标签:may chkconfig loaded 服务 amp lin mic alt verify
系统:CentOS7
Redis:5.0.5
获取最新版本redis:https://redis.io/download ,下载Stable版本,当前安装版本5.0.5
1、下载redis安装包(安装目录/usr/local/)
[root@iZbp12y6fwj9mup08bgko6Z ~]# cd /usr/local/
[root@iZbp12y6fwj9mup08bgko6Z local]# wget http://download.redis.io/releases/redis-5.0.5.tar.gz
2、解压redis-5.0.5.tar.gz
[root@iZbp12y6fwj9mup08bgko6Z local]# tar -xzf redis-5.0.5.tar.gz
3、进入解压的redis目录,通过make命令进行编译
[root@iZbp12y6fwj9mup08bgko6Z local]# cd redis-5.0.5
[root@iZbp12y6fwj9mup08bgko6Z redis-5.0.5]# make
4、执行make test验证编译是否成功(可能会报错,但是不要怕一步一步解决错误,直至成功)
[root@iZbp12y6fwj9mup08bgko6Z redis-5.0.5]# make test
cd src && make test
make[1]: Entering directory `/usr/local/redis-5.0.5/src‘
    CC Makefile.dep
make[1]: Leaving directory `/usr/local/redis-5.0.5/src‘
make[1]: Entering directory `/usr/local/redis-5.0.5/src‘
You need tcl 8.5 or newer in order to run the Redis test
make[1]: *** [test] Error 1
make[1]: Leaving directory `/usr/local/redis-5.0.5/src‘
make: *** [test] Error 2
###### 很不巧,我的编译错误了,根据错误提示是tcl的问题,所有我要安装一下tcl,你需要根据你的结果信息来处理
[root@iZbp12y6fwj9mup08bgko6Z redis-5.0.5]# yum install -y tcl
......

Install  1 Package

Total download size: 1.9 M
Installed size: 4.4 M
Downloading packages:
tcl-8.5.13-8.el7.x86_64.rpm                                                                                                                                             | 1.9 MB  00:00:00
Running transaction check
Running transaction test
Transaction test succeeded
Running transaction
  Installing : 1:tcl-8.5.13-8.el7.x86_64                                                                                                                                                   1/1
  Verifying  : 1:tcl-8.5.13-8.el7.x86_64                                                                                                                                                   1/1

Installed:
  tcl.x86_64 1:8.5.13-8.el7

Complete!
[root@iZbp12y6fwj9mup08bgko6Z redis-5.0.5]#
###### tcl安装完成后重新运行make test
[root@iZbp12y6fwj9mup08bgko6Z redis-5.0.5]# make test
......
!!! WARNING The following tests failed:

*** [err]: Active defrag big keys in tests/unit/memefficiency.tcl
Expected condition ‘$max_latency <= 120‘ to be true (258 <= 120)
Cleanup: may take some time... OK
make[1]: *** [test] Error 1
make[1]: Leaving directory `/usr/local/redis-5.0.5/src‘
make: *** [test] Error 2
######此错误是由于所测试的阿里云ECS服务器配置过低造成的延迟太大,可以忽略。
忽略警告,继续安装
6、运行make install命令,将命令安装到/usr/local/bin目录
[root@iZbp12y6fwj9mup08bgko6Z redis-5.0.5]# make install
cd src && make install
make[1]: Entering directory `/usr/local/redis-5.0.5/src‘

Hint: It‘s a good idea to run ‘make test‘ ;)

    INSTALL install
    INSTALL install
    INSTALL install
    INSTALL install
    INSTALL install
make[1]: Leaving directory `/usr/local/redis-5.0.5/src‘
[root@iZbp12y6fwj9mup08bgko6Z redis-5.0.5]#
7、启动服务器
[root@iZbp12y6fwj9mup08bgko6Z redis-5.0.5]# redis-server
8、另开一个命令窗口,进行测试,可以看到通过redis-cli命令连接redis之后,输入ping,redis会为我们返回PONG
[root@iZbp12y6fwj9mup08bgko6Z ~]# redis-cli
127.0.0.1:6379> ping
PONG
127.0.0.1:6379>
1、复制redis配置文件,将redis目录的redis.conf复制到/etc/redis目录下
root@iZbp12y6fwj9mup08bgko6Z ~]# find / -name redis.conf
/usr/local/redis-5.0.5/redis.conf
[root@iZbp12y6fwj9mup08bgko6Z ~]# mkdir /etc/redis
[root@iZbp12y6fwj9mup08bgko6Z ~]# cp /usr/local/redis-5.0.5/redis.conf /etc/redis/redis.conf
2、设置可以远程登录,编辑/etc/redis/redis.conf配置文件,注释掉bind 127.0.0.1,如下图:

3、修改默认端口6379,编辑/etc/redis/redis.conf配置文件,如下图:

同时修改pidfile,将其改为pidfile /var/run/redis_6379.pid,修改目的是为了文件名上的端口和实际端口保持一致,方便通过服务方式启动、停止,如后面设置开机启动

4、设置redis服务后台运行,编辑/etc/redis/redis.conf配置文件,将daemonize设置为yes,如下图

5、设置访问密码,编辑/etc/redis/redis.conf配置文件,去掉requirepass行的注释或添加一行,如下图

6、启动redis并指定配置文件为我们刚才修改的/etc/redis/redis.conf配置文件,服务启动后就不像前面那样输出redis图形信息的内容了。
[root@iZbp12y6fwj9mup08bgko6Z redis-5.0.5]# redis-server /etc/redis/redis.conf
21262:C 27 Jun 2020 17:21:47.055 # oO0OoO0OoO0Oo Redis is starting oO0OoO0OoO0Oo
21262:C 27 Jun 2020 17:21:47.055 # Redis version=5.0.5, bits=64, commit=00000000, modified=0, pid=21262, just started
21262:C 27 Jun 2020 17:21:47.055 # Configuration loaded
[root@iZbp12y6fwj9mup08bgko6Z redis-5.0.5]#
7、测试
[root@iZbp12y6fwj9mup08bgko6Z ~]# redis-cli
127.0.0.1:6379> ping
(error) NOAUTH Authentication required.
127.0.0.1:6379> auth 123456
OK
127.0.0.1:6379> ping
PONG
127.0.0.1:6379>
也可以通过-p指定端口访问
[root@iZbp12y6fwj9mup08bgko6Z ~]# redis-cli -p 6379
127.0.0.1:6379> ping
(error) NOAUTH Authentication required.
127.0.0.1:6379> auth 123456
OK
127.0.0.1:6379> ping
PONG
127.0.0.1:6379>
由于开启了远程访问,所以在其他电脑上也可以访问,通过-h指定ip,-p指定端口:
[iypocket@smac src] ./redis-cli -p 6380 -h 192.168.16.125
192.168.16.125:6379> ping
(error) NOAUTH Authentication required.
192.168.16.125:6379> auth 123456
OK
192.168.16.125:6379> ping
PONG
192.168.16.125:6379>
8、停止服务
1、复制开机启动脚本,在redis目录的utils包下,有一个redis_init_script文件,我们复制到/etc/init.d/目录下,并将文件名改为redis。
[root@iZbp12y6fwj9mup08bgko6Z redis-5.0.5]# find / -name redis_init_script
/usr/local/redis-5.0.5/utils/redis_init_script
[root@iZbp12y6fwj9mup08bgko6Z redis-5.0.5]# cp /usr/local/redis-5.0.5/utils/redis_init_script /etc/init.d/redis
2、(非必须)修改/etc/redis/redis.conf文件名为/etc/redis/6380.conf,此修改非必须,不修改的话可以在步骤3指定配置文件路径
[root@iZbp12y6fwj9mup08bgko6Z redis-5.0.5]# mv /etc/redis/redis.conf /etc/redis/6379.conf
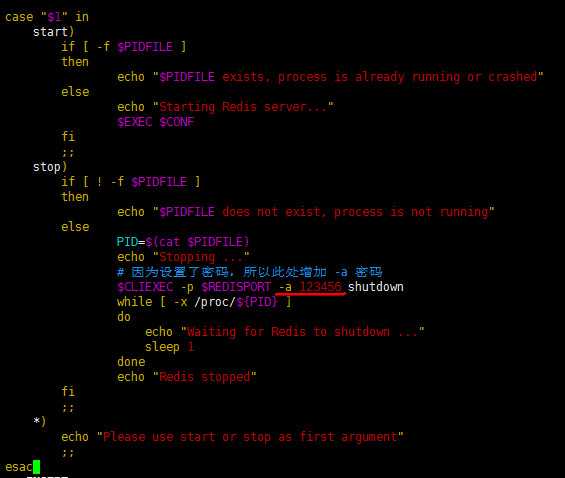
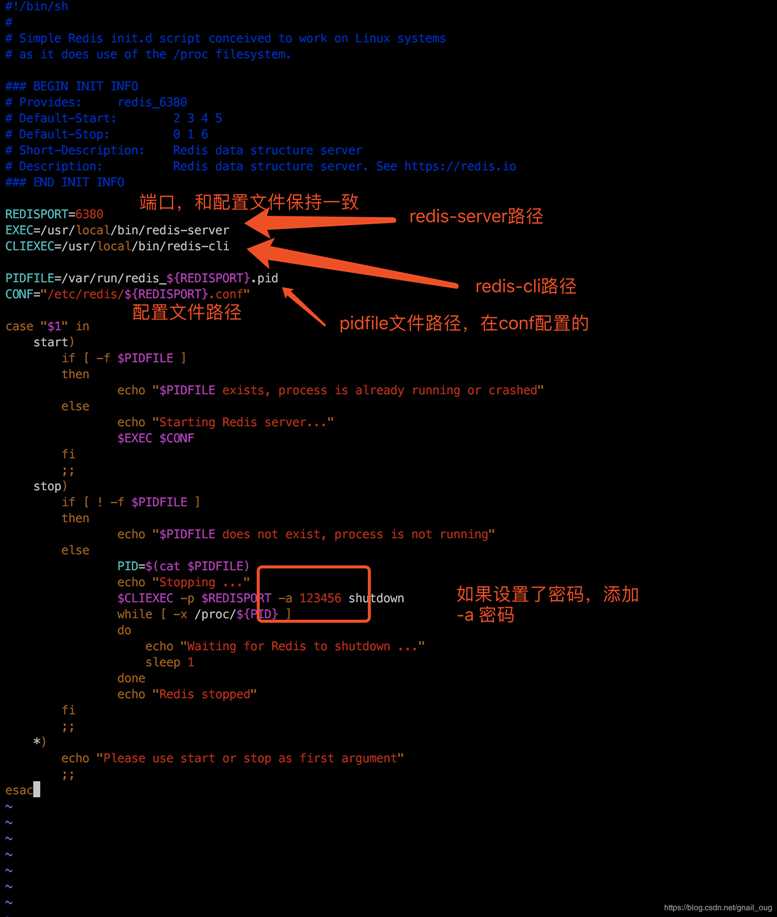
3、编辑/etc/init.d/redis启动脚本,脚本说明如下:
[root@iZbp12y6fwj9mup08bgko6Z redis-5.0.5]# vim /etc/init.d/redis


说明

4、测试启动脚本,启动服务systemctl start redis,停止服务systemctl stop redis
[root@iZbp12y6fwj9mup08bgko6Z redis-5.0.5]# systemctl start redis
[[root@iZbp12y6fwj9mup08bgko6Z redis-5.0.5]# systemctl stop redis
5、设置开机启动
[root@iZbp12y6fwj9mup08bgko6Z redis-5.0.5]# chkconfig --add redis
6、重启系统,redis服务即随系统启动。
[root@iZbp12y6fwj9mup08bgko6Z redis-5.0.5]# reboot
参考:https://blog.csdn.net/gnail_oug/article/details/94735879
标签:may chkconfig loaded 服务 amp lin mic alt verify
原文地址:https://www.cnblogs.com/clubs/p/13199240.html