标签:this style position div nts return group dell eid
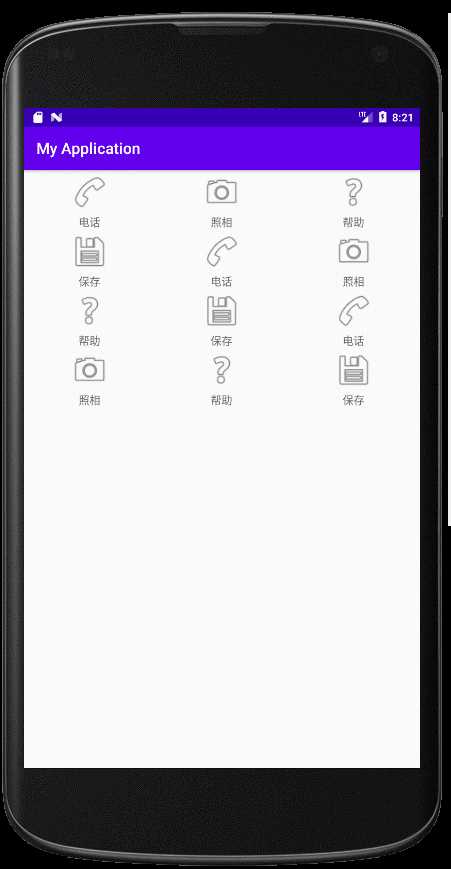
看看效果图吧

然后看代码吧,为了方便大家,所有资源文件都是用系统自带的,所以可以直接copy
build.gradle 文件添加
// 注意,对应得也必须是28 compileSdkVersion 28
implementation ‘com.android.support:recyclerview-v7:28.1.1‘
主布局文件
activity_main.xml
<?xml version="1.0" encoding="utf-8"?>
<LinearLayout xmlns:android="http://schemas.android.com/apk/res/android"
    xmlns:tools="http://schemas.android.com/tools"
    android:layout_width="match_parent"
    android:layout_height="match_parent"
    android:orientation="vertical"
    tools:context=".MainActivity">

    <androidx.recyclerview.widget.RecyclerView
        android:id="@+id/recycler_view"
        android:layout_width="match_parent"
        android:layout_height="match_parent"
        android:clickable="true" />


</LinearLayout>
item布局文件
<?xml version="1.0" encoding="utf-8"?>
<LinearLayout xmlns:android="http://schemas.android.com/apk/res/android"
    android:layout_width="match_parent"
    android:layout_height="wrap_content"
    android:orientation="vertical">

    <!-- 这个LinearLayout不能去除,有这个包围所有view,才能让RecyclerView点击效果包围整个view-->
    <LinearLayout
        android:gravity="center"
        android:layout_gravity="center"
        android:layout_width="wrap_content"
        android:layout_height="wrap_content"
        android:orientation="vertical">

        <ImageView
            android:id="@+id/image"
            android:layout_width="50dp"
            android:layout_height="57dp"
            android:src="@android:drawable/btn_star" />

        <TextView
            android:id="@+id/name"
            android:layout_width="50dp"
            android:layout_height="wrap_content"
            android:layout_gravity="center_vertical"
            android:gravity="center"
            android:text="@string/app_name" />
    </LinearLayout>

</LinearLayout>
主类MainActivity
package com.example.myapplication;

import androidx.appcompat.app.AppCompatActivity;
import androidx.recyclerview.widget.GridLayoutManager;
import androidx.recyclerview.widget.RecyclerView;

import android.os.Bundle;
import android.util.Log;
import android.view.View;
import android.widget.Toast;

import java.util.ArrayList;
import java.util.List;

public class MainActivity extends AppCompatActivity {


    private List<MenuModel> menuModelList = new ArrayList<>();
    RecyclerView recyclerView;

    @Override
    protected void onCreate(Bundle savedInstanceState) {
        super.onCreate(savedInstanceState);
        setContentView(R.layout.activity_main);
        recyclerView = findViewById(R.id.recycler_view);
        //给集合添加数据,一般都是从后台取数据
        for (int i = 0; i < 3; i++) {
            MenuModel ic_menu_call = new MenuModel("电话", android.R.drawable.ic_menu_call);
            menuModelList.add(ic_menu_call);
            MenuModel ic_menu_camera = new MenuModel("照相", android.R.drawable.ic_menu_camera);
            menuModelList.add(ic_menu_camera);
            MenuModel ic_menu_help = new MenuModel("帮助", android.R.drawable.ic_menu_help);
            menuModelList.add(ic_menu_help);
            MenuModel ic_menu_save = new MenuModel("保存", android.R.drawable.ic_menu_save);
            menuModelList.add(ic_menu_save);
        }
        //设置布局方式,可以用LinearLayout,RelativeLayout等,这里用GridLayoutManager,因为可以方便得配置一行显示多少个item,这里显示3个
        GridLayoutManager layoutManager = new GridLayoutManager(this, 3);
        recyclerView.setLayoutManager(layoutManager);
        MenuAdapter adapter = new MenuAdapter(menuModelList);
        recyclerView.setAdapter(adapter);

        //设置点击,这个需要自己写,官方没有直接提供方法
        adapter.setOnRecyclerViewItemClickListener(new OnRecyclerViewItemClickListener() {
            @Override
            public void onItemClick(View view, int position) {
                showMsg(position);
            }
        });
    }

    public void showMsg(int position){
        Toast.makeText(this,"点击了"+menuModelList.get(position).getName(),Toast.LENGTH_SHORT).show();
    }
}
对象类MenuModel
package com.example.myapplication;

public class MenuModel {

    private String name;
    private int imageId;

    public MenuModel(String name, int imageId){
        this.name = name;
        this.imageId = imageId;

    }

    public String getName() {
        return name;
    }

    public int getImageId() {
        return imageId;
    }
}
适配器类MenuAdapter,最核心就这个类了
package com.example.myapplication;


import android.util.TypedValue;
import android.view.LayoutInflater;
import android.view.View;
import android.view.ViewGroup;
import android.widget.ImageView;
import android.widget.TextView;

import androidx.recyclerview.widget.RecyclerView;

import java.util.List;

public class MenuAdapter extends RecyclerView.Adapter<MenuAdapter.ViewHolder>  implements View.OnClickListener{


    //声明接口,用于点击item
    private OnRecyclerViewItemClickListener onRecyclerViewItemClickListener;

    private  List<MenuModel> mMenuModelList;

    @Override
    public void onClick(View view) {

    }

    static class ViewHolder extends RecyclerView.ViewHolder{
        ImageView mImage;
        TextView mName;

        public ViewHolder (View view)
        {
            super(view);
            mImage =  view.findViewById(R.id.image);
            mName =  view.findViewById(R.id.name);
        }

    }

    public void setOnRecyclerViewItemClickListener(OnRecyclerViewItemClickListener onRecyclerViewItemClickListener){
        this.onRecyclerViewItemClickListener = onRecyclerViewItemClickListener;
    }


    public MenuAdapter(List <MenuModel> menuModelList){
        mMenuModelList = menuModelList;
    }

    @Override

    public ViewHolder onCreateViewHolder(ViewGroup parent, int viewType){
        View view = LayoutInflater.from(parent.getContext()).inflate(R.layout.item,parent,false);
        view.setOnClickListener(this);

        //这三行代码实现点击有水波纹效果
        TypedValue typedValue = new TypedValue();
        parent.getContext().getTheme().resolveAttribute(R.attr.selectableItemBackground, typedValue, true);
        view.setBackgroundResource(typedValue.resourceId);

        ViewHolder holder = new ViewHolder(view);
        return holder;
    }

    @Override
    public void onBindViewHolder(ViewHolder holder, final int position){

        MenuModel menuModel = mMenuModelList.get(position);
        holder.mImage.setImageResource(menuModel.getImageId());
        holder.mName.setText(menuModel.getName());

        //实现点击事件
        holder.itemView.setOnClickListener(new View.OnClickListener() {
            @Override
            public void onClick(View view) {
                if (onRecyclerViewItemClickListener !=null){
                    onRecyclerViewItemClickListener.onItemClick(view,position);
                }
            }
        });
    }

    @Override
    public int getItemCount(){
        return mMenuModelList.size();
    }
}
点击事件接口OnRecyclerViewItemClickListener,因为官方没有提供点击事件,所以需要自己实现
package com.example.myapplication;

import android.view.View;

public interface OnRecyclerViewItemClickListener {
    void onItemClick(View view, int position);
}
这样就OK了。
标签:this style position div nts return group dell eid
原文地址:https://www.cnblogs.com/linfenghp/p/13279947.html