标签:emctl att ram ip地址 move 备份 des ima tip
sersync是基于inotify和srync的二次开发,代码托管在github上面在rsync的客户端上安装,下载地址:
单点故障:没有做集群的机器,挂了一台全部的数据都丢失了。
GNU-Linux-x86的目录,里面包含了xml格式的配置文件和启动文件
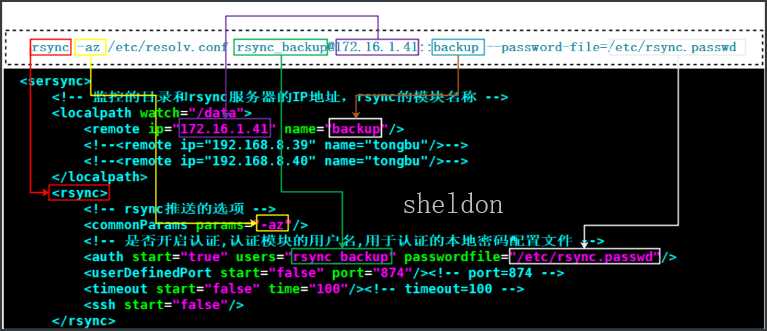
在配置文件confxml.xml中

编辑推送的认证、目录信息,只需要更改监控的事件(inotify标签)和推送到的目的认证(sersync标签)两个地方即可。图中标明了直接使用命令和使用sersync的对应地方。

需求:web01和web02使用nfs服务器的共享存储,从wen01上传的图片使用web02也可以访问;nfs通过sersync实时把数据同步到backup备份服务器当中.。
环境:
| 主机名 | wan | lan | 角色 |
|---|---|---|---|
| web01 | 10.0.0.7 | 172.16.1.7 | nfs客户端 |
| web02 | 10.0.0.8 | 172.16.1.8 | nfs客户端 |
| nfs | 10.0.0.31 | 172.16.1.31 | nfs服务端,rsync客户端,sersync |
| backup | 10.0.0.41 | 172.16.1.41 | rsync服务端 |
# 1、安装rsync服务
[root@backup ~]# yum -y install rsync

# 2、修改配置文件
[root@backup ~]# vi /etc/rsyncd.conf
uid = www
gid = www
port = 873
fake super = yes
use chroot = no
max connections = 200
timeout = 600
ignore errors
read only = false
list = false
auth users = rsync_backup
secrets file = /etc/rsync.passwd
log file = /var/log/rsyncd.log
#####################################
[backup]
comment = welcome to oldboyedu backup!
path = /backup

# 3、创建www用户
[root@backup ~]# groupadd www -g 666
[root@backup ~]# useradd www -u666 -g666 -s /sbin/nologin -M

# 4、创建密码文件
[root@backup ~]# echo ‘rsync_backup:123‘ >/etc/rsync.passwd
[root@backup ~]# chmod 600 /etc/rsync.passwd

# 5、创建上传目录
[root@backup ~]# mkdir /backup
[root@backup ~]# chown www.www /backup/

# 6、启动服务
[root@backup /backup]# systemctl start rsyncd
[root@backup /backup]# systemctl enable rsyncd
# 1、安装nfs服务
[root@nfs01 ~]# yum -y install nfs-utils

# 2、修改配置文件
[root@nfs01 ~]# vi /etc/exports
/data 172.16.1.0/24(rw,sync,all_squash,anonuid=666,anongid=666)

# 3、创建uid个gid为666的用户
[root@nfs01 ~]# groupadd www -g666
[root@nfs01 ~]# useradd www -u666 -g666 -s /sbin/nologin -M

# 4、创建/data目录
[root@nfs01 ~]# mkdir /data
[root@nfs01 ~]# chown www.www /data/

# 5、启动服务
[root@nfs01 ~]# systemctl start rpcbind nfs-server
[root@nfs01 ~]# systemctl enable rpcbind nfs-server

# 6、客户端安装nfs
[root@web01 ~]# yum -y install nfs-utils
[root@web02 ~]# yum -y install nfs-utils
# 1、安装apache php
[root@web02 ~]# yum -y install httpd php
[root@web01 ~]# yum -y install httpd php

# 2、更改管理apache的配置文件
[root@web02 ~]# vi /etc/httpd/conf/httpd.conf
User www
Group www

[root@web01 ~]# vi /etc/httpd/conf/httpd.conf
User www
Group www

# 3、添加管理httpd服务的用户
[root@web02 ~]# groupadd -g666 www
[root@web02 ~]# useradd www -u666 -g666 -s /sbin/nologin -M

[root@web01 ~]# groupadd -g666 www
[root@web01 ~]# useradd www -u666 -g666 -s /sbin/nologin -M

# 4、更改网站目录
[root@web02 /var/www/html]# unzip kaoshi.zip
[root@web01 /var/www/html]# unzip kaoshi.zip

# 5、修改配置文件上传目录
[root@web02 /var/www/html]# vi upload_file.php
$wen="upload";

[root@web01 /var/www/html]# vi upload_file.php
$wen="upload";

# 6、更改目录权限
[root@web02 /var/www/html]# chown -R www.www /var/www/html/
[root@web01 /var/www/html]# chown -R www.www /var/www/html/

# 7、启动服务
[root@web01 /var/www/html]# systemctl start httpd
[root@web01 /var/www/html]# systemctl enable httpd

# 8、创建上传目录,上传的文件之后也会自动创建
[root@web02 /var/www/html]# mkdir upload
[root@web02 /var/www/html]# chown www.www upload

[root@web01 /var/www/html]# mkdir upload
[root@web01 /var/www/html]# chown www.www upload

# 9、挂载nfs共享目录
[root@web01 /var/www/html]# mount -t nfs 172.16.1.31:/data /var/www/html/upload
[root@web02 /var/www/html]# mount -t nfs 172.16.1.31:/data /var/www/html/upload
把backup和nfs上的内容进行实时同步
先安装 rsync和 inotify
yum -y install rsync inotify-tools

# 1、下载sersync
[root@nfs01 ~]# wget https://raw.githubusercontent.com/wsgzao/sersync/master/sersync2.5.4_64bit_binary_stable_final.tar.gz

# 2、解压安装
[root@nfs01 ~]# tar -xf sersync2.5.4_64bit_binary_stable_final.tar.gz

# 3、解压并改名
[root@nfs01 ~]# mv GNU-Linux-x86/  /usr/local/sersync

# 4、修改配置文件
[root@nfs01 ~]# vi /usr/local/sersync/confxml.xml
<?xml version="1.0" encoding="ISO-8859-1"?>
<head version="2.5">
    <host hostip="localhost" port="8008"></host>
    <debug start="false"/>
    <fileSystem xfs="false"/>
    <filter start="false">
	<exclude expression="(.*)\.svn"></exclude>
	<exclude expression="(.*)\.gz"></exclude>
	<exclude expression="^info/*"></exclude>
	<exclude expression="^static/*"></exclude>
    </filter>
    <inotify>
	<!-- inotify监控的事件,true为监控,false为不监控 -->
	<delete start="true"/>
	<createFolder start="true"/>
	<createFile start="true"/>
	<closeWrite start="true"/>
	<moveFrom start="true"/>
	<moveTo start="true"/>
	<attrib start="true"/>
	<modify start="true"/>
    </inotify>

    <sersync>
	<!-- 监控的目录和rsync服务器的IP地址,rsync的模块名称 -->
	<localpath watch="/data">
	    <remote ip="172.16.1.41" name="backup"/>
	    <!--<remote ip="192.168.8.39" name="tongbu"/>-->
	    <!--<remote ip="192.168.8.40" name="tongbu"/>-->
	</localpath>
	<rsync>
	    <!--rsync推送的选项-->
	    <commonParams params="-az"/>
	    <!--是否开启认证,认证模块的用户名,用于认证的本地密码配置文件-->
	    <auth start="true" users="rsync_backup" passwordfile="/etc/rsync.passwd"/>
	    <userDefinedPort start="false" port="874"/><!-- port=874 -->
	    <timeout start="false" time="100"/><!-- timeout=100 -->
	    <ssh start="false"/>
	</rsync>
	<failLog path="/tmp/rsync_fail_log.sh" timeToExecute="60"/><!--default every 60mins execute once-->
	<crontab start="false" schedule="600"><!--600mins-->
	    <crontabfilter start="false">
		<exclude expression="*.php"></exclude>
		<exclude expression="info/*"></exclude>
	    </crontabfilter>
	</crontab>
	<plugin start="false" name="command"/>
    </sersync>

    <plugin name="command">
	<param prefix="/bin/sh" suffix="" ignoreError="true"/>	<!--prefix /opt/tongbu/mmm.sh suffix-->
	<filter start="false">
	    <include expression="(.*)\.php"/>
	    <include expression="(.*)\.sh"/>
	</filter>
    </plugin>

    <plugin name="socket">
	<localpath watch="/opt/tongbu">
	    <deshost ip="192.168.138.20" port="8009"/>
	</localpath>
    </plugin>
    <plugin name="refreshCDN">
	<localpath watch="/data0/htdocs/cms.xoyo.com/site/">
	    <cdninfo domainname="ccms.chinacache.com" port="80" username="xxxx" passwd="xxxx"/>
	    <sendurl base="http://pic.xoyo.com/cms"/>
	    <regexurl regex="false" match="cms.xoyo.com/site([/a-zA-Z0-9]*).xoyo.com/images"/>
	</localpath>
    </plugin>
</head>
# 5、添加密码认证文件
[root@nfs01 ~]# echo ‘123‘ >/etc/rsync.passwd
[root@nfs01 ~]# chmod 600 /etc/rsync.passwd

# 6、启动
[root@nfs01 ~]# /usr/local/sersync/sersync2 -rdo /usr/local/sersync/confxml.xml
标签:emctl att ram ip地址 move 备份 des ima tip
原文地址:https://www.cnblogs.com/gshelldon/p/13287840.html