标签:setup err val 恢复 添加 ready 传递 toc rom
前面有对xpc进行一些学习了解,这篇主要是记录下xpc的创建以及使用过程。
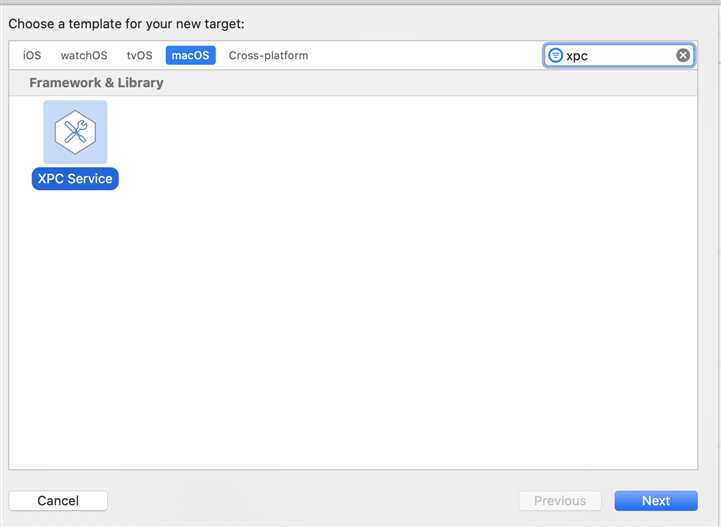
新建project-->targets,左下角点?搜索xpc,点击next添加即可,设定xpc bundle 名称,后面需要bind 连接。
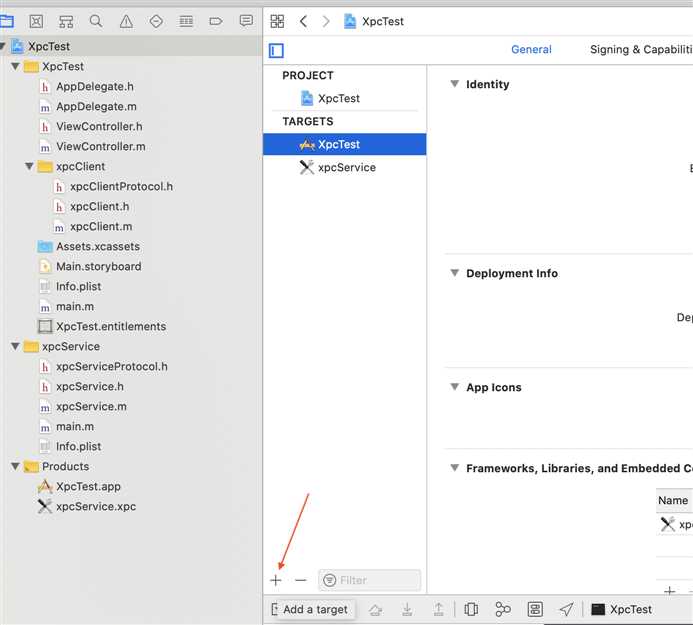
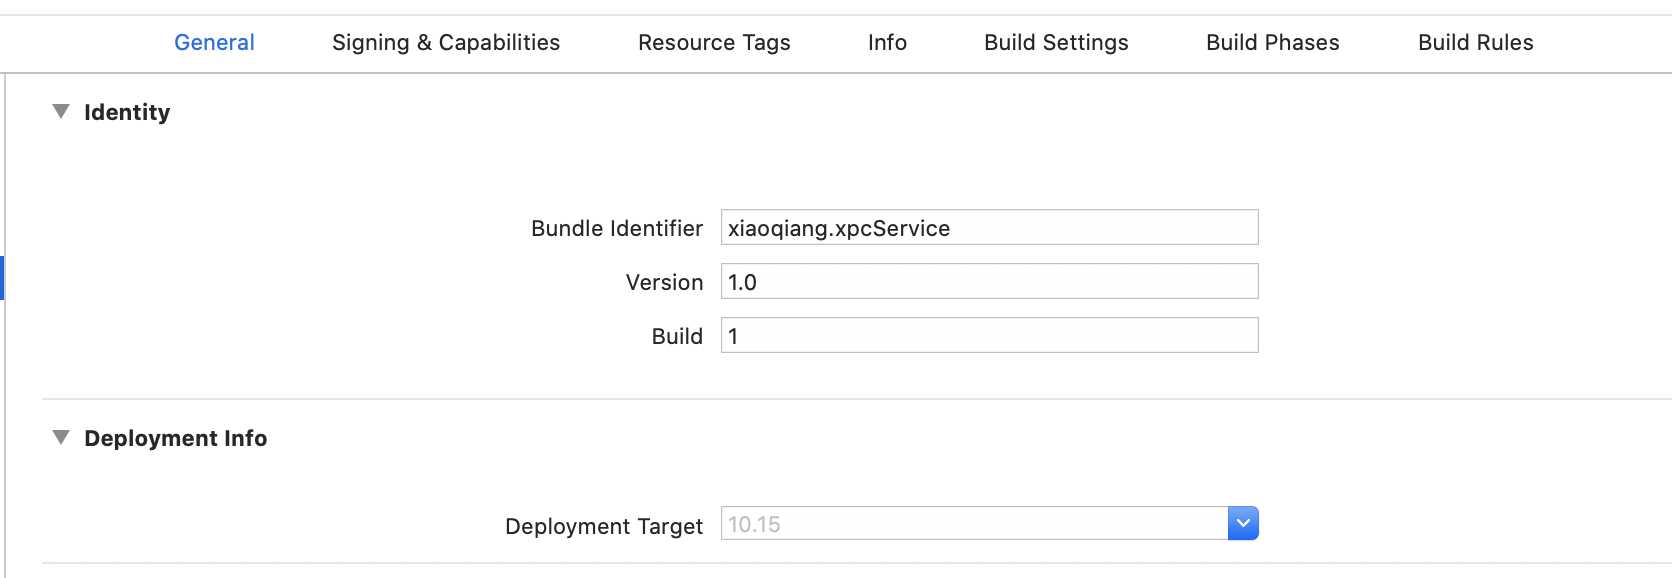
添加完xpc之后,项目内会出现xpc service的source 包,这里用来实现你的xpc功能需求,我这边新增了一个client 应来处理sevice的响应,代码如下:
Sevice端:
main.m
#import <Foundation/Foundation.h>
#import "xpcService.h"
#import "xpcClient.h"

@interface ServiceDelegate : NSObject <NSXPCListenerDelegate>
@end

@implementation ServiceDelegate

- (BOOL)listener:(NSXPCListener *)listener shouldAcceptNewConnection:(NSXPCConnection *)newConnection {
    // This method is where the NSXPCListener configures, accepts, and resumes a new incoming NSXPCConnection.

    // Configure the connection.
    // First, set the interface that the exported object implements.
    //设置service端接收消息的配置
    newConnection.exportedInterface = [NSXPCInterface interfaceWithProtocol:@protocol(xpcServiceProtocol)];

    // Next, set the object that the connection exports. All messages sent on the connection to this service will be sent to the exported object to handle. The connection retains the exported object.
    xpcService *exportedObject = [xpcService new];
    newConnection.exportedObject = exportedObject;


    newConnection.remoteObjectInterface = [NSXPCInterface interfaceWithProtocol:@protocol(xpcClientProtocol)];
    exportedObject.xpcConnect = newConnection;
    // Resuming the connection allows the system to deliver more incoming messages.
    [newConnection resume];


    // Returning YES from this method tells the system that you have accepted this connection. If you want to reject the connection for some reason, call -invalidate on the connection and return NO.
    return YES;
}


@end

int main(int argc, const char *argv[])
{
    // Create the delegate for the service.
    ServiceDelegate *delegate = [ServiceDelegate new];

    // Set up the one NSXPCListener for this service. It will handle all incoming connections.
    NSXPCListener *listener = [NSXPCListener serviceListener];
    listener.delegate = delegate;

    // Resuming the serviceListener starts this service. This method does not return.
    [listener resume];
    return 0;
}
xpcServiceProtocol.h
#import <Foundation/Foundation.h>

// The protocol that this service will vend as its API. This header file will also need to be visible to the process hosting the service.
@protocol xpcServiceProtocol

// Replace the API of this protocol with an API appropriate to the service you are vending.
- (void)upperCaseString:(NSString *)aString withReply:(void (^)(NSString *))reply;

- (void)sendToClient:(NSString *)info withReply:(void (^)(NSString *))reply;

@end
xpcService.h
#import <Foundation/Foundation.h>
#import "xpcServiceProtocol.h"
#import "xpcClient.h"
// This object implements the protocol which we have defined. It provides the actual behavior for the service. It is ‘exported‘ by the service to make it available to the process hosting the service over an NSXPCConnection.
@interface xpcService : NSObject <xpcServiceProtocol>
@property(nonatomic,strong) id<xpcClientProtocol> service;

@property NSXPCConnection *xpcConnect;

@end
xpcService.m
#import "xpcService.h"

@implementation xpcService

// This implements the example protocol. Replace the body of this class with the implementation of this service‘s protocol.
- (void)upperCaseString:(NSString *)aString withReply:(void (^)(NSString *))reply {
    NSString *response = [aString uppercaseString];
    reply(response);
}

- (void)sendToClient:(NSString *)info withReply:(void (^)(NSString *))reply {
    reply(@"[Server]:");
    [[_xpcConnect remoteObjectProxy] getMsgFromService:@"this is ping test from server"];
}


@end
Client端:
xpcClientProtocol.h
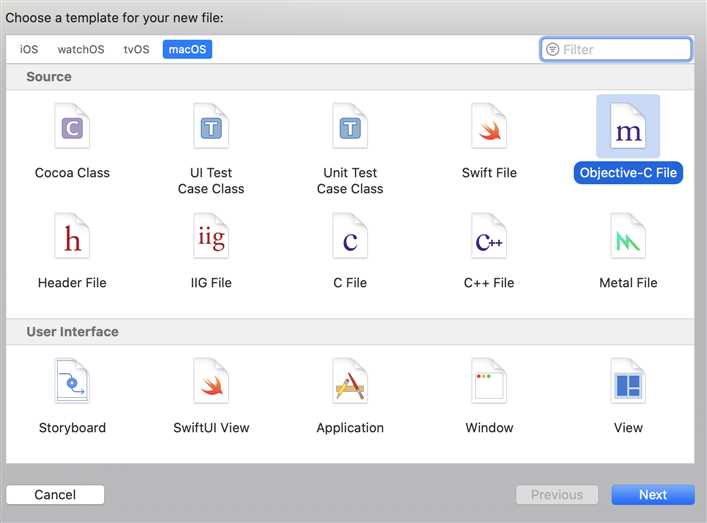
-->协议的创建,点击项目里面,command+n或者右键新增,选择objectivec-c file,选择类型为protocol
#import <Foundation/Foundation.h>

NS_ASSUME_NONNULL_BEGIN

@protocol xpcClientProtocol <NSObject>

- (void)getMsgFromService:(NSString *)message;

@end

NS_ASSUME_NONNULL_END
xpcClient.h
#import <Foundation/Foundation.h>
#import "xpcClientProtocol.h"
#import "xpcServiceProtocol.h"


NS_ASSUME_NONNULL_BEGIN

@interface xpcClient : NSObject<xpcClientProtocol>
@property NSXPCConnection *connectionToService;
@property (nonatomic,strong) id<xpcServiceProtocol> service;


@end

NS_ASSUME_NONNULL_END
xpcClient.m
#import "xpcClient.h"

@implementation xpcClient

- (instancetype)init
{
    self = [super init];
    if (self) {
        [self createConnect];
    }
    return self;
}

-(void)createConnect{
       _connectionToService = [[NSXPCConnection alloc] initWithServiceName:@"xiaoqiang.xpcService"];
       _connectionToService.remoteObjectInterface = [NSXPCInterface interfaceWithProtocol:@protocol(xpcServiceProtocol)];
       _connectionToService.exportedObject = self;
       _connectionToService.exportedInterface = [NSXPCInterface interfaceWithProtocol:@protocol(xpcClientProtocol)];
       _service = [self.connectionToService remoteObjectProxyWithErrorHandler:^(NSError * _Nonnull error) {
             //这里面是错误处理的代码
         }];

    //可以通过remoteObjectProxy获得protocol
    [[_connectionToService remoteObjectProxy] upperCaseString:@"hello ,xiaoqiang" withReply:^(NSString* reply){
        NSLog(@"result from server: %@", reply);
    }];

    [_connectionToService resume];

}
- (void)getMsgFromService:(nonnull NSString *)message {
     NSLog(@"server Reply:%@",message);
}


@end
ViewController.m
#import "ViewController.h"
#import "xpcClient.h"

@implementation ViewController

- (void)viewDidLoad {
    [super viewDidLoad];
    xpcClient *xpc = [[xpcClient alloc]init];
    [xpc.service upperCaseString:@"hello,world" withReply:^(NSString * reply){
        NSLog(@"result :%@",reply);
    }];
    [xpc.service sendToClient:@"Receive:" withReply:^(NSString *reply){
        NSLog(@"----->%@",reply);

    }];
    // Do any additional setup after loading the view.
}


- (void)setRepresentedObject:(id)representedObject {
    [super setRepresentedObject:representedObject];

    // Update the view, if already loaded.
}
最后编译执行,你就会看到sevice 呼叫,client接收的信息。
2020-07-21 14:29:45.373534+0800 XpcTest[10121:122917] result from server: HELLO ,XIAOQIANG
2020-07-21 14:29:45.373713+0800 XpcTest[10121:122917] result :HELLO,WORLD
2020-07-21 14:29:45.373856+0800 XpcTest[10121:122917] ----->[Server]:
2020-07-21 14:29:45.373930+0800 XpcTest[10121:122917] server Reply:this is ping test from server
前面如果看的不是很明白的话,在来解释下xpc的应用过程
前面用到了2种方法来调用远端方法
1.xpcServiceProtocol 属性
@property (nonatomic,strong) id<xpcServiceProtocol> service;
-->
xpcClient *xpc = [[xpcClient alloc]init];
[xpc.service upperCaseString:@"hello,world" withReply:^(NSString * reply){
    NSLog(@"result :%@",reply);
}];
2.NSXPCConnection 属性remoteObjectProxy调用远端方法
@property NSXPCConnection *connectionToService;
-->
[[_connectionToService remoteObjectProxy] upperCaseString:@"hello ,xiaoqiang" withReply:^(NSString* reply){
      NSLog(@"result from server: %@", reply);
  }];
根据这张图,来解析一下client和main.m所做的事情:
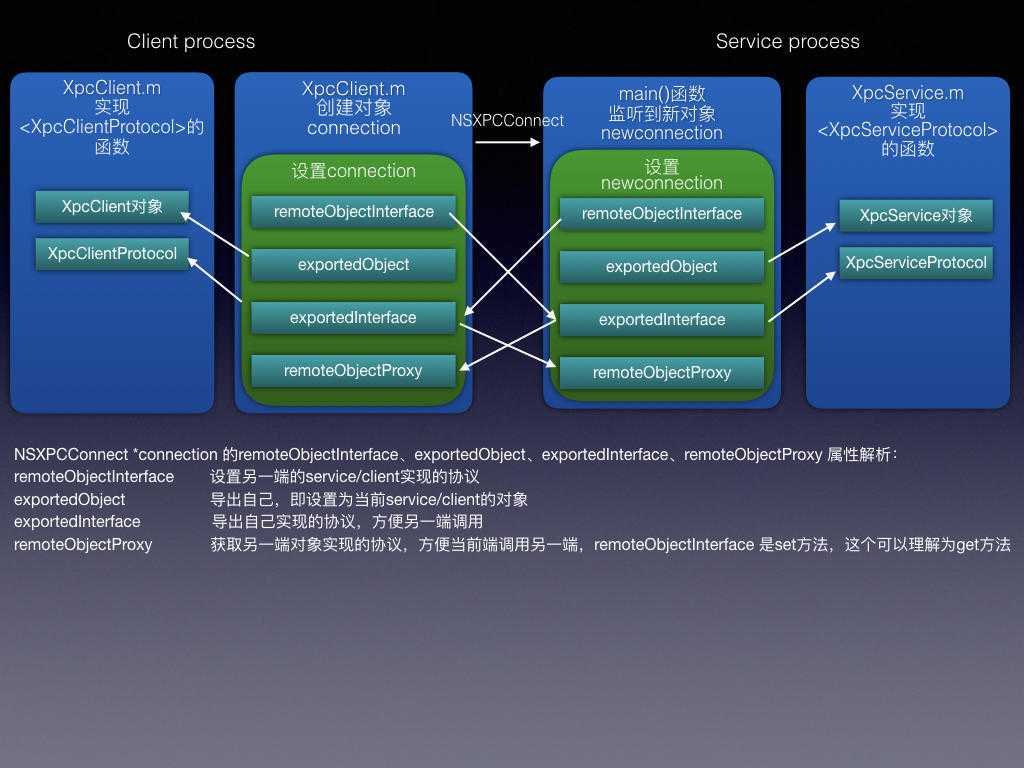
过程:
Service端:
1.首先,设置导出对象实现的接口,也就是service协议
-->newConnection.exportedInterface = [NSXPCInterface interfaceWithProtocol:@protocol(xpcServiceProtocol)];

2.接下来,设置连接导出的对象。在与此服务的连接上发送的所有消息都将发送到导出的对象进行处理(xpcService)。连接保留导出的对象。
 --> xpcService *exportedObject = [xpcService new];
    newConnection.exportedObject = exportedObject;
    newConnection.remoteObjectInterface = [NSXPCInterface interfaceWithProtocol:@protocol(xpcClientProtocol)];
    exportedObject.xpcConnect = newConnection;

3.恢复连接允许系统传递更多的传入消息。
 -->[newConnection resume];

Client端:
@property NSXPCConnection *connectionToService;
1.设定当前xpc服务名称,并设定远端service接口,也就是sevice协议。
_connectionToService = [[NSXPCConnection alloc] initWithServiceName:@"xiaoqiang.xpcService"];

_connectionToService.remoteObjectInterface = [NSXPCInterface interfaceWithProtocol:@protocol(xpcServiceProtocol)];

2.将自己设置为导出对象,目的是为了在当前同一xpcConnection属性下供对方获得接口内容(这里的client有定义一个协议方法,暴露给remote sevice)。
_connectionToService.exportedObject = self;
_connectionToService.exportedInterface = [NSXPCInterface interfaceWithProtocol:@protocol(xpcClientProtocol)];

3.这一步很重要,通过remoteObjectProxyWithErrorHandler返回一个代理对象,如果连接发生错误,它将调用错误处理块。如果发送给代理的消息具有reply处理程序,则错误处理程序或reply处理程序将仅被调用一次.
_service = [self.connectionToService remoteObjectProxyWithErrorHandler:^(NSError * _Nonnull error) {
             //错误处理的代码
 }];

4.通过remoteObjectProxy获得protocol方法实现,最后resume整个xpc 连接.
[[_connectionToService remoteObjectProxy] upperCaseString:@"hello ,xiaoqiang" withReply:^(NSString* reply){
    NSLog(@"result from server: %@", reply);
}];

[_connectionToService resume];
标签:setup err val 恢复 添加 ready 传递 toc rom
原文地址:https://www.cnblogs.com/xiaoqiangink/p/13355210.html