标签:city 做了 android mamicode inf asi runner its nec
下文 #1,#2 摘自 https://www.jianshu.com/p/3c5d7f09dfbd 还做了部分修改,想看原文点链接
使用方法很简单:
ThreadLocal<T> local = new ThreadLocal<T>();
local.set(...);
local.get();
ThreadLocal 而是一个线程内部的存储类,可以在指定线程内存储数据,数据存储以后,只有指定线程可以得到存储数据,官方解释如下。
This class provides thread-local variables. These variables differ from their normal counterparts in that each thread that accesses one (via its {@code get} or {@code set} method) has its own, independently initialized copy of the variable. {@code ThreadLocal} instances are typically private static fields in classes that wish to associate state with a thread (e.g., a user ID or Transaction ID).
大致意思就是 ThreadLocal 提供了线程内存储变量的能力,这些变量不同之处在于每一个线程读取的变量是对应的互相独立的。通过 get 和 set 方法就可以得到当前线程对应的值。
做个不恰当的比喻,从表面上看 Thread 相当于维护了一个 Map,key 就是当前的 ThreadLocal,value 就是需要存储的对象。
这里的这个比喻是不恰当的,实际上是 ThreadLocal 的静态内部类 ThreadLocalMap 为每个 Thread 都维护了一个 table[],ThreadLocal 确定了一个数组下标,而这个下标就是 value 存储的对应位置。
public class ThreadLocal<T> {

    public ThreadLocal() {}

    protected T initialValue() {
        return null;
    }

    public T get() {
        Thread t = Thread.currentThread();
        ThreadLocalMap map = getMap(t);
        if (map != null) {
            ThreadLocalMap.Entry e = map.getEntry(this);
        if (e != null) {
            @SuppressWarnings("unchecked")
            T result = (T)e.value;
            return result;
        }
    }
        return setInitialValue();
    }

    // 设置并获取初始化值
    private T setInitialValue() {
        T value = initialValue();
        Thread t = Thread.currentThread();
        ThreadLocalMap map = getMap(t);
        if (map != null)
            map.set(this, value);
        else
            createMap(t, value);
        return value;
    }

    public void set(T value) {
        Thread t = Thread.currentThread();
        ThreadLocalMap map = getMap(t);
        if (map != null)
            map.set(this, value);
        else
            createMap(t, value);
    }

    public void remove() {
        ThreadLocalMap m = getMap(Thread.currentThread());
        if (m != null)
            m.remove(this);
    }

    // 每一个 Thread 都会实例化 ThreadLocalMap 并赋值给成员变量 threadLocals
    void createMap(Thread t, T firstValue) {
        t.threadLocals = new ThreadLocalMap(this, firstValue);
    }

    ThreadLocalMap getMap(Thread t) {
        return t.threadLocals;
    }
}
public class Thread implements Runnable {
    // 每个线程持有一个 ThreadLocalMap 对象
    ThreadLocal.ThreadLocalMap threadLocals = null;
}
// Entry 为 ThreadLocalMap 静态内部类,对 ThreadLocal 的若引用
// 同时让 ThreadLocal 和 value 形成 key-value 的关系
static class Entry extends WeakReference<ThreadLocal<?>> {
    /** The value associated with this ThreadLocal. */
    Object value;

    Entry(ThreadLocal<?> k, Object v) {
        super(k);
        value = v;
    }
}

// ThreadLocalMap 构造器
ThreadLocalMap(ThreadLocal<?> firstKey, Object firstValue) {
    // 内部成员数组,INITIAL_CAPACITY 值为 16 的常量
    table = new Entry[INITIAL_CAPACITY];
    // 位运算,结果与取模相同,计算出需要存放的位置
    int i = firstKey.threadLocalHashCode & (INITIAL_CAPACITY - 1);
    table[i] = new Entry(firstKey, firstValue);
    size = 1;
    setThreshold(INITIAL_CAPACITY);
}
通过上面的代码不难看出在实例化 ThreadLocalMap 时创建了一个长度为 16 的 Entry[]。通过 hashCode 与 length 位运算确定出一个索引值 i,这个i就是被存储在 table 中的位置。
前面讲过每个线程Thread持有一个 ThreadLocalMap 类型的实例 threadLocals,结合此处的构造方法可以理解成每个线程 Thread 都持有一个 Entry 型的数组 table,而一切的读取过程都是通过操作这个数组table完成的。
显然 table 是 set 和 get 的焦点,在看具体的 set 和 get 方法前,先看下面这段代码。
// 在某一线程声明了 ABC 三种类型的 ThreadLocal
ThreadLocal<A> sThreadLocalA = new ThreadLocal<A>();
ThreadLocal<B> sThreadLocalB = new ThreadLocal<B>();
ThreadLocal<C> sThreadLocalC = new ThreadLocal<C>();
由前面我们知道对于一个 Thread 来说只有持有一个 ThreadLocalMap,所以 A B C 对应同一个 ThreadLocalMap 对象。为了管理 A B C,于是将他们存储在一个数组的不同位置,而这个数组就是上面提到的 Entry 型的数组 table。
那么问题来了,ABC在table中的位置是如何确定的?为了能正常够正常的访问对应的值,肯定存在一种方法计算出确定的索引。如下 ThreadLocalMap 中 set 方法
private void set(ThreadLocal<?> key, Object value) {

    // We don‘t use a fast path as with get() because it is at
    // least as common to use set() to create new entries as
    // it is to replace existing ones, in which case, a fast
    // path would fail more often than not.

    Entry[] tab = table;
    int len = tab.length;
    //获取索引值,这个地方是比较特别的地方
    int i = key.threadLocalHashCode & (len-1);

    //遍历 tab 如果已经存在则更新值
    for (Entry e = tab[i]; e != null; e = tab[i = nextIndex(i, len)]) {
        ThreadLocal<?> k = e.get();

        if (k == key) {
            e.value = value;
            return;
        }

        if (k == null) {
            replaceStaleEntry(key, value, i);
            return;
        }
    }

    // 如果上面没有遍历成功则创建新值
    tab[i] = new Entry(key, value);
    int sz = ++size;

    //满足条件数组扩容x2
    if (!cleanSomeSlots(i, sz) && sz >= threshold)
        rehash();
}
在 ThreadLocalMap 中的 set 方法与构造方法能看到以下代码片段。
int i = key.threadLocalHashCode & (len-1);
int i = firstKey.threadLocalHashCode & (INITIAL_CAPACITY - 1);
简而言之就是将 threadLocalHashCode 进行一个位运算(取模)得到索引i,threadLocalHashCode 代码如下。
private final int threadLocalHashCode = nextHashCode();

// The next hash code to be given out. Updated atomically. Starts at zero.
private static AtomicInteger nextHashCode = new AtomicInteger();

/**
 * The difference between successively generated hash codes - turns
 * implicit sequential thread-local IDs into near-optimally spread
 * multiplicative hash values for power-of-two-sized tables.
 */
private static final int HASH_INCREMENT = 0x61c88647;

// Returns the next hash code.
private static int nextHashCode() {
    return nextHashCode.getAndAdd(HASH_INCREMENT); // 自增
}
因为 static 的原因,在每次 new ThreadLocal 时因为 threadLocalHashCode 的初始化,会使 threadLocalHashCode 值自增一次,增量为 0x61c88647。
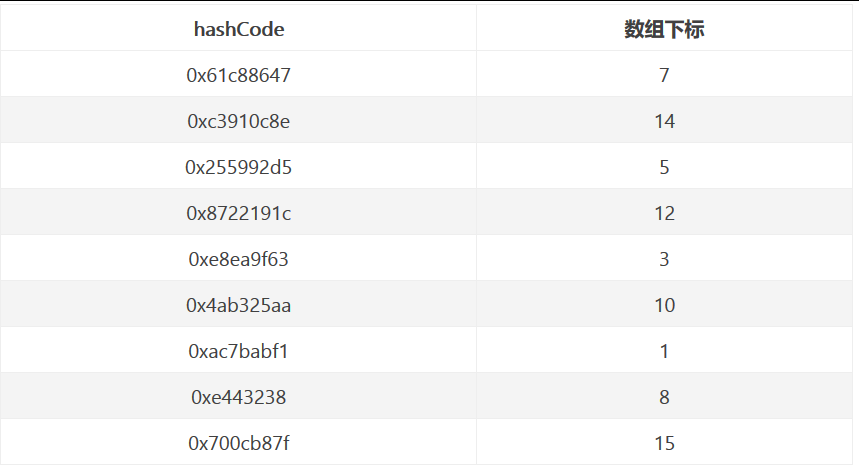
0x61c88647 是斐波那契散列乘数,它的优点是通过它散列(hash) 出来的结果分布会比较均匀,可以很大程度上避免hash冲突,已初始容量 16 为例,hash 并与 15 位运算计算数组下标结果如下:

总结如下:
// ThreadLocal 中 get 方法
public T get() {
    Thread t = Thread.currentThread();
    ThreadLocalMap map = getMap(t);
    if (map != null) {
        ThreadLocalMap.Entry e = map.getEntry(this);
        if (e != null) {
            @SuppressWarnings("unchecked")
            T result = (T)e.value;
            return result;
        }
    }
    return setInitialValue();
}

// ThreadLocalMap 中 getEntry 方法
private Entry getEntry(ThreadLocal<?> key) {
    int i = key.threadLocalHashCode & (table.length - 1);
    Entry e = table[i];
    if (e != null && e.get() == key)
        return e;
    else
        return getEntryAfterMiss(key, i, e);
}

// 开放寻址法吗? (瞎说的...
private Entry getEntryAfterMiss(ThreadLocal<?> key, int i, Entry e) {
    Entry[] tab = table;
    int len = tab.length;

    while (e != null) {
        ThreadLocal<?> k = e.get();
        if (k == key)
            return e;
        if (k == null)
            expungeStaleEntry(i);
        else
            i = nextIndex(i, len);
            e = tab[i];
    }

    return null;
}

private static int nextIndex(int i, int len) {
    return ((i + 1 < len) ? i + 1 : 0);
}
理解了 set 方法,get 方法也就清楚明了,无非是通过计算出索引直接从数组对应位置读取即可。
ThreadLocal 实现主要涉及 Thread,ThreadLocal,ThreadLocalMap 这三个类。关于 ThreadLocal 的实现流程正如上面写的那样,实际代码还有许多细节处理的部分并没有在这里写出来。
ThreadLocal和Synchronized都是为了解决多线程中相同变量的访问冲突问题,不同的点是
正因为ThreadLocal的线程隔离特性,使他的应用场景相对来说更为特殊一些。在 Android 中 Looper、ActivityThread 以及 AMS 中都用到了 ThreadLocal。当某些数据是以线程为作用域并且不同线程具有不同的数据副本的时候,就可以考虑采用 ThreadLocal。
1. 工厂类 + 动态代理 → 面向切面编程(service层)
public class BasicFactory {
    private static BasicFactory factory = new BasicFactory();
    private static Properties prop = new Properties();

    static {
        try {
            prop.load(BasicFactory.class.getClassLoader().getResourceAsStream("config.properties"));
        } catch(Exception e) {
            e.printStackTrace();
            throw new RuntimeException(e);
        }
    }

    private BasicFactory() {}

    public static BasicFactory getFactory() {
        return factory;
    }

    /*
    @SuppressWarnings("unchecked")
    public <T> T getInstance(Class<T> clazz) {
        String key = clazz.getSimpleName();
        String value = prop.getProperty(key);
        try {
            return (T) Class.forName(value).newInstance();
        } catch (Exception e) {
            e.printStackTrace();
            throw new RuntimeException(e);
        }
    }
    */

    @SuppressWarnings("unchecked")
    public <T extends Dao> T getDao(Class<T> clazz) {
        String key = clazz.getSimpleName();
        String value = prop.getProperty(key);
        try {
            return (T) Class.forName(value).newInstance();
        } catch (Exception e) {
            e.printStackTrace();
            throw new RuntimeException(e);
        }
    }

    @SuppressWarnings("unchecked")
    public <T extends Service> T getService(Class<T> clazz) {
        String key = clazz.getSimpleName();
        String value = prop.getProperty(key);
        try {
            final T service = (T) Class.forName(value).newInstance();
            T proxyService = (T) Proxy.newProxyInstance(service.getClass().getClassLoader()
                    , service.getClass().getInterfaces(), new InvocationHandler() {
                @Override
                public Object invoke(Object proxy, Method method, Object[] args)
                        throws Throwable {
                    if (method.isAnnotationPresent(Trans.class)) {
                        try {
                        TransactionManager.startTran();
                        Object obj = method.invoke(service, args);
                        TransactionManager.commit();
                        return obj;
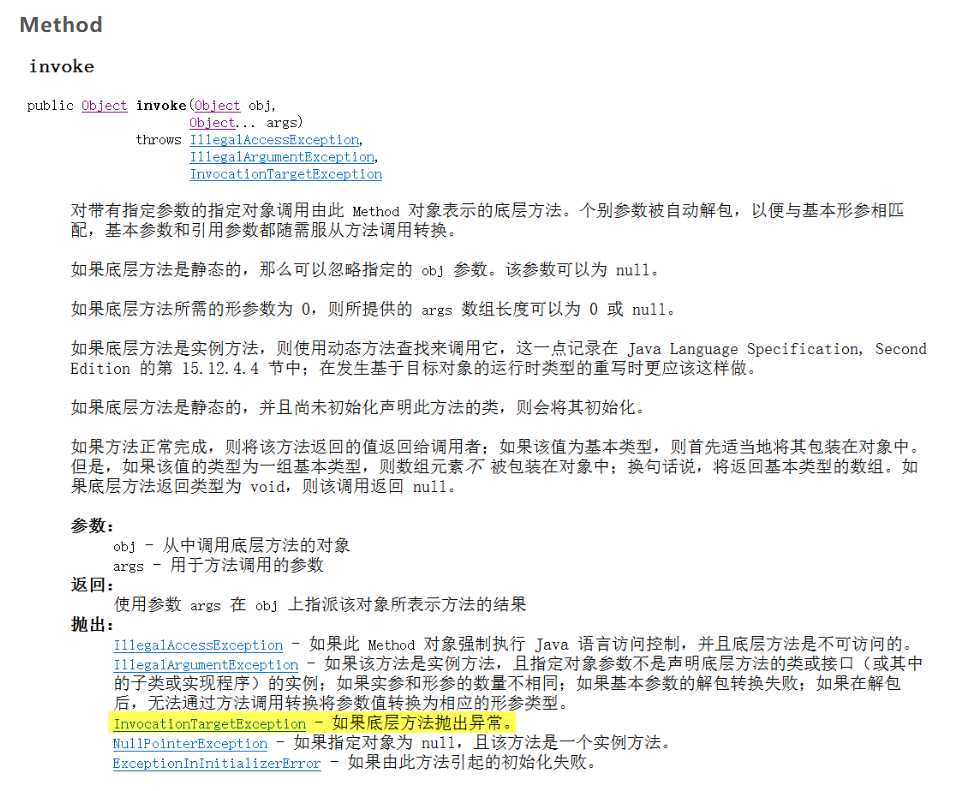
                    } catch(InvocationTargetException e) {
                        TransactionManager.rollback();
                        throw new RuntimeException(e.getTargetException());
                    } catch(Exception e) {
                        TransactionManager.rollback();
                        throw new RuntimeException(e);
                    } finally {
                        TransactionManager.release();
                    }
                } else {
                    return method.invoke(service, args);
                }
                }
            });
            return proxyService;
        } catch (Exception e) {
            e.printStackTrace();
            throw new RuntimeException(e);
        }
    }
}

2. ThreadLocal + @Annotation → 事务管理
@Retention(RetentionPolicy.RUNTIME)
@Target(ElementType.METHOD)
public @interface Trans {}
public class TransactionManager {
    private TransactionManager() {}

    private static DataSource source = new ComboPooledDataSource();

    // private static Connection conn = DaoUtils.getConn();

    private static ThreadLocal<Boolean> flag_local = new ThreadLocal<Boolean>() {
        protected Boolean initialValue() {
            return false;
        };
    };

    /*
    conn_local:
        需要事务管理的业务可能会在这同一个 Connection 上执行多次SQL,为防止
        QueryRunner 执行完每一次操作之后 close 该连接,故为此连接做代理,让
        proxySource 每次 getConnection() 时,返回这个 proxyConnection
    realConn_local:
        但迟早是要关的,所以还要保存真实的 Connection 的引用到此 ThreadLocalMap
    */
    private static ThreadLocal<Connection> conn_local = new ThreadLocal<Connection>();
    private static ThreadLocal<Connection> realConn_local = new ThreadLocal<Connection>();

    public static void startTran() throws SQLException {
        flag_local.set(true);
        final Connection conn = source.getConnection();
        conn.setAutoCommit(false);
        realConn_local.set(conn);
        Connection proxyConn = (Connection) Proxy.newProxyInstance(
                conn.getClass().getClassLoader(), conn.getClass()
                .getInterfaces(), new InvocationHandler() {
            @Override
            public Object invoke(Object proxy, Method method, Object[] args)
                    throws Throwable {
                if("close".equals(method.getName()))
                    return null;
                else
                    return method.invoke(conn, args);
            }
        });
        conn_local.set(proxyConn);
    }

    public static void commit() {
        DbUtils.commitAndCloseQuietly(conn_local.get());
    }

    public static void rollback() {
        DbUtils.rollbackAndCloseQuietly(conn_local.get());
    }

    /*
    public static Connection getConn() {
        return conn_local.get();
    }
    ----------------------------------------
    若无须事务控制,QueryRunner 构造器里传 DataSource;需要事务控制,update 方法里传 getConn()
    这么做无疑是和 Service 层耦合了。应统一起来,均在 QueryRunner 构造器里传 DataSource,只不过:
    > 如果 Service 没有开启事务,则返回普通数据源
    > 如果 Service 已经开启事务,则返回改造过 getConnection() 的数据源
        ,该数据源每次返回的都是同一个开启过事务的 Connection
    */
    public static DataSource getSource() throws SQLException {
        if(flag_local.get()) { // 开启过事务,返回改造过的 DataSource
            return (DataSource) Proxy.newProxyInstance(source.getClass().getClassLoader()
                    , source.getClass().getInterfaces(), new InvocationHandler() {
                @Override
                public Object invoke(Object proxy, Method method, Object[] args)
                        throws Throwable {
                    if("getConnection".equals(method.getName())) {
                        return conn_local.get();
                    } else { // 没开启事务,返回普通的 DataSource
                        return method.invoke(source, args);
                    }
                }
            });
        } else {
            return source;
        }
    }

    public static void release() {
        try {
            realConn_local.get().close();
        } catch (SQLException e) {
            e.printStackTrace();
        }
        realConn_local.remove();
        conn_local.remove();
        flag_local.remove();
    }
}
标签:city 做了 android mamicode inf asi runner its nec
原文地址:https://www.cnblogs.com/liujiaqi1101/p/13391227.html