标签:patch hang rgs 简单的 详解 方便 通过 ora 也有
说句心里话,这篇文章,来来回回修改了很多次,如果认真看完这篇文章,还不会写fish_redux,请在评论里喷我。
来学学难搞的fish_redux框架吧,这个框架,官方的文档真是一言难尽,比flutter_bloc官网的文档真是逊色太多了,但是一旦知道怎么写,页面堆起来也是非常爽呀,结构分明,逻辑也会错落有致。
其实在当时搞懂这个框架的时候,就一直想写一篇文章记录下,但是因为忙(lan),导致一直没写,现在觉得还是必须把使用的过程记录下,毕竟刚上手这个框架是个蛋痛的过程,必须要把这个过程做个记录。
这不仅仅是记录的文章,文中所给出的示例,也是我重新构思去写的,过程也是力求阐述清楚且详细。

如果你在使用fish_redux的过程中遇到过上述的问题,那就来看看这篇文章吧!这里,会解答上面所有的问题点!
fish_redux相关地址
我用的是0.3.X的版本,算是第三版,相对于前几版,改动较大
fish_redux: ^0.3.4
#演示列表需要用到的库
dio: ^3.0.9    #网络请求框架
json_annotation: ^2.4.0 #json序列化和反序列化用的
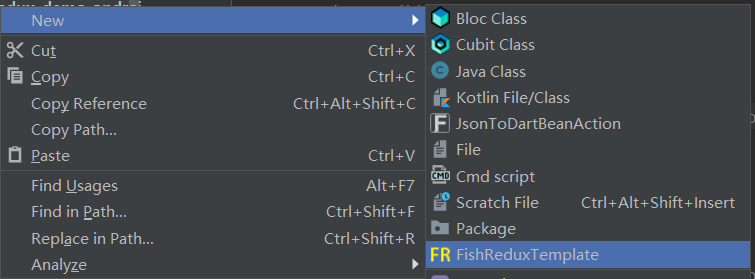
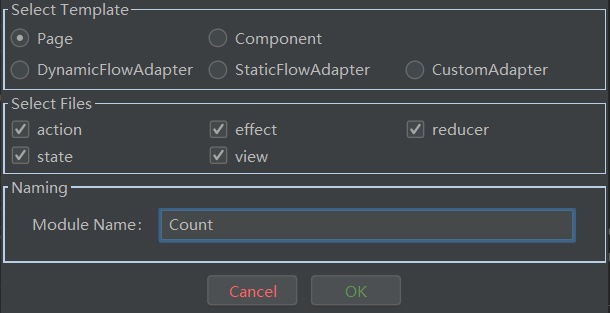
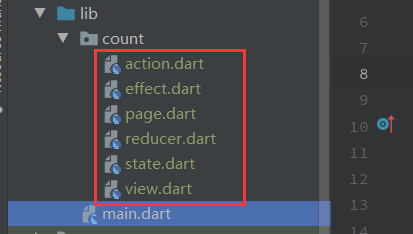
此处我们需要安装代码生成插件,可以帮我们生成大量文件和模板代码
在Android Studio里面搜索”fish“就能搜出插件了,插件名叫:FishReduxTemplate

BakerJQ编写:Android Studio的Fish Redux模板。
huangjianke编写:VSCode的Fish Redux模板


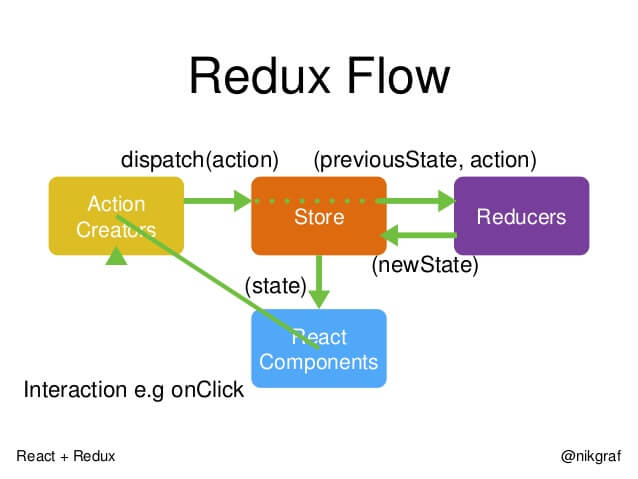
在写代码前,先看写下流程图,这图是凭着自己的理解画的
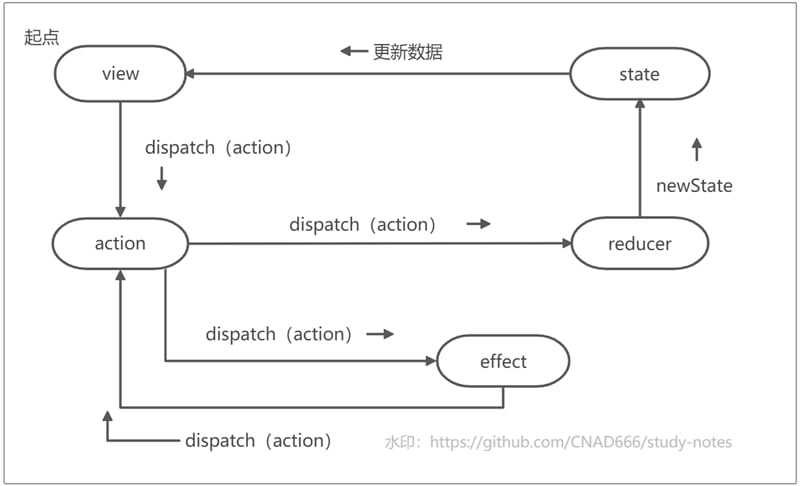
通过俩个流程图对比,其中还是有一些差别的
这边写几个示例,来演示fish_redux的使用
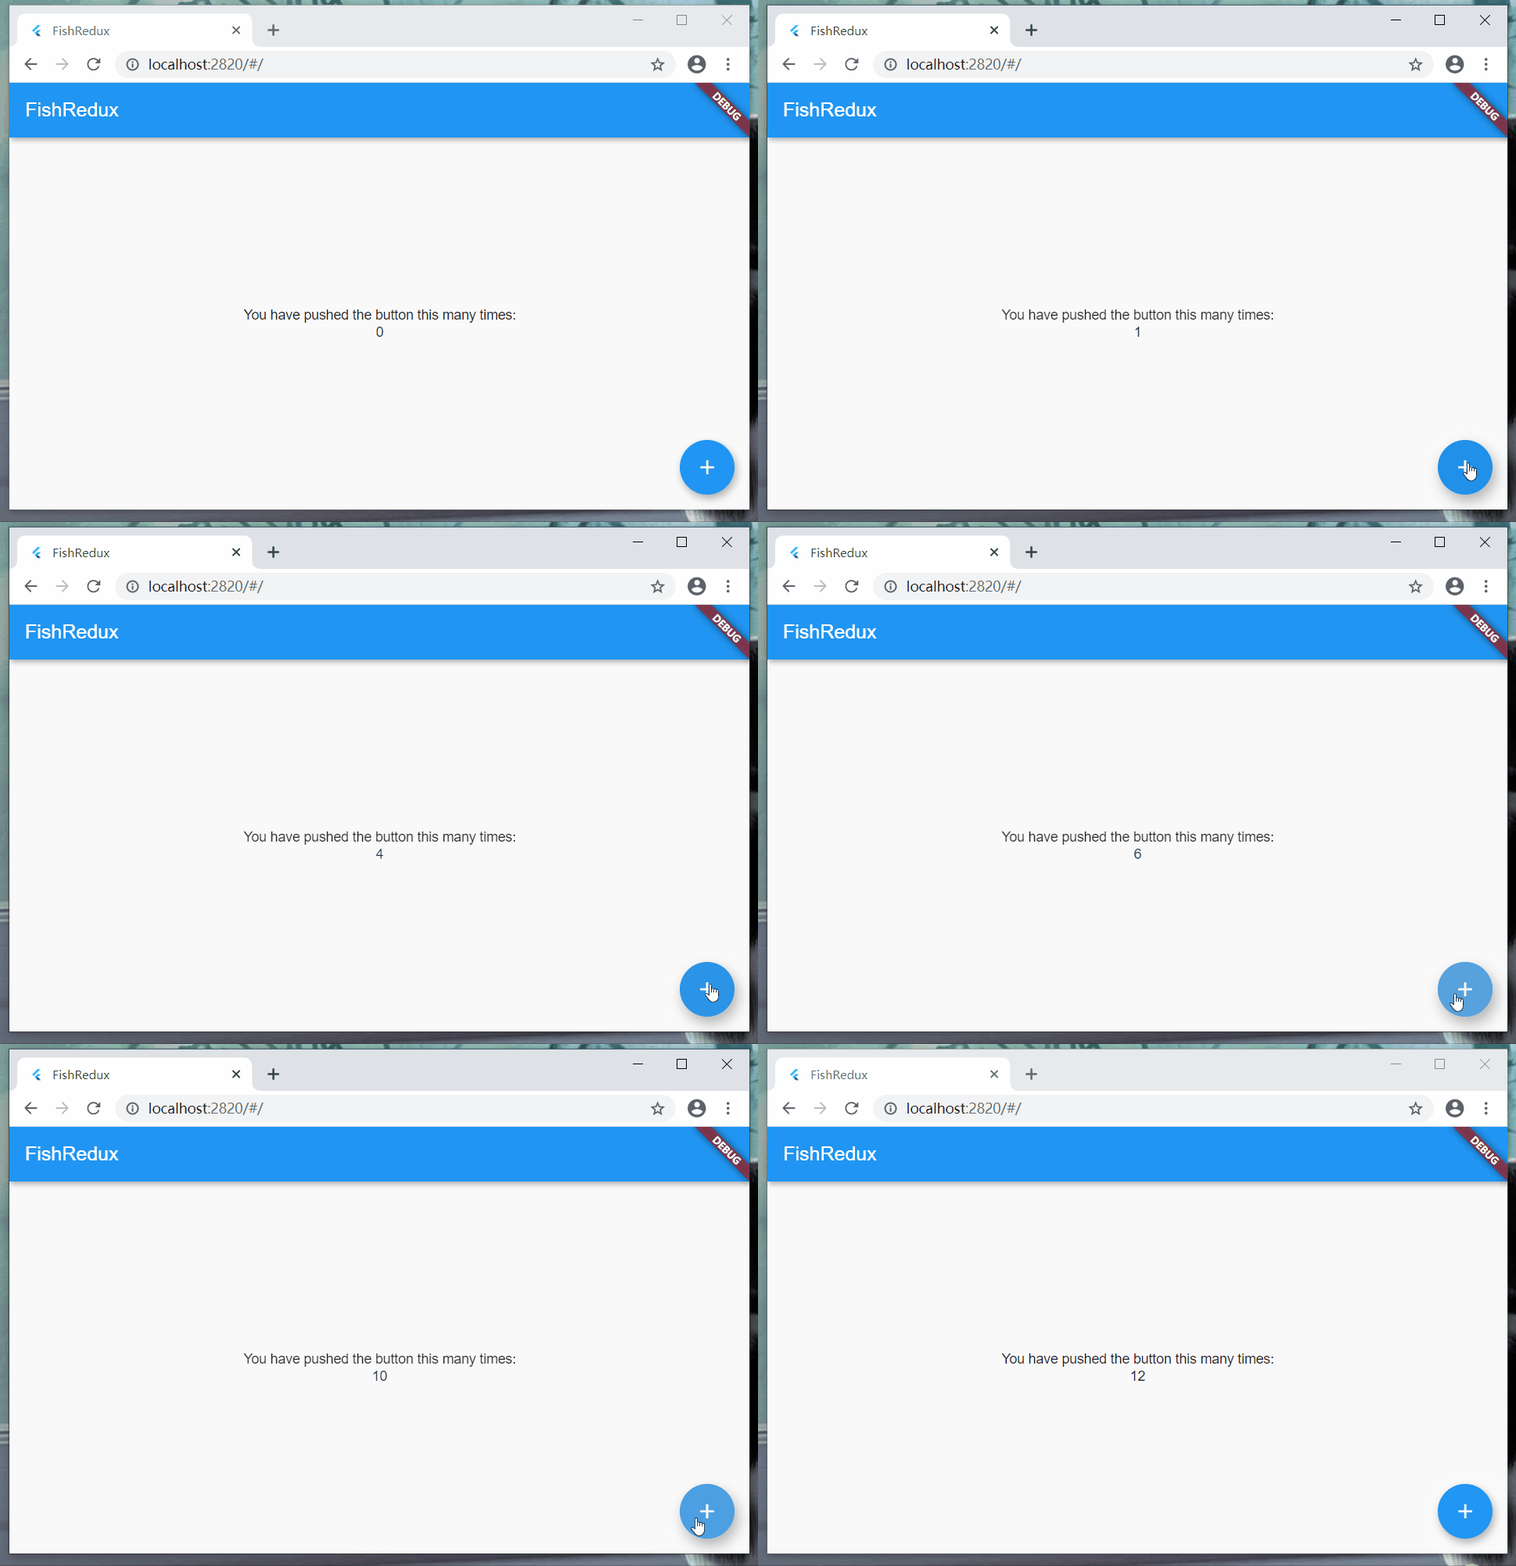
///需要使用hide隐藏Page
import ‘package:flutter/cupertino.dart‘hide Page;
import ‘package:flutter/material.dart‘ hide Page;

void main() {
  runApp(MyApp());
}

Widget createApp() {
  ///定义路由
  final AbstractRoutes routes = PageRoutes(
    pages: <String, Page<Object, dynamic>>{
      "CountPage": CountPage(),
    },
  );

  return MaterialApp(
    title: ‘FishDemo‘,
    home: routes.buildPage("CountPage", null), //作为默认页面
    onGenerateRoute: (RouteSettings settings) {
      //ios页面切换风格
      return CupertinoPageRoute(builder: (BuildContext context) {
        return routes.buildPage(settings.name, settings.arguments);
      })
//      Material页面切换风格
//      return MaterialPageRoute<Object>(builder: (BuildContext context) {
//        return routes.buildPage(settings.name, settings.arguments);
//      });
    },
  );
}
class CountState implements Cloneable<CountState> {
  int count;

  @override
  CountState clone() {
    return CountState()..count = count;
  }
}

CountState initState(Map<String, dynamic> args) {
  return CountState()..count = 0;
}
Widget buildView(CountState state, Dispatch dispatch, ViewService viewService) {
  return _bodyWidget(state, dispatch);
}

Widget _bodyWidget(CountState state, Dispatch dispatch) {
  return Scaffold(
    appBar: AppBar(
      title: Text("FishRedux"),
    ),
    body: Center(
      child: Column(
        mainAxisAlignment: MainAxisAlignment.center,
        children: <Widget>[
          Text(‘You have pushed the button this many times:‘),
          ///使用state中的变量,控住数据的变换
          Text(state.count.toString()),
        ],
      ),
    ),
    floatingActionButton: FloatingActionButton(
      onPressed: () {
        ///点击事件,调用action 计数自增方法
        dispatch(CountActionCreator.countIncrease());
      },
      child: Icon(Icons.add),
    ),
  );
}
enum CountAction { increase, updateCount }

class CountActionCreator {
  ///去effect层去处理自增数据
  static Action countIncrease() {
    return Action(CountAction.increase);
  }
  ///去reducer层更新数据,传参可以放在Action类中的payload字段中,payload是dynamic类型,可传任何类型
  static Action updateCount(int count) {
    return Action(CountAction.updateCount, payload: count);
  }
}
Effect<CountState> buildEffect() {
  return combineEffects(<Object, Effect<CountState>>{
    CountAction.increase: _onIncrease,
  });
}
///自增数
void _onIncrease(Action action, Context<CountState> ctx) {
  ///处理自增数逻辑
  int count = ctx.state.count + 1;
  ctx.dispatch(CountActionCreator.updateCount(count));
}
Reducer<CountState> buildReducer() {
  return asReducer(
    <Object, Reducer<CountState>>{
      CountAction.updateCount: _updateCount,
    },
  );
}
///通知View层更新界面
CountState _updateCount(CountState state, Action action) {
  final CountState newState = state.clone();
  newState..count = action.payload;
  return newState;
}
从上面的例子看到,如此简单数据变换,仅仅是个state中一个参数自增的过程,effect层就显得有些多余;所以,把流程简化成下面
注意:这边把effect层删掉,该层可以舍弃了;然后对view,action,reducer层代码进行一些小改动
搞起来
Widget buildView(CountState state, Dispatch dispatch, ViewService viewService) {
  return _bodyWidget(state, dispatch);
}

Widget _bodyWidget(CountState state, Dispatch dispatch) {
  return Scaffold(
    appBar: AppBar(
      title: Text("FishRedux"),
    ),
    body: Center(
      child: Column(
        mainAxisAlignment: MainAxisAlignment.center,
        children: <Widget>[
          Text(‘You have pushed the button this many times:‘),
          Text(state.count.toString()),
        ],
      ),
    ),
    floatingActionButton: FloatingActionButton(
      onPressed: () {
        ///点击事件,调用action 计数自增方法
        dispatch(CountActionCreator.updateCount());
      },
      child: Icon(Icons.add),
    ),
  );
}
enum CountAction { updateCount }

class CountActionCreator {
  ///去reducer层更新数据,传参可以放在Action类中的payload字段中,payload是dynamic类型,可传任何类型
  static Action updateCount() {
    return Action(CountAction.updateCount);
  }
}
Reducer<CountState> buildReducer() {
  return asReducer(
    <Object, Reducer<CountState>>{
      CountAction.updateCount: _updateCount,
    },
  );
}
///通知View层更新界面
CountState _updateCount(CountState state, Action action) {
  final CountState newState = state.clone();
  newState..count = state.count + 1;
  return newState;
}

Widget createApp() {
  ///定义路由
  final AbstractRoutes routes = PageRoutes(
    pages: <String, Page<Object, dynamic>>{
      ///计数器模块演示
      "CountPage": CountPage(),
      ///页面传值跳转模块演示
      "FirstPage": FirstPage(),
      "SecondPage": SecondPage(),
    },
  );

  return MaterialApp(
    title: ‘FishRedux‘,
    home: routes.buildPage("FirstPage", null), //作为默认页面
    onGenerateRoute: (RouteSettings settings) {
      //ios页面切换风格
      return CupertinoPageRoute(builder: (BuildContext context) {
        return routes.buildPage(settings.name, settings.arguments);
      });
    },
  );
}
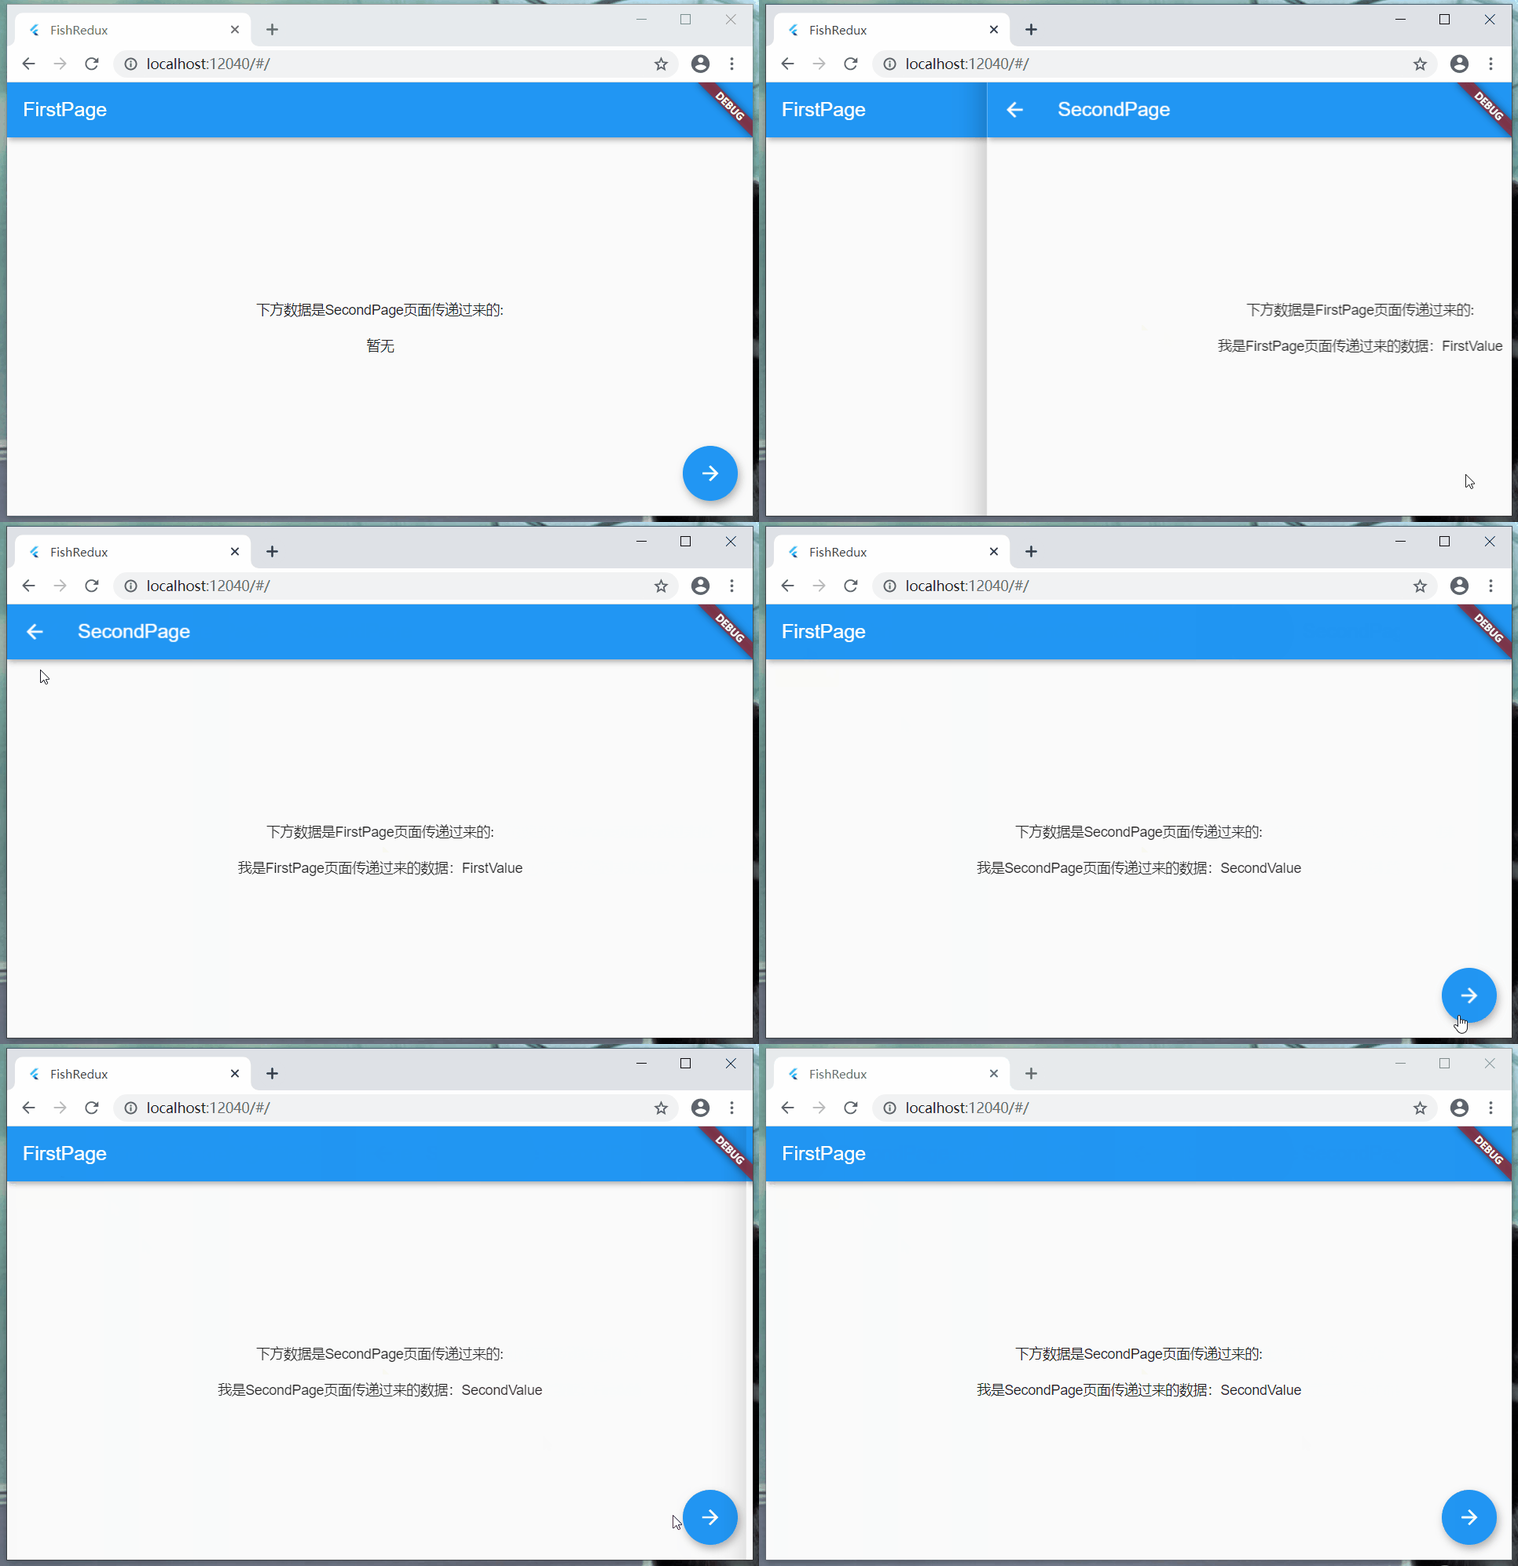
先来看看该页面的一个流程
state
class FirstState implements Cloneable<FirstState> {
  ///传递给下个页面的值
  static const String fixedMsg = "\n我是FirstPage页面传递过来的数据:FirstValue";
  ///展示传递过来的值
  String msg;

  @override
  FirstState clone() {
    return FirstState()..msg = msg;
  }
}

FirstState initState(Map<String, dynamic> args) {
  return FirstState()..msg = "\n暂无";
}
Widget buildView(FirstState state, Dispatch dispatch, ViewService viewService) {
  return _bodyWidget(state, dispatch);
}

Widget _bodyWidget(FirstState state, Dispatch dispatch) {
  return Scaffold(
    appBar: AppBar(
      title: Text("FirstPage"),
    ),
    body: Center(
      child: Column(
        mainAxisAlignment: MainAxisAlignment.center,
        children: <Widget>[
          Text(‘下方数据是SecondPage页面传递过来的:‘),
          Text(state.msg),
        ],
      ),
    ),
    floatingActionButton: FloatingActionButton(
      onPressed: () {
        ///跳转到Second页面
        dispatch(FirstActionCreator.toSecond());
      },
      child: Icon(Icons.arrow_forward),
    ),
  );
}
enum FirstAction { toSecond , updateMsg}

class FirstActionCreator {
  ///跳转到第二个页面
  static Action toSecond() {
    return const Action(FirstAction.toSecond);
  }
  ///拿到第二个页面返回的数据,执行更新数据操作
  static Action updateMsg(String msg) {
    return Action(FirstAction.updateMsg, payload: msg);
  }
}
/// 使用hide方法,隐藏系统包里面的Action类
import ‘package:flutter/cupertino.dart‘ hide Action;

Effect<FirstState> buildEffect() {
  return combineEffects(<Object, Effect<FirstState>>{
    FirstAction.toSecond: _toSecond,
  });
}

void _toSecond(Action action, Context<FirstState> ctx) async{
  ///页面之间传值;这地方必须写个异步方法,等待上个页面回传过来的值;as关键字是类型转换
  var result = await Navigator.of(ctx.context).pushNamed("SecondPage", arguments: {"firstValue": FirstState.fixedMsg});
  ///获取到数据,更新页面上的数据
  ctx.dispatch(FirstActionCreator.updateMsg( (result as Map)["secondValue"]) );
}
Reducer<FirstState> buildReducer() {
  return asReducer(
    <Object, Reducer<FirstState>>{
      FirstAction.updateMsg: _updateMsg,
    },
  );
}

FirstState _updateMsg(FirstState state, Action action) {
  return state.clone()..msg = action.payload;
}
class SecondState implements Cloneable<SecondState> {
  ///传递给下个页面的值
  static const String fixedMsg = "\n我是SecondPage页面传递过来的数据:SecondValue";
  ///展示传递过来的值
  String msg;

  @override
  SecondState clone() {
    return SecondState()..msg = msg;
  }
}

SecondState initState(Map<String, dynamic> args) {
  ///获取上个页面传递过来的数据
  return SecondState()..msg = args["firstValue"];
}
Widget buildView(SecondState state, Dispatch dispatch, ViewService viewService) {
  return WillPopScope(
    child: _bodyWidget(state),
    onWillPop: () {
      dispatch(SecondActionCreator.backFirst());
      ///true:表示执行页面返回    false:表示不执行返回页面操作,这里因为要传值,所以接管返回操作
      return Future.value(false);
    },
  );
}

Widget _bodyWidget(SecondState state) {
  return Scaffold(
    appBar: AppBar(
      title: Text("SecondPage"),
    ),
    body: Center(
      child: Column(
        mainAxisAlignment: MainAxisAlignment.center,
        children: <Widget>[
          Text(‘下方数据是FirstPage页面传递过来的:‘),
          Text(state.msg),
        ],
      ),
    ),
  );
}
enum SecondAction { backFirst }

class SecondActionCreator {
  ///返回到第一个页面,然后从栈中移除自身,同时传回去一些数据
  static Action backFirst() {
    return Action(SecondAction.backFirst);
  }
}
///隐藏系统包中的Action类
import ‘package:flutter/cupertino.dart‘ hide Action;

Effect<SecondState> buildEffect() {
  return combineEffects(<Object, Effect<SecondState>>{
    SecondAction.backFirst: _backFirst,
  });
}

void _backFirst(Action action, Context<SecondState> ctx) {
  ///pop当前页面,并且返回相应的数据
  Navigator.pop(ctx.context, {"secondValue": SecondState.fixedMsg});
}

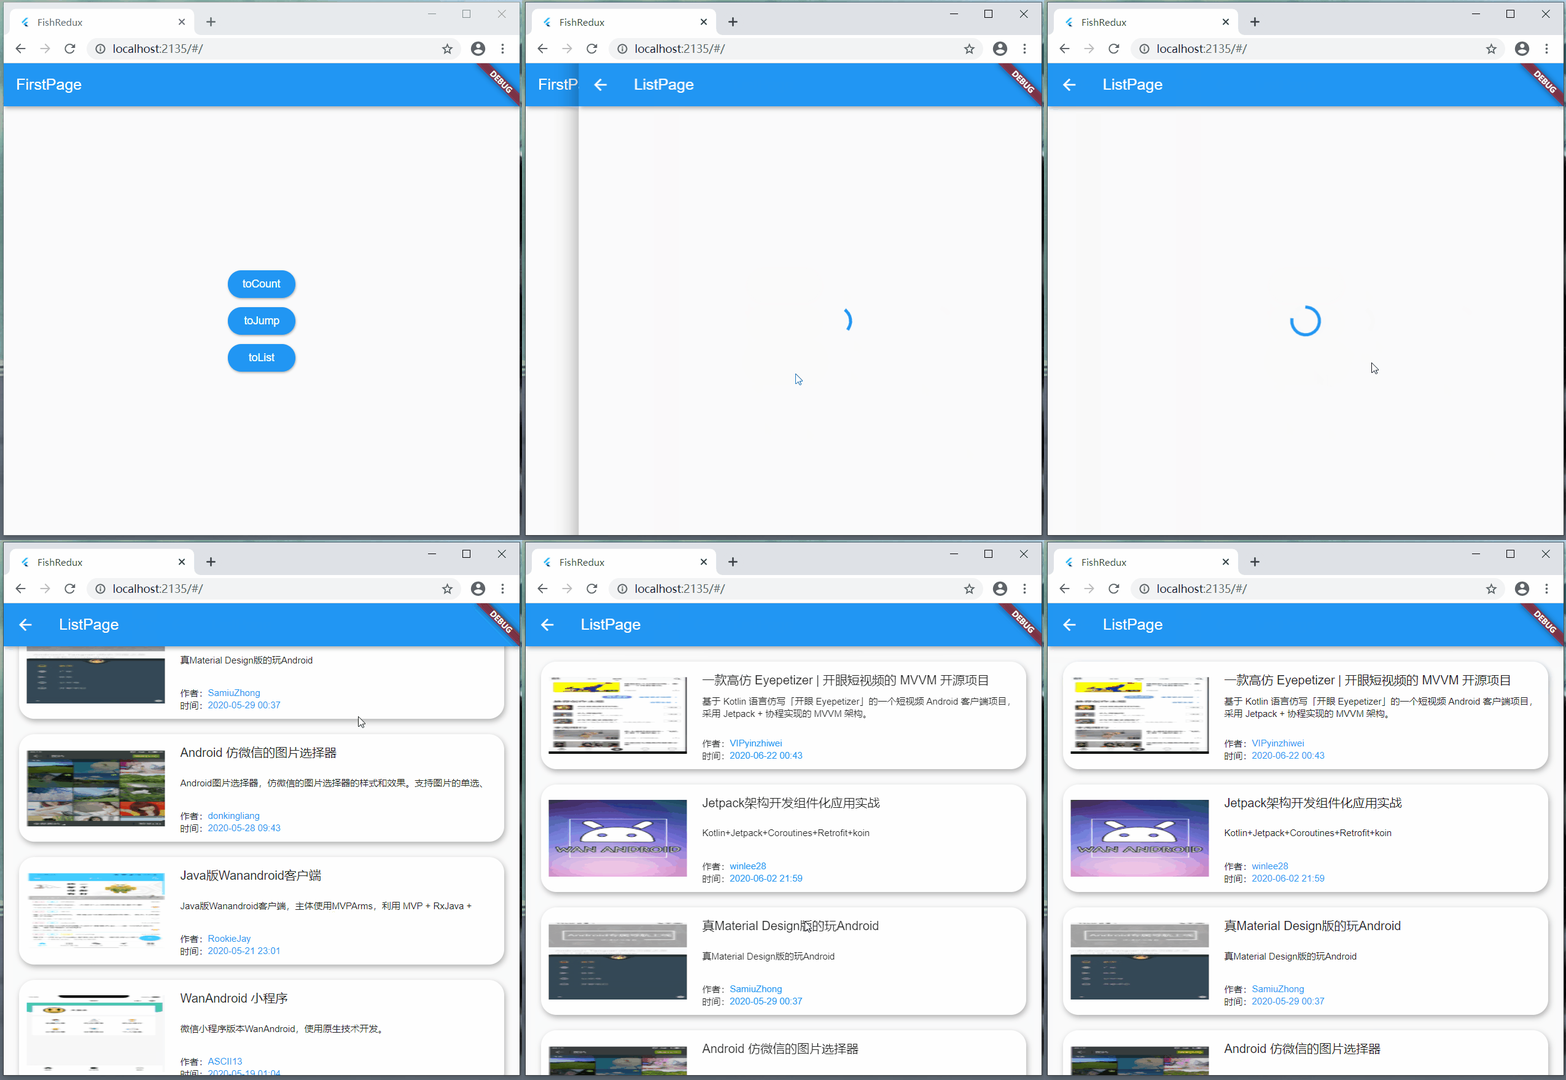
理解了上面俩个案例,相信你可以使用fish_redux实现一部分页面了;但是,我们堆页面的过程中,能体会列表模块是非常重要的一部分,现在就来学学,在fish_redux中怎么使用ListView吧!

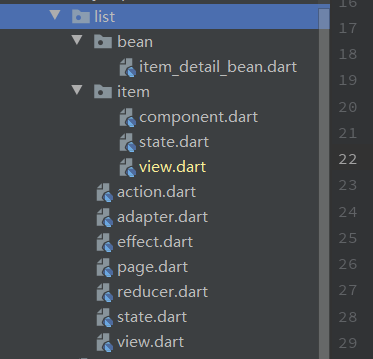
void main() {
  runApp(createApp());
}

Widget createApp() {
  ///定义路由
  final AbstractRoutes routes = PageRoutes(
    pages: <String, Page<Object, dynamic>>{
      ///导航页面
      "GuidePage": GuidePage(),
      ///计数器模块演示
      "CountPage": CountPage(),
      ///页面传值跳转模块演示
      "FirstPage": FirstPage(),
      "SecondPage": SecondPage(),
      ///列表模块演示
      "ListPage": ListPage(),
    },
  );

  return MaterialApp(
    title: ‘FishRedux‘,
    home: routes.buildPage("GuidePage", null), //作为默认页面
    onGenerateRoute: (RouteSettings settings) {
      //ios页面切换风格
      return CupertinoPageRoute(builder: (BuildContext context) {
        return routes.buildPage(settings.name, settings.arguments);
      });
    },
  );
}
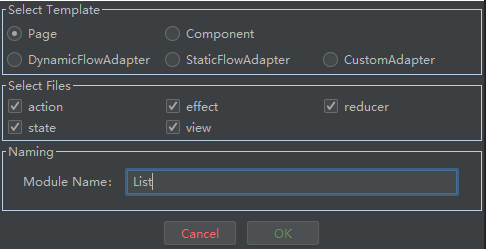
按照流程走
准备工作
创建bean实体
创建item模块
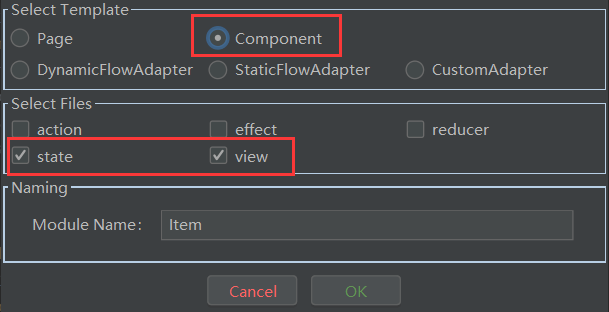
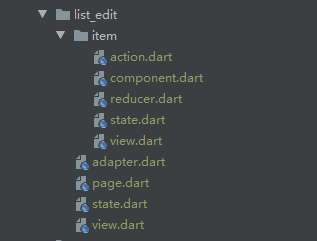
文件结构
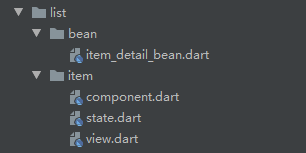
OK,bean文件搞定了,再来看看,item文件中的文件,这里component文件不需要改动,所以这地方,我们只需要看:state.dart,view.dart
import ‘package:fish_redux/fish_redux.dart‘;
import ‘package:fish_redux_demo/list/bean/item_detail_bean.dart‘;

class ItemState implements Cloneable<ItemState> {
  Datas itemDetail;

  ItemState({this.itemDetail});

  @override
  ItemState clone() {
    return ItemState()
        ..itemDetail = itemDetail;
  }
}

ItemState initState(Map<String, dynamic> args) {
  return ItemState();
}
Widget buildView(ItemState state, Dispatch dispatch, ViewService viewService) {
  return _bodyWidget(state);
}

Widget _bodyWidget(ItemState state) {
  return Card(
    shape: RoundedRectangleBorder(borderRadius: BorderRadius.circular(20)),
    elevation: 5,
    margin: EdgeInsets.only(left: 20, right: 20, top: 20),
    child: Row(
      children: <Widget>[
        //左边图片
        Container(
          margin: EdgeInsets.all(10),
          width: 180,
          height: 100,
          child: Image.network(
            state.itemDetail.envelopePic,
            fit: BoxFit.fill,
          ),
        ),
        //右边的纵向布局
        _rightContent(state),
      ],
    ),
  );
}

///item中右边的纵向布局,比例布局
Widget _rightContent(ItemState state) {
  return Expanded(
      child: Container(
    margin: EdgeInsets.all(10),
    height: 120,
    child: Column(
      mainAxisAlignment: MainAxisAlignment.start,
      children: <Widget>[
        //标题
        Expanded(
          flex: 2,
          child: Container(
            alignment: Alignment.centerLeft,
            child: Text(
              state.itemDetail.title,
              style: TextStyle(fontSize: 16),
              maxLines: 1,
              overflow: TextOverflow.ellipsis,
            ),
          ),
        ),
        //内容
        Expanded(
            flex: 4,
            child: Container(
              alignment: Alignment.centerLeft,
              child: Text(
                state.itemDetail.desc,
                style: TextStyle(fontSize: 12),
                maxLines: 3,
                overflow: TextOverflow.ellipsis,
              ),
            )),
        Expanded(
          flex: 3,
          child: Column(
            mainAxisAlignment: MainAxisAlignment.end,
            children: <Widget>[
              //作者
              Row(
                children: <Widget>[
                  Text("作者:", style: TextStyle(fontSize: 12)),
                  Expanded(
                    child: Text(state.itemDetail.author,
                        style: TextStyle(color: Colors.blue, fontSize: 12),
                        overflow: TextOverflow.ellipsis),
                  )
                ],
              ),
              //时间
              Row(children: <Widget>[
                Text("时间:", style: TextStyle(fontSize: 12)),
                Expanded(
                  child: Text(state.itemDetail.niceDate,
                      style: TextStyle(color: Colors.blue, fontSize: 12),
                      overflow: TextOverflow.ellipsis),
                )
              ])
            ],
          ),
        ),
      ],
    ),
  ));
}
item模块,就这样写完了,不需要改动什么了,接下来看看List模块
首先最重要的,我们需要将adapter建立起来,并和page绑定
adapter创建及其绑定
class ListItemAdapter extends SourceFlowAdapter<ListState> {
  static const String item_style = "project_tab_item";

  ListItemAdapter()
      : super(
          pool: <String, Component<Object>>{
            ///定义item的样式
            item_style: ItemComponent(),
          },
        );
}
class ListState extends MutableSource implements Cloneable<ListState> {
  ///这地方一定要注意,List里面的泛型,需要定义为ItemState
  ///怎么更新列表数据,只需要更新这个items里面的数据,列表数据就会相应更新
  ///使用多样式,请写出  List<Object> items;
  List<ItemState> items;

  @override
  ListState clone() {
    return ListState()..items = items;
  }

  ///使用上面定义的List,继承MutableSource,就把列表和item绑定起来了
  @override
  Object getItemData(int index) => items[index];

  @override
  String getItemType(int index) => ListItemAdapter.item_style;

  @override
  int get itemCount => items.length;

  @override
  void setItemData(int index, Object data) {
    items[index] = data;
  }
}

ListState initState(Map<String, dynamic> args) {
  return ListState();
}
class ListPage extends Page<ListState, Map<String, dynamic>> {
  ListPage()
      : super(
          initState: initState,
          effect: buildEffect(),
          reducer: buildReducer(),
          view: buildView,
          dependencies: Dependencies<ListState>(
              ///绑定Adapter
              adapter: NoneConn<ListState>() + ListItemAdapter(),
              slots: <String, Dependent<ListState>>{}),
          middleware: <Middleware<ListState>>[],
        );
}
正常page页面编辑
整体流程
view模块编写 ---> action添加更新数据事件 ---> effect初始化时获取数据并处理 ---> reducer更新数据
view
Widget buildView(ListState state, Dispatch dispatch, ViewService viewService) {
  return Scaffold(
    appBar: AppBar(
      title: Text("ListPage"),
    ),
    body: _itemWidget(state, viewService),
  );
}

Widget _itemWidget(ListState state, ViewService viewService) {
  if (state.items != null) {
    ///使用列表
    return ListView.builder(
      itemBuilder: viewService.buildAdapter().itemBuilder,
      itemCount: viewService.buildAdapter().itemCount,
    );
  } else {
    return Center(
      child: CircularProgressIndicator(),
    );
  }
}
enum ListAction { updateItem }

class ListActionCreator {
  static Action updateItem(var list) {
    return Action(ListAction.updateItem, payload: list);
  }
}
Effect<ListState> buildEffect() {
  return combineEffects(<Object, Effect<ListState>>{
    ///进入页面就执行的初始化操作
    Lifecycle.initState: _init,
  });
}

void _init(Action action, Context<ListState> ctx) async {
  String apiUrl = "https://www.wanandroid.com/project/list/1/json";
  Response response = await Dio().get(apiUrl);
  ItemDetailBean itemDetailBean =
      ItemDetailBean.fromJson(json.decode(response.toString()));
  List<Datas> itemDetails = itemDetailBean.data.datas;
  ///构建符合要求的列表数据源
  List<ItemState> items = List.generate(itemDetails.length, (index) {
    return ItemState(itemDetail: itemDetails[index]);
  });
  ///通知更新列表数据源
  ctx.dispatch(ListActionCreator.updateItem(items));
}
Reducer<ListState> buildReducer() {
  return asReducer(
    <Object, Reducer<ListState>>{
      ListAction.updateItem: _updateItem,
    },
  );
}

ListState _updateItem(ListState state, Action action) {
  return state.clone()..items = action.payload;
}
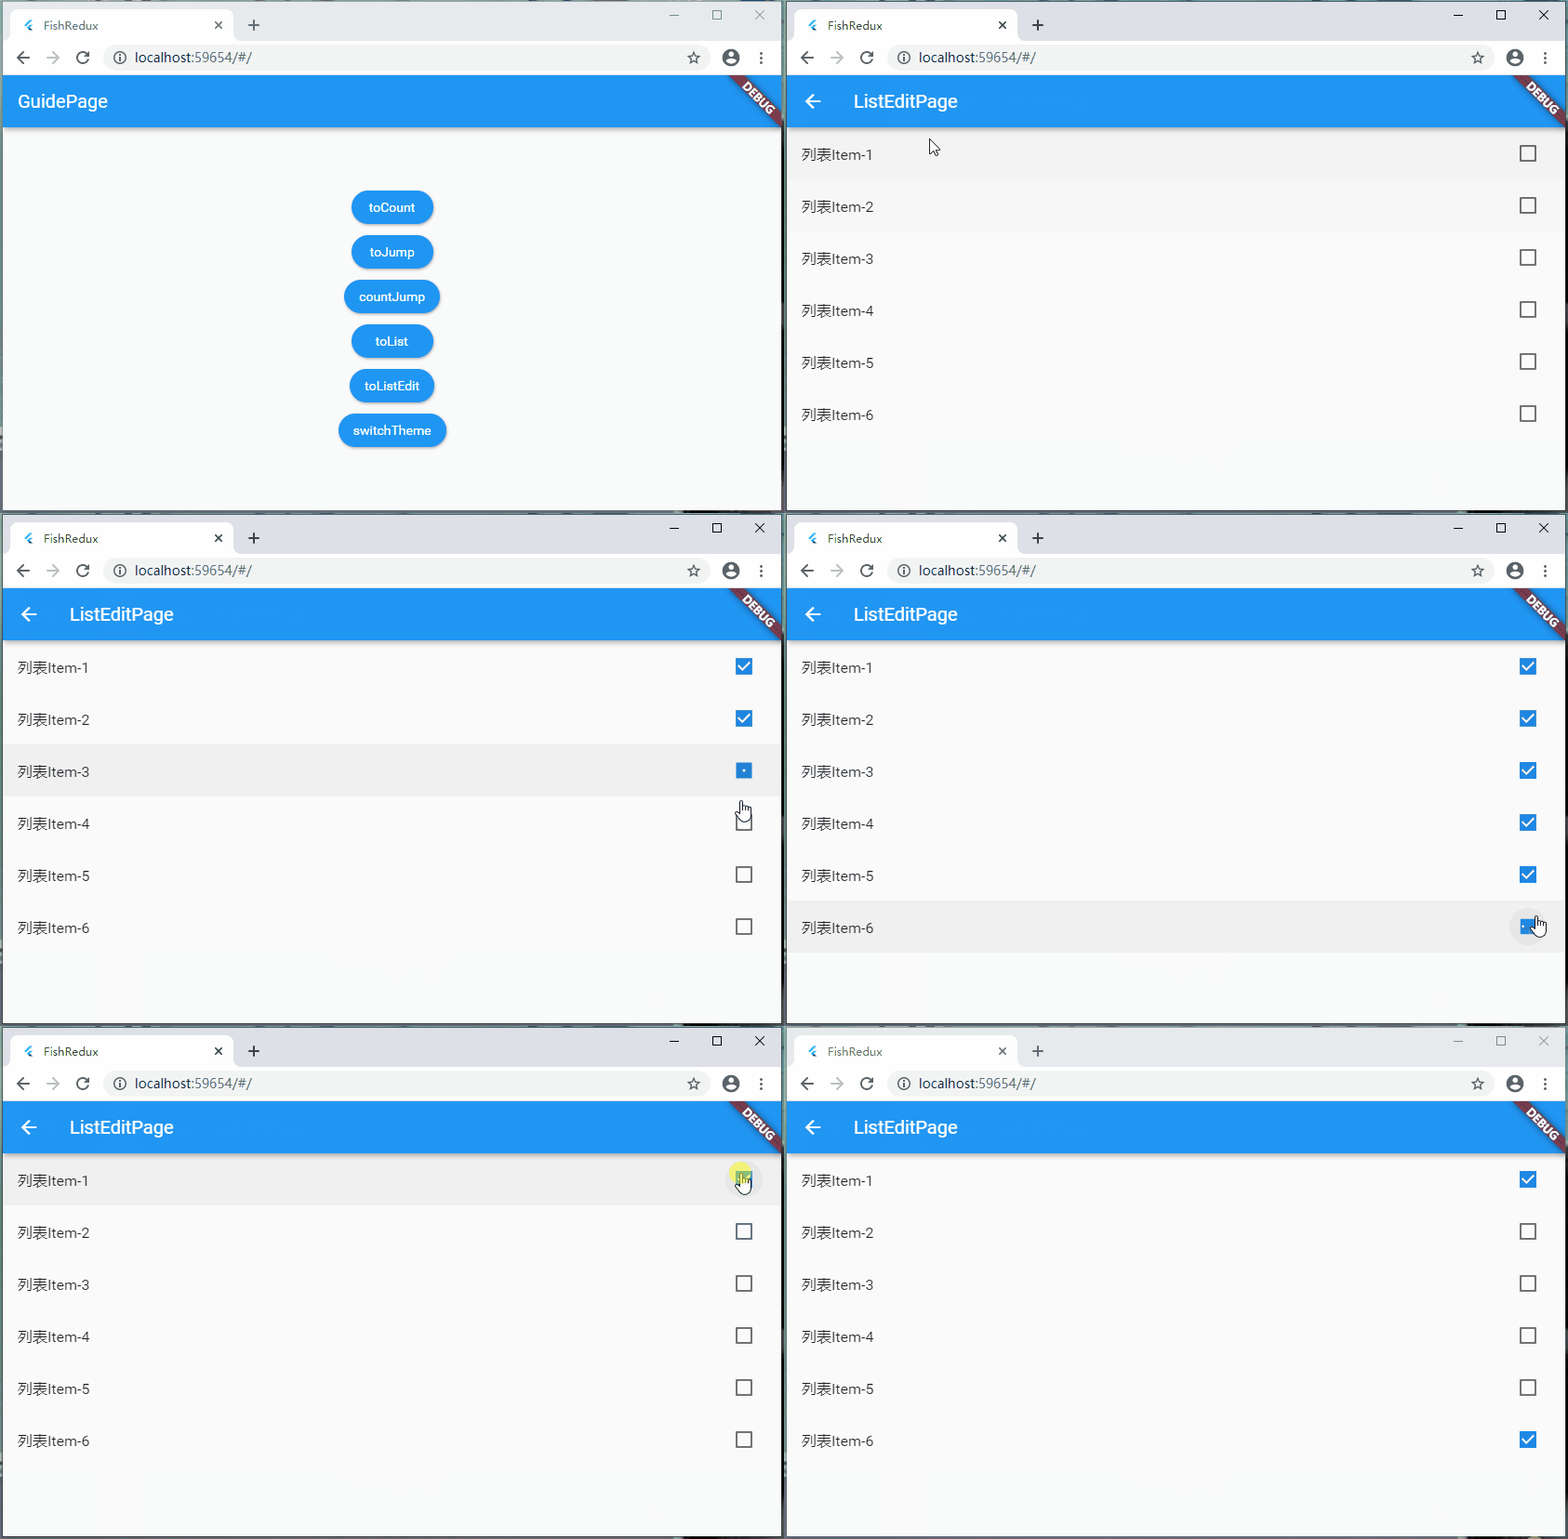
这次列表模块是非常的简单,基本不涉及什么流程,就是最基本初始化的一个过程,将state里初始化的数据在view中展示
state
class ListEditState extends MutableSource implements Cloneable<ListEditState> {
  List<ItemState> items;

  @override
  ListEditState clone() {
    return ListEditState()..items = items;
  }

  @override
  Object getItemData(int index) => items[index];

  @override
  String getItemType(int index) => ListItemAdapter.itemName;

  @override
  int get itemCount => items.length;

  @override
  void setItemData(int index, Object data) {
    items[index] = data;
  }
}

ListEditState initState(Map<String, dynamic> args) {
  return ListEditState()
    ..items = [
      ItemState(id: 1, title: "列表Item-1", itemStatus: false),
      ItemState(id: 2, title: "列表Item-2", itemStatus: false),
      ItemState(id: 3, title: "列表Item-3", itemStatus: false),
      ItemState(id: 4, title: "列表Item-4", itemStatus: false),
      ItemState(id: 5, title: "列表Item-5", itemStatus: false),
      ItemState(id: 6, title: "列表Item-6", itemStatus: false),
    ];
}
Widget buildView(ListEditState state, Dispatch dispatch, ViewService viewService) {
  return Scaffold(
    appBar: AppBar(
      title: Text("ListEditPage"),
    ),
    body: ListView.builder(
      itemBuilder: viewService.buildAdapter().itemBuilder,
      itemCount: viewService.buildAdapter().itemCount,
    ),
  );
}
class ListItemAdapter extends SourceFlowAdapter<ListEditState> {
  static const String itemName = "item";

  ListItemAdapter()
      : super(
          pool: <String, Component<Object>>{itemName: ItemComponent()},
        );
}
class ListEditPage extends Page<ListEditState, Map<String, dynamic>> {
  ListEditPage()
      : super(
    initState: initState,
    view: buildView,
    dependencies: Dependencies<ListEditState>(
        ///绑定适配器
        adapter: NoneConn<ListEditState>() + ListItemAdapter(),
        slots: <String, Dependent<ListEditState>>{}),
    middleware: <Middleware<ListEditState>>[],
  );
}
class ItemState implements Cloneable<ItemState> {
  int id;
  String title;
  bool itemStatus;


  ItemState({this.id, this.title, this.itemStatus});

  @override
  ItemState clone() {
    return ItemState()
      ..title = title
      ..itemStatus = itemStatus
      ..id = id;
  }
}

ItemState initState(Map<String, dynamic> args) {
  return ItemState();
}
Widget buildView(ItemState state, Dispatch dispatch, ViewService viewService) {
  return Container(
    child: InkWell(
      onTap: () {},
      child: ListTile(
        title: Text(state.title),
        trailing: Checkbox(
          value: state.itemStatus,
          ///Checkbox的点击操作:状态变更
          onChanged: (value) => dispatch(ItemActionCreator.onChange(state.id)),
        ),
      ),
    ),
  );
}
enum ItemAction { onChange }

class ItemActionCreator {
  //状态改变
  static Action onChange(int id) {
    return Action(ItemAction.onChange, payload: id);
  }
}
Reducer<ItemState> buildReducer() {
  return asReducer(
    <Object, Reducer<ItemState>>{
      ItemAction.onChange: _onChange,
    },
  );
}

ItemState _onChange(ItemState state, Action action) {
  if (state.id == action.payload) {
    return state.clone()..itemStatus = !state.itemStatus;
  }
  ///这地方一定要注意,要返回:state;不能返回:state.clone(),否则会造成后续更新失灵
  return state;
}
注意:如果使用多样式,items的列表泛型不要写成ItemState,写成Object就行了;在下面代码,我们可以看到,实现的getItemData()方法返回的类型是Object,所以Items的列表泛型写成Object,是完全可以的。
下述代码可做思路参考
class ListState extends MutableSource implements Cloneable<PackageCardState> {
    List<Object> items;

    @override
    ListState clone() {
        return PackageCardState()..items = items;
    }

    @override
    Object getItemData(int index) => items[index];

    @override
    String getItemType(int index) {
        if(items[index] is OneState) {
            return PackageCardAdapter.itemStyleOne;
        }else{
            return PackageCardAdapter.itemStyleTwo;
        }
    }

    @override
    int get itemCount => items.length;

    @override
    void setItemData(int index, Object data) => items[index] = data;
}
这里搞定了单item刷新场景,还存在一种多item刷新的场景
举例:假设一种场景,对于上面的item只能单选,一个item项被选中,其它item状态被重置到未选状态,具体效果看下方效果图
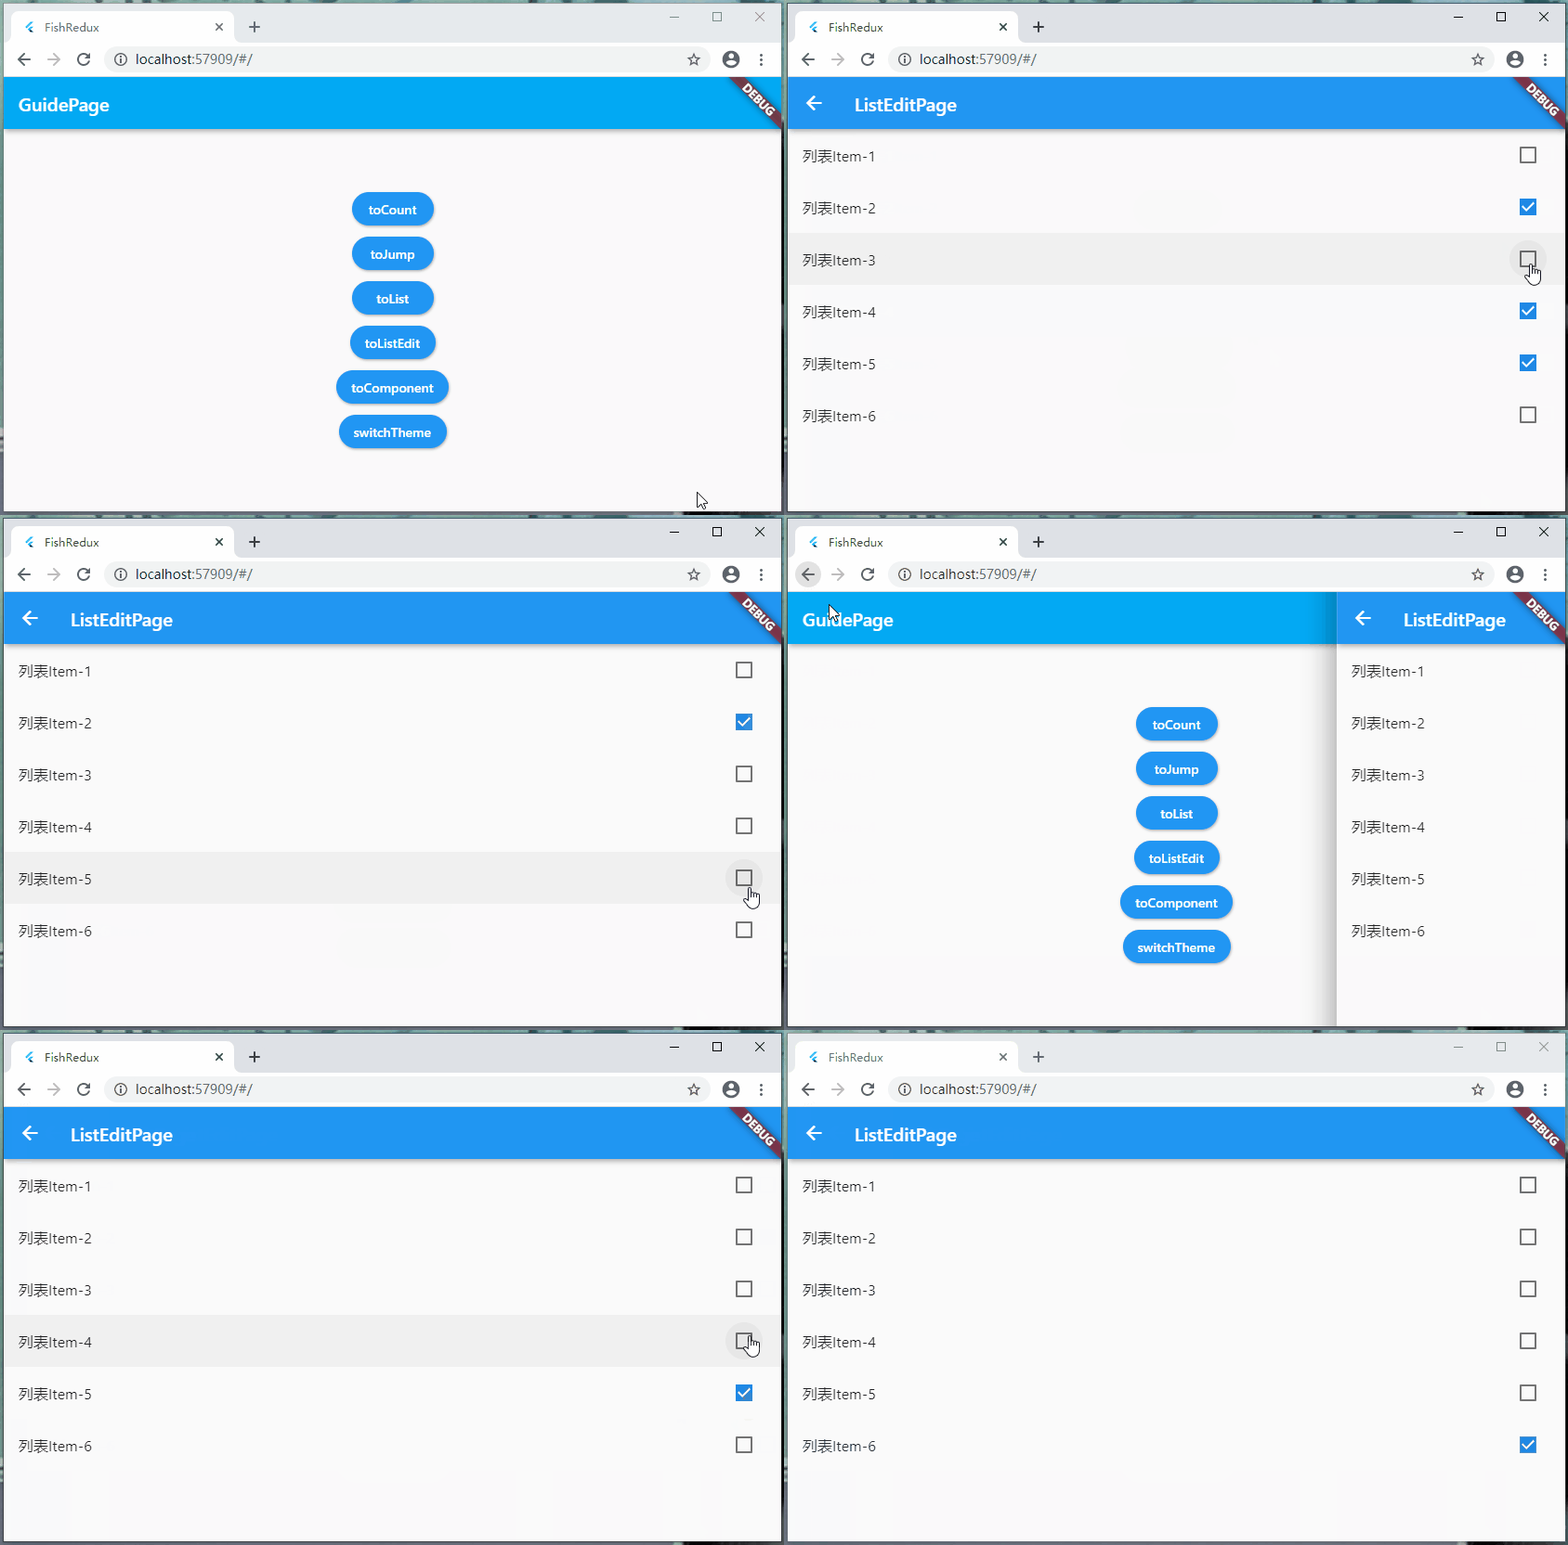
这种效果的实现非常简单,但是如果思路不对,会掉进坑里出不来
还原被选的状态,不能在同一个事件里写,需要新写一个清除事件
下述代码为整体流程
Widget buildView(ItemState state, Dispatch dispatch, ViewService viewService) {
  return InkWell(
    onTap: () {},
    child: ListTile(
      title: Text(state.title),
      trailing: Checkbox(
        value: state.itemStatus,
        ///CheckBox的点击操作:状态变更
        onChanged: (value) {
          //单选模式,清除选中的item,以便做单选
          dispatch(ItemActionCreator.clear());

          //刷新选中item
          dispatch(ItemActionCreator.onChange(state.id));
        }
      ),
    ),
  );
}
enum ItemAction {
  onChange,
  clear,
}

class ItemActionCreator {
  //状态改变
  static Action onChange(int id) {
    return Action(ItemAction.onChange, payload: id);
  }

  //清除改变的状态
  static Action clear() {
    return Action(ItemAction.clear);
  }
}
Reducer<ItemState> buildReducer() {
  return asReducer(
    <Object, Reducer<ItemState>>{
      ItemAction.onChange: _onChange,
      ItemAction.clear: _clear,
    },
  );
}

ItemState _onChange(ItemState state, Action action) {
  if (state.id == action.payload) {
    return state.clone()..itemStatus = !state.itemStatus;
  }

  ///这地方一定要注意,要返回:state;不能返回:state.clone(),否则会造成后续更新失灵
  return state;
}

///单选模式
ItemState _clear(ItemState state, Action action) {
  if (state.itemStatus) {
    return state.clone()..itemStatus = false;
  }

  ///这地方一定要注意,要返回:state;不能返回:state.clone(),否则会造成后续更新失灵
  return state;
}
这个问题实际上解决起来很简单,但是如果一直在 _onChange 方法重置状态,你会发现和你预期的结果一直对不上;完整且详细的效果,可以去看demo里面代码
呼,终于将列表这块写完,说实话,这个列表的使用确实有点麻烦;实际上,如果大家用心看了的话,麻烦的地方,其实就是在这块:adapter创建及其绑定;只能多写写了,熟能生巧!
列表模块大功告成,以后就能愉快的写列表了!

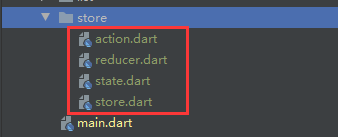
abstract class GlobalBaseState{
  Color themeColor;
}

class GlobalState implements GlobalBaseState, Cloneable<GlobalState>{
  @override
  Color themeColor;

  @override
  GlobalState clone() {
    return GlobalState();
  }
}
enum GlobalAction { changeThemeColor }

class GlobalActionCreator{
  static Action onChangeThemeColor(){
    return const Action(GlobalAction.changeThemeColor);
  }
}
import ‘package:flutter/material.dart‘ hide Action;

Reducer<GlobalState> buildReducer(){
  return asReducer(
    <Object, Reducer<GlobalState>>{
      GlobalAction.changeThemeColor: _onChangeThemeColor,
    },
  );
}

List<Color> _colors = <Color>[
  Colors.green,
  Colors.red,
  Colors.black,
  Colors.blue
];

GlobalState _onChangeThemeColor(GlobalState state, Action action) {
  final Color next =
  _colors[((_colors.indexOf(state.themeColor) + 1) % _colors.length)];
  return state.clone()..themeColor = next;
}
/// 建立一个AppStore
/// 目前它的功能只有切换主题
class GlobalStore{
  static Store<GlobalState> _globalStore;
  static Store<GlobalState> get store => _globalStore ??= createStore<GlobalState>(GlobalState(), buildReducer());
}
void main() {
  runApp(createApp());
}

Widget createApp() {
  ///全局状态更新
  _updateState() {
    return (Object pageState, GlobalState appState) {
      final GlobalBaseState p = pageState;

      if (pageState is Cloneable) {
        final Object copy = pageState.clone();
        final GlobalBaseState newState = copy;
        if (p.themeColor != appState.themeColor) {
          newState.themeColor = appState.themeColor;
        }
        /// 返回新的 state 并将数据设置到 ui
        return newState;
      }
      return pageState;
    };
  }

  final AbstractRoutes routes = PageRoutes(
    ///全局状态管理:只有特定的范围的Page(State继承了全局状态),才需要建立和 AppStore 的连接关系
    visitor: (String path, Page<Object, dynamic> page) {
      if (page.isTypeof<GlobalBaseState>()) {
        ///建立AppStore驱动PageStore的单向数据连接: 参数1 AppStore  参数2 当AppStore.state变化时,PageStore.state该如何变化
        page.connectExtraStore<GlobalState>(GlobalStore.store, _updateState());
      }
    },

    ///定义路由
    pages: <String, Page<Object, dynamic>>{
      ///导航页面
      "GuidePage": GuidePage(),
      ///计数器模块演示
      "CountPage": CountPage(),
      ///页面传值跳转模块演示
      "FirstPage": FirstPage(),
      "SecondPage": SecondPage(),
      ///列表模块演示
      "ListPage": ListPage(),
    },
  );

  return MaterialApp(
    title: ‘FishRedux‘,
    home: routes.buildPage("GuidePage", null), //作为默认页面
    onGenerateRoute: (RouteSettings settings) {
      //ios页面切换风格
      return CupertinoPageRoute(builder: (BuildContext context) {
        return routes.buildPage(settings.name, settings.arguments);
      });
    },
  );
}
class CountState implements Cloneable<CountState>,GlobalBaseState {
  int count;

  @override
  CountState clone() {
    return CountState()..count = count;
  }

  @override
  Color themeColor;
}

CountState initState(Map<String, dynamic> args) {
  return CountState()..count = 0;
}
Widget buildView(CountState state, Dispatch dispatch, ViewService viewService) {
  return _bodyWidget(state, dispatch);
}

Widget _bodyWidget(CountState state, Dispatch dispatch) {
  return Scaffold(
    appBar: AppBar(
      title: Text("FishRedux"),
      ///全局主题,仅仅在此处改动了一行
      backgroundColor: state.themeColor,
    ),
    body: Center(
      child: Column(
        mainAxisAlignment: MainAxisAlignment.center,
        children: <Widget>[
          Text(‘You have pushed the button this many times:‘),
          Text(state.count.toString()),
        ],
      ),
    ),
    floatingActionButton: FloatingActionButton(
      onPressed: () {
        ///点击事件,调用action 计数自增方法
        dispatch(CountActionCreator.updateCount());
      },
      child: Icon(Icons.add),
    ),
  );
}
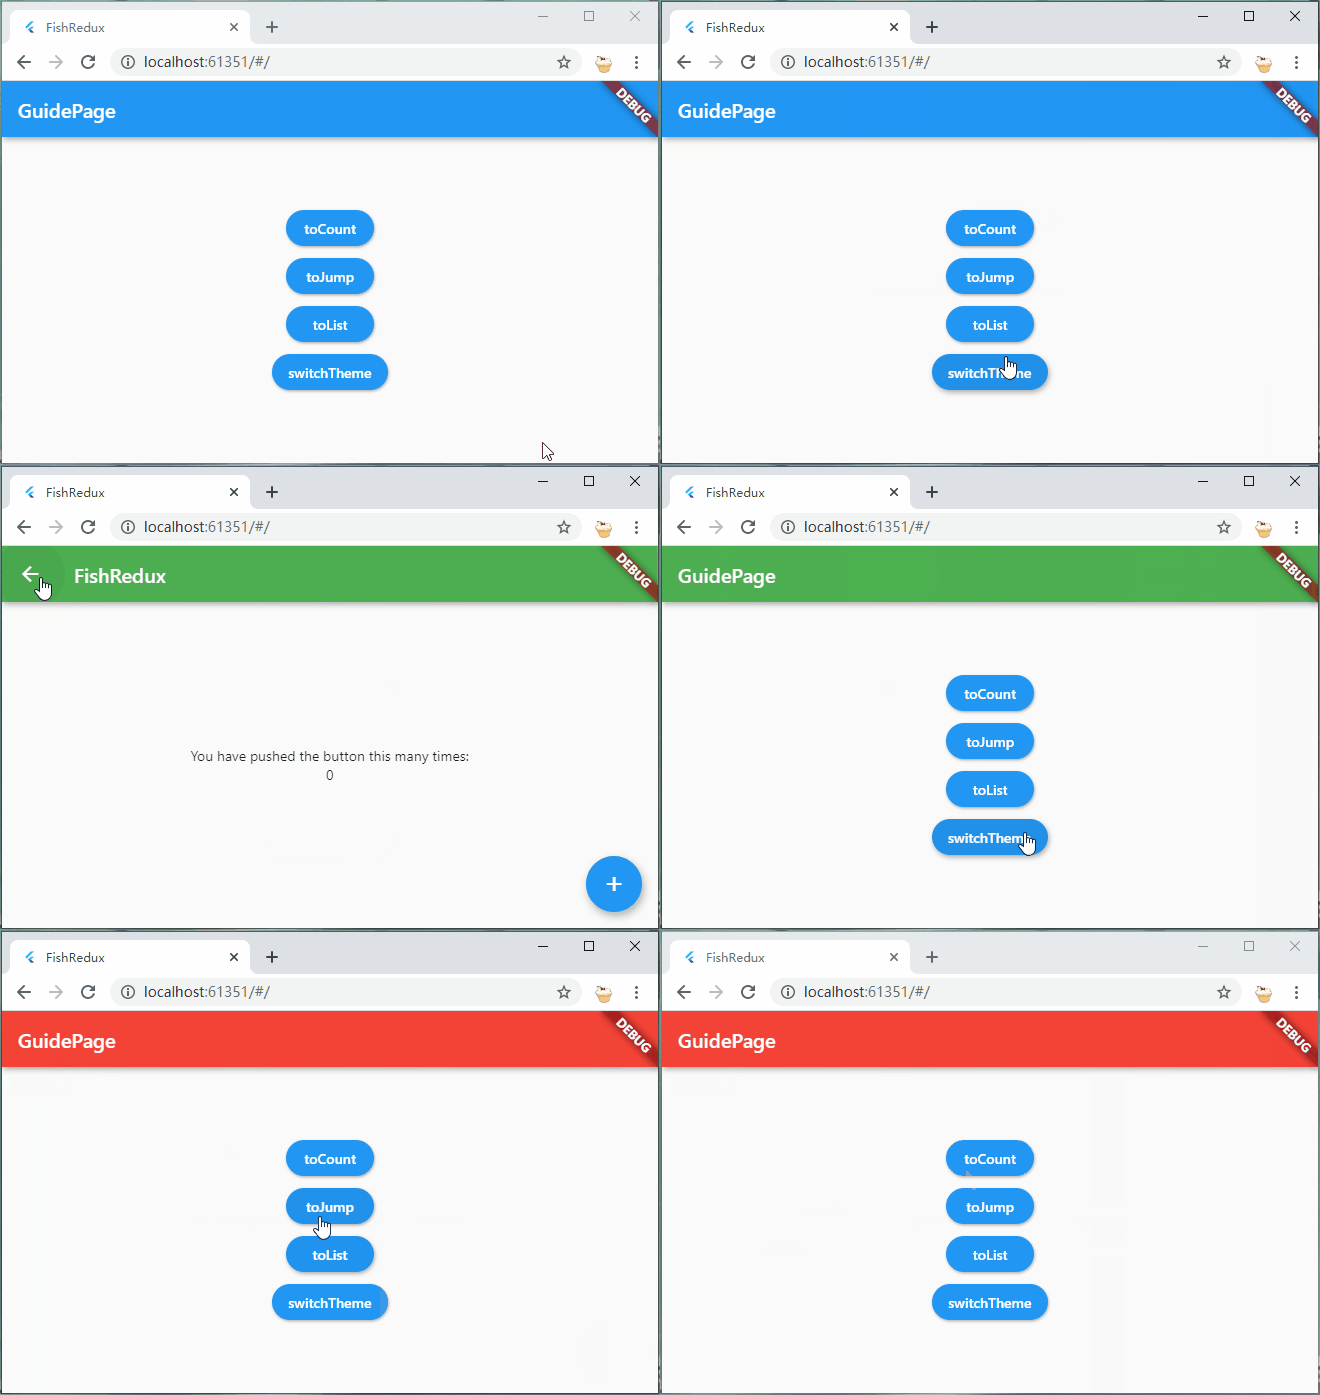
GlobalStore.store.dispatch(GlobalActionCreator.onChangeThemeColor());
在上面的全局模式里说了,使用全局模块,前期需要规划好字段,不然项目进行到中期的时候,想添加字段,多个模块的State会出现大范围爆红,提示去实现你添加的字段;项目开始规划好所有的字段,显然这需要全面的考虑好大部分场景,但是人的灵感总是无限的,不改代码是不可能,这辈子都不可能。只能想办法看能不能添加一次字段后,后期添加字段,并不会引起其他模块爆红,试了多次,成功的使用中间实体,来解决该问题
这里优化俩个方面
因为使用中间实体,有一些地方会出现空指针问题,我都在流程里面写清楚了,大家可以把优化流程完整看一遍哈,都配置好,后面拓展使用就不会报空指针了
void main() {
  runApp(createApp());
}

Widget createApp() {
  return MaterialApp(
    title: ‘FishRedux‘,
    home: RouteConfig.routes.buildPage(RouteConfig.guidePage, null), //作为默认页面
    onGenerateRoute: (RouteSettings settings) {
      //ios页面切换风格
      return CupertinoPageRoute(builder: (BuildContext context) {
        return RouteConfig.routes.buildPage(settings.name, settings.arguments);
      });
    },
  );
}

///路由管理
class RouteConfig {
  ///定义你的路由名称比如   static final String routeHome = ‘page/home‘;
  ///导航页面
  static const String guidePage = ‘page/guide‘;

  ///计数器页面
  static const String countPage = ‘page/count‘;

  ///页面传值跳转模块演示
  static const String firstPage = ‘page/first‘;
  static const String secondPage = ‘page/second‘;

  ///列表模块演示
  static const String listPage = ‘page/list‘;
  static const String listEditPage = ‘page/listEdit‘;

  static final AbstractRoutes routes = PageRoutes(
    pages: <String, Page<Object, dynamic>>{
      ///将你的路由名称和页面映射在一起,比如:RouteConfig.homePage : HomePage(),
      RouteConfig.guidePage: GuidePage(),
      RouteConfig.countPage: CountPage(),
      RouteConfig.firstPage: FirstPage(),
      RouteConfig.secondPage: SecondPage(),
      RouteConfig.listPage: ListPage(),
      RouteConfig.listEditPage: ListEditPage(),
    },
    visitor: StoreConfig.visitor,
  );
}

///全局模式
class StoreConfig {
  ///全局状态管理
  static _updateState() {
    return (Object pageState, GlobalState appState) {
      final GlobalBaseState p = pageState;

      if (pageState is Cloneable) {
        final Object copy = pageState.clone();
        final GlobalBaseState newState = copy;

        if (p.store == null) {
          ///这地方的判断是必须的,判断第一次store对象是否为空
          newState.store = appState.store;
        } else {
          /// 这地方增加字段判断,是否需要更新
          if ((p.store.themeColor != appState.store.themeColor)) {
            newState.store.themeColor = appState.store.themeColor;
          }

          /// 如果增加字段,同理上面的判断然后赋值...

        }

        /// 返回新的 state 并将数据设置到 ui
        return newState;
      }
      return pageState;
    };
  }

  static visitor(String path, Page<Object, dynamic> page) {
    if (page.isTypeof<GlobalBaseState>()) {
      ///建立AppStore驱动PageStore的单向数据连接
      ///参数1 AppStore  参数2 当AppStore.state变化时,PageStore.state该如何变化
      page.connectExtraStore<GlobalState>(GlobalStore.store, _updateState());
    }
  }
}
下面俩个模块是需要改动代码的模块
abstract class GlobalBaseState{
  StoreModel store;
}

class GlobalState implements GlobalBaseState, Cloneable<GlobalState>{

  @override
  GlobalState clone() {
    return GlobalState();
  }

  @override
  StoreModel store = StoreModel(
    /// store这个变量,在这必须示例化,不然引用该变量中的字段,会报空指针
    /// 下面的字段,赋初值,就是初始时展示的全局状态
    /// 这地方初值,理应从缓存或数据库中取,表明用户选择的全局状态
    themeColor: Colors.lightBlue
  );
}

///中间全局实体
///需要增加字段就在这个实体里面添加就行了
class StoreModel {
  Color themeColor;

  StoreModel({this.themeColor});
}
Reducer<GlobalState> buildReducer(){
  return asReducer(
    <Object, Reducer<GlobalState>>{
      GlobalAction.changeThemeColor: _onChangeThemeColor,
    },
  );
}

List<Color> _colors = <Color>[
  Colors.green,
  Colors.red,
  Colors.black,
  Colors.blue
];

GlobalState _onChangeThemeColor(GlobalState state, Action action) {
  final Color next =
  _colors[((_colors.indexOf(state.store.themeColor) + 1) % _colors.length)];
  return state.clone()..store.themeColor = next;
}
下面俩个模块代码没有改动,但是为了思路完整,同样贴出来
enum GlobalAction { changeThemeColor }

class GlobalActionCreator{
  static Action onChangeThemeColor(){
    return const Action(GlobalAction.changeThemeColor);
  }
}
class GlobalStore{
  static Store<GlobalState> _globalStore;
  static Store<GlobalState> get store => _globalStore ??= createStore<GlobalState>(GlobalState(), buildReducer());
}
class CountState implements Cloneable<CountState>, GlobalBaseState {
  int count;

  @override
  CountState clone() {
    return CountState()
      ..count = count
      ..store = store;
  }

  @override
  StoreModel store;
}

CountState initState(Map<String, dynamic> args) {
  return CountState()..count = 0;
}
Widget buildView(CountState state, Dispatch dispatch, ViewService viewService) {
  return _bodyWidget(state, dispatch);
}

Widget _bodyWidget(CountState state, Dispatch dispatch) {
  return Scaffold(
    appBar: AppBar(
      title: Text("FishRedux"),
      ///全局主题,仅仅在此处改动了一行
      backgroundColor: state.store.themeColor,
    ),
    ///下面其余代码省略....
}
GlobalStore.store.dispatch(GlobalActionCreator.onChangeThemeColor());
通过上面的优化,使用体验提升不是一个级别,大大提升的全局模式的扩展性,我们就算后期增加了大量的全局字段,也可以一个个模块慢慢改,不用一次爆肝全改完,猝死的概率又大大减少了!

Component是个比较常用的模块,上面使用列表的时候,就使用到了Component,这次我们来看看,在页面中直接使用Component,可插拔式使用!Component的使用总的来说是比较简单了,比较关键的是在State中建立起连接。

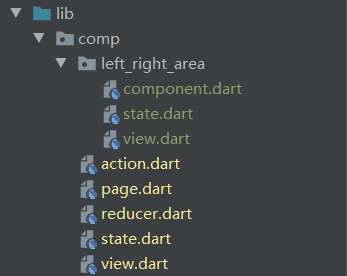
这地方写了一个Component,代码很简单,来看看吧
这地方代码是自动生成了,没有任何改动,就不贴了
class AreaState implements Cloneable<AreaState> {
  String title;
  String text;
  Color color;

  AreaState({
    this.title = "",
    this.color = Colors.blue,
    this.text = "",
  });

  @override
  AreaState clone() {
    return AreaState()
      ..color = color
      ..text = text
      ..title = title;
  }
}
Widget buildView(
    AreaState state, Dispatch dispatch, ViewService viewService) {
  return Scaffold(
    appBar: AppBar(
      title: Text(state.title),
      automaticallyImplyLeading: false,
    ),
    body: Container(
      height: double.infinity,
      width: double.infinity,
      alignment: Alignment.center,
      color: state.color,
      child: Text(state.text),
    ),
  );
}
CompPage中,没用到effete这层,就没创建该文件,老规矩,先看看state
class CompState implements Cloneable<CompState> {
  AreaState leftAreaState;
  AreaState rightAreaState;

  @override
  CompState clone() {
    return CompState()
      ..rightAreaState = rightAreaState
      ..leftAreaState = leftAreaState;
  }
}

CompState initState(Map<String, dynamic> args) {
  ///初始化数据
  return CompState()
    ..rightAreaState = AreaState(
      title: "LeftAreaComponent",
      text: "LeftAreaComponent",
      color: Colors.indigoAccent,
    )
    ..leftAreaState = AreaState(
      title: "RightAreaComponent",
      text: "RightAreaComponent",
      color: Colors.blue,
    );
}

///左边Component连接器
class LeftAreaConnector extends ConnOp<CompState, AreaState>
    with ReselectMixin<CompState, AreaState> {
  @override
  AreaState computed(CompState state) {
    return state.leftAreaState.clone();
  }

  @override
  void set(CompState state, AreaState subState) {
    state.leftAreaState = subState;
  }
}

///右边Component连接器
class RightAreaConnector extends ConnOp<CompState, AreaState>
    with ReselectMixin<CompState, AreaState> {
  @override
  AreaState computed(CompState state) {
    return state.rightAreaState.clone();
  }

  @override
  void set(CompState state, AreaState subState) {
    state.rightAreaState = subState;
  }
}
class CompPage extends Page<CompState, Map<String, dynamic>> {
  CompPage()
      : super(
          initState: initState,
          reducer: buildReducer(),
          view: buildView,
          dependencies: Dependencies<CompState>(
              adapter: null,
              slots: <String, Dependent<CompState>>{
                //绑定Component
                "leftArea": LeftAreaConnector() + AreaComponent(),
                "rightArea": RightAreaConnector() + AreaComponent(),
              }),
          middleware: <Middleware<CompState>>[],
        );
}
Widget buildView(CompState state, Dispatch dispatch, ViewService viewService) {
  return Container(
    color: Colors.white,
    child: Column(
      children: [
        ///Component组件部分
        Expanded(
          flex: 3,
          child: Row(
            children: [
              Expanded(child: viewService.buildComponent("leftArea")),
              Expanded(child: viewService.buildComponent("rightArea")),
            ],
          ),
        ),

        ///按钮
        Expanded(
            flex: 1,
            child: Center(
              child: RawMaterialButton(
                fillColor: Colors.blue,
                shape: StadiumBorder(),
                onPressed: () => dispatch(CompActionCreator.change()),
                child: Text("改变"),
              ),
            ))
      ],
    ),
  );
}
enum CompAction { change }

class CompActionCreator {
  static Action change() {
    return const Action(CompAction.change);
  }
}
Reducer<CompState> buildReducer() {
  return asReducer(
    <Object, Reducer<CompState>>{
      CompAction.change: _change,
    },
  );
}

CompState _change(CompState state, Action action) {
  final CompState newState = state.clone();
  //改变leftAreaComponent中state
  newState.leftAreaState.text = "LeftAreaState:${Random().nextInt(1000)}";
  newState.leftAreaState.color =
      Color.fromRGBO(randomColor(), randomColor(), randomColor(), 1);

  //改变rightAreaComponent中state
  newState.rightAreaState.text = "RightAreaState:${Random().nextInt(1000)}";
  newState.rightAreaState.color =
      Color.fromRGBO(randomColor(), randomColor(), randomColor(), 1);

  return newState;
}

int randomColor() {
  return Random().nextInt(255);
}
总的来说,Component的使用还是比较简单的;如果我们把某个复杂的列表提炼出一个Component的,很明显有个初始化的过程,这里我们需要将:请求参数调体或列表详情操作,在page页面处理好,然后再更新给我们绑定的子Component的State,这样就能起到初始化某个模块的作用;至于刷新,下拉等后续操作,就让Component内部自己去处理了
fish_redux中是带有广播的通信方式,使用的方式很简单,这本是effect层,ctx参数自带的一个api,这里简单介绍一下
enum BroadcastAction { toNotify }

class BroadcastActionCreator {
  ///广播通知
  static Action toNotify(String msg) {
    return Action(BroadcastAction.toNotify, payload: msg);
  }
}
void _backFirst(Action action, Context<SecondState> ctx) {
  //广播通信
  ctx.broadcast(BroadcastActionCreator.toNotify("页面二发送广播通知"));
}
Effect<FirstState> buildEffect() {
  return combineEffects(<Object, Effect<FirstState>>{
    //接受发送的广播消息
    BroadcastAction.toNotify: _receiveNotify,
  });
}
void _receiveNotify(Action action, Context<FirstState> ctx) async {
  ///接受广播
  print("跳转一页面:${action.payload}");
}
广播的使用还是挺简单的,基本和dispatch的使用是一致的,dispatch是模块的,而broadcast是有页面栈,就能通知其他页面,很多情况下,我们在一个页面进行了操作,其他页面也需要同步做一些处理,使用广播就很简单了
注意: 广播发送和接受是一对多的关系,一处发送,可以在多处接受;和dispatch发送事件,如果在effect里面接受,在reducer就无法接受的情况是不一样的(被拦截了)
无限弱化了reducer层作用
Reducer<TestState> buildReducer() {
  return asReducer(
    <Object, Reducer<TestState>>{
      TestAction.onRefresh: _onRefresh,
    },
  );
}

TestState _onRefresh(TreeState state, Action action) {
  return state.clone();
}
说明
这种开发形式,可以说是个惯例,在android里面是封装一个个View,View里有对应的一套,逻辑自洽的功能,然后在主xm里面组合这些View;这种思想完全可以引申到Flutter里,而且,开发体验更上几百层楼,让你的widget组合可以更加灵活百变,百变星君
view模块中,页面使用widget组合的方式去构造的,只传入必要的数据源和保留一些点击回调
为什么用widget组合方式构造页面?
组合widget关键点
具体请查看 玩android 项目代码
这片文章,说实话,花了不少精力去写的,也花了不少时间构思;主要是例子,必须要自己重写下,反复思考例子是否合理等等,头皮微凉。
代码地址:代码demo地址
fish_redux版-玩Android:fish_redux版-玩android
大家如果觉得有收获,就给我点个赞吧!你的点赞,是我码字的最大动力!

标签:patch hang rgs 简单的 详解 方便 通过 ora 也有
原文地址:https://www.cnblogs.com/xdd666/p/13803224.html