标签:pychar pytho http 会点 返回值 src ams pac ISE
写这篇文章,整体还是比较坎坷的,我发现有知识断层,理解再整理写出来,还真的有些难。
作为java党硬磕Python,虽然对我而言是常事了(因为我比较爱折腾,哈哈),但这并不能影响我的热情。
执念这东西,有时真的很强大,回想下,你有多久没有特别想坚持学一样技能或者看一本书了呢。
之前就有很多粉丝和我说,六哥pytest很简单,都是入门的东西不爱看,网上有很多教程,能不能写点干货呀,但我为什么还是要坚持写呢?
简单呀,因为我想学,我之前都是拿来改改直接用,“哪里不会点哪里”,个中细节处理不是很懂,想好好消化下,再整理写出来。
在函数上加个装饰器@pytest.fixture(),个人理解为,就是java的注解在方法上标记下,依赖注入就能用了。
fixture是有返回值,没有返回值默认为None。用例调用fixture返回值时,把fixture的函数名当做变量用就可以了,示例代码如下:
# -*- coding: utf-8 -*-
# @Time    : 2020/10/24 18:23
# @Author  : longrong.lang
# @FileName: test_fixture_AsParam.py
# @Software: PyCharm
# @Cnblogs :https://www.cnblogs.com/longronglang
import pytest
@pytest.fixture()
def param():
    return "fixture当做参数"
def test_Asparam(param):
    print(‘param : ‘+param)
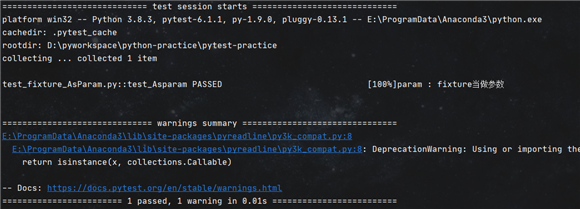
示例代码如下:
# -*- coding: utf-8 -*-
# @Time    : 2020/10/24 18:43
# @Author  : longrong.lang
# @FileName: test_Multiplefixture.py
# @Software: PyCharm
# @Cnblogs :https://www.cnblogs.com/longronglang
‘‘‘
多个fixture使用情况
‘‘‘
import pytest
@pytest.fixture()
def username():
    return ‘软件测试君‘
@pytest.fixture()
def password():
    return ‘123456‘
def test_login(username, password):
    print(‘\n输入用户名:‘+username)
    print(‘输入密码:‘+password)
    print(‘登录成功,传入多个fixture参数成功‘)

示例代码如下:
@pytest.fixture(scope="function", params=None, autouse=False, ids=None, name=None)
def test():
    print("fixture初始化参数列表")
控制fixture的作用范围:session>module>class>function
@pytest.fixture()如果不写参数,参数就是scope="function",它的作用范围是每个测试用例执行之前运行一次,销毁代码在测试用例之后运行。在类中的调用也是一样的。
示例代码如下:
# -*- coding: utf-8 -*-
# @Time    : 2020/10/24 19:05
# @Author  : longrong.lang
# @FileName: test_fixture_scopeFunction.py
# @Software: PyCharm
# @Cnblogs :https://www.cnblogs.com/longronglang
‘‘‘
scope="function"示例
‘‘‘
import pytest
# 默认不填写
@pytest.fixture()
def test1():
    print(‘\n默认不填写参数‘)
# 写入默认参数
@pytest.fixture(scope=‘function‘)
def test2():
    print(‘\n写入默认参数function‘)
def test_defaultScope1(test1):
    print(‘test1被调用‘)
def test_defaultScope2(test2):
    print(‘test2被调用‘)
class Testclass(object):
    def test_defaultScope2(self, test2):
        print(‘\ntest2,被调用,无返回值时,默认为None‘)
        assert test2 == None
if __name__ == ‘__main__‘:
    pytest.main(["-q", "test_fixture_scopeFunction.py"])
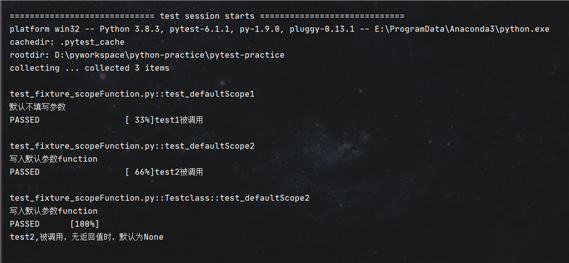
fixture为class级别的时候,如果一个class里面有多个用例,都调用了此fixture,那么此fixture只在此class里所有用例开始前执行一次。
示例代码如下:
# -*- coding: utf-8 -*-
# @Time    : 2020/10/24 19:15
# @Author  : longrong.lang
# @FileName: test_fixture_scopeClass.py
# @Software: PyCharm
# @Cnblogs :https://www.cnblogs.com/longronglang
‘‘‘
scope="class"示例
‘‘‘
import pytest
@pytest.fixture(scope=‘class‘)
def data():
    # 这是测试数据
    print(‘这是我的数据源,优先准备着哈‘)
    return [1, 2, 3, 4, 5]
class TestClass(object):
    def test1(self, data):
        # self可以理解为它自己的,英译汉我就是这么学的哈哈
        print(‘\n输出我的数据源:‘ + str(data))
if __name__ == ‘__main__‘:
    pytest.main(["-q", "test_fixture_scopeClass.py"])
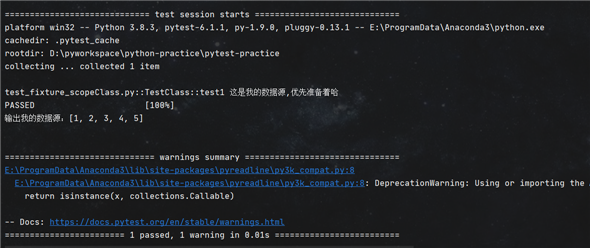
fixture为module时,在当前.py脚本里面所有用例开始前只执行一次。
示例代码如下:
# -*- coding: utf-8 -*-
# @Time    : 2020/10/24 19:27
# @Author  : longrong.lang
# @FileName: test_scopeModule.py
# @Software: PyCharm
# @Cnblogs :https://www.cnblogs.com/longronglang
‘‘‘
fixture为module示例
‘‘‘
import pytest
@pytest.fixture(scope=‘module‘)
def data():
    return ‘\nscope为module‘
def test1(data):
    print(data)
class TestClass(object):
    def text2(self, data):
        print(‘我在类中了哦,‘ + data)
if __name__ == ‘__main__‘:
    pytest.main(["-q", "test_scopeModule.py"])

fixture为session,允许跨.py模块调用,通过conftest.py 共享fixture。
也就是当我们有多个.py文件的用例的时候,如果多个用例只需调用一次fixture也是可以实现的。
必须以conftest.py命名,才会被pytest自动识别该文件。放到项目的根目录下就可以全局调用了,如果放到某个package下,那就在该package内有效。
文件目录结构如下:
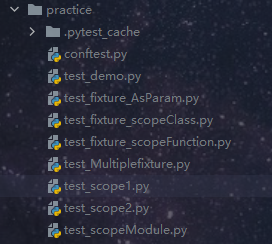
创建公共数据,命名为conftest.py,示例代码如下:
# -*- coding: utf-8 -*-
# @Time    : 2020/10/24 19:37
# @Author  : longrong.lang
# @FileName: conftest.py
# @Software: PyCharm
# @Cnblogs :https://www.cnblogs.com/longronglang
import pytest
@pytest.fixture(scope=‘session‘)
def commonData():
    str = ‘ 通过conftest.py 共享fixture‘
    print(‘获取到%s‘ % str)
    return str
创建测试脚本test_scope1.py,示例代码如下:
# -*- coding: utf-8 -*-
# @Time    : 2020/10/24 19:45
# @Author  : longrong.lang
# @FileName: test_scope1.py
# @Software: PyCharm
# @Cnblogs :https://www.cnblogs.com/longronglang
import pytest
def testScope1(commonData):
    print(commonData)
    assert commonData == ‘ 通过conftest.py 共享fixture‘
if __name__ == ‘__main__‘:
    pytest.main(["-q", "test_scope1.py"])
创建测试脚本test_scope2.py,示例代码如下:
# -*- coding: utf-8 -*-
# @Time    : 2020/10/24 19:45
# @Author  : longrong.lang
# @FileName: test_scope1.py
# @Software: PyCharm
# @Cnblogs :https://www.cnblogs.com/longronglang
import pytest
def testScope2(commonData):
    print(commonData)
    assert commonData == ‘ 通过conftest.py 共享fixture‘
if __name__ == ‘__main__‘:
    pytest.main(["-q", "test_scope2.py"])
然后同时执行两个文件,cmd到脚本所在目录,输入命令
pytest -s test_scope2.py test_scope1.py

一个工程下可以有多个conftest.py的文件,在工程根目录下设置的conftest文件起到全局作用。在不同子目录下也可以放conftest.py的文件,作用范围只能在改层级以及以下目录生效,另conftest是不能跨模块调用的。
示例代码如下:
# -*- coding: utf-8 -*-
# @Time    : 2020/10/24 20:10
# @Author  : longrong.lang
# @FileName: test_fixtureCall.py
# @Software: PyCharm
# @Cnblogs :https://www.cnblogs.com/longronglang
‘‘‘
fixture调用示例
‘‘‘
import pytest
# 调用方式一
@pytest.fixture
def login1():
    print(‘第一种调用‘)
# 传login
def test_case1(login1):
    print("\n测试用例1")
# 不传login
def test_case2():
    print("\n测试用例2")
# 调用方式二
@pytest.fixture
def login2():
    print("第二种调用")
@pytest.mark.usefixtures("login2", "login1")
def test_case3():
    print("\n测试用例3")
# 调用方式三
@pytest.fixture(autouse=True)
def login3():
    print("\n第三种调用")
# 不是test开头,加了装饰器也不会执行fixture
@pytest.mark.usefixtures("login2")
def loginss():
    print(123)
if __name__ == ‘__main__‘:
    pytest.main(["-q", "test_fixtureCall.py"])
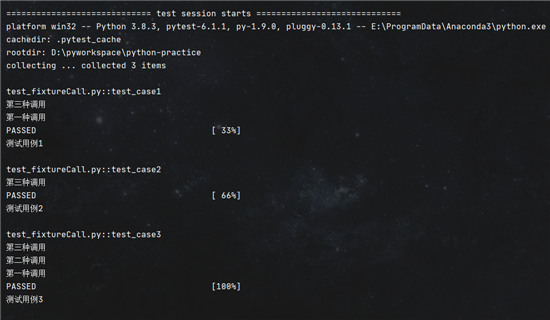
添加了 @pytest.fixture ,如果fixture还想依赖其他fixture,需要用函数传参的方式,不能用 @pytest.mark.usefixtures() 的方式,否则会不生效
示例代码如下:
# -*- coding: utf-8 -*-
# @Time    : 2020/10/24 20:23
# @Author  : longrong.lang
# @FileName: test_fixtureRelyCall.py
# @Software: PyCharm
# @Cnblogs :https://www.cnblogs.com/longronglang

‘‘‘
fixture依赖其他fixture的调用示例
‘‘‘
import pytest


@pytest.fixture(scope=‘session‘)
# 打开浏览器
def openBrowser():
    print(‘\n打开Chrome浏览器‘)


# @pytest.mark.usefixtures(‘openBrowser‘)这么写是不行的哦,肯定不好使
@pytest.fixture()
# 输入账号密码
def loginAction(openBrowser):
    print(‘\n输入账号密码‘)


#  登录过程
def test_login(loginAction):
    print(‘\n点击登录进入系统‘)


if __name__ == ‘__main__‘:
    pytest.main(["-q", "test_fixtureRelyCall.py"])
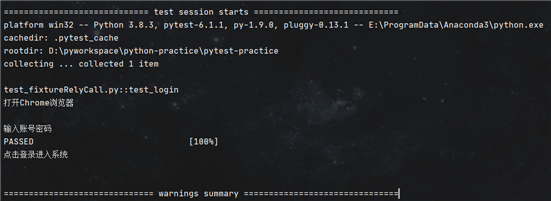
@pytest.fixture有一个params参数,接受一个列表,列表中每个数据都可以作为用例的输入。也就说有多少数据,就会形成多少用例,具体示例代码如下:
# -*- coding: utf-8 -*-
# @Time    : 2020/10/24 20:30
# @Author  : longrong.lang
# @FileName: test_fixtureParams.py
# @Software: PyCharm
# @Cnblogs :https://www.cnblogs.com/longronglang
‘‘‘
fixture的params示例
‘‘‘
import pytest

seq=[1,2]


@pytest.fixture(params=seq)
def params(request):
    # request用来接收param列表数据
    return request.param


def test_params(params):
    print(params)
    assert 1 == params
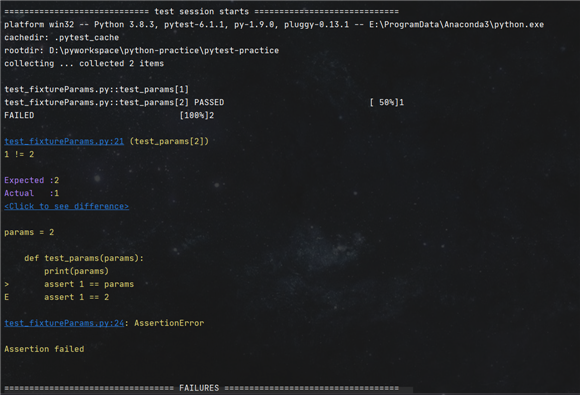
fixture里面的teardown,可以用yield来唤醒teardown的执行,示例代码如下:
# -*- coding: utf-8 -*-
# @Time    : 2020/10/24 20:44
# @Author  : longrong.lang
# @FileName: test_fixtrueYield.py
# @Software: PyCharm
# @Cnblogs :https://www.cnblogs.com/longronglang
‘‘‘
fixture之yield示例
‘‘‘

# !/usr/bin/env python
# -*- coding: utf-8 -*-

import pytest


@pytest.fixture(scope=‘module‘)
def open():
    print("打开浏览器!!!")
    yield
    print(‘关闭浏览器!!!‘)


def test01():
    print("\n我是第一个用例")


def test02(open):
    print("\n我是第二个用例")


if __name__ == ‘__main__‘:
    pytest.main(["-q", "test_fixtrueYield.py"])
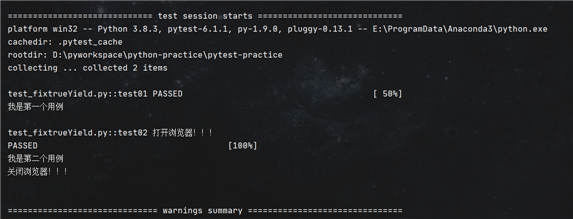
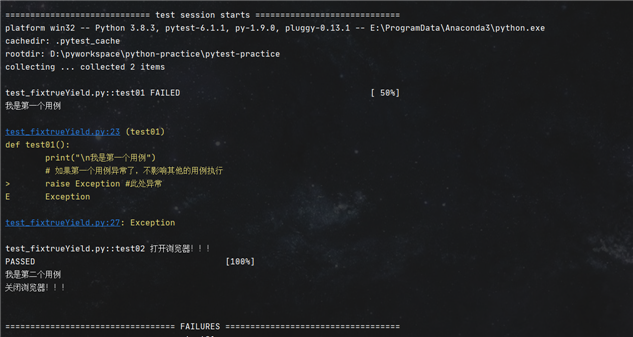
还在刚才的代码中修改,将test01函数中添加异常,具体代码如下:
# -*- coding: utf-8 -*-
# @Time    : 2020/10/24 20:44
# @Author  : longrong.lang
# @FileName: test_fixtrueYield.py
# @Software: PyCharm
# @Cnblogs :https://www.cnblogs.com/longronglang
‘‘‘
fixture之yield示例
‘‘‘

# !/usr/bin/env python
# -*- coding: utf-8 -*-

import pytest


@pytest.fixture(scope=‘module‘)
def open():
    print("打开浏览器!!!")
    yield
    print(‘关闭浏览器!!!‘)


def test01():
    print("\n我是第一个用例")
    # 如果第一个用例异常了,不影响其他的用例执行
    raise Exception #此处异常


def test02(open):
    print("\n我是第二个用例")


if __name__ == ‘__main__‘:
    pytest.main(["-q", "test_fixtrueYield.py"])
@pytest.fixture(scope="module")
def test_addfinalizer(request):
    # 前置操作setup
    print("==再次打开浏览器==")
    test = "test_addfinalizer"

    def fin():
        # 后置操作teardown
        print("==再次关闭浏览器==")

    request.addfinalizer(fin)
    # 返回前置操作的变量
    return test


def test_anthor(test_addfinalizer):
    print("==最新用例==", test_addfinalizer)
标签:pychar pytho http 会点 返回值 src ams pac ISE
原文地址:https://www.cnblogs.com/longronglang/p/13869445.html