标签:ethernet sha ast emc 返回 file 权限 led mit
Nginx+keepalived 双主配置这种使用两个vip地址,前端使用2台机器安装Nginx和Keepalived,互为主备,同时有两台机器工作,当其中一台机器出现故障,两台机器的请求转移到一台机器负担。
使用VMware Workstattion来创建虚拟机做实验,虚拟机网卡使用桥接模式,两台单网卡,两台双网卡。环境:
CentOS7系统,4台主机
 主机名和IP设置:

    两台Nginx,做为反向代理服务器,提供调度器高可用:
             Kee-Ngx-01.hjun.com  172.16.100.10
             Kee-Ngx-02.hjun.com  172.16.100.20

    两台upstream server,提供web服务高可用:
            Up-Servs-01.hjun.com  172.16.100.30
            Up-Servs-02.hjun.com  172.16.100.40

     keepalived的vrrp虚拟路由器的VIP为:
             172.16.100.60
             172.16.100.80
拓扑和地址规划: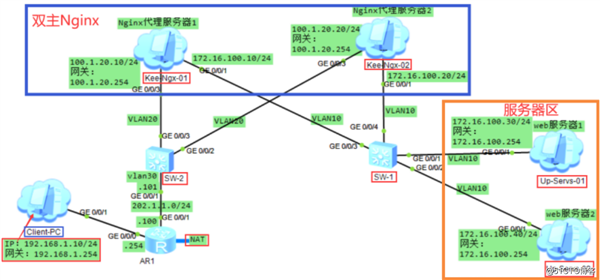
本实验使用网络模拟器和VMware Workstation Pro来实现:
Client-PC模拟外网用户访问服务器区提供的服务。
(1)交换机SW-1和SW-2的配置如下:
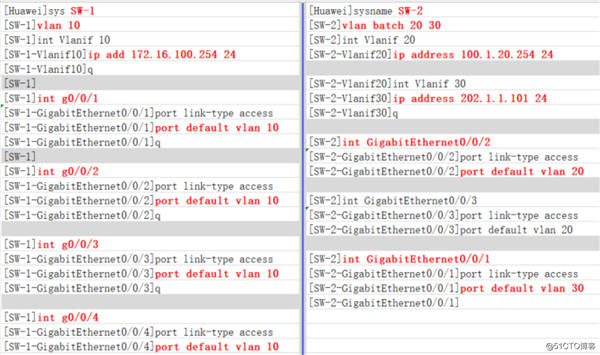
(2)、路由器AR1的配置:
 [AR1]int GigabitEthernet 0/0/1
 [AR1-GigabitEthernet0/0/1]ip add 202.1.1.100 24
 [AR1]int GigabitEthernet 0/0/0
 [AR1-GigabitEthernet0/0/0]ip add 192.168.1.254 24
(3)、配置路由:
[SW-2]ip route-static 192.168.1.0 24 Vlanif30 202.1.1.100
[AR1]ip route-static 100.1.20.0 24 GigabitEthernet 0/0/1 202.1.1.101
(4)、配置NAT:
配置ACL,配置数据包
[AR1]acl 2000
[AR1-acl-basic-2000]rule 10 permit source 192.168.1.0 0.0.0.255
[AR1-acl-basic-2000]rule 200 deny source any #拒绝其他所有地址
配置NAT,当数据匹配acl 2000时,就会进行地址转换(NAT)从GigabitEthernet 0/0/1出去:
[AR1]interface GigabitEthernet 0/0/1
[AR1-GigabitEthernet0/0/1]nat outbound 20001、配置各主机的主机名和IP地址:
(1)、设置各主机主机名:
[root@localhost ~]# hostnamectl set-hostname Kee-Ngx-01.hjun.com
[root@localhost ~]# hostnamectl set-hostname Kee-Ngx-02.hjun.com

[root@localhost ~]# hostnamectl set-hostname Up-Servs-01.hjun.com
[root@localhost ~]# hostnamectl set-hostname Up-Servs-02.hjun.com
(2)、配置各主机IP地址:
注意:两台nginx代理服务器有两个网卡,配置双IP,连接内网的网卡不用配置网关:
nginx代理服务器1的IP配置:
nginx代理服务器2的IP配置
后端两台web服务器也叫upstrem server的IP配置:
2、配置主机名解析:
[root@localhost ~]# cat /etc/hosts
127.0.0.1 localhost localhost.localdomain localhost4    localhost4.localdomain4
::1 localhost localhost.localdomain localhost6 localhost6.localdomain6
Kee-Ngx-01.hjun.com 172.16.100.10
Kee-Ngx-02.hjun.com 172.16.100.20
Up-Servs-01.hjun.com 172.16.100.30
Up-Servs-02.hjun.com 172.16.100.40
3、关闭selinux和firewalld
~]# setenforce 0
~]# sed -i ‘s#SELINUX=disabled#SELINUX=enforcing#g‘ /etc/selinux/config

~]# systemctl stop firewalld
~]# systemctl disable firewalld
4、配置时钟同步:
我没有时间服务器,这里只配置每台时间一样:
[root@localhost ~]# date ‘102715562020.30‘5、在各个节点都安装软件包:
(1)、代理服务器安装keepalived nginx:
~]# yum install keepalived nginx -y(2)、后端服务器web服务器也叫upstrem server安装httpd:
~]# yum install httpd -y(3)、在upstrem server中配web测试页面,为了能看到负载均衡效果,在两台RealServer中配置不同页面,如下:
[root@RS-1 ~] echo "Welcome To Up-Servs-01" > /var/www/html/index.html

[root@RS-2 ~] echo "Welcome To Up-Servs-02 !!!" > /var/www/html/index.html
6、在nginx反向代理服务器上配置nginx作为后端upstream server的反向代理服务器:
(1)、主机Kee-Ngx-01.hjun.com的nginx的配置如下:
首先在nginx的主配置文件nginx.conf中的http配置段中添加后端服务器upstream server组;然后在server段中配置nginx方向代理,调用upstream server组名称,这样客户端的请求就会被nginx转到后端upstream server提供的服务了。
http {
...............................................
include /etc/nginx/conf.d/*.conf;

upstream websrvs { #指定upstream server的名称为websrvs,调用时就调用websrvs
server 172.16.100.30 weight=1;
server 172.16.100.40 weight=1;
  }

server {
listen 80 default_server;
listen [::]:80 default_server;
server_name _;
root /usr/share/nginx/html;

include /etc/nginx/default.d/*.conf;

location / {
proxy_pass http://websrvs/; #调用upstream组名称,做反向代理
 }
(2)、主机Kee-Ngx-02.hjun.com的nginx的和Kee-Ngx-01配置一样,只要把Kee-Ngx-01的nginx配置
问复制到Kee-Ngx-02就可以了。
[root@Kee-Ngx-01 ~]# scp -p /etc/nginx/nginx.conf      root@172.16.100.15‘s password:
nginx.conf 100% 2611 1.6MB/s 00:00
[root@Kee-Ngx-01 ~]#
(3)、启动 Kee-Ngx-01.hjun.com 和Kee-Ngx-02.hjun.com上面的nginx服务:
[root@Kee-Ngx-01 ~]# systemctl start nginx
[root@Kee-Ngx-02 ~]# systemctl start nginx
这两台主机安装并启动nginx服务后,两台主机都可以代理后端服务器,都可以通过这两个主机的
IP都可以访问都后端upstream server提供的服务;
测试,先使用Kee-Ngx-01.hjun.com的IP172.16.100.10访问:

刷新页面,如下:
nginx代理访问后端服务也实现了负载均衡的效果了。
再测试,使用Ke-nginx01.hjun.com的172.16.100.20访问服务,页面显示如下:
刷新页面,如下:
这台nginx服务器代理访问后端服务也实现了负载均衡的效果了。
2、配置keepalived使两台nginx反向代理服务器可以作为高可用,就是使nginx反向代理服务
器也实现高可用;而且这里实现nginx反向代理服务器双主模型;
配置双主nginx反向代理服务器,需要在keepalived的配置文件中定义两个vrrp实例,即配置
两个vrrp虚拟路由器,不同虚拟路由器需要使用不同的vrid号。
我们配置nginx为高可用的使用,需要keepalived能够监控到nginx的运行状态,当keepalived的发现到
nginx发生故障时,keepAlived的虚拟路由器的MASTER的vip会切换到虚拟路由器的BACKUP节点上;
补充killall命令发送信号给程序的问题。
要是有killall命令需要安装psmisc包,安装:
~]# yum install psmisc -y

[root@Kee-Ngx-01 ~]# killall -0 nginx #使用killall发送信号0给处于启动状态的nginx进程
[root@Kee-Ngx-01 ~]# echo $? #查看命令执行后状态返回值,返回值是0
 0
[root@Kee-Ngx-01 ~]# systemctl stop nginx #停止nginx
[root@Kee-Ngx-01 ~]# killall -0 nginx #再使用killall发送信号0给处于关闭状态的nginx进程
nginx: no process found #提示没有找到进程
[root@Kee-Ngx-01 ~]# echo $? #查看命令执行后状态返回值,返回值是1
1
[root@Kee-Ngx-01 ~]#
这样我们就可以通过使用killall命令发送0信号给nginx就可以检测nginx的状态来判断nginx进程是否存在了。
(1)、下配置节点1(Kee-Ngx-01.hjun.com )的keepalived的配置文件:
[root@Kee-Ngx-01 ~]# cat /etc/keepalived/keepalived.conf
! Configuration File for keepalived

global_defs {
notification_email {
root@localhost
}
notification_email_from keadmin@localhost
smtp_server 127.0.0.1
smtp_connect_timeout 30
router_id Ke-dr01 #指定虚拟路由器的router_id
}

vrrp_script chk_mt #配置检测nginx状态的脚本
{
script "/etc/keepalived/nginx.sh" #转到检测nginx脚本的路径,这个脚本需要在keepalived配置文件之外定义
interval 2
weight -10

}

vrrp_instance VI_1 { #指定第一台虚拟路由器,名称为VI_1
state MASTER #当前节点的虚拟路由器为MASTER
interface ens37
virtual_router_id 60 #虚拟路由器的id
priority 100 #虚拟路由器的优先级
advert_int 1
authentication {
auth_type PASS
auth_pass 1111
}
virtual_ipaddress {
100.1.20.60/24 dev ens37 label ens37:1 #虚拟路由器的VIP地址
}

track_script {
chk_mt #调用检测nginx状态的脚本
}

notify_master "/etc/keepalived/notify.sh master"
notify_backup "/etc/keepalived/notify.sh backup"
notify_fault "/etc/keepalived/notify.sh fault"

}

vrrp_instance VI_2 { #指定配置第二台虚拟路由器
state BACKUP # 第二台虚拟路由器在当前节点为BACKUP
interface ens37
virtual_router_id 80
priority 98
advert_int 1
authentication {
auth_type PASS
auth_pass 2222
}
virtual_ipaddress {
100.1.20.80/24 dev ens37 label ens37:1
}

track_script {
chk_mt
}

notify_master "/etc/keepalived/notify.sh master"
notify_backup "/etc/keepalived/notify.sh backup"
notify_fault "/etc/keepalived/notify.sh fault"

}

[root@Kee-Ngx-01 ~]#
(2)、下配置节点2(Kee-Ngx-02.hjun.com )的keepalived的配置文件:
! Configuration File for keepalived

global_defs {
notification_email {
root@localhost
}
notification_email_from keadmin@localhost
smtp_server 127.0.0.1
smtp_connect_timeout 30
router_id Ke-dr02
}

vrrp_script chk_mt
{
script "/etc/keepalived/nginx.sh"
interval 2
weight -10

}

vrrp_instance VI_1 {
state BACKUP
interface ens37
virtual_router_id 60
priority 98
advert_int 1
authentication {
auth_type PASS
auth_pass 1111
}
virtual_ipaddress {
100.1.20.60/24 dev ens37 label ens37:1
}

track_script {
chk_mt
}

notify_master "/etc/keepalived/notify.sh master"
notify_backup "/etc/keepalived/notify.sh backup"
notify_fault "/etc/keepalived/notify.sh fault"

}

vrrp_instance VI_2 {
state MASTER
interface ens37
virtual_router_id 80
priority 100
advert_int 1
authentication {
auth_type PASS
auth_pass 2222
}
virtual_ipaddress {
100.1.20.80/24 dev ens37 label ens37:1
}

track_script {
chk_mt
}

notify_master "/etc/keepalived/notify.sh master"
notify_backup "/etc/keepalived/notify.sh backup"
notify_fault "/etc/keepalived/notify.sh fault"

}

[root@Kee-Ngx-02 ~]#
(3)、在两个节点都定义检测nginx状态的脚本,脚本如下(两个主机脚本一样):
[root@Kee-Ngx-01 keepalived]# cat nginx.sh
#!/bin/bash
killall -0 nginx &> /dev/null
[root@Kee-Ngx-0 keepalived]#
给脚本执行权限:
[root@Kee-Ngx-01 keepalived]# chmod a+x nginx.sh (4)、两台节点的keepalived的配置文件配置完成后启动keepalived:
[root@Kee-Ngx-01 ~]# systemctl start keepalived

[root@Kee-Ngx-02 ~]# systemctl start keepalived
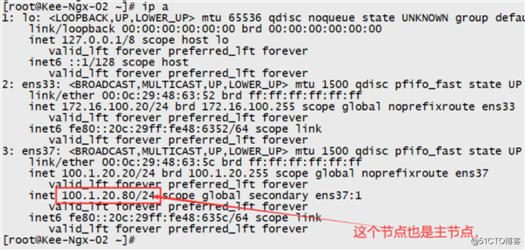
(5)、这时两个节点都会有VIP地址,只是VIP地址不一样:

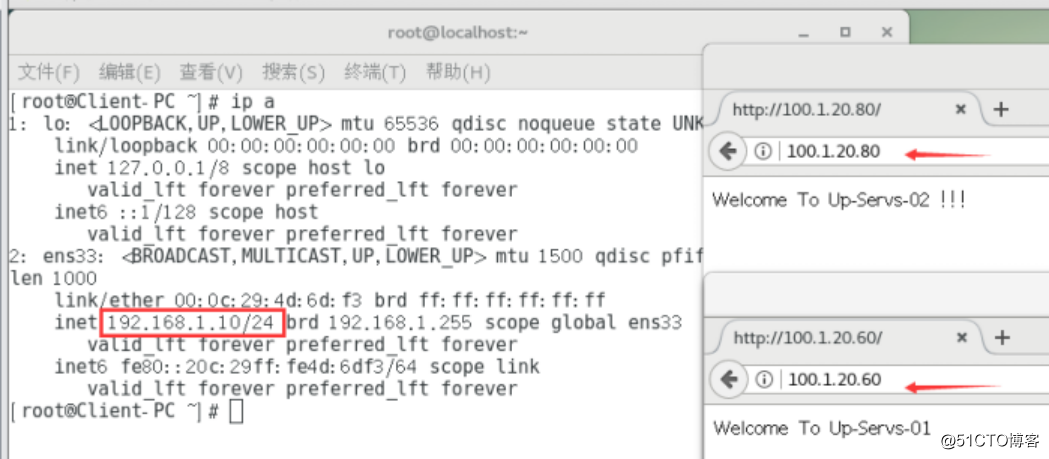
使用100.1.20.60访问,也是可以访问到后端两台服务器提供的页面,每次刷新都可以访问不同页面实现负载均衡效果: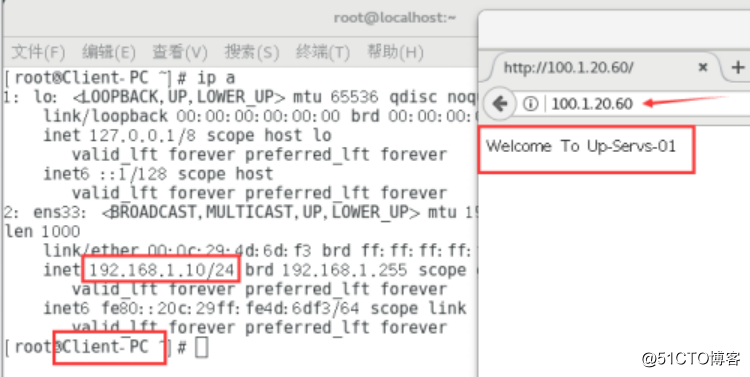
刷新页面,显示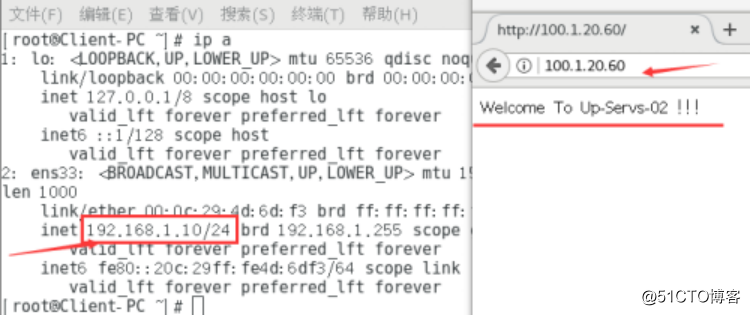
使用100.1.20.80访问,也是可以访问到后端两台服务器提供的页面,每次刷新都可以访问不同页面实现负载均衡效果: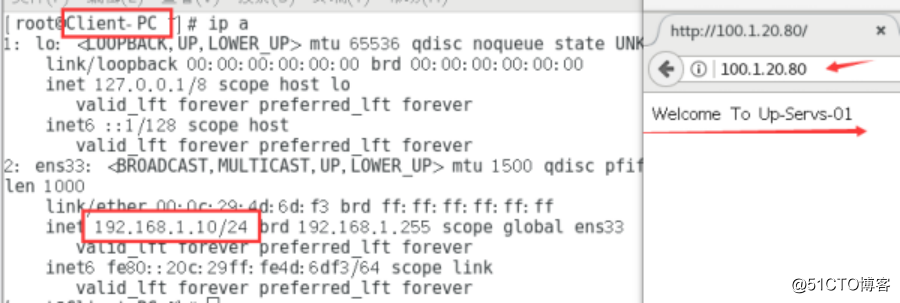
刷新页面,显示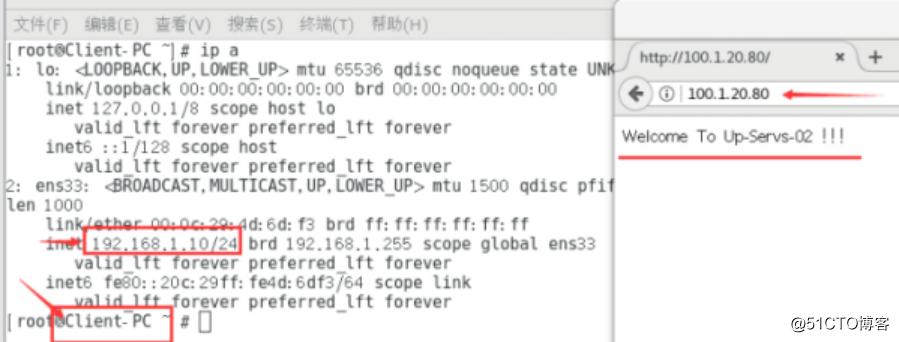
(6)、故障测试:
把节点1(Kee-Ngx-01)的nginx停掉,这样两个VIP都会在节点2(Kee-Ngx-02)上:
[root@Kee-Ngx-01 ~]# systemctl stop nginx查看节点2(Kee-Ngx-02)的IP,如:
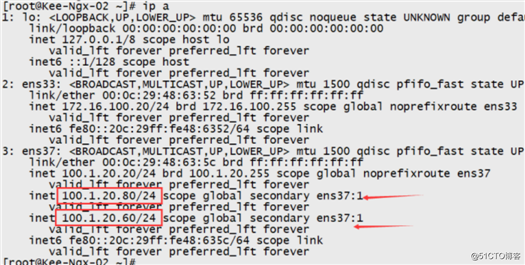
后端web服务依然可以服务:
Centos7+nginx+keepalived高可用及双主模式
标签:ethernet sha ast emc 返回 file 权限 led mit
原文地址:https://blog.51cto.com/75368/2545520