标签:roc file ash 分解 后台 使用 element option login
在前后台分离开发模式大行其道的今天,前端也形成了自己的一套工程体系,随着业务的不同,前端也诞生了很多相应的解决方案,那么我们在开发初期因该如何选择呢,我们来回顾常用应用有哪些。(本文只是自己得理解,
有理解错得地方希望老鸟帮忙指点一二)
SPA,单页面应用
单页面应用做为各种解决方案得基础,不得不说得力于webpack大行其道,webpack通过入口将所有彼此依赖得文件打成一个网,最终输出到磁盘中,index.html只关心最终输出文件,当然这里涉及到更核心得概念就是模块化编程,
比如amd,cmd,commonjs,es module等等这里就做阐述了。作为一个前端,我们很容易可以创建一个单页面应用。然而随着一个项目需求变得越来越多,项目体积变得越来越大得时候,单页面应用得弊端也渐渐得暴漏出来,
最大直观问题就是文件加载过大导致页面性能下降,到这里你会说,我可以做按需加载,可以uglify,可以tree shaking,可以提取公共文件等等,当然这些都是解决方案,那么如何可以更好得解决这个问题,是不是可以从业务上
进行拆分呢,各个模块单独使用各自得html呢,于是有了MPA(多页面应用)
MPA,多页面应用
通过webpack控制入口文件,打包出来多个最终文件同时提供多个html,可以实现模块之间项目独立从而达到解耦得目的,达到了我们得目的,但是也随之带来了一些弊端,MPA路由基于文档跳转,每一次跳转带来得负担就是需要重新加载
公共资源文件,性能上对比SPA大大降低,切合到实际开发中当项目太大多个部门共同开发时,所有人共同开发一个独立工程,一旦一个模块代码出现问题会影响到整个前端工程,线上发布同样会遇到同样得问题,一个模块会影响整个工程。
如何避免呢,答案就是微前端解决方案,那么什么是微前端设计方案呢
MicroFrontend,微前端
个人对于微前端的理解是基于对微服务的理解
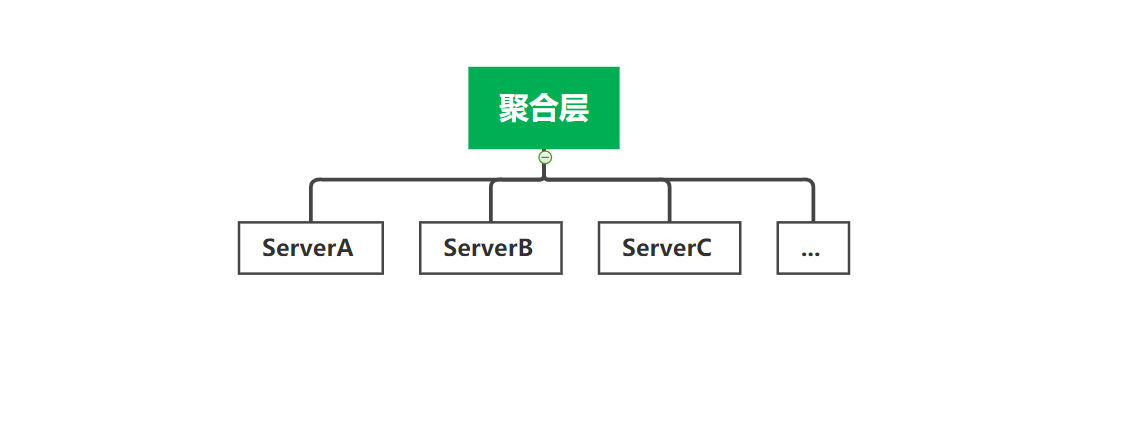
微服务将单体服务拆分成多个服务如图

多个服务相互独立,通过聚合层对外暴露公共端口,每个服务实现独立部署,那么前端是不是也可以这么做呢,于是微前端就诞生了
微前端架构解决了哪些SPA与MPA解决不了的问题呢?
1)对前端拆分解决了MPA的资源重新加载的问题
2)解决了SPA体积过大的问题
3)解决开发过程中各个模块相互影响的问题,达到了模块独立开发。
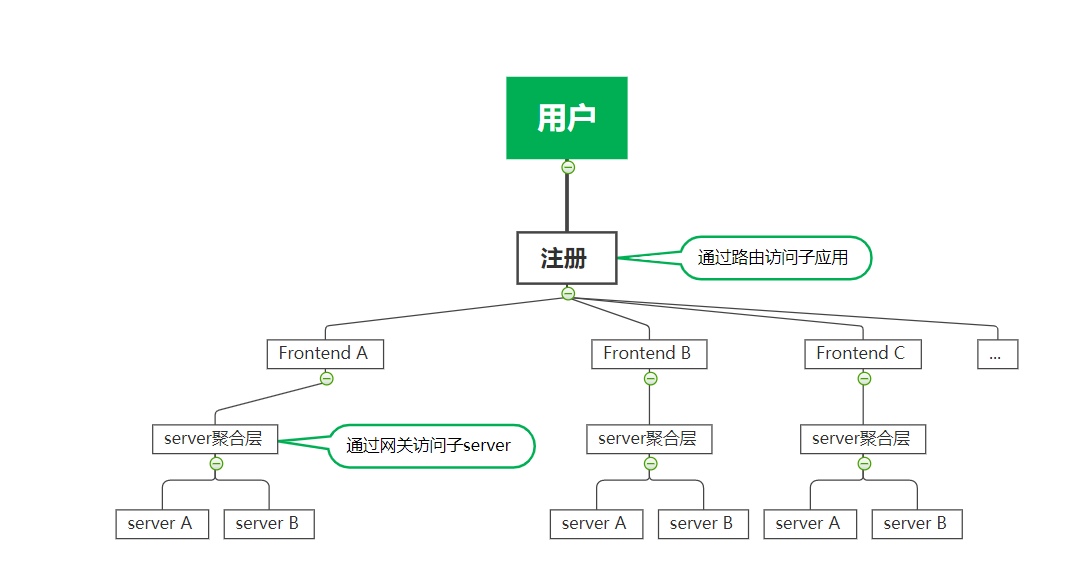
整体结构如图

那么如何创建一个微前端的应用呢
我们用两种方式实现,(核心思想都是single-spa)什么是single-spa自己查吧
1)html嵌套
核心:single-spa,htmlEntry
注册中心
import * as singleSpa from "single-spa";

import GlobalInstance from "./globalInstance";

import config from "./conf";

import { importEntry } from "import-html-entry";

var globalInstance = new GlobalInstance();

var registeredModule = [];

async function register(name, storeUrl, moduleUrl, path) {
  if (registeredModule.includes(name)) return;

  registeredModule.push(name);

  let storeModule = {},
    customProps = { globalInstance: globalInstance };
  // storeModule = await SystemJS.import(storeUrl);

  if (storeModule && globalInstance) {
    customProps.store = storeModule;
    // globalInstance.registerStore(storeModule);
  }

  singleSpa.registerApplication(
    name,
    () => {
      // return SystemJS.import(moduleUrl);
      return loadApp(moduleUrl);
    },
    () => {
      return location.pathname === path;
    },
    customProps
  );
}
async function loadApp(htmlPath) {
  const { template, execScripts, assetPublicPath } = await importEntry(
    htmlPath
  );

  const global = window;

  const appContent = template;

  let element = createElement(appContent);

  const execScriptsRes = await execScripts(global);

  var root = document.getElementById("root");
  root.appendChild(element);

  var appInstanceId = "test" + new Date().getTime();

  return {
    name: appInstanceId,
    bootstrap: execScriptsRes.bootstrap,
    mount: execScriptsRes.mount,
    unmount: execScriptsRes.unmount
  };
}

function createElement(htmlElement) {
  var container = document.createElement("div");
  container.innerHTML = htmlElement;
  return container;
}

config.forEach(c => {
  register(c.name, c.storeUrl, c.moduleUrl, c.path);
});

singleSpa.start();
这里加载应用利用的是html嵌套
子应用需要暴露三个钩子函数
bootstrap,mount,unmount
import singleSpaReact from ‘single-spa-react‘;
import RootComponent from ‘./component/root.component‘;

const reactLifecycles = singleSpaReact({
    React,
    ReactDOM,
    rootComponent: RootComponent,
    domElementGetter: () => document.getElementById(‘blog-root‘)
})


export const bootstrap = [
    reactLifecycles.bootstrap,
]

export const mount = [
    reactLifecycles.mount,
]

export const unmount = [
    reactLifecycles.unmount,
]
打包时候,针对出口配置如下
output: {
        path: path.resolve(__dirname, "./dist/"),
        filename: ‘[name]-[chunkhash].js‘,
        libraryTarget: "umd",
        library: "blog",
    },
这里要注意打包输出采用umd形式以保证importEntry可以正确加载到
2)js动态加载
核心single-spa,systemjs
import * as singleSpa from "single-spa";

// import appJson from "./appConf/importmap.json";
import confs from "./appConf/importConf.js";

function loadApp(url) {
  return System.import(url)
    .then(module => {
      console.log(module);
      return module.default;
    })
    .then(manifest => {
      const { entrypoints, publicPath } = manifest;
      const assets = entrypoints["app"].assets;
      return System.import(publicPath + assets[0])
    });
}

confs.forEach(conf => {
  register(conf);
});

function register(target) {
  singleSpa.registerApplication(
    target.name,
    () => {
      return loadApp(target.url);
    },
    () => {
      return location.pathname === target.path;
    }
  );
}

singleSpa.start();
子应用同样必须暴漏三个钩子函数
bootstrap,mount,unmount
import React from ‘react‘
import ReactDOM from ‘react-dom‘
import singleSpaReact from ‘single-spa-react‘
import RootComponent from ‘./root.component‘

const reactLifecycles = singleSpaReact({
  React,
  ReactDOM,
  rootComponent: RootComponent
  // domElementGetter: () => document.getElementById(‘common-root‘)
})


export const bootstrap = [
  reactLifecycles.bootstrap,
]

export const mount = [
  reactLifecycles.mount,
]

export const unmount = [
  reactLifecycles.unmount,
]
该种方式利用system进行加载目标应用
整个工程核心思想就这些,但是在实现过程中,我们如何正确加载到子应用
路由匹配子应用时候如何解决跨域问题
方案1
跳过跨域问题,由server解决路由问题
const express = require(‘express‘);
const path = require(‘path‘);
const { createProxyMiddleware } = require(‘http-proxy-middleware‘);

const port = process.env.PORT || 3001;
const app = express();

app.use(express.static(__dirname))


app.get(‘/blog‘, function (request, response) {
    response.sendFile(path.resolve(__dirname, ‘index.html‘))
})

app.get(‘/login‘, function (request, response) {
    response.sendFile(path.resolve(__dirname, ‘index.html‘))
})
var currentModule = ‘‘;

const getTargetServer = function (req) {
    var conf;
    switch (req.path) {
        case ‘/common_module‘:
            currentModule = ‘common_module‘;
            conf = {
                protocol: ‘http‘,
                host: ‘localhost‘,
                port: 3002
            };
            break;
        case ‘/blog_module‘:
            currentModule = ‘blog_module‘;
            conf = {
                protocol: ‘http‘,
                host: ‘localhost‘,
                port: 3003
            };
            break;case ‘/login_module‘:
            currentModule = ‘login_module‘;
            conf = {
                protocol: ‘http‘,
                host: ‘localhost‘,
                port: 3005
            };
            break;default:
            switch (currentModule) {
                case ‘common_module‘:
                    conf = {
                        protocol: ‘http‘,
                        host: ‘localhost‘,
                        port: 3002
                    };
                    break;
                case ‘blog_module‘:
                    conf = {
                        protocol: ‘http‘,
                        host: ‘localhost‘,
                        port: 3003
                    };
                    break;case ‘login_module‘:
                    conf = {
                        protocol: ‘http‘,
                        host: ‘localhost‘,
                        port: 3005
                    };
                    break;
                case ‘vedio_module‘:
            }
            break;
    }
    return conf;
}

const options = {
    target: ‘http://localhost:3002‘,
    changeOrigin: true,
    pathRewrite: {
        ‘/common_module‘: ‘/‘,
        ‘/blog_module‘: ‘/‘,‘/login_module‘: ‘/‘,
    },
    router: function (req) {
        return getTargetServer(req);
    }
}
const filter = function (pathname, req) {

    var result;
    result = (pathname.match(‘/common_module‘) ||
        pathname.match(‘/blog_module‘) ||
        pathname.match(‘/login_module‘) ||
        pathname.match(‘/*.css‘) ||
        pathname.match(‘/*.js‘)) && req.method === ‘GET‘;
    return result;
}
app.use(createProxyMiddleware(filter, options));


app.listen(port, function () {
    console.log("server started on port " + port)
})
方案2
前台通过cors解决跨域问题
headers: {
  "Access-Control-Allow-Origin": "*"
}
以上就是微前端的基本知识点,之后会不停更新。
标签:roc file ash 分解 后台 使用 element option login
原文地址:https://www.cnblogs.com/moran1992/p/14166056.html