标签:png on() 目的 class 支持向量机 repo pyplot 有关 info
数据预处理模块:由于图片的bmp格式或者pgm格式,所以需要先将读取进来的图片转化为二维矩阵,并保存为数据文件。目的是将图片信息切分为特征和标签,便于我们进行训练模型。
数据加载模块:将处理后的数据从文件中读入,同时切分为训练集和测试集。
模型训练模块:对训练集和测试集进行划分比例,接着使用PCA算法进行降维,再创建SVM分类器对训练集
行训练,得到训练好的SVM模型。使用该模型进行预测分析,计算出准确率。
绘制ROC曲线模块:根据学习器的预测结果对样例进行排序,并逐个作为正例进行预测,以假正例率为横轴,真正例率为纵轴可得到ROC曲线。
模型指标评估模块:返回F1-分数、precision和recall等评估参数。
读取图片数据,进行数据预处理:
读入的是图片,所以针对其尺寸将其转为矩阵,如ORL每张图片大小是92112,共有400张,所以将所有图片转化为一个(400, 92112)的二维矩阵,即大小为(400, 10304);同理,Yale每张图片大小是100*100,共有165张,所以对应的二维矩阵是(165,10000);
将得到的二维矩阵保存到文件中,便于下次的读取;
切分训练集和测试集:
对于ORL人脸库,训练集和测试集之比设置为70%:30%;
对于Yale人脸库,训练集和测试集之比设置为67.5%:32.5%;
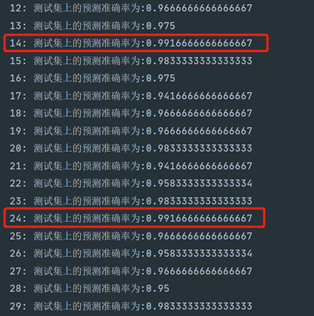
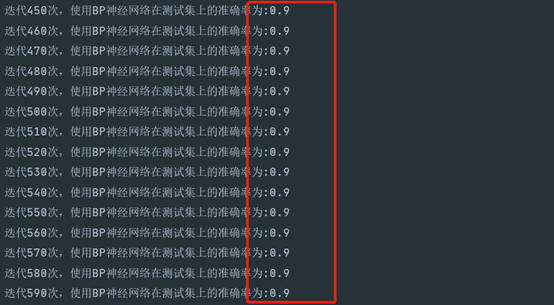
通过在一定的范围内迭代参数,ORL-svm模型最优随机种子random_state设置为14,效果如下图所示;Yale-svm模型最优随机种子random_state设置为13;
ORL人脸库:由英国剑桥大学AT&T实验室创建,包含40个不同个体,每个个体包含10张不同姿态的人脸图像,共400张面部图像,部分人脸图像包括了姿态,表情和面部饰物的变化,其深度旋转和平面旋转可达20度;ORL人脸数据库中每个采集对象的10幅样本图片都经过归一化处理的灰度图像,图像尺寸均为92×112,图像背景为黑色。
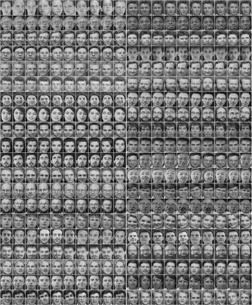
YALE人脸数据库:由耶鲁大学计算视觉与控制中心创建,包含包含15个个体,每个个体包含11张不同姿态的人脸图像,共165张图片,包含光照、表情和姿态的变化。Yale人脸数据库中每个个体采集的样本包含更明显的光照、表情和姿态以及遮挡变化。

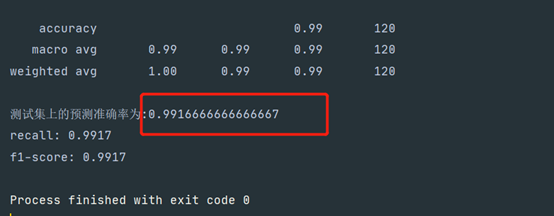
ORL人脸数据集:99.167%
F1-分数:0.9917
Recall召回率:0.9917
Yale人脸数据集准确率:96.297%
F1-分数:0.9630
Recall召回率:0.9630

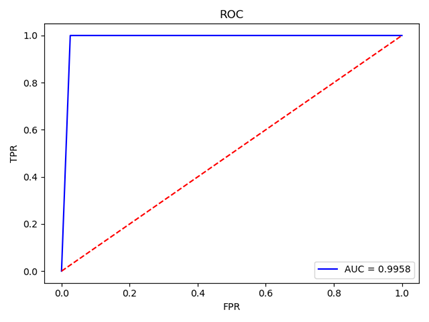
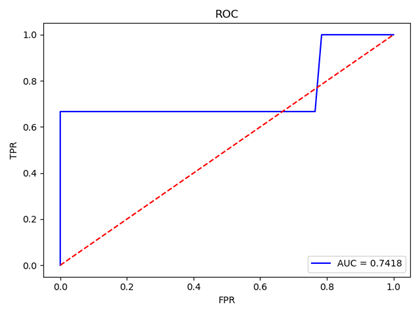
ROC曲线是评估模型效果的重要工具,其X轴为假阳性率,Y轴为真阳性率即召回率recall,其意义在于,在真阳性率时,模型同时判错阳性的样本比例,因此曲线越陡,越表示模型效果好。ROC曲线下AUC面积越大表示模型效果越好,我们可以利用sklearn 中的roc_curve函数方便的画ROC曲线。
下图是ORL人脸库使用测试集验证的模型ROC曲线图:

通过对ORL和Yale人脸数据集的识别实验,我总结出了一下结论:
从实验结果来看,通过不断优化模型参数,两个人脸库在测试集上的识别准确率都超过了95%,甚至ORL的识别准确率高达99.167%,这说明PCA降维结合svm分类器得到的效果是很好的。
人脸图像数据识别的准确率与人脸样本复杂程度有关系。比如ORL的人脸样本是相对于Yale的人脸样本,其姿势更加端正,而且面部表情的变化没有那么大,所以识别起来更加容易一些。另外样本的环境如果越复杂,识别起来难度就越大。
调参方面需要技巧。在构建模型时,模型的参数往往对模型效果具有较大的影响,如果通过设置多层遍历参数的方式来择优参数,那样时间复杂度会达到t(t>=2)次方级别。因此可以先固定几个较优的参数,然后针对某一个参数进行迭代,这样使得时间复杂度降到O(n),大大提高了调参效率。
# orl_face_recognition.py

from PIL import Image
import numpy as np
import matplotlib.pyplot as plt
from sklearn.decomposition import PCA
from sklearn.model_selection import train_test_split
from sklearn.svm import SVC
# 得到模型的评估指标,F1-分数,召回率,ROC曲线
from sklearn.metrics import classification_report, roc_curve, auc, f1_score, recall_score


class FaceRecognition:
    # 初始化参数
    def __init__(self, photo_path, save_file=‘data.txt‘):
        """
        :param photo_path: 图片路径
        :param save_file: 将图片转化为二维数据的文件名
        """
        self.path = photo_path
        self.save_file = save_file
        self.y_test = None
        self.y_predict = None
        self.model = None  # 保存最终训练得到的模型

    # 处理数据,将图片数据转化为二维矩阵
    def handle_data(self):
        # 标签列添加到矩阵的最后一列
        label_list = []
        # 将每一行的特征向量进行堆叠,最后得到(400,10305)大小的二维特征矩阵
        stack_matrix = np.array([[0]])
        for i in range(1, 41):
            # 加入每张图片的标签
            label_list.append(i)
            class_matrix = np.array(label_list, ndmin=2)
            for j in range(1, 11):
                self.path = photo_path.format(i, j)
                x = Image.open(self.path)
                # 转换为narray的结构,并转为二维矩阵
                data = np.reshape(np.asarray(x), (1, -1))
                # print(x_data.shape)  # 得到的维度是(1, 10304)
                one_data = np.column_stack((data, class_matrix))
                # 第一次不合并
                if i == 1 and j == 1:
                    stack_matrix = one_data
                    continue
                stack_matrix = np.row_stack((stack_matrix, one_data))

            label_list.pop()
        np.savetxt(self.save_file, stack_matrix)

    # 加载读入数据
    def load_data(self):
        file = self.save_file
        # 读入处理后的图片二维矩阵文件
        train_data = np.loadtxt(file)
        data = train_data[:, :10304]  # 取出特征数据
        target = train_data[:, -1]  # 取出标签数据
        return data, target

    # 训练模型,返回准确率和模型
    def train_model(self, n_components=50, random_state=14):
        """
        :param n_components: PCA降维的维度
        :param random_state: 设置随机种子,调整后得到最佳模型
        :return: 返回准确率和模型
        """
        x_data, y_data = self.load_data()
        x_train, x_test, y_train, self.y_test = train_test_split(x_data, y_data,
                                                                 test_size=0.3,
                                                                 random_state=random_state)

        # 利用PCA将特征降至50维
        pca = PCA(n_components=n_components)
        x_train = pca.fit_transform(x_train)
        self.model = SVC(kernel=‘rbf‘, C=10)  # C是惩罚参数
        self.model.fit(x_train, y_train)

        # 利用在训练集上进行降维的PCA对测试数据进行降维,保证转换矩阵相同
        x_test_pca = pca.transform(x_test)
        self.y_predict = self.model.predict(x_test_pca)
        score = self.model.score(x_test_pca, self.y_test)
        print(classification_report(self.y_test, self.y_predict))

        return score, self.model

    # 画ROC图
    def draw_ROC(self):
        fpr, tpr, thresholds = roc_curve(self.y_test, self.y_predict,  pos_label=40)
        roc_auc = auc(fpr, tpr)
        plt.title(‘ROC‘)
        plt.plot(fpr, tpr, ‘b‘, label=‘AUC = %0.4f‘ % roc_auc)
        plt.legend(loc=‘lower right‘)
        plt.plot([0, 1], [0, 1], ‘r--‘)
        plt.ylabel(‘TPR‘)
        plt.xlabel(‘FPR‘)
        plt.show()

    # 返回模型评估参数, 打印出F1-分数和召回率评估参数
    def model_evaluation(self):
        print(‘recall: %.4f‘ % recall_score(self.y_test, self.y_predict, average=‘micro‘))
        print(‘f1-score: %.4f‘ % f1_score(self.y_test, self.y_predict, average=‘micro‘))


if __name__ == ‘__main__‘:
    # 传入图片路径和需要保存的文件名
    photo_path = ‘./ORL/s{}_{}.bmp‘
    save_file = ‘data.txt‘
    recognition = FaceRecognition(photo_path=photo_path, save_file=save_file)

    recognition.handle_data()
    recognition.load_data()
    acc, model = recognition.train_model(50, 14)
    print(‘测试集上的预测准确率为:{}‘.format(acc))
    recognition.draw_ROC()
    recognition.model_evaluation()
# yale_face_recognition.py

from PIL import Image
import numpy as np
import matplotlib.pyplot as plt
from sklearn.decomposition import PCA
from sklearn.model_selection import train_test_split
from sklearn.svm import SVC
# 得到模型的评估指标,F1-分数,召回率,ROC曲线
from sklearn.metrics import classification_report, roc_curve, auc, f1_score, recall_score


class FaceRecognition:
    # 初始化参数
    def __init__(self, photo_path, save_file=‘yale_data.txt‘):
        """
        :param photo_path: 图片路径
        :param save_file: 将图片转化为二维数据的文件名
        """
        self.path = photo_path
        self.save_file = save_file
        self.y_test = None
        self.y_predict = None
        self.model = None  # 保存最终训练得到的模型

    # 处理数据,将图片数据转化为二维矩阵
    def handle_data(self):
        # 标签列添加到矩阵的最后一列
        label_list = []
        # 将每一行的特征向量进行堆叠,最后得到(165,10000)大小的二维特征矩阵
        stack_matrix = np.array([[0]])
        for i in range(1, 16):
            # 加入每张图片的标签
            label_list.append(i)
            class_matrix = np.array(label_list, ndmin=2)
            for j in range(1, 12):
                self.path = photo_path.format(i, j)
                x = Image.open(self.path)
                # 转换为narray的结构,并转为二维矩阵
                data = np.reshape(np.asarray(x), (1, -1))
                # print(x_data.shape)  # 得到的维度是(1, 10304)
                one_data = np.column_stack((data, class_matrix))
                # 第一次不合并
                if i == 1 and j == 1:
                    stack_matrix = one_data
                    continue
                stack_matrix = np.row_stack((stack_matrix, one_data))

            label_list.pop()
        np.savetxt(self.save_file, stack_matrix)

    # 加载读入数据
    def load_data(self):
        file = self.save_file
        # 读入处理后的图片二维矩阵文件
        train_data = np.loadtxt(file)
        data = train_data[:, :10000]  # 取出特征数据
        target = train_data[:, -1]  # 取出标签数据
        return data, target

    # 训练模型,返回准确率和模型,并打印出F1-分数和召回率等评估参数
    def train_model(self, n_components=50, random_state=13):
        """
        :param n_components: PCA降维的维度
        :param random_state: 设置随机种子,调整后得到最佳模型
        :return: 返回准确率和模型
        """
        x_data, y_data = self.load_data()
        x_train, x_test, y_train, self.y_test = train_test_split(x_data, y_data, test_size=0.325, random_state=random_state)

        # 利用PCA将特征降至50维
        pca = PCA(n_components=n_components, whiten=True)
        x_train = pca.fit_transform(x_train)
        self.model = SVC(kernel=‘rbf‘, C=50)  # C是惩罚参数
        self.model.fit(x_train, y_train)

        # 利用在训练集上进行降维的PCA对测试数据进行降维,保证转换矩阵相同
        x_test_pca = pca.transform(x_test)
        self.y_predict = self.model.predict(x_test_pca)
        score = self.model.score(x_test_pca, self.y_test)
        print(classification_report(self.y_test, self.y_predict))
        return score, self.model

    # 画ROC图
    def draw_ROC(self):
        fpr, tpr, thresholds = roc_curve(self.y_test, self.y_predict, pos_label=15)
        roc_auc = auc(fpr, tpr)
        plt.title(‘ROC‘)
        plt.plot(fpr, tpr, ‘b‘, label=‘AUC = %0.4f‘ % roc_auc)
        plt.legend(loc=‘lower right‘)
        plt.plot([0, 1], [0, 1], ‘r--‘)
        plt.ylabel(‘TPR‘)
        plt.xlabel(‘FPR‘)
        plt.show()

    # 返回模型评估参数
    def model_evaluation(self):
        print(‘recall: %.4f‘ % recall_score(self.y_test, self.y_predict, average=‘micro‘))
        print(‘f1-score: %.4f‘ % f1_score(self.y_test, self.y_predict, average=‘micro‘))


if __name__ == ‘__main__‘:
    # 传入图片路径和需要保存的文件名
    photo_path = ‘./Yale/{}/s{}.bmp‘
    save_file = ‘yale_data.txt‘
    recognition = FaceRecognition(photo_path=photo_path, save_file=save_file)

    recognition.handle_data()
    recognition.load_data()

    acc, model = recognition.train_model()
    print(‘测试集上的预测准确率为:{}‘.format(acc))
    recognition.draw_ROC()
    recognition.model_evaluation()
标签:png on() 目的 class 支持向量机 repo pyplot 有关 info
原文地址:https://www.cnblogs.com/jmchen/p/14244249.html