标签:download roo codeblock 状态 lib world span space package
?目录一览:
0x01 基础实践
(1) Maven 构建之 Pipeline Script
(2) Maven 构建之 Pipeline Script from SCM
(3) Jenkins pipeline 之 邮件(Email)发信管理
WeiyiGeek Blog - 为了能到远方,脚下的每一步都不能少。
原文地址: https://mp.weixin.qq.com/s/RES8eg0ljzdrQ_ls_hHWjw
Tips : 本文章来源 Blog 站点或者 WeiyiGeek 公众账号 (技术交流、友链交换请邮我哟),

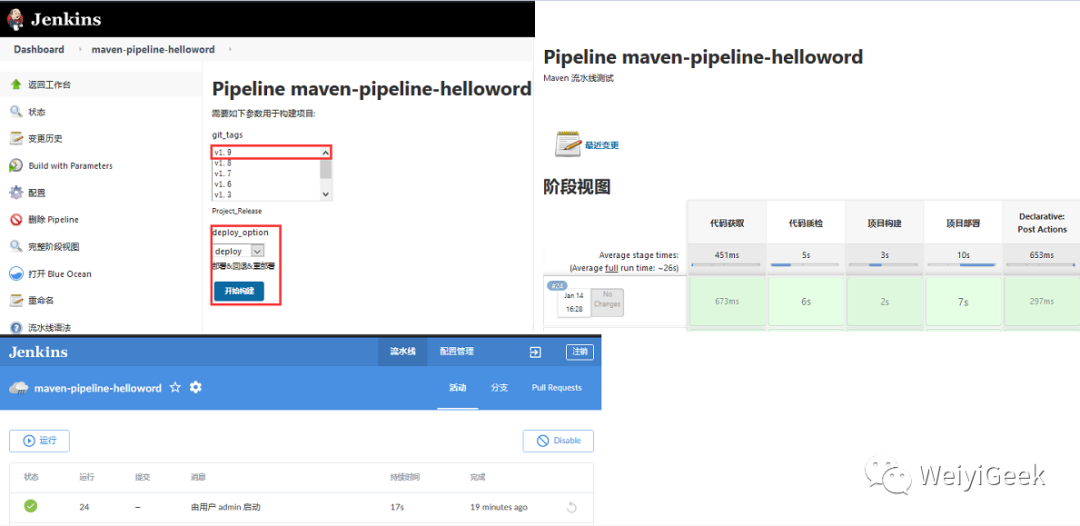
实现效果:

描述:此处重新不在累述新建流水线任务(maven-pipeline-helloword)而是直接进行配置测试等关键项;
流程:代码拉取 -> 代码检测 -> 代码构建 -> 代码部署 -> 消息通知
Step 1. Dashboard -> maven-pipeline-helloword -> 流水线项目配置 (名称|丢弃旧的构建|参数化构建过程(Git/名称))
# Git 参数
名称: git_tags
描述: Project_Release
参数类型: 标签
默认值: origin/master
排序方式: DESCENDING SMART
----------------------------
# 选项 参数
名称: deploy_option
选项:
deploy
rollback
redeploy
描述: 部署&回退&重部署
Step 2.流水线 Pipeline script 编写
pipeline {
  agent any
  stages {
    stage ("代码获取") {
      steps {
       checkout([$class: ‘GitSCM‘, branches: [[name: ‘${git_tags}‘]], doGenerateSubmoduleConfigurations: false, extensions: [], submoduleCfg: [], userRemoteConfigs: [[credentialsId: ‘b4c8b4e9-2777-44a1-a1ed-e9dc21d37f4f‘, url: ‘git@gitlab.weiyigeek.top:ci-cd/java-maven.git‘]]])
      }
    }

    stage ("代码质检") {
     steps {
       sh label: ‘sonar‘, returnStatus: true, script: ‘‘‘/usr/local/bin/sonar-scanner -Dsonar.projectName=${JOB_NAME} -Dsonar.projectKey=Hello-World -Dsonar.sources=.‘‘‘
     }
    }

    stage ("项目构建") {
     steps {
      // 此处实际上不用执行cd命令
      sh label: ‘build‘, script: ‘cd /var/lib/jenkins/workspace/maven-pipeline-helloword/ && /usr/local/maven/bin/mvn clean package -Dmaven.test.skip=true ‘
     }
    }

    stage ("项目部署") {
     steps {
      // 脚本为前面一章的部署脚本(两种方式)
      sh label: ‘deploy‘, script: ‘/tmp/script/maven-jenkins-ci-script.sh‘
      // sh "/tmp/script/maven-jenkins-ci-script.sh"
     }
    }
  }

  // 消息通知: POST阶段当所有任务执行后触发
  post {
    // 企业微信
    always {
      qyWechatNotification aboutSend: true, failNotify: true, failSend: true, mentionedId: ‘ALL‘, mentionedMobile: ‘‘, startBuild: true, successSend: true, unstableSend: true, webhookUrl: ‘https://qyapi.weixin.qq.com/cgi-bin/webhook/send?key=c222f3fc-f645-440a-ad24-0ce8d9626fa0‘
    }

    // 钉钉
    success {
      //当此Pipeline成功时打印消息(注意此处的robot为您在Jenkins全局配置中设置钉钉的id值)
      echo ‘success‘
      dingtalk (
          robot: ‘weiyigeek-1000‘,
          type: ‘LINK‘,
          title: ‘Jenkins 持续集成 - 任务名称 ${JOB_NAME}‘,
          text: [
              ‘项目构建成功‘,
              ‘Pipeline 流水线测试‘
          ],
          messageUrl: ‘http://www.weiyigeek.top‘,
          picUrl: ‘https://ss2.bdstatic.com/70cFvnSh_Q1YnxGkpoWK1HF6hhy/it/u=2319834554,1372531032&fm=26&gp=0.jpg‘,
          atAll: true
      )
    }
  }
}
Step 3.Pipeline maven-pipeline-helloword 进行选项参数构建 (Build with Parameters)-> 部署 v1.8 版本

Step 4.查看部署结果与信息通知

描述: 我也可以将上面流水线的脚本放在我们的代码项目之中,在流水线拉取项目时候便会自动按照项目中的Jenkinsfile文件内容进行执行对于操作
Step 1.修改项目首页文件以及在项目根添加Jenkinsfile文件(内容将取消第一阶段的代码拉取),例如:
# (1) E:\EclipseProject\hello-world\src\main\webapp\index.jsp
# (2) 项目信息
/e/EclipseProject/hello-world (master)
$ ls
Jenkinsfile  pom.xml  src/  target/

# (3) Jenkinsfile :注意内容将取消第一阶段的代码拉取
pipeline {
  agent any
  stages {

    stage ("代码质检") {
     steps {
       sh label: ‘sonar‘, returnStatus: true, script: ‘‘‘/usr/local/bin/sonar-scanner -Dsonar.projectName=${JOB_NAME} -Dsonar.projectKey=Hello-World -Dsonar.sources=.‘‘‘
     }
    }

    stage ("项目构建") {
     steps {
      sh label: ‘build‘, script: ‘cd /var/lib/jenkins/workspace/maven-pipeline-helloword/ && /usr/local/maven/bin/mvn clean package -Dmaven.test.skip=true ‘
     }
    }

    stage ("项目部署") {
     steps {
      // 脚本为前面一章的部署脚本
      sh label: ‘deploy‘, script: ‘/tmp/script/maven-jenkins-ci-script.sh‘
     }
    }
  }

  // 消息通知: POST阶段当所有任务执行后触发
  post {
    // 企业微信
    always {
      qyWechatNotification aboutSend: true, failNotify: true, failSend: true, mentionedId: ‘ALL‘, mentionedMobile: ‘‘, startBuild: true, successSend: true, unstableSend: true, webhookUrl: ‘https://qyapi.weixin.qq.com/cgi-bin/webhook/send?key=c222f3fc-f645-440a-ad24-0ce8d9626fa0‘
    }

    // 钉钉
    success {
      //当此Pipeline成功时打印消息 (注意此处的robot为您在Jenkins全局配置中设置钉钉的id值)
      echo ‘success‘
      dingtalk (
          robot: ‘weiyigeek-1000‘,
          type: ‘LINK‘,
          title: ‘Jenkins 持续集成 - 任务名称 ${JOB_NAME}‘,
          text: [
              ‘项目构建成功‘,
              ‘Pipeline 流水线测试‘
          ],
          messageUrl: ‘http://www.weiyigeek.top‘,
          picUrl: ‘https://ss2.bdstatic.com/70cFvnSh_Q1YnxGkpoWK1HF6hhy/it/u=2319834554,1372531032&fm=26&gp=0.jpg‘,
          atAll: true
      )
    }
  }
}
Step 2.上传修改的项目到Gitlab内部私有仓库中
$ git add .
$ git commit -m "v1.10 pipeline script for SCM"
# [master 3f9b6e8] v1.10 pipeline
#  2 files changed, 26 insertions(+), 1 deletion(-)
#  create mode 100644 Jenkinsfile
$ git push
# To http://gitlab.weiyigeek.top/ci-cd/java-maven.git
#    0f50b10..3f9b6e8  master -> master
$ git tag -a "v1.10" -m "v1.10 Pipelinescript for SCM "
$ git push origin v1.10
# To http://gitlab.weiyigeek.top/ci-cd/java-maven.git
#  * [new tag]         v1.10 -> v1.10
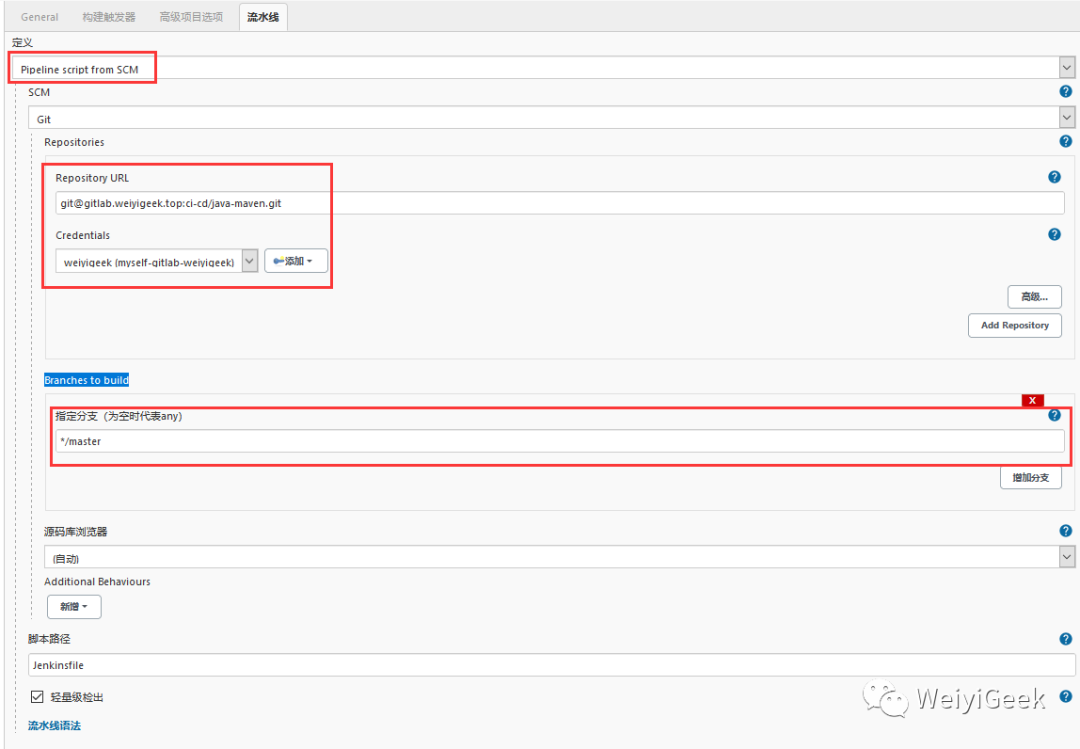
Step 3.任务项目流水线设置 -> 选择 Pipeline script from SCM -> git -> 输入 Repository URL 和 Credentials -> 指定分支 Branches to build (以及Jenkinsfile 拉取的文件名实现自动构建集成)

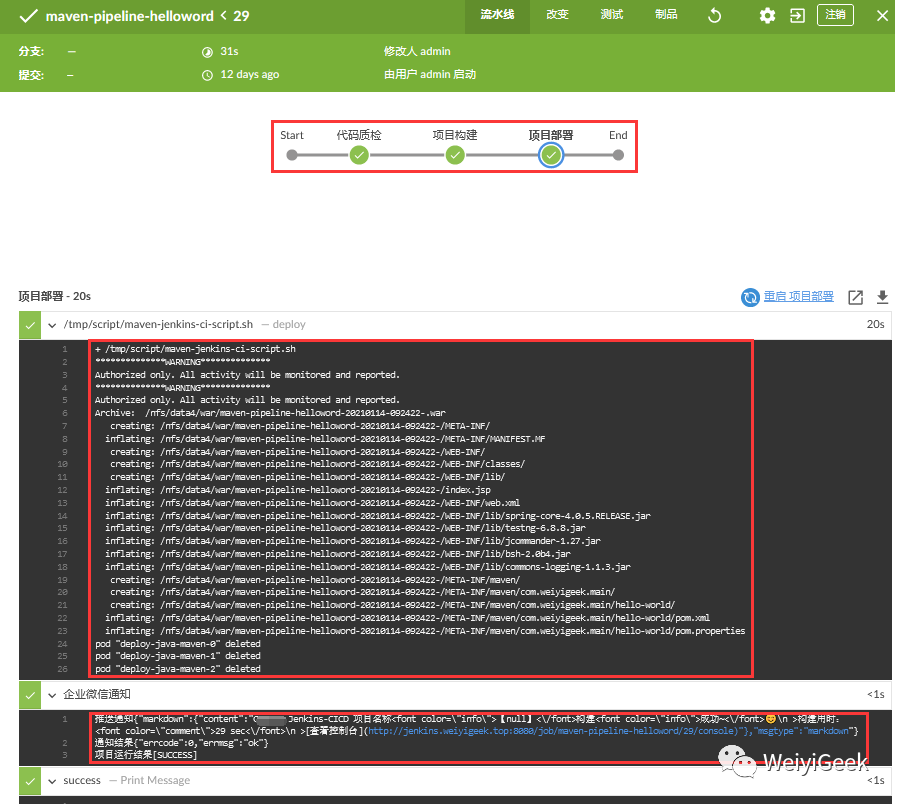
Step 4.项目构建参数输入 -> v1.10 | deploy -> 进行构建 -> 查看流水线

Step 5.查看部署结果http://10.10.107.202:30089/结果正常;
Maven - Hello World - v1.10 - Pipeline script for SCM

访问时间: Tue Jan 26 2021 14:54:35 GMT+0800 (中国标准时间)

Server : Apache Tomcat/8.5.61 | 10.244.1.217

Client : 10.244.0.0 | 10.244.0.0

Document_Root : /usr/local/tomcat/webapps/ROOT/

URL : 10.10.107.202/index.jsp
描述: 如果利用 Freestyle 的原生Job我们可以很好的进行Job邮件发信,而在与 Jenkins 流水线中需要Extended E-mail Notification的方式进行实现(此处只是简单说明建议采用钉钉或者企业微信的方式更加及时方便);
下面提供两种格式进行参考:
(1) Scripted Pipeline
node ("master"){
    parameters {string(name:‘Jenkins‘,defaultValue:‘Hello‘,description:‘How should I greet the world‘)}
    echo  "${params.nane} 你好!"
    // gitlab 流水线通知
    gitlabCommitStatus {
        stage(‘第1步拉代码‘){
            echo "拉代码"
            git credentialsId: ‘03fd8295-c536-4871-9794-1c37394676e0‘, url: ‘git@gitlab.corp.XXX.com:wangxu/ops.git‘
        }
        stage(‘第2步编译‘){
            echo "编译"
           // sh "source /etc/profile && /usr/local/maven/bin/mvn clean compile"
        }
        stage(‘第3步打包‘){
            echo "打包,有一个mail模块是系统级别的,需要sudo"
            // sh "sudo /usr/local/maven/bin/mvn package"
            // echo "完成后 修改一下权限,否则下一次麻烦"
            // sh "sudo chown -R  jenkins: ."
            // sh "find -name ‘*SNAPSHOT.jar‘ "
        }
        stage(‘第四步单元测试‘){
            echo "单元测试"
            //sh "sudo /usr/local/maven/bin/mvn test"
        }
        stage("放到下载服务器上"){
            echo "发送文件"
          //  sh "sudo cp ./account-email/target/account-email-1.0.0-SNAPSHOT.jar /home/admin/webserver/html/download && sudo chown  -R admin: /home/admin/webserver/html/download"
        }
    }
    stage("发送邮件"){
      def git_url = ‘git@gitlab.corp.XXX.com:wangxu/ops.git‘
            def branch = ‘dev‘
            def username = ‘Jenkins‘
            echo "Hello Mr.${username}"
            echo "GIT路径: ${git_url}"

            echo "发送邮件"
            emailext body: """
            <!DOCTYPE html>
            <html>
            <head>
            <meta charset="UTF-8">
            <title>${ENV, var="JOB_NAME"}-第${BUILD_NUMBER}次构建日志</title>
            </head>
            <body leftmargin="8" marginwidth="0" topmargin="8" marginheight="4" offset="0">
                <table width="95%" cellpadding="0" cellspacing="0" style="font-size: 11pt; font-family: Tahoma, Arial, Helvetica, sans-serif">
                    <tr>
                        <td>(本邮件由程序自动下发,请勿回复!)</td>
                    </tr>
                    <tr>
                        <td>
                            <h2><font color="#FF0000">构建结果 - ${BUILD_STATUS}</font></h2>
                        </td>
                    </tr>
                    <tr>
                        <td><br />
                            <b><font color="#0B610B">构建信息</font></b>
                            <hr size="2" width="100%" align="center" />
                        </td>
                    </tr>
                    <tr><a href="${PROJECT_URL}">${PROJECT_URL}</a>
                        <td>
                            <ul>
                                <li>项目名称:${PROJECT_NAME}</li>
                                <li>GIT路径:<a href="git@gitlab.corp.XXX.com:wangxu/ops.git">git@gitlab.corp.XXX.com:wangxu/ops.git</a></li>
                                <li>GIT分支:master</li>
                                <li>构建编号:${BUILD_NUMBER}</li>
                                <li>触发原因:${CAUSE}</li>
                                <li>构建日志:<a href="${BUILD_URL}console">${BUILD_URL}console</a></li>
                            </ul>
                        </td>
                    </tr>
                    <tr>
                        <td>
                            <b><font color="#0B610B">变更信息:</font></b>
                           <hr size="2" width="100%" align="center" />
                        </td>
                    </tr>
                    <tr>
                        <td>
                            <ul>
                                <li>上次构建成功后变化 :  ${CHANGES_SINCE_LAST_SUCCESS}</a></li>
                            </ul>
                        </td>
                    </tr>
             <tr>
                        <td>
                            <ul>
                                <li>上次构建不稳定后变化 :  ${CHANGES_SINCE_LAST_UNSTABLE}</a></li>
                            </ul>
                        </td>
                    </tr>
                    <tr>
                        <td>
                            <ul>
                                <li>历史变更记录 : <a href="${PROJECT_URL}changes">${PROJECT_URL}changes</a></li>
                            </ul>
                        </td>
                    </tr>
                    <tr>
                        <td>
                            <ul>
                                <li>变更集:${JELLY_SCRIPT,template="html"}</a></li>
                            </ul>
                        </td>
                    </tr>
                    <!--
                    <tr>
                        <td>
                            <b><font color="#0B610B">Failed Test Results</font></b>
                            <hr size="2" width="100%" align="center" />
                        </td>
                    </tr>
                    <tr>
                        <td>
                            <pre style="font-size: 11pt; font-family: Tahoma, Arial, Helvetica, sans-serif">${FAILED_TESTS}</pre>
                            <br />
                        </td>
                    </tr>

                    <tr>
                        <td>
                            <b><font color="#0B610B">构建日志 (最后 100行):</font></b>
                            <hr size="2" width="100%" align="center" />
                        </td>
                    </tr>-->
                    <!-- <tr>
                        <td>Test Logs (if test has ran): <a
                            href="${PROJECT_URL}ws/TestResult/archive_logs/Log-Build-${BUILD_NUMBER}.zip">${PROJECT_URL}/ws/TestResult/archive_logs/Log-Build-${BUILD_NUMBER}.zip</a>
                            <br />
                        <br />
                        </td>
                    </tr> -->
                    <!--
                    <tr>
                        <td>
                            <textarea cols="80" rows="30" readonly="readonly" style="font-family: Courier New">${BUILD_LOG, maxLines=100,escapeHtml=true}</textarea>
                        </td>
                    </tr>-->
                    <hr size="2" width="100%" align="center" />

                </table>


            </body>
            </html>
    """, subject: ‘$PROJECT_NAME - Build # $BUILD_NUMBER - $BUILD_STATUS!‘, to: ‘master@weiyigeek.top‘
    }
}
(2) Declarative Pipeline
  1 pipeline{
  2   agent{label ‘master‘}
  3   environment {
  4     git_url = ‘git@gitlab.corp.XXX.com:wangxu/ops.git‘
  5     git_key = ‘03fd8295-c536-4871-9794-1c37394676e0‘
  6     git_branch = ‘master‘
  7   }
  8
  9   stages {
 10     stage(‘下载代码‘) {
 11       steps {
 12         git branch: "${git_branch}",credentialsId: "${git_key}", url: "${env.git_url}"
 13       }
 14     }
 15   }
 16
 17   post {
 18     //always部分 pipeline运行结果为任何状态都运行
 19     always{
 20       script{
 21         emailext body:
 22           ‘‘‘  <!DOCTYPE html>
 23           <html>
 24           <head>
 25           <meta charset="UTF-8">
 26           <title>${ENV, var="JOB_NAME"}-第${BUILD_NUMBER}次构建日志</title>
 27           </head>
 28           <body leftmargin="8" marginwidth="0" topmargin="8" marginheight="4" offset="0">
 29               <table width="95%" cellpadding="0" cellspacing="0" style="font-size: 11pt; font-family: Tahoma, Arial, Helvetica, sans-serif">
 30                   <tr>
 31                       <td>(本邮件由程序自动下发,请勿回复!)</td>
 32                   </tr>
 33                   <tr>
 34                       <td>
 35                           <h2><font color="#FF0000">构建结果 - ${BUILD_STATUS}</font></h2>
 36                       </td>
 37                   </tr>
 38                   <tr>
 39                       <td><br />
 40                           <b><font color="#0B610B">构建信息</font></b>
 41                           <hr size="2" width="100%" align="center" />
 42                       </td>
 43                   </tr>
 44                   <tr><a href="${PROJECT_URL}">${PROJECT_URL}</a>
 45                       <td>
 46                           <ul>
 47                               <li>项目名称:${PROJECT_NAME}</li>
 48                               <li>GIT路径:<a href="git@gitlab.corp.XXX.com:wangxu/ops.git">git@gitlab.corp.XXX.com:wangxu/ops.git</a></li>
 49                               <li>GIT分支:master</li>
 50                               <li>构建编号:${BUILD_NUMBER}</li>
 51                               <li>触发原因:${CAUSE}</li>
 52                               <li>构建日志:<a href="${BUILD_URL}console">${BUILD_URL}console</a></li>
 53                           </ul>
 54                       </td>
 55                   </tr>
 56                   <tr>
 57                       <td>
 58                           <b><font color="#0B610B">变更信息:</font></b>
 59                           <hr size="2" width="100%" align="center" />
 60                       </td>
 61                   </tr>
 62                   <tr>
 63                       <td>
 64                           <ul>
 65                               <li>上次构建成功后变化 :  ${CHANGES_SINCE_LAST_SUCCESS}</a></li>
 66                           </ul>
 67                       </td>
 68                   </tr>
 69             <tr>
 70                       <td>
 71                           <ul>
 72                               <li>上次构建不稳定后变化 :  ${CHANGES_SINCE_LAST_UNSTABLE}</a></li>
 73                           </ul>
 74                       </td>
 75                   </tr>
 76                   <tr>
 77                       <td>
 78                           <ul>
 79                               <li>历史变更记录 : <a href="${PROJECT_URL}changes">${PROJECT_URL}changes</a></li>
 80                           </ul>
 81                       </td>
 82                   </tr>
 83                   <tr>
 84                       <td>
 85                           <ul>
 86                               <li>变更集:${JELLY_SCRIPT,template="html"}</a></li>
 87                           </ul>
 88                       </td>
 89                   </tr>
 90                   <!--
 91                   <tr>
 92                       <td>
 93                           <b><font color="#0B610B">Failed Test Results</font></b>
 94                           <hr size="2" width="100%" align="center" />
 95                       </td>
 96                   </tr>
 97                   <tr>
 98                       <td>
 99                           <pre style="font-size: 11pt; font-family: Tahoma, Arial, Helvetica, sans-serif">$FAILED_TESTS</pre>
100                           <br />
101                       </td>
102                   </tr>
103
104                   <tr>
105                       <td>
106                           <b><font color="#0B610B">构建日志 (最后 100行):</font></b>
107                           <hr size="2" width="100%" align="center" />
108                       </td>
109                   </tr>-->
110                   <!-- <tr>
111                       <td>Test Logs (if test has ran): <a
112                           href="${PROJECT_URL}ws/TestResult/archive_logs/Log-Build-${BUILD_NUMBER}.zip">${PROJECT_URL}/ws/TestResult/archive_logs/Log-Build-${BUILD_NUMBER}.zip</a>
113                           <br />
114                       <br />
115                       </td>
116                   </tr> -->
117                   <!--
118                   <tr>
119                       <td>
120                           <textarea cols="80" rows="30" readonly="readonly" style="font-family: Courier New">${BUILD_LOG, maxLines=100,escapeHtml=true}</textarea>
121                       </td>
122                   </tr>-->
123                   <hr size="2" width="100%" align="center" />
124
125               </table>
126
127
128           </body>
129           </html>
130 ‘‘‘,
131               subject: ‘$PROJECT_NAME - Build # $BUILD_NUMBER - $BUILD_STATUS!‘, to: ‘master@weiyigeek.top‘
132           }
133           }
134
135           success {
136               //当此Pipeline成功时打印消息
137               echo ‘success‘
138           }
139           failure {
140               //当此Pipeline失败时打印消息
141               echo ‘failure‘
142           }
143           unstable {
144               //当此Pipeline 为不稳定时打印消息
145               echo ‘unstable‘
146           }
147           aborted {
148               //当此Pipeline 终止时打印消息
149               echo ‘aborted‘
150           }
151           changed {
152               //当pipeline的状态与上一次build状态不同时打印消息
153               echo ‘changed‘
154           }
155   }
156 }
WeiyiGeek Blog - 为了能到远方,脚下的每一步都不能少。
Tips : 本文章来源 Blog 站点或者 WeiyiGeek 公众账号 (友链交换请邮我哟):
微信公众号-WeiyiGeek # 精华文章发布地址(及时发布)
https://weiyigeek.top 国内有时访问较慢
https://weiyigeek.gitee.io
Tips: 更多学习笔记文章请关注
WeiyiGeek公众账号
【微信公众号关注(点击)】
【邮箱联系: Master#weiyigeek.top】

8.Jenkins进阶之流水线pipeline基础使用实践(1)
标签:download roo codeblock 状态 lib world span space package
原文地址:https://www.cnblogs.com/WeiyiGeek/p/14711397.html