标签:containe 包括 属性 rac 用户名 通知 超时 ops png
(2) Declarative Pipeline Syntax
2.1) Sections - 章节
2.2) Directives - 指令
2.3) Sequential Stages - 顺序阶段
2.4) Parallel - 并行
2.5) Matrix - 模型
语法总结
script - 脚本
sh - 命令执行
agent - 代理
stages - 阶段
steps - 步骤
post - 发布
environment - 环境
options - 选项
parameters - 参数
triggers - 触发器
stage - 单阶段
Tools - 工具
Input - 输入
when - 执行条件
Matrix 单元级指令(可选)
0x03 pipeline 内置支持
3.0) 字符串和标准输出
3.1) 文件目录相关步骤
3.2) 制品相关步骤
3.3) 命令相关步骤
3.4) 其他步骤
0x04 Pipeline 片段示例
WeiyiGeek Blog - 为了能到远方,脚下的每一步都不能少。
原文地址: https://mp.weixin.qq.com/s/mqEd6VXzAU8YfumjsXHh1A
Tips : 本文章来源 Blog 站点或者 WeiyiGeek 公众账号 (技术交流、友链交换请邮我哟)。
描述: 前面说过Declarative Pipeline是 Jenkins Pipeline 的一个相对较新的补充, 它在Pipeline子系统之上提出了一种更为简化和有意义的语法。
Declarative Pipeline 中的基本语句和表达式遵循与Groovy语法相同的规则 ,但有以下例外:
1.Pipeline的顶层必须是块,即所有有效的Declarative Pipeline必须包含在一个pipeline块内.
2.没有分号作为语句分隔符,每个声明必须在自己的一行。
3.块只能包含Sections, Directives, Steps或赋值语句。
4.属性引用语句被视为无参方法调用。(例如: 输入被视为input)
参考流水线语法: http://jenkins.weiyigeek.top:8080/job/simple-pipeline-demo/pipeline-syntax
简单语法规范示例:
// (1) 所有代码包裹在 Pipeline 块之中
pipeline {
  // (2) 定义任务在那台主机上运行可以是any、none(可以实现分布式的构建)等
  agent any
  // (3) 定义的环境变量比如PATH路径
  environment {
    hostname=‘Jenkins Pipeline‘
  }
  // (4) 其类似一个大项目任务的集合主要包含所有stage子项目
  stages {
    // (5) 其类似一个项目中的单个任务主要来包含所有stage子任务
    stage (‘clone‘) {
      // (6) 用来实现具体的执行的动作
      steps {
        // (7) 内置命令执行(信息打印)
        echo "git Clone Stage!"
      }
    }
    stage (‘build‘) {
      steps {
        // (8) shell 命令执行 (Shell Script)
        sh "echo $hostname"
      }
    }
  }
  // (9) 消息通知
  post {
    always {
      echo "构建成功"
    }
  }
}
语法格式说明:
pipeline:代表整条流水线,包含整条流水线的逻辑。
agent 部分:指定流水线的执行位置(Jenkins agent)。流水线中的每个阶段都必须在某个地方(物理机、虚拟机或Docker容器)执行。
stage 部分:阶段,代表流水线的阶段。每个阶段都必须有名称。本例中,build就是此阶段的名称。
steps 部分:代表阶段中的一个或多个具体步骤(step)的容器。steps部分至少包含一个步骤。
stages 部分:流水线中多个stage的容器。stages部分至少包含一个stage。
post 部分:包含的是在整个pipeline或阶段完成后一些附加的步骤 (可选)
描述: 声明性 Pipeline中的节通常包含一个或多个指令或步骤(Steps)。
描述: 指定整个Pipeline或特定阶段将在Jenkins环境中执行的位置,具体取决于该agent 部分的放置位置;
语法参数:
必须: YES
参数:any / none / label / node / docker / dockerfile / kubernetes
  - 1.在任何可用的 agent 上执行Pipeline或stage
  - 2.在pipeline块的顶层应用时,不会为整个 Pipeline运行分配全局代理,并且每个stage部分都需要包含自己的agent部分。
  - 3.使用提供的标签在Jenkins环境中可用的代理上执行 Pipeline或阶段, 注意标签条件也可以使用。
  - 4.node使用与lable类似
  - 5.执行Pipeline或stage时会动态供应一个docker节点去接受Docker-based的Pipelines。
  - 6.使用从Dockerfile源存储库中包含的容器构建的容器执行 Pipeline或阶段,Jenkinsfile 必须从多分支 Pipeline或 SCM Pipeline加载。
  - 7.在Kubernetes集群上部署的Pod内执行 Pipeline或阶段,同样Jenkinsfile 必须从多分支 Pipeline或 SCM Pipeline加载,Pod模板在kubernetes {} 块内定义。
允许:在顶层pipeline块和每个stage块中。
语法示例:
pipeline {
  agent any

  agent none

  agent {
    label ‘my-label1 && my-label2‘
  }

  agent { node { label ‘labelName‘ } }  // 等同于 agent { label ‘labelName‘ }

  // docker 还可以接受一个args直接传递给`docker run`调用以及一个 alwaysPull 选项
  // registryUrl和registryCredentialsId参数 有助于指定要使用的Docker注册表及其凭据
  agent {
    docker {
      image ‘maven:3-alpine‘
      label ‘my-defined-label‘
      args  ‘-v /tmp:/tmp‘
      registryUrl ‘https://myregistry.com/‘
      registryCredentialsId ‘myPredefinedCredentialsInJenkins‘
    }
  }

  // dockerfile
  agent {
    // 等同于 to "docker build -f Dockerfile.build --build-arg version=1.0.2 ./build/
    dockerfile {
        filename ‘Dockerfile.build‘
        // 如果要Dockerfile在另一个目录中构建,请使用以下dir选项
        dir ‘build‘
        label ‘my-defined-label‘
        additionalBuildArgs  ‘--build-arg version=1.0.2‘
        args ‘-v /tmp:/tmp‘
        // 同样也接受registryUrl和registryCredentialsId参数
        registryUrl ‘https://myregistry.com/‘
        registryCredentialsId ‘myPredefinedCredentialsInJenkins‘
    }
  }

  // kubernetes: 例如如果要在其中装有Kaniko容器的容器
  agent {
    kubernetes {
      label podlabel
      yaml """
  kind: Pod
  metadata:
    name: jenkins-agent
  spec:
    containers:
    - name: kaniko
      image: gcr.io/kaniko-project/executor:debug
      imagePullPolicy: Always
      command:
      - /busybox/cat
      tty: true
      volumeMounts:
        - name: aws-secret
          mountPath: /root/.aws/
        - name: docker-registry-config
          mountPath: /kaniko/.docker
    restartPolicy: Never
    volumes:
      - name: aws-secret
        secret:
          secretName: aws-secret
      - name: docker-registry-config
        configMap:
          name: docker-registry-config
  """
  }
}
常用选项:
描述: 下面可以应用于两个或者多个agent实现的选项即label、customWorkspace、reuseNode;
1.label (参数:字符串): 运行 Pipeline或单个 Pipeline的标签或标签条件stage。 【此选项对node,docker和有效对dockerfile必需 node。】
2.customWorkspace (参数: 字符串) : 运行 Pipeline或个人 stage 这 agent 是这个自定义的工作空间内的应用,而不是默认的, 它可以是相对路径(在这种情况下自定义工作空间将位于节点上的工作空间根目录下),也可以是绝对路径。【此选项是有效的node,docker和dockerfile。】
3.reuseNode(参数: 布尔值-false): 如果为true在同一工作空间中在 Pipeline顶级指定的节点上运行容器,而不是在整个新节点上运行
4.args (参数: 字符串): 要传递给的运行时参数docker run,此选项对docker和有效dockerfile。
// 示例1. Docker代理,声明性 Pipeline
pipeline {
  // V.在具有给定名称和标签(maven:3-alpine)的新创建容器中执行此 Pipeline中定义的所有步骤。
  agent { docker ‘maven:3-alpine‘ }
  stages {
      stage(‘Example Build‘) {
          steps {
              sh ‘mvn -B clean verify‘
          }
      }
  }
}

// 例子2.阶段级代理部分
pipeline {
  /* agent none在 Pipeline的顶层进行定义可确保 不会不必要地分配执行程序。使用agent none还会强制每个stage部分包含其自己的agent部分。 */
  agent none
  stages {
    stage(‘Example Build‘) {
      /* 使用此映像在新创建的容器中执行此阶段中的步骤。*/
      agent { docker ‘maven:3-alpine‘ }
      steps {
          echo ‘Hello, Maven‘
          sh ‘mvn --version‘
      }
    }
    stage(‘Example Test‘) {
      /* 使用与上一阶段不同的图像在新创建的容器中执行此阶段中的步骤。 */
      agent { docker ‘openjdk:8-jre‘ }
      steps {
          echo ‘Hello, JDK‘
          sh ‘java -version‘
      }
    }
  }
}
描述: Stages 是 Pipeline描述的大部分“工作”所在的位置, 该部分包含一个或多个阶段指令的序列。对于连续交付过程的每个离散部分,建议stages至少包含一个阶段指令,例如Build,Test和Deploy。
位置&参数:
必须: YES
参数:NONE
允许:pipeline块内只有一次
例子.阶段声明性 Pipeline
pipeline {
    agent any
    // stages部分将典型地遵循指令,例如agent, options等
    stages {
        stage(‘Example‘) {
            steps {
                echo ‘Hello World‘
            }
        }
    }
}
Tips : 该部分必须在pipeline块内的顶层定义,但stage级使用是可选的。
Tips : 顶级代理和阶段代理之间的细微差别,而在options应用指令时会有所不同。
描述: 该阶段包含在给定指令中执行的一系列一个或多个步骤 stage 之中
位置&参数:
必须: YES
参数:None
允许:每个Stage块之中
描述: 前面我们说过我们可在Declarative Pipeline 中 采用script指令来执行Scripted Pipeline中的一些脚本;
例子.单步式声明式 && Script Block in Declarative Pipeline
pipeline {
    agent any
    stages {
        stage(‘Example‘) {
          // 步骤部分必须包含一个或多个步骤。
          steps {
              echo ‘Hello World‘
              // 执行 Scripted Pipeline (实际上就是直接执行并采用Groovy原生语法)
              script {
                def browsers = [‘chrome‘, ‘firefox‘]
                for (int i = 0; i < browsers.size(); ++i) {
                    echo "Testing the ${browsers[i]} browser"
                }
              }
          }
        }
    }
}
描述: pipeline中获取shell命令的输出以及状态,注意其必须在steps 块以及 script 块之中
(0) 最简单的方式最简单的方式
sh ‘‘
(1) 获取标准输出
//第一种
result = sh returnStdout: true ,script: ""
result = result.trim()
//第二种
result = sh(script: "", returnStdout: true).trim()
//第三种
sh " > commandResult"
result = readFile(‘commandResult‘).trim()
(2) 获取执行状态
//第一种
result = sh returnStatus: true ,script: ""
result = result.trim()

//第二种
result = sh(script: "", returnStatus: true).trim()

//第三种
sh ‘; echo $? > status‘
def r = readFile(‘status‘).trim() //值得学习

//第四种
sh label: ‘release‘, returnStdout: true, script:"""
sudo apk add jq && \
if ( \$(curl -s --header ‘PRIVATE-TOKEN: ${private_token}‘ ${GITLAB_REL} | jq .[].tag_name | grep -c ‘${params.RELEASE_VERSION}‘) != 0 );then echo -n 1 > result.txt;else echo -n 0 > result.txt;fi
"""
def r = readFile(‘result.txt‘).trim() //值得学习

// 注意使用‘但引号也可以解析变量
sh(returnStatus: true, script: "sudo apk add jq && curl -s --header ‘PRIVATE-TOKEN: ${private_token}‘ ${GITLAB_REL} | jq .[].tag_name | grep -c ‘${params.RELEASE_VERSION}‘")
实际案例:
// # (1) 命令拼接
sh ‘ $SonarScannerHome/bin/sonar-scanner ‘ +
    ‘-Dsonar.sources=src/main ‘ +
    ‘-Dsonar.projectKey="test" ‘ +
    ‘-Dsonar.projectName="test" ‘

// # (2) 值传递到参数
stage ("测试") {
  steps {
    timeout(time: 1, unit: ‘MINUTES‘) {
        script {
          def RELEASE=sh returnStdout: true, script: ‘git tag -l --column‘   // # git show --oneline --ignore-all-space --text | head -n 1
          env.DEPLOY_ENV = input message: "选择部署的环境的版本", ok: ‘deploy‘,
              parameters: [string(name: ‘DEPLOY_ENV‘,defaultValue: "${RELEASE}",description: "可选项选择的版本 ${RELEASE}")]
         }
      }
  }
}

// # (3) 多行命令执行(值得注意在sh中得 $符号 需要采用 \$ 进行转义)
stage ("测试") {
  steps {
      timeout(time: 1, unit: ‘MINUTES‘) {
      script {
          def RELEASE=sh returnStdout: true, script: ‘git tag -l --column‘
          def RELE=sh returnStdout: true, script: """\
          git tag -l --column | tr -d ‘ ‘  > tag ;
          export a="\$(sed "s#v#,‘v#g" tag)‘";
          echo [\${a#,*}];
          """
          // env.DEPLOY_ENV = input message: "选择部署的环境的版本1", ok: ‘deploy‘,
          //     parameters: [string(name: ‘DEPLOY_ENV‘,defaultValue: "${RELEASE}",description: "可选项选择的版本 ${RELEASE}")]
          // }
          println RELE // [‘v1.1,‘v1.10,‘v1.11,‘v1.2,‘v1.3,‘v1.6,‘v1.7,‘v1.8,‘v1.9‘]
          // 选择部署的环境的版本 [‘v1.1,‘v1.10,‘v1.11,‘v1.2,‘v1.3,‘v1.6,‘v1.7,‘v1.8,‘v1.9‘]
          env.DEPLOY_RELEASE = input message: "选择部署的环境的版本 ${RELE}", ok: ‘deploy‘,
          parameters: [choice(name: ‘PREJECT_OPERATION‘, choices: ["ss","s"], description: ‘Message: 选择项目版本? ${RELE}‘)]
    }
  }
}
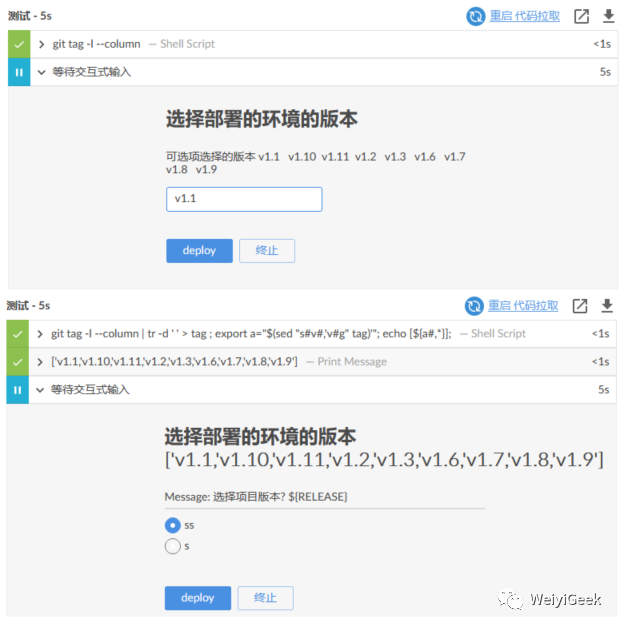
Tips : 注意传递变量得生存周期以及范围,在pipeline全局中则全局有效,而stage块中则该块中有效,其他stage引用则报No such property: 变量名称 for class: groovy.lang.Binding错误
描述: 本post部分定义了在 Pipeline或阶段的运行完成后运行的一个或多个其他步骤(取决于该post部分在 Pipeline中的位置),即定义Pipeline或stage运行结束时的操作, 通常将清理工作空间以及构建状态的消息通知(Email/钉钉、企业微信或者其他WebHook);
post可以支持任何以下的后置条件块:always, changed,fixed,regression,aborted,failure,success, unstable,unsuccessful,和cleanup, 条件块允许根据 Pipeline或阶段的完成状态在每个条件内执行步骤。
位置&参数:
必须: NO

参数:`always,changed,fixed,regression,aborted,failure,success, unstable,unsuccessful,和cleanup`
  - always :post不管 Pipeline运行或阶段运行的完成状态如何,都运行本节中的步骤。
  - changed :仅post当当前 Pipeline或阶段的运行与之前的运行具有不同的完成状态时,才运行步骤。
  - fixed :仅post在当前 Pipeline或阶段的运行成功并且前一运行失败或不稳定的情况下运行步骤。
  - regression :仅post当当前 Pipeline或阶段的运行状态为失败,不稳定或中止并且上一次运行成功时,才运行步骤。
  - aborted :仅post在当前 Pipeline或阶段的运行状态为“中止”时才运行步骤,通常是由于手动中止了 Pipeline。通常在网络用户界面中用灰色表示。
  - failure :仅post当当前 Pipeline或阶段的运行具有“失败”状态时才运行这些步骤,通常在Web UI中用红色表示。
  - success :仅post当当前 Pipeline或阶段的运行具有“成功”状态时才运行步骤,通常在Web UI中用蓝色或绿色表示。
  - unstable :仅post在当前 Pipeline或阶段的运行状态为“不稳定”(通常由测试失败,代码冲突等引起)的情况下,才运行步骤。通常在Web UI中以黄色表示。
  - unsuccessful :仅post当当前 Pipeline或阶段的运行状态不是“成功”时才运行步骤。这通常根据前面提到的状态在Web UI中表示。
  - cleanup : 在评估post所有其他条件之后post,无论 Pipeline或阶段的状态如何,都在此条件下运行步骤。

允许位置:在顶层pipeline块和每个stage块中。
示例.Post 部分示例:
pipeline {
  agent any
  stages {
    stage(‘Example‘) {
      steps {
          echo ‘Hello World‘
      }
    }
  }
  post {
    always {
      echo ‘I will always say Hello again!‘
    }
  }
}
描述: 显然基本结构满足不了现实多变的需求。所以Jenkins pipeline通过各种指令(directive)来丰富自己。指令可以被理解为对Jenkins pipeline基本结构的补充。
Jenkins pipeline支持的指令有:
environment:用于设置环境变量,可定义在stage或pipeline部分。
tools:可定义在pipeline或stage部分。它会自动下载并安装我们指定的工具,并将其加入PATH变量中。
input:定义在stage部分,会暂停pipeline,提示你输入内容。
options:用于配置Jenkins pipeline本身的选项,比如options {retry(3)}指当pipeline失败时再重试2次。options指令可定义在stage或pipeline部分。
parallel:并行执行多个step。在pipeline插件1.2版本后,parallel开始支持对多个阶段进行并行执行。
parameters:与input不同,parameters是执行pipeline前传入的一些参数。
triggers:用于定义执行pipeline的触发器。
when:当满足when定义的条件时,阶段才执行。
Tips: 在使用指令时需要注意的是每个指令都有自己的“作用域”。如果指令使用的位置不正确Jenkins将会报错。
描述: 该指定了一系列键值对,这些键值对将被定义为所有步骤或特定于阶段的步骤的环境变量,具体取决于该environment指令在 Pipeline中的位置。
位置&参数:
必须: No
参数:Yes
允许:在pipeline块内,或在stage指令内。
Tips : 非常注意该块中的变量将写入到Linux环境变量之中作为全局变量,在shell可通过变量名访问,而在script pipeline脚本中通过env.变量名称访问.
支持的凭证类型:Supported Credentials Type
Secret Text :设置为加密文本字符串内容
Secret File : 设置为临时创建的文件文件的位置, 并自动定义变量存储该文件内容。
Username and password : 将设置为username:password并且两个其他环境变量将自动定义为MYVARNAME_USR 和MYVARNAME_PSW。
SSH with Private Key : 设置为临时创建的SSH密钥文件的位置,并且可能会自动定义两个其他环境变量:MYVARNAME_USR和MYVARNAME_PSW(保留密码)。
示例1:秘密文本凭证,声明性 Pipeline
pipeline {
  agent any
  // (1) 由于在pipeline下一层,则使用的指令将应用于 Pipeline中的所有步骤。
  environment {
    CC = ‘clang‘
  }
  stages {
    stage(‘Example‘) {
      // (2) 在 stage 中定义的 environment指令只会将给定的环境变量应用于Example内的步骤。
        environment {
          // 在environment块中credentials(‘凭据名称‘)定义的帮助程序方法通过其在Jenkins环境中的标识符来访问预定义的凭据
          AN_ACCESS_KEY = credentials(‘my-predefined-secret-text‘)
        }
        steps {
          sh ‘printenv‘
          echo "${env.AN_ACCESS_KEY}"
          echo "${env.CC}"
        }
    }
  }
}
示例2.用户名和密码凭证
pipeline {
  agent any
  stages {
    stage(‘Example Username/Password‘) {
      environment {
        // 变量 = 将用户密码凭证赋予变量
        SERVICE_CREDS = credentials(‘my-predefined-username-password‘)
      }
      steps {
        // 注意点: defined: MYVARNAME_USR and MYVARNAME_PSW respectively.
        sh ‘echo "Service user is $SERVICE_CREDS_USR"‘
        sh ‘echo "Service password is $SERVICE_CREDS_PSW"‘
        sh ‘curl -u $SERVICE_CREDS https://myservice.example.com‘
      }
    }
    stage(‘Example SSH Username with private key‘) {
      environment {
        // 变量 = 将 `ssh private` 公密钥进行赋予变量
        SSH_CREDS = credentials(‘my-predefined-ssh-creds‘)
      }
      steps {
        // 注意点: defined: MYVARNAME_USR and MYVARNAME_PSW (holding the passphrase).
        sh ‘echo "SSH private key is located at $SSH_CREDS"‘
        sh ‘echo "SSH user is $SSH_CREDS_USR"‘
        sh ‘echo "SSH passphrase is $SSH_CREDS_PSW"‘

        // 调用内置变量 (如果变量不存在则输出null) - 值得学习注意。
        echo "${JOB_NAME}"
        echo env.‘JOB_NAME‘
        println(env.‘JOB_NAME‘)

        // 自定义全局变量方式(写入文件中再读取)
        script {
          def projectProduct = sh returnStdout: true, script: "find ${APP_NAME}"
          if ( projectProduct != ‘‘ ){
            echo "${projectProduct}"
            writeFile file: ‘abc.sh‘, text: "${projectProduct}"
            change_id = readFile ‘abc.sh‘
            print(change_id)
          } else {
            error "[-Error] : projectProduct 不能为空!"
          }
        }

      }
    }
  }
}
Tips : 该指令支持特殊的帮助程序方法credentials(),该方法可用于在Jenkins环境中通过其标识符访问预定义的凭据。
Tips : 如有不支持的凭据类型导致 Pipeline失败,并显示以下消息:org.jenkinsci.plugins.credentialsbinding.impl.CredentialNotFoundException: No suitable binding handler could be found for type .
描述: options 指令 允许在 Pipeline 本身内配置 Pipeline 专用选项, 例如 buildDiscarder 它们也可能由插件提供;
位置&参数:
必须: No
参数:None
允许:pipeline块内只有一次。
可用选项:
1.buildDiscarder : 保存最近历史构建记录的数量。设置此选项后会自动清理pipeline 的构建历史。
options { buildDiscarder(logRotator(numToKeepStr: ‘1‘)) }
2.disableConcurrentBuilds : 禁止并发执行 Pipeline 对于防止同时访问共享资源等很有用
options { disableConcurrentBuilds() }
3.checkoutToSubdirectory : Jenkins从版本控制库拉取源码时,默认检出到工作空间的根目录中,此选项可以指定检出到工作空间的子目录中。
options { checkoutToSubdirectory(‘foo‘) }
4.newContainerPerStage : 当agent为docker或dockerfile时,指定在同一个Jenkins节点上,每个stage都分别运行在一个新的容器中,而不是所有stage都运行在同一个容器中。
5.disableResume : 如果控制器重新启动则不允许 Pipeline恢复
options { disableResume() }
6.overrideIndexTriggers : 允许重写分支索引触发器的默认处理,如果在多分支或组织标签处禁用了分支索引触发器。
# 仅为该作业启用分支索引触发器
options { overrideIndexTriggers(true) }

# 仅为此作业禁用分支索引触发器
options { overrideIndexTriggers(false) }
7.preserveStashes: 保留已完成构建中的隐藏项,以用于阶段重新启动。
# 保存构建
options { preserveStashes() }

# 保存最近5次构建
options { preserveStashes(buildCount: 5) }
8.quietPeriod:设置 Pipeline的静默时间段(以秒为单位),以覆盖全局默认值
options { quietPeriod(30) }
9.retry:如果失败重试整个 Pipeline指定次数。该次数是指总次数包括第1次失败。
options { retry(3) }
10.skipDefaultCheckout : 默认跳过来自源代码控制的代码(代理指令)。
options { skipDefaultCheckout() }
11.skipStagesAfterUnstable : 一旦构建状态变得不稳定就跳过各个阶段;
options { skipStagesAfterUnstable() }
12.timestamps : 预定义由Pipeline生成的所有控制台输出时间
options { timestamps() }
13.parallelsAlwaysFailFast :将 Pipeline中所有后续并行阶段的failfast设置为true。
options { parallelsAlwaysFailFast() }
14.timeout(常用) : 设置 Pipeline运行的超时时间在此之后Jenkins 应中止 Pipeline(运行的超时时间)。
# 操守时间一个小时(HOURS/Minute)
options { timeout(time: 1, unit: ‘HOURS‘) }

# Global Timeout, Declarative Pipeline
pipeline {
    agent any
    options {
      // 将全局执行超时指定为一小时,然后Jenkins将中止 Pipeline运行。
      timeout(time: 1, unit: ‘HOURS‘)
    }
    stages {
        stage(‘Example‘) {
            steps {
                echo ‘Hello World‘
            }
        }
    }
}
Tips: 在 stage 块中支持的 options 要少于 pipeline 块中,只能采用skipDefaultCheckout,timeout,retry,timestamps 等选项;
例如:
pipeline {
    agent any
    stages {
        stage(‘Example‘) {
            // 关键单
            options {
                timeout(time: 1, unit: ‘HOURS‘)
            }
            steps {
                echo ‘Hello World‘
            }
        }
    }
}
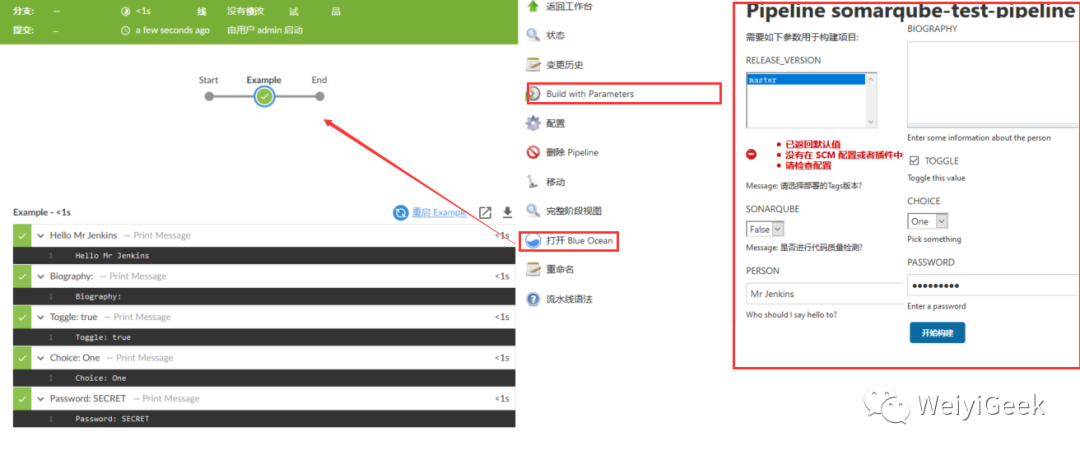
描述: 该指令提供了一个用户在触发 Pipeline时应该提供的参数列表。这些用户指定参数的值通过params对象提供给 Pipeline步骤,请参阅参数,声明式 Pipeline的具体用法。
目前可用参数有string , text, booleanParam, choice, password等参数,其他高级参数化类型还需等待社区支持。
位置&参数:
必须: No
参数: None
允许: 在`Pipeline`块内仅一次。
Tips : 非常注意全局参数, 在shell可通过变量名访问,而在script pipeline脚本中通过params.参数名称访问.
示例: Parameters, Declarative Pipeline
Parameters, Declarative Pipeline
pipeline {
    agent any

    // Jenkins -> 原生 Build With Parameters 支持
    parameters {
      gitParameter name: ‘RELEASE_VERSION‘,
                      type: ‘PT_BRANCH_TAG‘,
                      branchFilter: ‘origin/(.*)‘,
                      defaultValue: ‘master‘,
                      selectedValue: ‘DEFAULT‘,
                      sortMode: ‘DESCENDING_SMART‘,
            description: ‘Message: 请选择部署的Tags版本?‘
      choice(name: ‘SONARQUBE‘, choices: [‘False‘,‘True‘], description: ‘Message: 是否进行代码质量检测?‘)

      //  Jenkins -> 原生 Build With Parameters 支持 和 BlueOcean 都支持
      string(name: ‘PERSON‘, defaultValue: ‘Mr Jenkins‘, description: ‘Who should I say hello to?‘)

      text(name: ‘BIOGRAPHY‘, defaultValue: ‘‘, description: ‘Enter some information about the person‘)

      booleanParam(name: ‘TOGGLE‘, defaultValue: true, description: ‘Toggle this value‘)

      choice(name: ‘CHOICE‘, choices: [‘One‘, ‘Two‘, ‘Three‘], description: ‘Pick something‘)

      password(name: ‘PASSWORD‘, defaultValue: ‘SECRET‘, description: ‘Enter a password‘)
    }
    stages {
        stage(‘Example‘) {
            steps {
                // 调用
                echo "Hello ${params.PERSON}"

                echo "Biography: ${params.BIOGRAPHY}"

                echo "Toggle: ${params.TOGGLE}"

                echo "Choice: ${params.CHOICE}"

                echo "Password: ${params.PASSWORD}"
            }
        }
    }
}
描述: 该指令定义了Pipeline自动化触发的方式,对于与GitHub或BitBucket等源集成的 Pipeline可能不需要触发器,因为基于webhook的集成可能已经存在了。
位置&参数:
必须: No
参数: None
允许: 在Pipeline块内
Tips : 当前可用的触发器是cron、pollSCM和upstream。
1.cron : 以Linux中Cron风格的字符串,以定义应该重新触发 Pipeline的定期间隔
triggers { cron(‘H */4 * * 1-5‘) }
2.pollSCM : 接受cron样式的字符串以定义Jenkins应检查新源更改的定期间隔。如果存在新的更改则将重新触发 Pipeline。
triggers { pollSCM(‘H */4 * * 1-5‘) }
Tips : pollSCM触发器仅在Jenkins 2.22或更高版本中可用。
3.upstream : 接受以逗号分隔的作业字符串和阈值。当字符串中的任何作业以最小阈值结束时 Pipeline将被重新触发
triggers { upstream(upstreamProjects: ‘job1,job2‘, threshold: hudson.model.Result.SUCCESS) }
cron语法
描述: Jenkins cron语法遵循cron实用程序的语法(略有不同)。具体来说每行包含5个由TAB或空格分隔的字段:
* * * * *
MINUTE - Minutes within the hour (0–59)

HOUR   - The hour of the day (0–23)

DAY	   - The day of the month (1–31)

MONTH  - The month (1–12)

WEEK   - The day of the week (0–7) where 0 and 7 are Sunday.
如果要为一个字段指定多个值,可以使用以下操作符。按照优先顺序,
*   specifies all valid values  (指定所有有效值)

M-N specifies a range of values (指定值范围)

M-N/X or */X steps by intervals of X through the specified range or whole valid range (在指定范围或整个有效范围内按X的间隔步进)

A,B,…,Z enumerates multiple values (枚举多个值)
Tips : 在 Cron 中使用 H 字符为了使定期计划的任务在系统上产生均匀的负载,H符号可以被认为是在一定范围内的随机值。
例如使用0 0 * * *一打日常工作将导致午夜时分大幅增加。相反使用H H * * *仍会每天执行一次每个作业,但不是同时执行所有作业,更好地使用有限的资源。
Tips : 此外@yearly,@annually,@monthly, @weekly,@daily,@midnight,并且@hourly也支持方便的别名。这些使用哈希系统进行自动平衡。
例如 @hourly与相同,H * * * *并且可能表示该小时中的任何时间, @midnight实际上是指在12:00 AM和2:59 AM之间的某个时间。
示例.Triggers, Declarative Pipeline:
// (1) Jenkins cron语法示例
// 每十五分钟执行触发
triggers{ cron(‘H/15 * * * *‘) }

// 每小时(1~30分钟)内每十分钟一次
triggers{ cron(‘H(0-29)/10 * * * *‘) }

// 每隔一个小时的45分钟,每两小时一次,从上午9:45开始,到每个工作日的下午3:45结束。
triggers{ cron(‘45 9-16/2 * * 1-5‘) }

// 每个工作日的上午9点至下午5点之间每两小时一次
triggers{ cron(‘H H(9-16)/2 * * 1-5‘) }

// 每月12月1日和15日每天一次
triggers{ cron(‘H H 1,15 1-11 *‘) }

//(2) Declarative Pipeline
pipeline {
    agent any
    triggers {
      cron(‘H */4 * * 1-5‘)
    }
    stages {
        stage(‘Example‘) {
            steps {
                echo ‘Hello World‘
            }
        }
    }
}
描述: 该 stage 指令位于stages中并且应包含Step 节,可选 agent 节或其他特定于阶段的指令, 实际上管道完成的所有实际工作都将包含在一个或多个stage指令中。
位置&参数:
必须: YES
参数: 步骤名称(字符串、必填)
允许: 在 Pipeline块 -> stages部分 内
示例.stage , Declarative Pipeline
// Declarative
pipeline {
  agent any
  stages {
    stage(‘Example‘) {
      steps {
        echo ‘Hello World‘
      }
    }
  }
}
描述: 定义自定义安装的Tools工具路径,并放置环境变量到PATH。如果agent none 这将被忽略
Supported Tools(Global Tool Configuration) : maven / jdk / gradle / Sonarqube
位置&参数:
必须: No
参数: None
允许: 在 Pipeline 块 或者 stage 部分 内
示例.Tools ,声明性管道
pipeline {
    agent any
    tools {
      // 工具名称必须在Jenkins中的 Manage Jenkins → Global Tool Configuration 下预先配置。
      maven ‘apache-maven-3.0.1‘
    }
    stages {
      stage(‘Example‘) {
        steps {
          sh ‘mvn --version‘
          script {
            // 无指定名称时可用采用tool指定设置的全局工具名称,这里这个tool是直接根据名称,获取自动安装的插件的路径
            def scannerHome = tool ‘sonarqubescanner‘
          }
          withSonarQubeEnv(‘SonarQube‘) {
            sh "${scannerHome}/bin/sonar-scanner -Dsonar.projectKey=YourProjectKey -Dsonar.sources=."
          }
        }
      }
    }
}
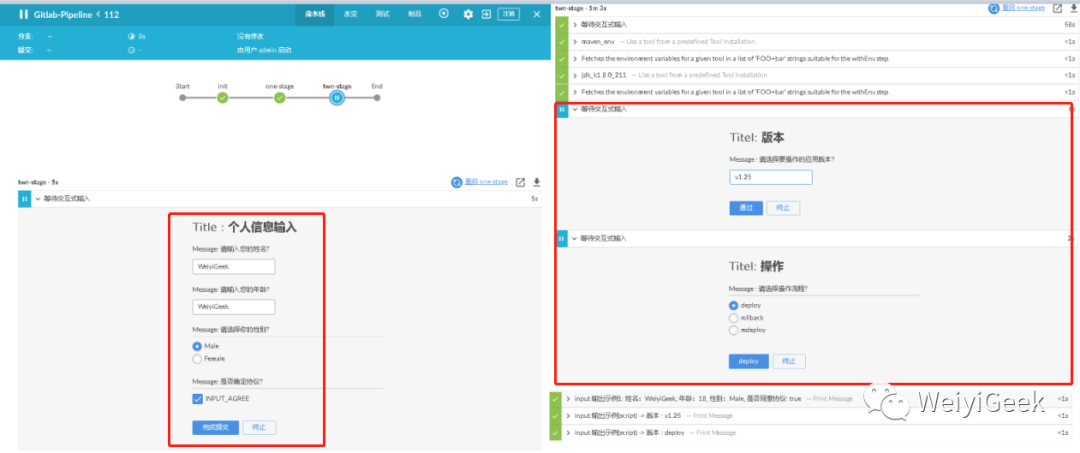
描述: input指令允许您使用输入步骤提示输入。在应用了任何选项之后,在进入该阶段的代理块或评估该阶段的when条件之前,该阶段将暂停。如果输入被批准,该阶段将继续。作为输入提交的一部分提供的任何参数都将在该阶段的其余部分的环境中可用。
位置&参数:
必须: No
参数: message 、id 、ok、submitter、submitterParameter、parameters
允许: 在 Pipeline块 -> stages 块内 (注意不是在stage中)
配置选项
message : 必须的前台输入时提示用户的信息;
id : 此输入的可选标识符。默认为阶段名称。
ok : 输入表单上“确定”按钮的可选文本。
Parameter : 提示提交者提供的可选参数列表。请参阅参数以获取更多信息。
submitter : 可选的用逗号分隔的用户或允许输入此输入的外部组名的列表,默认为允许任何用户。
submitterParameter : 可以使用提交者名称设置的环境变量的可选名称(如果存在)。
基础示例:
pipeline {
  agent any
  stages {
    stage(‘Example‘) {
      // 方式1.此种方式只能该块有效
      input {
        message "Title : 个人信息输入"
        ok "完成提交"
        submitter "alice,bob"
        parameters {
          string(name: ‘INPUT_PERSON‘, defaultValue: ‘WeiyiGeek‘, description: ‘Message: 请输入您的姓名?‘)
          string(name: ‘INPUT_AGE‘, defaultValue: ‘WeiyiGeek‘, description: ‘Message: 请输入您的年龄?‘)
          choice(name: ‘INPUT_SEX‘, choices: [‘Male‘,‘Female‘], description: ‘Message: 请选择你的性别?‘)
          booleanParam(name: ‘INPUT_AGREE‘, defaultValue: true, description: ‘Message: 是否确定协议?‘)
        }
      }

      steps {
        // 方式2: 注意script必须包含在 steps 块之中(此种方式可以全局传递参数)
        script {
          env.git_version=input message: ‘Titel: 版本‘, ok: ‘通过‘,parameters: [string ( name: ‘git_version‘, trim: true, description: ‘Message : 请选择要操作的应用版本?‘)];

          env.deploy_option = input message: ‘Titel: 操作‘, ok: ‘deploy‘, parameters: [choice(name: ‘deploy_option‘, choices: [‘deploy‘, ‘rollback‘, ‘redeploy‘], description: ‘Message : 请选择操作流程?‘)];
        }

        // 12.input 输出示例
        echo "局部可用 输出示例1: 姓名:${INPUT_PERSON}, 年龄:${INPUT_AGE}, 性别:${INPUT_SEX}, 是否同意协议: ${INPUT_AGREE}"

        echo "全局可用 输出示例(script) -> 版本 : ${env.git_version}"
        echo "全局可用 输出示例(script) -> 版本 : ${env.deploy_option}"
    }
  }

  // 采用script块中定义input可以调用不同stage中得参数值
  stage (‘调用‘) {
    steps {
      echo "调用1 : ${env.git_version}"
      echo "调用2 : ${env.deploy_option}"
    }
  }

}
描述: 该指令允许管道根据给定条件确定是否应执行该阶段,when指令必须至少包含一个条件,如果when指令包含多个条件,则所有子条件必须返回true才能执行该阶段;
使用嵌套条件构建更复杂的条件结构:not,allOf或anyOf,嵌套条件可以嵌套到任意深度。
1.如果使用allOf条件,则表示所有条件为真才继续执行。
2.如果使用anyOf条件,请注意一旦找到第一个“真”条件,该条件将跳过其余测试。
3.使用使用not条件是,则当条件为false是为真才进行执行
// 1.不匹配分支
when { not { branch ‘master‘ } }

// 2.分别满足分支为master并且DEPLOY_TO环境变量值为production是继续执行
when { allOf { branch ‘master‘; environment name: ‘DEPLOY_TO‘, value: ‘production‘ } }

// 3.满足分支为master或者分支为staging都可以继续执行.
when { anyOf { branch ‘master‘; branch ‘staging‘ } }
位置&参数:
必须: No
参数: Express
允许: 在 Pipeline块 -> stage 块内
内置条件:
branch : 当正在构建的分支与给出的分支模式匹配时执行,请注意这仅适用于多分支管道;
when { branch ‘master‘ }
environment : 当指定的环境变量设置为给定值时执行,
when { expression { return params.DEBUG_BUILD } }
equals : 当期望值等于实际值时执行阶段,
when { equals expected: 2, actual: currentBuild.number }
expression : 在指定的Groovy表达式计算为true时执行阶段, 注意当从表达式返回字符串时,它们必须被转换为布尔值,或者返回null来计算为false。简单地返回"0"或"false"仍然会计算为"true"。
when { expression { return params.DEBUG_BUILD } }
Tag : 如果TAG_NAME变量匹配给定的模式则执行该阶段, 注意如果提供了一个空模式,那么阶段将在TAG_NAME变量存在时执行(与buildingTag()相同)。
when { tag "release-*" }
buildingTag : 执行构建构建标签的阶段.
when { buildingTag() }
changelog : 如果构建的SCM更改日志包含给定的正则表达式模式则执行阶段;
when { changelog ‘.*^\\[DEPENDENCY\\] .+$‘ }
changeset : 如果构建的SCM变更集包含一个或多个与给定模式匹配的文件,则执行阶段。
when { changeset "**/*.js" }
when { changeset pattern: ".TEST\\.java", comparator: "REGEXP" }  // 正则表达式匹配
when { changeset pattern: "*/*TEST.java", caseSensitive: true }   // 区分大小写ANT样式路径
changeRequest : 如果当前构建是针对“变更请求”的,则执行阶段(也称为GitHub和Bitbucket上的Pull Request,GitLab上的Merge Request,Gerrit变更等)。如果未传递任何参数,则阶段将在每个更改请求上运行
when { changeRequest() }.
// # Possible attributes are `id, target, branch, fork, url, title, author, authorDisplayName, and authorEmail`

// 每一个都对应一个CHANGE_*环境变量,
when { changeRequest target: ‘master‘ }.

// comparator 参数后指导属性,以指定匹配时如何计算任何模式:
// * EQUALS用于简单的字符串比较(默认值),
// * GLOB用于ANT风格的路径GLOB(与例如changeset相同),
// * REGEXP用于正则表达式匹配
when { changeRequest authorEmail: "[\\w_-.]+@example.com", comparator: ‘REGEXP‘ }
triggeredBy : 在给定的参数触发当前构建时执行该阶段。
when { triggeredBy ‘SCMTrigger‘ }

when { triggeredBy ‘TimerTrigger‘ }

when { triggeredBy ‘UpstreamCause‘ }

when { triggeredBy cause: "UserIdCause", detail: "vlinde" }
优先级说明
1.when在input指令前评估 : 默认情况下,如果定义了阶段则在输入之前不会评估阶段的when条件。但是可以通过beforeInput在when块中指定选项来更改此设置。如果beforeInput设置为true,则将首先评估when条件并且仅当when条件评估为true时才输入。
pipeline {
    agent none
    stages {
        stage(‘Example Build‘) {
            steps {
                echo ‘Hello World‘
            }
        }
        stage(‘Example Deploy‘) {
            when {
                beforeInput true    // 关键点
                branch ‘production‘
            }
            input {
                message "Deploy to production?"
                id "simple-input"
            }
            steps {
                echo ‘Deploying‘
            }
        }
    }
}
2.when在options指令前评估 : 默认情况下,when一个条件stage会进入之后进行评价options为stage,如果任何限定。但是可以通过beforeOptions在when 块中指定选项来更改此设置。如果beforeOptions将设置为true,when则将首先评估条件,并且options仅在 when 条件评估为true时才输入。
pipeline {
    agent none
    stages {
      stage(‘Example Build‘) {
          steps {
              echo ‘Hello World‘
          }
      }
      stage(‘Example Deploy‘) {
          when {
              beforeOptions true   // 关键点
              branch ‘testing‘
          }
          options {
              lock label: ‘testing-deploy-envs‘, quantity: 1, variable: ‘deployEnv‘
          }
          steps {
              echo "Deploying to ${deployEnv}"
          }
      }
  }
}
3.when在stage进入agent前评估 : 默认情况下,如果定义了一个阶段的when条件,那么将在进入该阶段的代理之后计算。但是,这可以通过在when块中指定beforeAgent选项来更改。如果beforeAgent被设置为true,那么将首先计算when条件,只有当when条件计算为true时才会输入agent。
pipeline {
    agent none
    stages {
        stage(‘Example Build‘) {
            steps {
                echo ‘Hello World‘
            }
        }
        stage(‘Example Deploy‘) {
            agent {
                label "some-label"
            }
            when {
                beforeAgent true
                branch ‘production‘
            }
            steps {
                echo ‘Deploying‘
            }
        }
    }
}
示例.Condition When
pipeline {
    agent none  // beforeAgent
    stages {
      stage(‘Example Build‘) {
        steps {
          echo ‘Hello World‘
        }
      }
      stage(‘Example Deploy‘) {
        // Single Condition - 单一条件
        when {
          branch ‘production‘
        }

        // Multiple Condition - 多重条件
        when {
          branch ‘production‘
          environment name: ‘DEPLOY_TO‘, value: ‘production‘
        }

        // Nested condition - 嵌套条件
        when {
          allOf {
            branch ‘production‘
            environment name: ‘DEPLOY_TO‘, value: ‘production‘
          }
        }

        // Multiple condition and nested condition - 注意点
        when {
            branch ‘production‘
            anyOf {
                environment name: ‘DEPLOY_TO‘, value: ‘production‘
                environment name: ‘DEPLOY_TO‘, value: ‘staging‘
            }
         }

        // Expression condition and nested condition  - 表达式条件和嵌套条件
        when {
          expression { BRANCH_NAME ==~ /(production|staging)/ }
          anyOf {
              environment name: ‘DEPLOY_TO‘, value: ‘production‘
              environment name: ‘DEPLOY_TO‘, value: ‘staging‘
          }
        }

        // triggeredBy
        when {
          triggeredBy "TimerTrigger"  // 当前Job设置的触发器名称进行监控
        }

        // 当前面的when都满足时采用执行该阶段步骤,否则丢弃
        steps {
            echo ‘Deploying‘
        }
      }
    }
}
Tips : GLOB(对于默认)对于不区分大小写的ANT样式路径所以可以使用caseSensitive参数将其关闭;
描述: 声明式管道中的阶段可能有一个包含要按顺序运行的嵌套阶段列表的stage节。注意,一个阶段必须有且只有一个步骤、阶段、并行或 Matrix。如果stage指令嵌套在一个并行块或 Matrix 块本身中, 则不可能在stage指令中嵌套一个并行块或 Matrix 块。然而一个并行或 Matrix 块中的stage指令可以使用stage的所有其他功能,包括代理、工具、when等。
示例:Sequential Stages, Declarative Pipeline
pipeline {
    agent none
    stages {
        // 非时序的阶段
        stage(‘Non-Sequential Stage‘) {
            agent {
                label ‘for-non-sequential‘
            }
            steps {
                echo "On Non-Sequential Stage"
            }
        }
        // 顺序阶段
        stage(‘Sequential Stage‘) {
            agent {
                label ‘for-sequential‘
            }
            environment {
                FOR_SEQUENTIAL = "some-value"
            }
            // 注意点1:
            stages {
                stage(‘In Sequential 1‘) {
                    steps {
                        echo "In Sequential 1"
                    }
                }
                stage(‘In Sequential 2‘) {
                    steps {
                        echo "In Sequential 2"
                    }
                }
                // 注意点2:可以使用stage的所有其他功能,包括代理、工具、when等
                stage(‘Parallel In Sequential‘) {
                    // 并行执行上面已讲述
                    parallel {
                        stage(‘In Parallel 1‘) {
                            steps {
                                echo "In Parallel 1"
                            }
                        }
                        stage(‘In Parallel 2‘) {
                            steps {
                                echo "In Parallel 2"
                            }
                        }
                    }
                }
            }
        }
    }
}
描述:声明式管道中的阶段可能有一个包含要并行运行的嵌套阶段列表的并行部分。注意,一个阶段必须有且只有一个步骤、阶段、并行或 Matrix 。如果stage指令嵌套在一个并行块或 Matrix 块本身中,则不可能在stage指令中嵌套一个并行块或 Matrix 块。然而,一个并行或 Matrix 块中的stage指令可以使用stage的所有其他功能,包括代理、工具、when等。
Tips : 此外,通过在包含并行的阶段中添加failFast true,可以在任何一个阶段失败时强制终止所有并行阶段。添加failfast 的另一个选项是在管道定义中添加一个option{ parallelsAlwaysFailFast() }
示例:Parallel Stages, Declarative Pipeline
pipeline {
    agent any
    //方式1.parallelsAlwaysFailFast
    options {
        parallelsAlwaysFailFast()
    }
    stages {
        stage(‘Non-Parallel Stage‘) {
            steps {
                echo ‘This stage will be executed first.‘
            }
        }
        stage(‘Parallel Stage‘) {
            when {
                branch ‘master‘
            }
            // 方式2.在任何一个阶段失败时强制终止所有并行阶段
            failFast true
            // 并行构建值得学习
            parallel {
                stage(‘Branch A‘) {
                    agent {
                        label "for-branch-a"
                    }
                    steps {
                        echo "On Branch A"
                    }
                }
                stage(‘Branch B‘) {
                    agent {
                        label "for-branch-b"
                    }
                    steps {
                        echo "On Branch B"
                    }
                }
                stage(‘Branch C‘) {
                    agent {
                        label "for-branch-c"
                    }
                    stages {
                        stage(‘Nested 1‘) {
                            steps {
                                echo "In stage Nested 1 within Branch C"
                            }
                        }
                        stage(‘Nested 2‘) {
                            steps {
                                echo "In stage Nested 2 within Branch C"
                            }
                        }
                    }
                }
            }
        }
    }
}
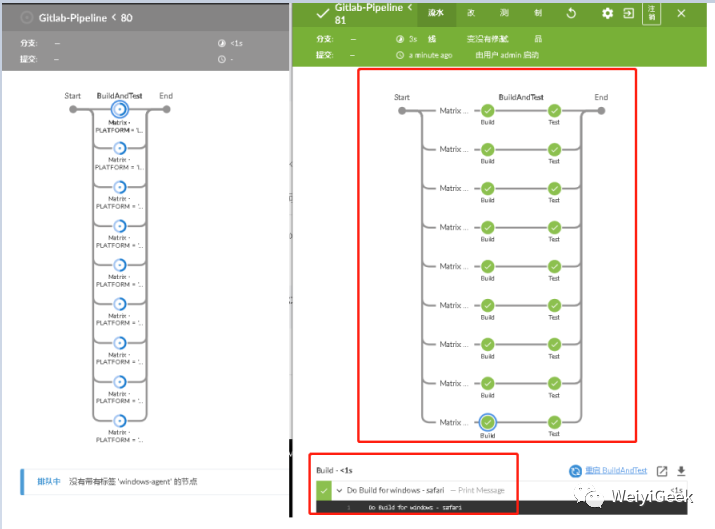
描述: 声明式管道(Declarative pipeline)中的阶段可能有一个 Matrix 节,定义要并行运行的名称-值组合的多维 Matrix 。我们将把这些组合称为 Matrix 中的“细胞”。 Matrix 中的每个单元可以包括一个或多个阶段,使用该单元的配置按顺序运行。注意一个阶段必须有且只有一个步骤、阶段、并行或 Matrix 。如果stage指令嵌套在一个并行块或 Matrix 块本身中,则不可能在stage指令中嵌套一个并行块或 Matrix 块。然而,一个并行或 Matrix 块中的stage指令可以使用stage的所有其他功能,包括代理、工具、when等。
此外,通过在包含 Matrix 的阶段同样也可添加 failFast true,您可以强制您的 Matrix 单元在其中任何一个失败时全部终止。添加failfast的另一个选项是在管道定义中添加一个option { parallelsAlwaysFailFast() } Matrix 部分必须包括一个轴部分和一个级部分。
axis部分定义了 Matrix 中每个轴的值。
stage部分定义了要在每个单元格中按顺序运行的阶段列表。
Tips : 同时Matrix 可以有一个exclude节来移除无效的单元格, 舞台上可用的许多指令,包括代理、工具、何时等,也可以添加到matrix中来控制每个单元格的行为。
axis
描述: axes(轴线)部分指定了一个或多个axis指令。每个轴由一个名称和一个值列表组成。每个轴上的所有值都与其他轴上的值组合起来生成单元格。
stages
描述: 该阶段部分指定每个单元中要顺序执行的一个或多个阶段, 此部分与前面任何stages是相同的;
示例: Matrix
// One-axis with 3 cells, each cell runs three stages - "build", "test", and "deploy"
matrix {
    axes {
      axis {
        name ‘PLATFORM‘
        values ‘linux‘, ‘mac‘, ‘windows‘
      }
    }
    stages {
        stage(‘build‘) {
            // ...
        }
        stage(‘test‘) {
            // ...
        }
        stage(‘deploy‘) {
            // ...
        }
    }
}


// Three-axis matrix with 24 cells (three by four by two)
// 即 24 种组合方式: 例如 linux -> 32-bit -> chrome , mac -> 32-bit -> chrome
matrix {
  axes {
    axis {
        name ‘PLATFORM‘
        values ‘linux‘, ‘mac‘, ‘windows‘
    }
    axis {
        name ‘BROWSER‘
        values ‘chrome‘, ‘edge‘, ‘firefox‘, ‘safari‘
    }
    axis {
        name ‘ARCHITECTURE‘
        values ‘32-bit‘, ‘64-bit‘
    }
  }
    // ...
}
excludes (optional) - 排出
描述: 可选的exclude部分允许作者指定一个或多个exclude filter表达式,这些表达式选择要从扩展的矩阵单元格集合中排除的单元格(aka, sparsening)。过滤器是使用一个或多个带有名称和值列表的排除轴指令的基本指令结构来构造的。
exclude中的axis指令生成一组组合(类似于生成矩阵单元格)。匹配排除组合中所有值的矩阵单元格从矩阵中移除。如果提供了多个exclude指令,则每个指令将分别计算以删除单元格。
当处理一长串要排除的值时 exclude axis指令可以使用 notValues 代替 values.这将排除与传递给notValues的值之一不匹配的单元格。
示例.具有24个单元的三轴矩阵,不包括“ 32位,mac”(不包括4个单元)
matrix {
  axes {
      axis {
          name ‘PLATFORM‘
          values ‘linux‘, ‘mac‘, ‘windows‘
      }
      axis {
          name ‘BROWSER‘
          values ‘chrome‘, ‘edge‘, ‘firefox‘, ‘safari‘
      }
      axis {
          name ‘ARCHITECTURE‘
          values ‘32-bit‘, ‘64-bit‘
      }
  }
  excludes {
      exclude {
          axis {
              name ‘PLATFORM‘
              values ‘mac‘
          }
          axis {
              name ‘ARCHITECTURE‘
              values ‘32-bit‘
          }
      }

      //排除linux和safari组合,并排除使用edge浏览器的任何非windows平台。
       exclude {
          // 2 cells
          axis {
              name ‘PLATFORM‘
              values ‘linux‘
          }
          axis {
              name ‘BROWSER‘
              values ‘safari‘
          }
        }
        exclude {
          // 3 more cells and ‘32-bit, mac‘ (already excluded)
          axis {
              name ‘PLATFORM‘
              notValues ‘windows‘ // 注意点 norValues
          }
          axis {
              name ‘BROWSER‘
              values ‘edge‘
          }
        }
  }
    // ...
}
描述: 通过在Matrix本身下添加阶段级指令,用户可以有效地为每个单元配置整体环境。这些指令的行为与它们在舞台上的行为相同,但它们也可以接受矩阵为每个单元格提供的值。
注意 axis和exclude指令定义了组成矩阵的静态单元格集, 这组组合是在管道运行开始之前生成的。另一方面“per-cell”指令在运行时进行计算。
directives include:
agent
environment
input
options
post
tools
when
Example.完整的矩阵示例,声明性管道
pipeline {
    // 参数选择
    parameters {
        choice(name: ‘PLATFORM_FILTER‘, choices: [‘all‘, ‘linux‘, ‘windows‘, ‘mac‘], description: ‘Run on specific platform‘)
    }
    agent none
    stages {
        stage(‘BuildAndTest‘) {
            matrix {
                agent {
                    label "${PLATFORM}-agent"
                }
                when { anyOf {
                    // 参数选择不为空时继续执行
                    expression { params.PLATFORM_FILTER == ‘all‘ }
                    expression { params.PLATFORM_FILTER == env.PLATFORM }
                } }
                // 2 轴 (3 x 4) 十二格组合方式
                axes {
                    axis {
                        name ‘PLATFORM‘
                        values ‘linux‘, ‘windows‘, ‘mac‘
                    }
                    axis {
                        name ‘BROWSER‘
                        values ‘firefox‘, ‘chrome‘, ‘safari‘, ‘edge‘
                    }
                }
                // 排除指定Matrix矩阵中的值 (排除linux和safari组合,并排除使用edge浏览器的任何非windows平台。)
                // 即 排除 (linux,safari) , (linux,edge) , (mac,edge) 三种情况
                excludes {
                    exclude {
                        axis {
                            name ‘PLATFORM‘
                            values ‘linux‘
                        }
                        axis {
                            name ‘BROWSER‘
                            values ‘safari‘
                        }
                    }
                    exclude {
                        axis {
                            name ‘PLATFORM‘
                            notValues ‘windows‘
                        }
                        axis {
                            name ‘BROWSER‘
                            values ‘edge‘
                        }
                    }
                }
                stages {
                    stage(‘Build‘) {
                        steps {
                            echo "Do Build for ${PLATFORM} - ${BROWSER}"
                        }
                    }
                    stage(‘Test‘) {
                        steps {
                            echo "Do Test for ${PLATFORM} - ${BROWSER}"
                        }
                    }
                }
            }
        }
    }
}
// Declarative Pipeline Syntax Composite sample
pipeline {
  // 1.由于此处没有其它jenkins slave 分布式机器则采用any进行替代
  agent any
  // 7.全局环境变量
  environment {
    global_env = ‘Jenkins global environment‘
    global_when = ‘true‘
  }
  // 8.全局选项
  options {
    // 如果失败重试整个 Pipeline指定次数
    retry(3)
    // 在任何一个阶段失败时强制终止所有并行阶段
    parallelsAlwaysFailFast()

  }
  // 9.全局参数
  parameters {
    // 参数声明定义
    string(name: ‘PERSON‘, defaultValue: ‘Mr Jenkins‘, description: ‘Who should I say hello to?‘)
    booleanParam(name: ‘TOGGLE‘, defaultValue: true, description: ‘Toggle this value‘)
    text(name: ‘BIOGRAPHY‘, defaultValue: ‘‘, description: ‘Enter some information about the person‘)
    choice(name: ‘CHOICE‘, choices: [‘One‘, ‘Two‘, ‘Three‘], description: ‘Pick something‘)
    password(name: ‘PASSWORD‘, defaultValue: ‘SECRET‘, description: ‘Enter a password‘)
  }

  // 11.触发器 (每两分钟执行一次)
  triggers{ cron(‘H/2 * * * *‘) }

  // 12.工具路径并放置环境变量到PATH
  // Dashboard -> 全局工具配置
  tools {
    maven ‘maven_env‘
    jdk   ‘jdk_1.8.0_211‘
  }
  // 2.多阶段唯一入口
  stages {
    // 3.指定的单阶段(init-初始化阶段)
    stage (‘init‘) {
      // 4.单阶段中的只有一个步骤steps
      steps {
        // 5.内置指令例如 echo 、println进行输出
        echo "init - steps one - built-in functions echo"
        println "init - steps one - built-in functions println "

        // 6.采用script指令来执行Scripted Pipeline中的一些脚本
        script {
          def browsers = [‘chrome‘, ‘firefox‘, ‘edge‘]
          for (int i = 0; i < browsers.size(); ++i) {
              echo "Testing the ${browsers[i]} browser"
          }
        }
      }
    }

   stage (‘one-stage‘) {
      // 7.局部环境变量
      environment {
        // 变量定义
        local_env = "Jenkins local environment"
        // 将在Jenkins中设置的用户密码凭证赋予local_creds变量, 注意括号中为凭据名称
        // Dashboard -> 凭据 -> 系统 -> 全局凭据 (unrestricted) -> 添加凭据
        // Username with password	: 43287e62-ce5b-489a-9c11-cedf38e16e92	weiyigeek/****** (Pipeline 测试 credentials 读取)	Username with password	Pipeline 测试 credentials 读取
        Local_userpass_creds = credentials(‘43287e62-ce5b-489a-9c11-cedf38e16e92‘)
        // SSH Username with private key : b4c8b4e9-2777-44a1-a1ed-e9dc21d37f4f	weiyigeek (myself-gitlab-weiyigeek)	SSH Username with private key	myself-gitlab-weiyigeek
        Local_ssh_creds = credentials(‘b4c8b4e9-2777-44a1-a1ed-e9dc21d37f4f‘)
      }

      steps {
        println "全局变量: " + global_env +", 局部变量: " + local_env
        /* == 全局变量: Jenkins global environment, 局部变量: Jenkins local environment*/
        // 注意点: defined: MYVARNAME_USR and MYVARNAME_PSW respectively. (输出的字符串已经经过转义)
        sh ‘echo "user is $Local_userpass_creds_USR"‘      /* = user is **** */
        sh ‘echo "password is $Local_userpass_creds_PSW"‘  /* = password is **** */
        // 注意点: defined: MYVARNAME_USR and MYVARNAME_PSW (holding the passphrase).
        sh ‘echo "SSH private key is located at $Local_ssh_creds"‘
        sh ‘echo "SSH user is $Local_ssh_creds_USR"‘

        // 12.额外第三方工具插件路径调用方式
        script {
          scannerHome = tool ‘sonarqubescanner‘
          //这里这个tool是直接根据名称,获取自动安装的插件的路径
        }
        // withSonarQubeEnv(‘SonarQube‘) {
        //   sh "${scannerHome}/bin/sonar-scanner -Dsonar.projectKey=YourProjectKey -Dsonar.sources=."
        // }
      }


   }

    stage (‘two-stage‘) {
      // 13.当任一满足以下条件时执行
      when {
        beforeInput true
        anyOf { branch ‘master‘; environment name: ‘global_when‘, value: ‘true‘ }
      }

      // 8.局部选项
      options {
        // 可设置全局(局部阶段)执行超时指定为一分钟,然后Jenkins将中止 Pipeline运行。
        timeout(time: 5, unit: ‘MINUTES‘)
      }

      // 12.Input指令输入参数到变量中
      // 方式1
      input {
          message "Title : 个人信息输入"
          ok "完成提交"
          submitter "alice,bob"
          parameters {
            string(name: ‘INPUT_PERSON‘, defaultValue: ‘WeiyiGeek‘, description: ‘Message: 请输入您的姓名?‘)
            text(name: ‘INPUT_AGE‘, defaultValue: ‘WeiyiGeek‘, description: ‘Message: 请输入您的年龄?‘)
            choice(name: ‘INPUT_SEX‘, choices: [‘Male‘,‘Female‘], description: ‘Message: 请选择你的性别?‘)
            password(name: ‘INPUT_PASSWORD‘, defaultValue: ‘SECRET‘, description: ‘Message: 请输入您注册密码?‘)
            booleanParam(name: ‘INPUT_AGREE‘, defaultValue: true, description: ‘Message: 是否确定协议?‘)
          }
      }

      steps {
          // 方式2:注意script必须包含在 steps 块之中
          script {
            env.git_version=input message: ‘Titel: 版本‘, ok: ‘通过‘,parameters: [string ( name: ‘git_version‘, trim: true, description: ‘Message : 请选择要操作的应用版本?‘)];
            env.deploy_option = input message: ‘Titel: 操作‘, ok: ‘deploy‘, parameters: [choice(name: ‘deploy_option‘, choices: [‘deploy‘, ‘rollback‘, ‘redeploy‘], description: ‘Message : 请选择操作流程?‘)];
          }

        // 10.Parameters 参数调用
        echo "全局 - Hello ${params.PERSON}"
        echo "全局 - Toggle: ${params.TOGGLE}"
        echo "全局 - Choice: ${params.CHOICE}"
        echo "全局 - Password: ${params.PASSWORD}"
        echo "全局 - Biography: ${params.BIOGRAPHY}"

        // 12.input 输出示例
        echo "input 输出示例1: 姓名:${INPUT_PERSON}, 年龄:${INPUT_AGE}, 性别:${INPUT_SEX}, 是否同意协议: ${INPUT_AGREE}"
        echo "input 输出示例(script) -> 版本 : ${env.git_version}"
        echo "input 输出示例(script) -> 版本 : ${env.deploy_option}"
      }
    }

    stage (‘three-stage‘) {
      // 14.Parallel Stages 并行执行
      // 方式2.failFast true 在任何一个阶段失败时强制终止所有并行阶段
      parallel {
        stage(‘parallel-Branch A‘) {
            steps {
                echo "On Branch A"
            }
        }
        stage(‘parallel-Branch B‘) {
            steps {
                echo "On Branch B"
            }
        }
        stage(‘parallel-Branch C‘) {
          stages {
              stage(‘嵌套Nested 1‘) {
                  steps {
                      echo "In stage Nested 1 within Branch C"
                  }
              }
              stage(‘嵌套Nested 2‘) {
                  steps {
                      echo "In stage Nested 2 within Branch C"
                  }
              }
          }
        }
      }
    }

    // 15.Matrix 矩阵模型实践
    stage (‘four-stage‘) {
      input {
        message "Title : 部署平台"
        ok "完成提交"
        submitter "alice,bob"
        parameters {
          choice(name: ‘PLATFORM_FILTER‘, choices: [‘all‘, ‘linux‘, ‘windows‘, ‘mac‘], description: ‘Run on specific platform‘)
        }
      }
      matrix {
        when { anyOf {
                // 参数选择不为空时继续执行
                expression { params.PLATFORM_FILTER == ‘all‘ }
                expression { params.PLATFORM_FILTER == env.PLATFORM }
              }
        }
        // 16.2 轴 (3 x 2) 6种组合方式的模型
        axes {
          axis {
            name ‘PLATFORM‘
            values ‘linux‘, ‘windows‘, ‘mac‘
          }
          axis {
            name ‘ARCHITECTURE‘
            values ‘32-bit‘,‘64-bit‘
          }
        }
        // 17.排除指定模型例如非64-bit的在windows平台的将被剔除
        excludes {
          exclude {
              axis {
                name ‘PLATFORM‘
                values ‘windows‘
              }
              axis {
                name ‘ARCHITECTURE‘
                notValues ‘64-bit‘
              }
          }
        }
        // 18.还有5种情况依次进行构建
        stages {
          stage(‘Build‘) {
            steps {
              echo "matrix - Do Build for ${PLATFORM} - ${BROWSER}"
            }
          }
        }
      }
    }
  }

  // 6.消息通知
  post {
    // # 总是执行的步骤
    always {
      echo ‘I will always say Hello again!‘ /* == I will always say Hello again!— Print Message */
    }
  }
}
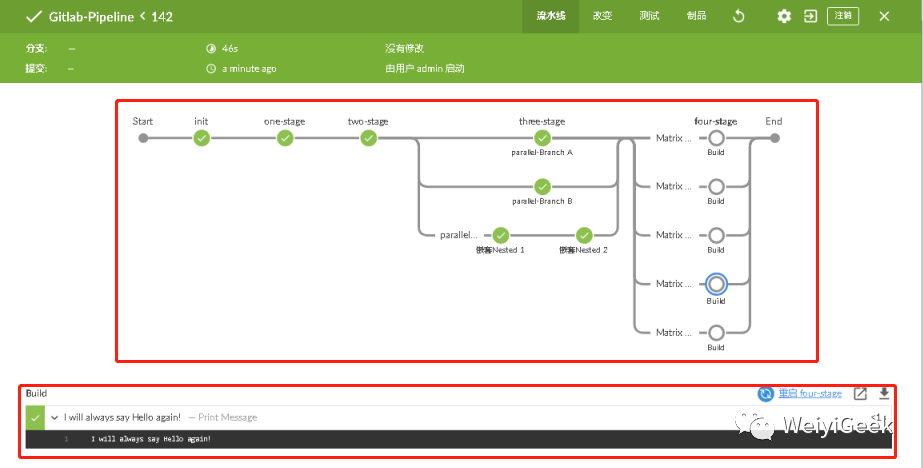
输出结果:
## init - stage
maven_env— Use a tool from a predefined Tool Installation <1s
# Fetches the environment variables for a given tool in a list of ‘FOO=bar‘ strings suitable for the withEnv step.<1s
jdk_k1.8.0_211— Use a tool from a predefined Tool Installation <1s
# Fetches the environment variables for a given tool in a list of ‘FOO=bar‘ strings suitable for the withEnv step.<1s
init - steps one - built-in functions echo— Print Message <1s
init - steps one - built-in functions println — Print Message <1s
Testing the chrome browser— Print Messag e<1s
Testing the firefox browser— Print Message 1s
Testing the edge browser— Print Message <1s
## one - stage
全局变量: Jenkins global environment, 局部变量: Jenkins local environment
+ echo user is ****
user is ****
+ echo **** is ****
**** is ****
+ echo SSH private key is located at ****
SSH private key is located at ****
+ echo SSH user is ****
SSH user is ****
## two-stage
全局 - Hello Mr Jenkins— Print Message<1s
全局 - Toggle: true— Print Message<1s
全局 - Choice: One— Print Message<1s
全局 - Password: SECRET— Print Message<1s
全局 - Biography: — Print Message<1s
input 输出示例1: 姓名:WeiyiGeek, 年龄:185, 性别:Male, 是否同意协议: true— Print Message<1s
input 输出示例(script) -> 版本 : v1.2— Print Message<1s
input 输出示例(script) -> 版本 : deploy— Print Message
## three-stage
On Branch A— Print Message
On Branch B— Print Message
In stage Nested 1 within Branch C
In stage Nested 2 within Branch C
## four-stage
I will always say Hello again!— Print Message<1s
echo: Print Message
println: Print Message
echo "Hello"
println "World!"
isUnix: 如果封闭节点运行在类unix系统(如Linux或Mac OS X)上,则返回true,如果Windows。
pwd:确认当前目录
dir: 默认pipeline工作在工作空间目录下,dir步骤可以让我们切换到其他目录。
deleteDir:是一个无参步骤删除的是当前工作目录。通常它与dir步骤一起使用,用于删除指定目录下的内容。
dir("./delete_dir")
deleteDir()
fileExists:检查给定的文件(作为当前目录的相对路径)是否存在。参数file返回 true | false 。
# 工作空间中文件的相对(/分隔)路径,以验证文件是否存在。
fileExists file: "./pom.xml"
writeFile:将内容写入指定文件中; 参数为:file, text, encoding
readFile:读取文件内容; 参数为:file, encoding
writeFile encoding: ‘utf-8‘, file: ‘file‘, text: ‘测试写入‘
stash : 步骤可以将一些文件保存起来以便被同一次构建的其他步骤或阶段使用。
name
Name of a stash. Should be a simple identifier akin to a job name.
    Type: String

allowEmpty (optional)
    Type: boolean

excludes (optional)
Optional set of Ant-style exclude patterns.
Use a comma separated list to add more than one expression.
If blank, no files will be excluded.
    Type: String

includes (optional)
Optional set of Ant-style include patterns.
Use a comma separated list to add more than one expression.
If blank, treated like **: all files.
The current working directory is the base directory for the saved files, which will later be restored in the same relative locations, so if you want to use a subdirectory wrap this in dir.
    Type: String

useDefaultExcludes (optional)
If selected, use the default excludes from Ant - see here for the list.
    Type: boolean
unstash:恢复以前存储在当前工作区中的一组文件。
# name: 以前保存的仓库的名称。
unstash ‘repo‘
wrap: 一般构建包装,它是特殊的步骤允许调用构建包装器(在freestyle或类似项目中也称为“环境配置”)
wrap([$class: ‘AnsiColorBuildWrapper‘]).
archive: Archive artifacts-归档的工件
unarchive: Copy archived artifacts into the workspace-将存档工件复制到工作区中
archiveArtifacts: 存档构建的成品 (重点)
# 参数: String includes, optional: excludes
archive
# 参数: Type: java.util.Map<java.lang.String, java.lang.String> mapping
unarchive
# 参数:
# artifacts: 用于存档的文件(支持通配符)
# excludes: 不包含的文件(支持通配符)
# allowEmptyArchive: 归档为空时不引起构建失败
# onlyIfSuccessful: 只有构建成功时归档
# fingerprint: 记录所有归档成品的指纹
# Follow symbolic links: 通过禁用此选项,工作空间中找到的所有符号链接都将被忽略。
archiveArtifacts artifacts: ‘./target/*.jar‘, excludes: ‘./target/test/*‘, fingerprint: true, onlyIfSuccessful: true, allowEmptyArchive: true
描述: 与命令相关的步骤其实是 Pipeline:Nodes and Processes 插件提供的步骤。由于它是 Pipeline 插件的一个组件,所以基本不需要单独安装
withEnv: 设置环境变量
描述: 在块中设置一个或多个环境变量, 这些可用于该范围内生成的任何外部流程。例如:
node {
  withEnv([‘MYTOOL_HOME=/usr/local/mytool‘]) {
    sh ‘$MYTOOL_HOME/bin/start‘
  }
}
Tips: 注意这里我们在Groovy中使用了单引号,所以变量展开是由Bourne shell完成的而不是Jenkins;
sh:执行shell命令
该步骤支持的参数有:
script:将要执行的shell脚本,通常在类UNIX系统上可以是多行脚本。
encoding:脚本执行后输出日志的编码,默认值为脚本运行所在系统的编码。
returnStatus:布尔类型,默认脚本返回的是状态码,如果是一个非零的状态码,则会引发pipeline执行失败。如果 returnStatus 参数为true,则不论状态码是什么,pipeline的执行都不会受影响。
returnStdout:布尔类型,如果为true,则任务的标准输出将作为步骤的返回值,而不是打印到构建日志中(如果有错误,则依然会打印到日志中)。除了script参数,其他参数都是可选的。
Tips: returnStatus与returnStdout参数一般不会同时使用,因为返回值只能有一个。如果同时使用则只有returnStatus参数生效。
Tips : 注意采用sh执行echo 1 > 1.txt命令时然后采用readFile读取时带有换行符,解决办法:
# 方式1.采用 $? 判断命令执行成功与否。
# 方式2.采用echo命令输出到文件时加上 -n 选项。
bat、powershell步骤
bat步骤执行的是Windows的批处理命令。
powershell步骤执行的是PowerShell脚本,支持3+版本。
Tips: 步骤支持的参数与sh步骤的一样就不重复介绍了。
异常终止
try-catch-finally : 异常捕获和抛出
error:主动报错中止当前 pipeline 并且避免打印堆栈跟踪信息。
// 简单示例
try {
  sh ‘might fail && whoami‘
  echo ‘Succeeded!‘
} catch (err) {
  echo "Failed: ${err} - " + err.toString()
  error "[-Error] : 项目部署失败 \n[-Msg] : ${err.getMessage()} "
} finally {
  sh ‘./tear-down.sh‘
}
catchError: 捕获错误并将构建结果设置为失败
catchError {
  sh ‘might fail‘
}
unstable: 设置阶段结果为不稳定, 将一条消息打印到日志中并将整个构建结果和阶段结果设置为不稳定。消息还将与阶段结果相关联并可能以可视化方式显示。
unstable ‘阶段结果为不稳定‘
unstable {
  echo "阶段结果为不稳定"
}
电子邮件
mail: Simple step for sending email.
subject
Email subject line.
    Type: String
body
Email body.
    Type: String
bcc (optional)
BCC email address list. Comma separated list of email addresses.
    Type: String
cc (optional)
CC email address list. Comma separated list of email addresses.
    Type: String
charset (optional)
Email body character encoding. Defaults to UTF-8
    Type: String
from (optional)
From email address. Defaults to the admin address globally configured for the Jenkins instance.
    Type: String
mimeType (optional)
Email body MIME type. Defaults to text/plain.
    Type: String
replyTo (optional)
Reploy-To email address. Defaults to the admin address globally configured for the Jenkins instance.
    Type: String
to (optional)
To email address list. Comma separated list of email addresses.
    Type: String
重试休眠和超时
retry:重试正文最多N次, 如果在块体执行过程中发生任何异常,请重试该块(最多N次)。如果在最后一次尝试时发生异常,那么它将导致中止构建(除非以某种方式捕获并处理它),不会捕获生成的用户中止。
sleep:让pipeline休眠指定的一段时间 , 只需暂停管道构建直到给定的时间已经过期相当于(在Unix上)sh ‘sleep…‘。
timeout:以确定的超时限制执行块内的代码。
waitUntil:反复运行它的主体直至条件满足。
# 参数: int count
retry(count: 5)  # 重试5次

# 参数: int time, optional unit ( Values: NANOSECONDS, MICROSECONDS, MILLISECONDS, SECONDS, MINUTES, HOURS, DAYS)
sleep(time: 60,unit: SECONDS  # 休眠60s

# 参数: int time, optional activity, optional unit
# Values: NANOSECONDS, MICROSECONDS, MILLISECONDS, SECONDS, MINUTES, HOURS, DAYS
timeout(time: 10,unit: MINUTES) # 超时10分钟

# 参数: optional initialRecurrencePeriod, optional quiet
# initialRecurrencePeriod: 设置重试之间的初始等待周期(以毫秒为单位)默认为250 ms。每次失败都将降低尝试之间的延迟最多可达15秒。
# quiet: 如果为true,则该步骤不会在每次检查条件时记录消息。默认值为false。
waitUntil(initialRecurrencePeriod: 250, quiet: false){
  sh "./monitor.sh"
}
tool:使用预定义的工具,在Global Tool Configuration(全局工具配置)中配置了工具。
tool name: ‘Sonar-Scanner‘, type: ‘hudson.plugins.sonar.SonarRunnerInstallation‘
tool name: ‘docker‘, type: ‘dockerTool‘
getContext: 从内部api获取上下文对象
withContext: 在块中使用内部api中的上下文对象
# 参数: 用于受信任的代码,如全局库,它可以操作内部Jenkins api。
# Type: java.lang.Class<?>
# 例子:接受单个类型参数
getContext hudson.FilePath

# 例子:接受一个context参数和一个block。
# 在ConsoleLogFilter、LauncherDecorator和EnvironmentExpander的情况下,自动将其参数与上下文对象合并。
withContext(new MyConsoleLogFilter()) {
  sh ‘process‘
}
Tips : 不要试图传递在Groovy中定义的对象;只支持java定义的对象。实际上你应该避免使用this和getContext而只是在插件中定义一个步骤。
参考地址: https://www.jenkins.io/doc/pipeline/steps/workflow-basic-steps/
(1) 超时设置与部署参数switch语句选择
timeout(time: 1, unit: ‘MINUTES‘) {
  script {
    env.deploy_option = input message: ‘选择操作‘, ok: ‘deploy‘,
    parameters: [choice(name: ‘deploy_option‘, choices: [‘deploy‘, ‘rollback‘, ‘redeploy‘], description: ‘选择部署环境‘)]
    switch("${env.deploy_option}"){
        case ‘deploy‘:
            println(‘1.deploy prd env‘)
            break;
        case ‘rollback‘:
            println(‘2.rollback env‘)
            break;
        case ‘redeploy‘:
            println(‘3.redeploy env‘)
            break;
        default:
            println(‘error env‘)
    }
  }
}
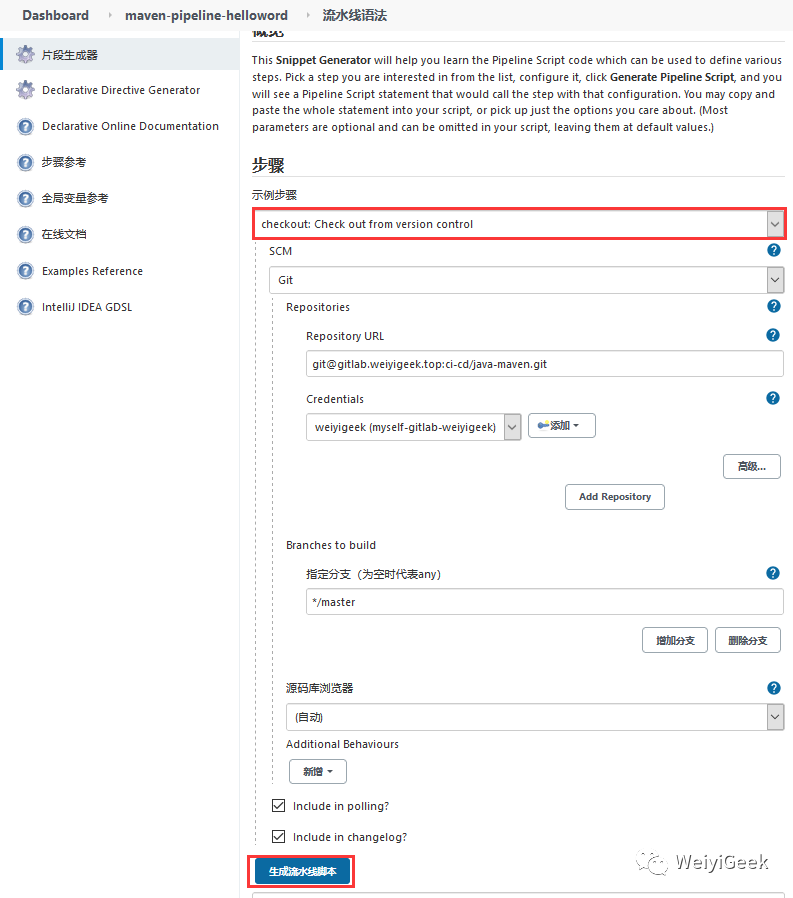
(1)代码仓库拉取之checkout SCM
checkout([$class: ‘GitSCM‘, branches: [[name: ‘*/master‘]], doGenerateSubmoduleConfigurations: false, extensions: [], submoduleCfg: [], userRemoteConfigs: [[credentialsId: ‘b4c8b4e9-2777-44a1-a1ed-e9dc21d37f4f‘, url: ‘git@gitlab.weiyigeek.top:ci-cd/java-maven.git‘]]])
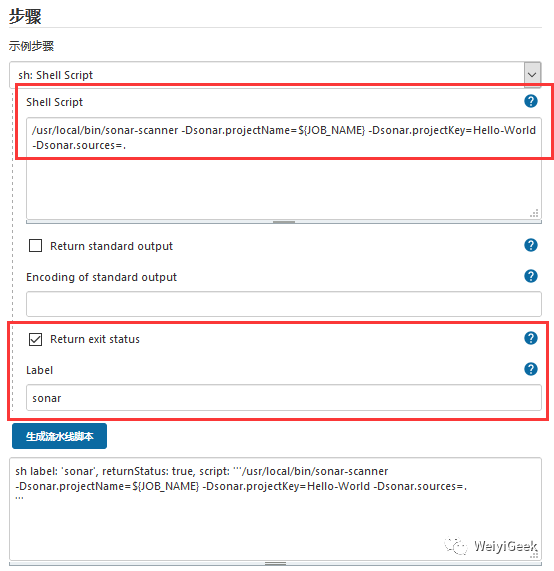
(2) 代码质量检测之shell Script
/usr/local/bin/sonar-scanner -Dsonar.projectName=${JOB_NAME} -Dsonar.projectKey=Hello-World -Dsonar.sources=.

// # 生成的流水线
sh label: ‘sonar‘, returnStatus: true, script: ‘‘‘/usr/local/bin/sonar-scanner -Dsonar.projectName=${JOB_NAME} -Dsonar.projectKey=Hello-World -Dsonar.sources=.‘‘‘
(3) Kubernetes 动态节点 Pod 模板的选择
// # Scripted Pipeline
podTemplate(label: ‘jenkins-jnlp-slave‘, cloud: ‘k8s_115‘) {
  node (‘jenkins-jnlp-slave‘) {
    stage (‘dynamic-checkout‘) {
      checkout([$class: ‘GitSCM‘, branches: [[name: ‘*/master‘]], userRemoteConfigs: [[credentialsId: ‘69c0dbf0-f786-4aa0-975a-76528f10de8b‘, url: ‘http://127.0.0.1/xxx/devops_test.git‘]]])
    }
  }
}
WeiyiGeek Blog - 为了能到远方,脚下的每一步都不能少。
Tips : 本文章来源 Blog 站点或者 WeiyiGeek 公众账号 (友链交换请邮我哟):
微信公众号-WeiyiGeek` # 精华文章发布地址
https://weiyigeek.top # 采用cloudflare CDN 国内有时访问较慢
https://weiyigeek.gitee.io # 国内访问快可能会有更新不及时得情况
个人知乎-WeiyiGeek
Tips: 更多学习笔记文章请关注
WeiyiGeek公众账号
【微信公众号关注(点击)】
【邮箱联系: Master#weiyigeek.top】

7.Jenkins进阶之流水线pipeline语法入门学习(2)
标签:containe 包括 属性 rac 用户名 通知 超时 ops png
原文地址:https://www.cnblogs.com/WeiyiGeek/p/14711379.html