标签:出现 user ESS 官方文档 from iproute capture 工作方式 网络方案
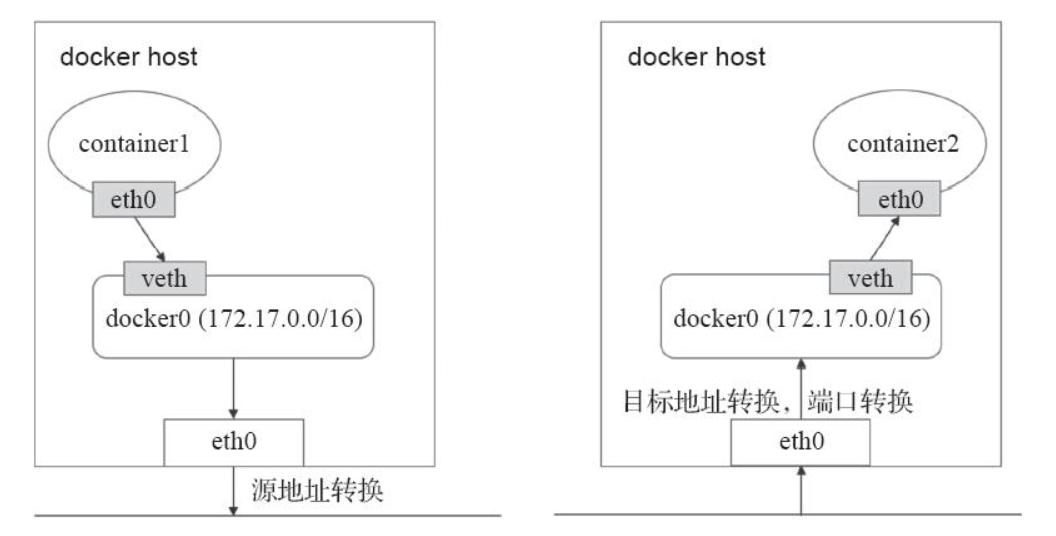
Bridge:借助虚拟网桥设备为容器建立网络连接。Host:设置容器直接共享当前节点主机的网络名称空间。none:多个容器共享同一个网络名称空间。#使用以下命令查看docker原生的三种网络
[root@localhost ~]# docker network ls
NETWORK ID NAME DRIVER SCOPE
0efec019c899 bridge bridge local
40add8bb5f07 host host local
ad94f0b1cca6 none null local
#none网络,在该网络下的容器仅有lo网卡,属于封闭式网络,通常用于对安全性要求较高并且不需要联网的应用
[root@localhost ~]# docker run -it --network=none busybox
/ # ifconfig
lo Link encap:Local Loopback
inet addr:127.0.0.1 Mask:255.0.0.0
UP LOOPBACK RUNNING MTU:65536 Metric:1
RX packets:0 errors:0 dropped:0 overruns:0 frame:0
TX packets:0 errors:0 dropped:0 overruns:0 carrier:0
collisions:0 txqueuelen:1000
RX bytes:0 (0.0 B) TX bytes:0 (0.0 B)
#host网络,共享宿主机的网络名称空间,容器网络配置和host一致,但是存在端口冲突的问题
[root@localhost ~]# docker run -it --network=host busybox
/ # ip addr
1: lo: <LOOPBACK,UP,LOWER_UP> mtu 65536 qdisc noqueue qlen 1000
link/loopback 00:00:00:00:00:00 brd 00:00:00:00:00:00
inet 127.0.0.1/8 scope host lo
valid_lft forever preferred_lft forever
inet6 ::1/128 scope host
valid_lft forever preferred_lft forever
2: eth0: <BROADCAST,MULTICAST,UP,LOWER_UP> mtu 1500 qdisc pfifo_fast qlen 1000
link/ether 00:0c:29:69:a7:23 brd ff:ff:ff:ff:ff:ff
inet 192.168.1.4/24 brd 192.168.1.255 scope global dynamic eth0
valid_lft 84129sec preferred_lft 84129sec
inet6 fe80::20c:29ff:fe69:a723/64 scope link
valid_lft forever preferred_lft forever
3: docker0: <NO-CARRIER,BROADCAST,MULTICAST,UP> mtu 1500 qdisc noqueue
link/ether 02:42:29:09:8f:dd brd ff:ff:ff:ff:ff:ff
inet 172.17.0.1/16 brd 172.17.255.255 scope global docker0
valid_lft forever preferred_lft forever
inet6 fe80::42:29ff:fe09:8fdd/64 scope link
valid_lft forever preferred_lft forever
/ # hostname
localhost
#bridge网络,Docker安装完成时会创建一个名为docker0的linux bridge,不指定网络时,创建的网络默认为桥接网络,都会桥接到docker0上。
[root@localhost ~]# brctl show
bridge name bridge id STP enabled interfaces
docker0 8000.024229098fdd no
[root@localhost ~]# docker run -d nginx #运行一个nginx容器
c760a1b6c9891c02c992972d10a99639d4816c4160d633f1c5076292855bbf2b
[root@localhost ~]# brctl show
bridge name bridge id STP enabled interfaces
docker0 8000.024229098fdd no veth3f1b114
一个新的网络接口veth3f1b114桥接到了docker0上,veth3f1b114就是新创建的容器的虚拟网卡。进入容器查看其网络配置:
[root@localhost ~]# docker exec -it c760a1b6c98 bash
root@c760a1b6c989:/# apt-get update
root@c760a1b6c989:/# apt-get iproute
root@c760a1b6c989:/# ip a
1: lo: <LOOPBACK,UP,LOWER_UP> mtu 65536 qdisc noqueue state UNKNOWN group default qlen 1000
link/loopback 00:00:00:00:00:00 brd 00:00:00:00:00:00
inet 127.0.0.1/8 scope host lo
valid_lft forever preferred_lft forever
38: eth0@if39: <BROADCAST,MULTICAST,UP,LOWER_UP> mtu 1500 qdisc noqueue state UP group default
link/ether 02:42:ac:11:00:02 brd ff:ff:ff:ff:ff:ff link-netnsid 0
inet 172.17.0.2/16 brd 172.17.255.255 scope global eth0
valid_lft forever preferred_lft forever

我们知道的是,在K8S上的网络通信包含以下几类:
容器间的通信:同一个Pod内的多个容器间的通信,它们之间通过lo网卡进行通信。Pod之间的通信:通过Pod IP地址进行通信。Pod和Service之间的通信:Pod IP地址和Service IP进行通信,两者并不属于同一网络,实现方式是通过IPVS或iptables规则转发。Service和集群外部客户端的通信,实现方式:Ingress、NodePort、Loadbalance这三种的网络插件需要实现Pod网络方案的方式通常有以下几种:
[root@k8s-master ~]# cat /etc/cni/net.d/10-flannel.conflist
{
  "name": "cbr0",
  "plugins": [
    {
      "type": "flannel",
      "delegate": {
        "hairpinMode": true,
        "isDefaultGateway": true
      }
    },
    {
      "type": "portmap",
      "capabilities": {
        "portMappings": true
      }
    }
  ]
}

# kubelet调用第三方插件,进行网络地址的分配
CNI主要是定义容器网络模型规范,链接容器管理系统和网络插件,两者主要通过上面的JSON格式文件进行通信,实现容器的网络功能。CNI的主要核心是:在创建容器时,先创建好网络名称空间(netns),然后调用CNI插件为这个netns配置网络,最后在启动容器内的进程。
常见的CNI网络插件包含以下几种:
Flannel:为Kubernetes提供叠加网络的网络插件,基于TUN/TAP隧道技术,使用UDP封装IP报文进行创建叠 加网络,借助etcd维护网络的分配情况,缺点:无法支持网络策略访问控制。Calico:基于BGP的三层网络插件,也支持网络策略进而实现网络的访问控制;它在每台主机上都运行一个虚拟路由,利用Linux内核转发网络数据包,并借助iptables实现防火墙功能。实际上Calico最后的实现就是将每台主机都变成了一台路由器,将各个网络进行连接起来,实现跨主机通信的功能。Canal:由Flannel和Calico联合发布的一个统一网络插件,提供CNI网络插件,并支持网络策略实现。
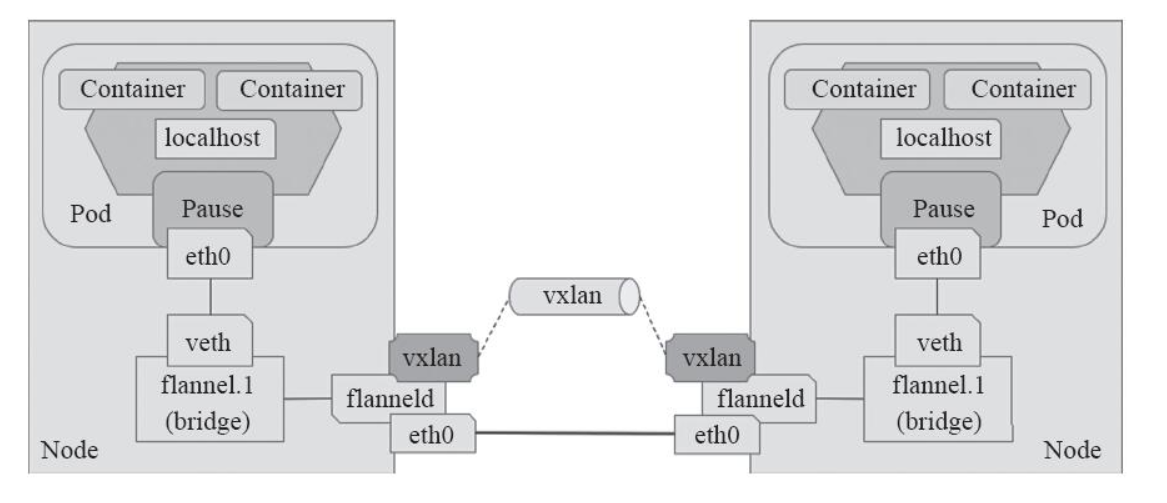
VxLAN(Virtual extensible Local Area Network)虚拟可扩展局域网,采用MAC in UDP封装方式,具体的实现方式为:
跨节点的Pod之间的通信就是以上的一个过程,整个过程中通信双方对物理网络是没有感知的。如下网络图:

VxLAN的部署可以直接在官方上找到其YAML文件,如下
[root@k8s-master:~# kubectl apply -f https://raw.githubusercontent.com/coreos/flannel/bc79dd1505b0c8681ece4de4c0d86c5cd2643275/Documentation/kube-flannel.yml
clusterrole.rbac.authorization.k8s.io/flannel created
clusterrolebinding.rbac.authorization.k8s.io/flannel created
serviceaccount/flannel created
configmap/kube-flannel-cfg created
daemonset.extensions/kube-flannel-ds-amd64 created
daemonset.extensions/kube-flannel-ds-arm64 created
daemonset.extensions/kube-flannel-ds-arm created
daemonset.extensions/kube-flannel-ds-ppc64le created
daemonset.extensions/kube-flannel-ds-s390x created

#输出如下结果表示flannel可以正常运行了
[root@k8s-master ~]# kubectl get daemonset -n kube-system
NAME              DESIRED   CURRENT   READY     UP-TO-DATE   AVAILABLE   NODE SELECTOR                   AGE
kube-flannel-ds   3         3         3         3            3           beta.kubernetes.io/arch=amd64   202d
kube-proxy        3         3         3         3            3           beta.kubernetes.io/arch=amd64   202d
[root@k8s-master ~]# kubectl get node
NAME         STATUS    ROLES     AGE       VERSION
k8s-master   Ready     master    202d      v1.11.2
k8s-node01   Ready     <none>    202d      v1.11.2
k8s-node02   Ready     <none>    201d      v1.11.2
#master节点的flannel.1网络接口,其网段为:10.244.0.0
[root@k8s-master ~]# ifconfig flannel.1
flannel.1: flags=4163<UP,BROADCAST,RUNNING,MULTICAST>  mtu 1450
        inet 10.244.0.0  netmask 255.255.255.255  broadcast 0.0.0.0
        inet6 fe80::31:5dff:fe01:4bc0  prefixlen 64  scopeid 0x20<link>
        ether 02:31:5d:01:4b:c0  txqueuelen 0  (Ethernet)
        RX packets 1659239  bytes 151803796 (144.7 MiB)
        RX errors 0  dropped 0  overruns 0  frame 0
        TX packets 2115439  bytes 6859187242 (6.3 GiB)
        TX errors 0  dropped 10 overruns 0  carrier 0  collisions 0

#node1节点的flannel.1网络接口,其网段为:10.244.1.0
[root@k8s-node01 ~]# ifconfig flannel.1
flannel.1: flags=4163<UP,BROADCAST,RUNNING,MULTICAST>  mtu 1450
        inet 10.244.1.0  netmask 255.255.255.255  broadcast 0.0.0.0
        inet6 fe80::2806:4ff:fe71:2253  prefixlen 64  scopeid 0x20<link>
        ether 2a:06:04:71:22:53  txqueuelen 0  (Ethernet)
        RX packets 136904  bytes 16191144 (15.4 MiB)
        RX errors 0  dropped 0  overruns 0  frame 0
        TX packets 180775  bytes 512637365 (488.8 MiB)
        TX errors 0  dropped 8 overruns 0  carrier 0  collisions 0

#node2节点的flannel.1网络接口,其网段为:10.244.2.0
[root@k8s-node02 ~]# ifconfig flannel.1
flannel.1: flags=4163<UP,BROADCAST,RUNNING,MULTICAST>  mtu 1450
        inet 10.244.2.0  netmask 255.255.255.255  broadcast 0.0.0.0
        inet6 fe80::58b7:7aff:fe8d:2d  prefixlen 64  scopeid 0x20<link>
        ether 5a:b7:7a:8d:00:2d  txqueuelen 0  (Ethernet)
        RX packets 9847824  bytes 12463823121 (11.6 GiB)
        RX errors 0  dropped 0  overruns 0  frame 0
        TX packets 2108796  bytes 185073173 (176.4 MiB)
        TX errors 0  dropped 13 overruns 0  carrier 0  collisions 0
举个实际例子
#启动一个nginx容器,副本为3
[root@k8s-master ~]# kubectl run nginx --image=nginx:1.14 --port=80 --replicas=3
deployment.apps/nginx created

#查看Pod
[root@k8s-master ~]# kubectl get pods -o wide |grep nginx
nginx-5bd76bcc4f-8s64s                1/1       Running    0          2m        10.244.2.85    k8s-node02
nginx-5bd76bcc4f-mr6k5                1/1       Running    0          2m        10.244.1.146   k8s-node01
nginx-5bd76bcc4f-pb257                1/1       Running    0          2m        10.244.0.17    k8s-master
[root@k8s-master ~]# ifconfig cni0
cni0: flags=4163<UP,BROADCAST,RUNNING,MULTICAST>  mtu 1450
        inet 10.244.0.1  netmask 255.255.255.0  broadcast 0.0.0.0
        inet6 fe80::848a:beff:fe44:4959  prefixlen 64  scopeid 0x20<link>
        ether 0a:58:0a:f4:00:01  txqueuelen 1000  (Ethernet)
        RX packets 2772994  bytes 300522237 (286.6 MiB)
        RX errors 0  dropped 0  overruns 0  frame 0
        TX packets 3180562  bytes 928687288 (885.6 MiB)
        TX errors 0  dropped 0 overruns 0  carrier 0  collisions 0
#可以看到有一veth的网络接口桥接在cni0网桥上
[root@k8s-master ~]# brctl show cni0
bridge name bridge id       STP enabled interfaces
cni0        8000.0a580af40001   no      veth020fafae


#宿主机ping测试访问Pod ip
[root@k8s-master ~]# ping 10.244.0.17
PING 10.244.0.17 (10.244.0.17) 56(84) bytes of data.
64 bytes from 10.244.0.17: icmp_seq=1 ttl=64 time=0.291 ms
64 bytes from 10.244.0.17: icmp_seq=2 ttl=64 time=0.081 ms
^C
--- 10.244.0.17 ping statistics ---
4 packets transmitted, 4 received, 0% packet loss, time 3000ms
rtt min/avg/max/mdev = 0.055/0.129/0.291/0.094 ms
[root@k8s-master ~]# kubectl exec -it nginx-5bd76bcc4f-pb257 -- /bin/bash
root@nginx-5bd76bcc4f-pb257:/# ping 10.244.1.146
PING 10.244.1.146 (10.244.1.146) 56(84) bytes of data.
64 bytes from 10.244.1.146: icmp_seq=1 ttl=62 time=1.44 ms
64 bytes from 10.244.1.146: icmp_seq=2 ttl=62 time=0.713 ms
64 bytes from 10.244.1.146: icmp_seq=3 ttl=62 time=0.713 ms
64 bytes from 10.244.1.146: icmp_seq=4 ttl=62 time=0.558 ms
^C
--- 10.244.1.146 ping statistics ---
4 packets transmitted, 4 received, 0% packet loss, time 3004ms
rtt min/avg/max/mdev = 0.558/0.858/1.448/0.346 ms
[root@k8s-master ~]# ip route
......
10.244.1.0/24 via 10.244.1.0 dev flannel.1 onlink
10.244.2.0/24 via 10.244.2.0 dev flannel.1 onlink
......
#在宿主机和容器内都进行ping另外一台主机上的Pod ip并进行抓包
[root@k8s-master ~]# ping -c 10 10.244.1.146
[root@k8s-master ~]# kubectl exec -it nginx-5bd76bcc4f-pb257 -- /bin/bash
root@nginx-5bd76bcc4f-pb257:/# ping 10.244.1.146

[root@k8s-master ~]# tcpdump -i flannel.1 -nn host 10.244.1.146
tcpdump: verbose output suppressed, use -v or -vv for full protocol decode
listening on flannel.1, link-type EN10MB (Ethernet), capture size 262144 bytes

#宿主机ping后抓包情况如下:
22:22:35.737977 IP 10.244.0.0 > 10.244.1.146: ICMP echo request, id 29493, seq 1, length 64
22:22:35.738902 IP 10.244.1.146 > 10.244.0.0: ICMP echo reply, id 29493, seq 1, length 64
22:22:36.739042 IP 10.244.0.0 > 10.244.1.146: ICMP echo request, id 29493, seq 2, length 64
22:22:36.739789 IP 10.244.1.146 > 10.244.0.0: ICMP echo reply, id 29493, seq 2, length 64

#容器ping后抓包情况如下:
22:33:49.295137 IP 10.244.0.17 > 10.244.1.146: ICMP echo request, id 837, seq 1, length 64
22:33:49.295933 IP 10.244.1.146 > 10.244.0.17: ICMP echo reply, id 837, seq 1, length 64
22:33:50.296736 IP 10.244.0.17 > 10.244.1.146: ICMP echo request, id 837, seq 2, length 64
22:33:50.297222 IP 10.244.1.146 > 10.244.0.17: ICMP echo reply, id 837, seq 2, length 64
22:33:51.297556 IP 10.244.0.17 > 10.244.1.146: ICMP echo request, id 837, seq 3, length 64
22:33:51.298054 IP 10.244.1.146 > 10.244.0.17: ICMP echo reply, id 837, seq 3, length 64

# 可以看到报文都是经过flannel.1网络接口进入2层隧道进而转发
Flannel VxLAN的Direct routing模式配置
[root@k8s-master ~]# vim kube-flannel.yml
......
 net-conf.json: |
    {
      "Network": "10.244.0.0/16",   #默认网段
      "Backend": {
        "Type": "vxlan",
        "Directrouting": true   #增加
      }
    }
......

[root@k8s-master ~]# kubectl apply -f kube-flannel.yml
clusterrole.rbac.authorization.k8s.io/flannel configured
clusterrolebinding.rbac.authorization.k8s.io/flannel configured
serviceaccount/flannel unchanged
configmap/kube-flannel-cfg configured
daemonset.extensions/kube-flannel-ds-amd64 created
daemonset.extensions/kube-flannel-ds-arm64 created
daemonset.extensions/kube-flannel-ds-arm created
daemonset.extensions/kube-flannel-ds-ppc64le created
daemonset.extensions/kube-flannel-ds-s390x created

#查看路由信息
[root@k8s-master ~]# ip route
......
10.244.1.0/24 via 192.168.56.12 dev eth0
10.244.2.0/24 via 192.168.56.13 dev eth0
target      prot    opt     source              destination
ACCEPT      all     --  10. 244. 0. 0/ 16       0. 0. 0. 0/ 0
ACCEPT      all     --  0. 0. 0. 0/ 0           10. 244. 0. 0/ 16
[root@k8s-master ~]# tcpdump -i flannel.1 -nn host 10.244.1.146
tcpdump: verbose output suppressed, use -v or -vv for full protocol decode
listening on flannel.1, link-type EN10MB (Ethernet), capture size 262144 bytes
^C
0 packets captured
0 packets received by filter
0 packets dropped by kernel

[root@k8s-master ~]# tcpdump -i eth0 -nn host 10.244.1.146
tcpdump: verbose output suppressed, use -v or -vv for full protocol decode
listening on eth0, link-type EN10MB (Ethernet), capture size 262144 bytes
22:48:52.376393 IP 10.244.0.17 > 10.244.1.146: ICMP echo request, id 839, seq 1, length 64
22:48:52.376877 IP 10.244.1.146 > 10.244.0.17: ICMP echo reply, id 839, seq 1, length 64
22:48:53.377005 IP 10.244.0.17 > 10.244.1.146: ICMP echo request, id 839, seq 2, length 64
22:48:53.377621 IP 10.244.1.146 > 10.244.0.17: ICMP echo reply, id 839, seq 2, length 64

22:50:28.647490 IP 192.168.56.11 > 10.244.1.146: ICMP echo request, id 46141, seq 1, length 64
22:50:28.648320 IP 10.244.1.146 > 192.168.56.11: ICMP echo reply, id 46141, seq 1, length 64
22:50:29.648958 IP 192.168.56.11 > 10.244.1.146: ICMP echo request, id 46141, seq 2, length 64
22:50:29.649380 IP 10.244.1.146 > 192.168.56.11: ICMP echo reply, id 46141, seq 2, length 64
[root@k8s-master ~]# vim kube-flannel.yml
......
  net-conf.json: |
    {
      "Network": "10.244.0.0/16",
      "Backend": {
        "Type": "host-gw"
      }
    }
......

[root@k8s-master ~]# kubectl apply -f kube-flannel.yml
#查看路由表信息,可以看到其报文的发送方向都是和Directrouting是一样的
[root@k8s-master ~]# ip route
......
10.244.1.0/24 via 192.168.56.12 dev eth0
10.244.2.0/24 via 192.168.56.13 dev eth0
.....

#进行ping包测试
[root@k8s-master ~]# ping -c 2 10.244.1.146

#在eth0上进行抓包
[root@k8s-master ~]# tcpdump -i eth0 -nn host 10.244.1.146
tcpdump: verbose output suppressed, use -v or -vv for full protocol decode
listening on eth0, link-type EN10MB (Ethernet), capture size 262144 bytes
23:11:05.556972 IP 192.168.56.11 > 10.244.1.146: ICMP echo request, id 59528, seq 1, length 64
23:11:05.557794 IP 10.244.1.146 > 192.168.56.11: ICMP echo reply, id 59528, seq 1, length 64
23:11:06.558231 IP 192.168.56.11 > 10.244.1.146: ICMP echo request, id 59528, seq 2, length 64
23:11:06.558610 IP 10.244.1.146 > 192.168.56.11: ICMP echo reply, id 59528, seq 2, length 64
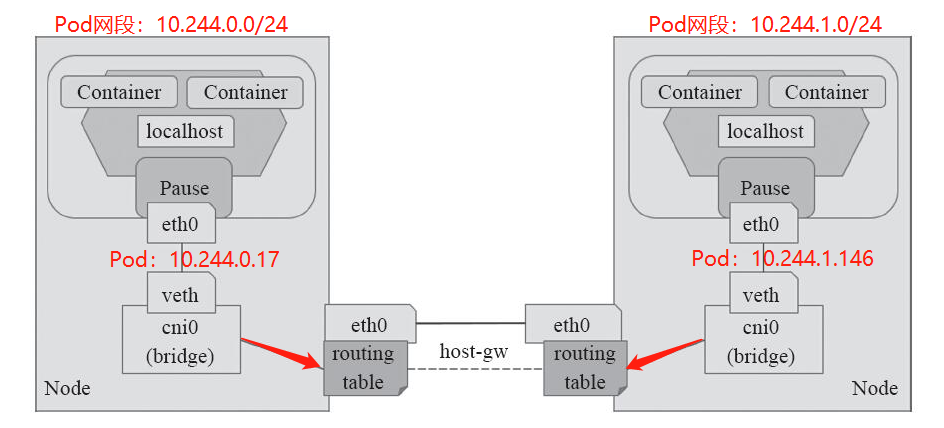
该模式下,报文转发的相关流程如下:
工作模式流程图如下:

以上就是Flannel网络模型的三种工作模式,但是flannel自身并不具备为Pod网络实现网络策略和网络通信隔离的功能,为此只能借助于Calico联合统一的项目Calnal项目进行构建网络策略的功能。
标签:出现 user ESS 官方文档 from iproute capture 工作方式 网络方案
原文地址:https://www.cnblogs.com/dai-zhe/p/14774768.html