标签:事件 高性能 服务器 mamicode 变量 headers 读取 lock 加载
nginx(发音同engine x)是一款轻量级的Web服务器/反向代理服务器及电子邮件(IMAP/POP3)代理服务器,并在一个BSD-like协议下发行。
nginx由俄罗斯的程序设计师Igor Sysoev所开发,最初供俄国大型的入口网站及搜寻引擎Rambler使用。
第一个公开版本0.1.0发布于2004年10月4日。其将源代码以类BSD许可证的形式发布,因它的稳定性、丰富的功能集、示例配置文件和低系统资源的消耗而闻名。2011年6月1日,nginx 1.0.4发布。
nginx的特点是占有内存少,并发能力强,事实上nginx的并发能力确实在同类型的网页服务器中表现较好,中国大陆使用nginx网站用户有:百度、京东、新浪、网易、腾讯、淘宝等
nginx是一个很牛的高性能Web和反向代理服务器,它具有很多非常优越的特性:
nginx由内核和模块组成。其中,内核的设计非常微小和简洁,完成的工作也非常简单,仅仅通过查找配置文件将客户端请求映射到一个location block(location是nginx配置中的一个指令,用于URL匹配),而在这个location中所配置的每个指令将会启动不同的模块去完成相应的工作
nginx的模块从结构上分为核心模块、基础模块和第三方模块
用户根据自己的需要开发的模块都属于第三方模块。正是有了如此多模块的支撑,nginx的功能才会如此强大
nginx模块从功能上分为三类,分别是:
nginx模块分为:核心模块、事件模块、标准Http模块、可选Http模块、邮件模块、第三方模块和补丁等
nginx的模块直接被编译进nginx,因此属于静态编译方式。
启动nginx后,nginx的模块被自动加载,与Apache不一样,首先将模块编译为一个so文件,然后在配置文件中指定是否进行加载。
在解析配置文件时,nginx的每个模块都有可能去处理某个请求,但是同一个处理请求只能由一个模块来完成。
nginx的进程架构:
启动nginx时,会启动一个Master进程,这个进程不处理任何客户端的请求,主要用来产生worker线程,一个worker线程用来处理n个request

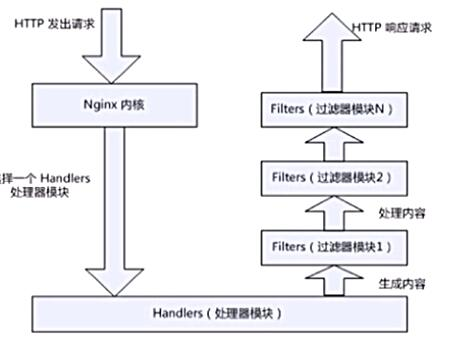
下图展示了nginx模块一次常规的HTTP请求和响应的过程

下图展示了基本的WEB服务请求步骤

主配置文件:/usr/local/nginx/conf/nginx.conf
nginx常见的配置文件及其作用
| 配置文件 | 作用 |
|---|---|
| nginx.conf | nginx的基本配置文件 |
| mime.types | MIME类型关联的扩展文件 |
| fastcgi.conf | 与fastcgi相关的配置 |
| proxy.conf | 与proxy相关的配置 |
| sites.conf | 配置nginx提供的网站,包括虚拟主机 |
nginx.conf的内容分为以下几段:
配置指令:要以分号结尾,语法格式如下
$remote_addr 与 $http_x_forwarded_for 用以记录客户端的ip地址;

$remote_user :用来记录客户端用户名称;

$time_local : 用来记录访问时间与时区;

$request : 用来记录请求的url与http协议;

$status : 用来记录请求状态;成功是200;

$body_bytes_s ent :记录发送给客户端文件主体内容大小;

$http_referer :用来记录从那个页面链接访问过来的;

$http_user_agent :记录客户端浏览器的相关信息;

每个指令必须有分号结束。
daemon {on|off}; //是否以守护进程方式运行nginx,调试时应设置为off

master_process {on|off};//是否以master/worker模型来运行nginx,调试时可以设置为off

error_log 位置 级别; //配置错误日志
error_log里的位置和级别能有以下可选项
| 位置 | 级别 |
|---|---|
| file stderr syslog:server=address[,parameter=value] memory:size |
debug:若要使用debug级别,需要在编译nginx 时使用--with-debug选项 info notice warn errorcrit alert emerg |
user USERNAME [GROUPNAME]; //指定运行worker进程的用户和组

pid /path/to/pid_file; //指定nginx守护进程的pid文件

worker_rlimit_nofile number; //设置所有worker进程最大可以打开的文件数,默认为1024

worker_rlimit_core size; //指明所有worker进程所能够使用的总体的最大核心文件大小,保持默 认即可
worker_processes n; //启动n个worker进程,这里的n为了避免上下文切换,通常设置为cpu总核心 数-1或等于总核心数

worker_cpu_affinity cpumask ...; //将进程绑定到某cpu中,避免频繁刷新缓存

//cpumask:使用8位二进制表示cpu核心,如:
    0000 0001 //第一颗cpu核心
    0000 0010 //第二颗cpu核心
    0000 0100 //第三颗cpu核心
    0000 1000 //第四颗cpu核心
    0001 0000 //第五颗cpu核心
    0010 0000 //第六颗cpu核心
    0100 0000 //第七颗cpu核心
    1000 0000 //第八颗cpu核心

timer_resolution interval; //计时器解析度。降低此值,可减少gettimeofday()系统调用的次数

worker_priority number; //指明worker进程的nice值
keepalive_timeout number; //长连接的超时时长,默认为65s

keepalive_requests number; //在一个长连接上所能够允许请求的最大资源数

keepalive_disable [msie6|safari|none]; //为指定类型的UserAgent禁用长连接

tcp_nodelay on|off; //是否对长连接使用TCP_NODELAY选项,为了提升用户体验,通常设为on

client_header_timeout number; //读取http请求报文首部的超时时长

client_body_timeout number; //读取http请求报文body部分的超时时长

send_timeout number; //发送响应报文的超时时长
LNMP:php要启用fpm模型
location ~ \.php$ {
    root html;
    fastcgi_pass 127.0.0.1:9000; //定义反向代理
    fastcgi_index index.php;
    fastcgi_param SCRIPT_FILENAME /scripts$fastcgi_script_name;
    include fastcgi_params;
}
http{...}:配置http相关,由ngx_http_core_module模块引入。nginx的HTTP配置主要包括四个区块
结构如下

http {//协议级别
    include mime.types;
    default_type application/octet-stream;
    keepalive_timeout 65;
    gzip on; upstream {//负载均衡配置
    ...
    }
    server {//服务器级别,每个server类似于httpd中的一个<VirtualHost>
        listen 80;
        server_name localhost;
        location / {//请求级别,类似于httpd中的<Location>,用于定义URL与本地文件系统的映射关系 root html;
        index index.html index.htm;
        }
    }
}
server {}:定义一个虚拟主机
示例如下:
server {
    listen 80;
    server_name www.idfsoft.com;
    root "/vhosts/web";
}
listen address[:port];
listen port;
server_name NAME [...];后面可跟多个主机,名称可使用正则表达式或通配符
http{...}:配置http相关,由ngx_http_core_module模块引入。nginx的HTTP配置主要包括四个区块,结构如下
http {//协议级别
  include mime.types;
  default_type application/octet-stream;
  keepalive_timeout 65;
  gzip on;
  upstream {//负载均衡配置
    ...
  }
  server {//服务器级别,每个server类似于httpd中的一个<VirtualHost>
    listen 80;
    server_name localhost;
    location / {//请求级别,类似于httpd中的<Location>,用于定义URL与本地文件系统的映射关系
      root html;
      index index.html index.htm;
    }
  }
}
server {
  listen 80;
  server_name www.idfsoft.com;
  root "/vhosts/web";
}
listen address[:port];
listen port;
当有多个server时,匹配顺序如下:

先做精确匹配检查
左侧通配符匹配检查,如*.idfsoft.com
右侧通配符匹配检查,如mail.*
正则表达式匹配检查,如~ ^.*\.idfsoft\.com$
default_server
root path 设置资源路径映射,用于指明请求的URL所对应的资源所在的文件系统上的起始路径
alias path 用于location配置段,定义路径别名
error_page code [...] [=code] URI | @name 根据http响应状态码来指明特用的错误页面,例如 error_page 404 /404_customed.html
[=code]:以指定的响应码进行响应,而不是默认的原来的响应,默认表示以新资源的响应码为其响应码,例如 error_page 404 =200 /404_customed.html
location区段,通过指定模式来与客户端请求的URI相匹配
//功能:允许根据用户请求的URI来匹配定义的各location,匹配到时,此请求将被相应的location配置块中的配置所处理,例如做访问控制等功能

//语法:location [ 修饰符 ] pattern {......}
常用修饰符说明:
| 修饰符 | 功能 |
|---|---|
| = | 精确匹配 |
| ~ | 正则表达式模式匹配,区分大小写 |
| ~* | 正则表达式模式匹配,不区分大小写 |
| ^~ | 前缀匹配,类似于无修饰符的行为,也是以指定模块开始,不同的是,如果模式匹配,那么就停止搜索其他模式了,不支持正则表达式 |
| @ | 定义命名location区段,这些区段客户端不能访问,只可以由内部产生的请求来访问,如try_files或error_page等 |
没有修饰符表示必须以指定模式开始
server {
  server_name www.idfsoft.com;
  location /abc {
    ......
  }
}
过程:
1.获取之前的编译参数
2.下载新模块
3.重新编译软件,--add-module=新模块的路径
4.编译,替换主程序(原程序先备份)
5.启动新程序
[root@nginx ~]# wget https://github.com/openresty/echo-nginx-module/archive/refs/heads/master.zip
--2021-05-30 23:00:09--  https://github.com/openresty/echo-nginx-module/archive/refs/heads/master.zip
Resolving github.com (github.com)... 13.250.177.223
Connecting to github.com (github.com)|13.250.177.223|:443... connected.
HTTP request sent, awaiting response... 302 Found
Location: https://codeload.github.com/openresty/echo-nginx-module/zip/refs/heads/master [following]
--2021-05-30 23:00:10--  https://codeload.github.com/openresty/echo-nginx-module/zip/refs/heads/master
Resolving codeload.github.com (codeload.github.com)... 13.229.189.0
Connecting to codeload.github.com (codeload.github.com)|13.229.189.0|:443... connected.
HTTP request sent, awaiting response... 200 OK
Length: unspecified [application/zip]
Saving to: ‘master.zip’

master.zip                       [ <=>                                         ]  75.35K   451KB/s    in 0.2s

2021-05-30 23:00:11 (451 KB/s) - ‘master.zip’ saved [77163]


[root@nginx ~]#  unzip master.zip
[root@nginx ~]# nginx -V
nginx version: nginx/1.20.0
built by gcc 8.3.1 20191121 (Red Hat 8.3.1-5) (GCC)
built with OpenSSL 1.1.1g FIPS  21 Apr 2020
TLS SNI support enabled
configure arguments: --prefix=/usr/local/nginx --user=nginx --group=nginx --with-debug --with-http_ssl_module --with-http_realip_module --with-http_image_filter_module --with-http_gunzip_module --with-http_gzip_static_module --with-http_stub_status_module --http-log-path=/var/log/nginx/access.log --error-log-path=/var/log/nginx/error.log

[root@nginx ~]# tar -xf nginx-1.20.0.tar.gz

[root@nginx nginx-1.20.0]# ./configure  --prefix=/usr/local/nginx --user=nginx --group=nginx --with-debug --with-http_ssl_module --with-http_realip_module --with-http_image_filter_module --with-http_gunzip_module --with-http_gzip_static_module --with-http_stub_status_module --http-log-path=/var/log/nginx/access.log --error-log-path=/var/log/nginx/error.log --add-module=../echo-nginx-module-master/

[root@nginx nginx-1.20.0]# make

//替换主程序
[root@nginx nginx-1.20.0]# mv /usr/local/nginx/sbin/nginx /opt/nginx_$(date +%F)
[root@nginx nginx-1.20.0]# mv objs/nginx /usr/local/nginx/sbin/
[root@nginx nginx-1.20.0]# kill -USR2 `cat /usr/local/nginx/logs/nginx.pid`
[root@nginx nginx-1.20.0]# nginx -V
nginx version: nginx/1.20.0
built by gcc 8.3.1 20191121 (Red Hat 8.3.1-5) (GCC)
built with OpenSSL 1.1.1g FIPS  21 Apr 2020
TLS SNI support enabled
configure arguments: --prefix=/usr/local/nginx --user=nginx --group=nginx --with-debug --with-http_ssl_module --with-http_realip_module --with-http_image_filter_module --with-http_gunzip_module --with-http_gzip_static_module --with-http_stub_status_module --http-log-path=/var/log/nginx/access.log --error-log-path=/var/log/nginx/error.log --add-module=../echo-nginx-module-master/
主进程支持的信号
标签:事件 高性能 服务器 mamicode 变量 headers 读取 lock 加载
原文地址:https://www.cnblogs.com/Ycqifei/p/14829561.html