标签:poj 调用 bool any OLE response 规范 control 实体
在前后端分离开发的过程中,前端和后端需要进行api对接进行交互,就需要一个api规范文档,方便前后端的交互,但api文档不能根据代码的变化发生实时动态的改变,这样后端修改了接口,前端不能及时获取最新的接口,导致调用出错,需要手动维护api文档,加大了开发的工作量和困难,而swagger的出现就是为了解决这一系列的问题。
swagger是一套基于OpenAPI规范构建的开源工具,使用RestApi
1、代码变,文档变
2、跨语言,支持多种语言
3、swagger-ui 呈现出来的是一份可交互式的API文档,可以直接在文档页面尝试API的调用
4、可以将文档规范导入相关工具(postman、soapui),这些工具将会为我们自动地创建自动化测试
补充:
RestApi格式是根据请求的方式决定本次请求的一个操作,譬如:get-->读,post-->写(增、删、改),put-->修改,delete-->删除
OpenApi与语言无关,只是一种规范,可以使用yaml和json格式进行编写,这样更利于我们和机器进行阅读
swagger主要包含了以下三个部分:
使用swagger就是把相关信息存储在它定义的描述文件里面(yml或json格式),再通过维护这个描述文件可以去更新接口文档,以及生成各端代码
使用swagger时如果碰见版本更新迭代时,只需要更改swagger的描述文件即可,但是在频繁的更新项目版本时很多开发人员认为即使修改描述文件(yml或json文件)也是一定的工作负担,久而久之就直接修改代码,而不去修改描述文件了,这样基于描述文件生成接口文档也失去了意义。
Marty Pitt编写了一个基于spring的组件swagger-springmvc,Spring-fox就是根据这个组件发展而来的全新项目;
Spring-fox是根据代码生成接口文档,所以正常的进行更新项目版本,修改代码即可,而不需要跟随修改描述文件(yml或json文件);
spring-fox利用自身AOP特性,把swagger集成进来,底层还是Swagger,但是使用起来却方便很多,所以在实际开发中,都是直接使用spring-fox。
1、新建springboot项目
2、导入相关依赖
<!-- https://mvnrepository.com/artifact/io.springfox/springfox-swagger2 -->
<dependency>
    <groupId>io.springfox</groupId>
    <artifactId>springfox-swagger2</artifactId>
    <version>2.9.2</version>
</dependency>

<!-- https://mvnrepository.com/artifact/io.springfox/springfox-swagger-ui -->
<dependency>
    <groupId>io.springfox</groupId>
    <artifactId>springfox-swagger-ui</artifactId>
    <version>2.9.2</version>
</dependency>
3、启动类中添加@EnableSwagger2注解
@enableSwagger2:是springfox提供的一个注解,代表swagger2相关技术开启,会扫描当前类所在包,以及子包中所有的类型中的注解,做swagger文档的定值
4、编写一个简单api接口
@RestController
public class HelloController {

    @GetMapping("/get")
    public String get() {
        return "get";
    }

    @PostMapping("/post")
    public String post() {
        return "post";
    }

    @RequestMapping("/hello")
    public String hello() {
        return "hello";
    }
}
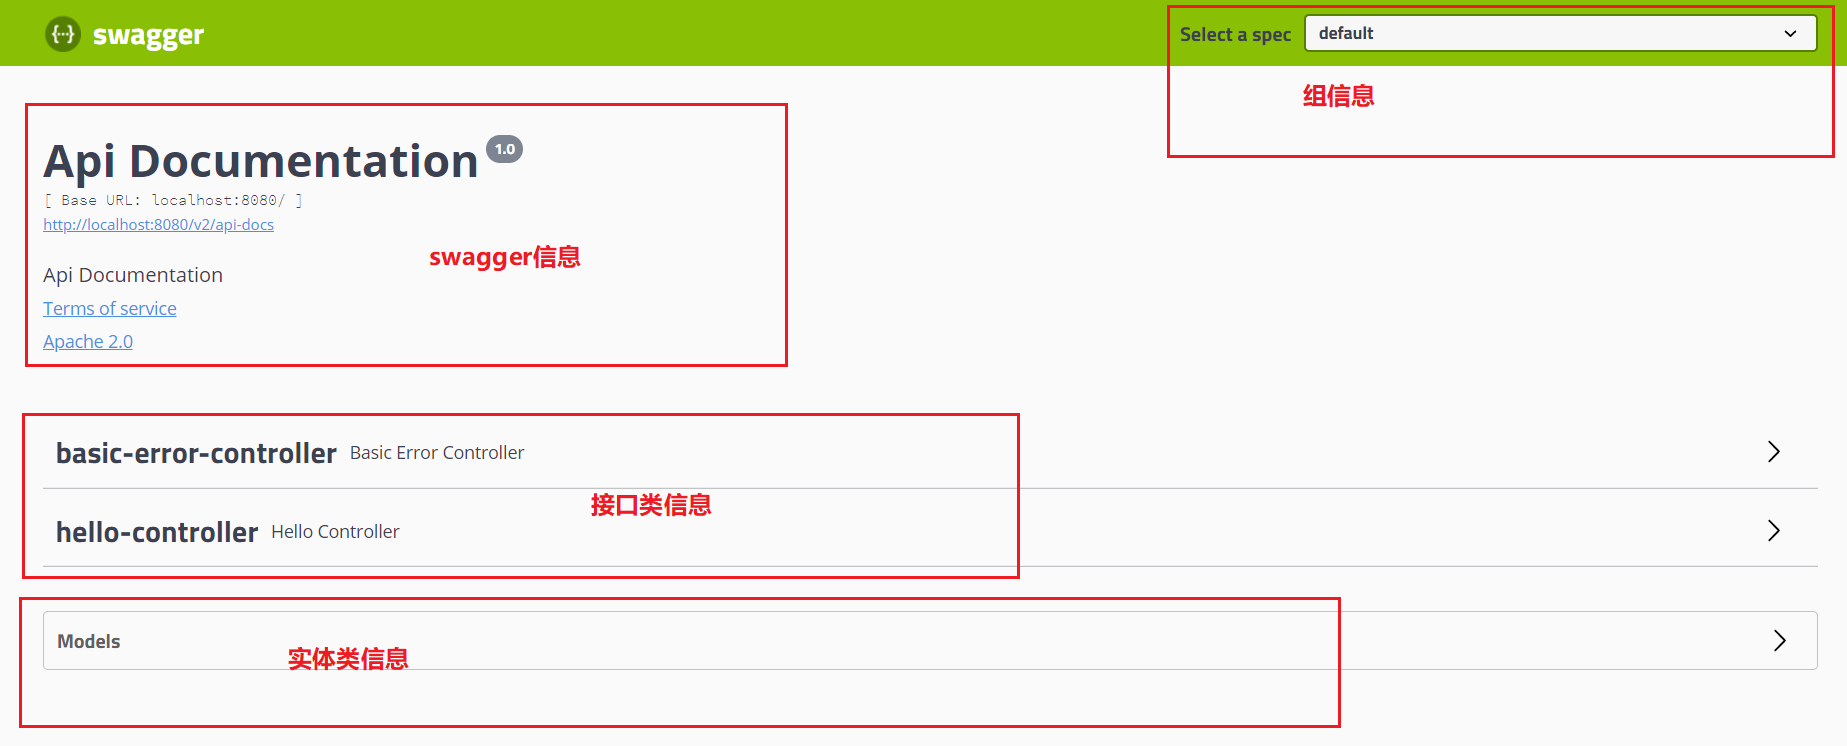
5、启动项目,并在浏览器输入http://localhost:8080/swagger-ui.html进行swagger-ui界面访问
@Configuration
@EnableSwagger2 //开启swagger2,若启动类上添加了该注解,则配置类可以不添加
public class SwaggerConfig {

    // 创建swagger bean
    @Bean
    public Docket docket() {
        // Docket是swagger全局配置对象
        // DocumentationType:指定文档类型为swagger2
        return new Docket(DocumentationType.SWAGGER_2)
                // swagger信息
                .apiInfo(apiInfo());
    }

    // swagger文档信息
    public ApiInfo apiInfo() {
        // 作者信息
        Contact contact = new Contact(
                // 文档发布者的名称
                "iqiuq",
                // 文档发布者的网站地址
                "https://iqiuq.gitee.io/qiuqblogs/",
                // 文档发布者的电子邮箱
                "qiuyonghui258@163.com"
        );
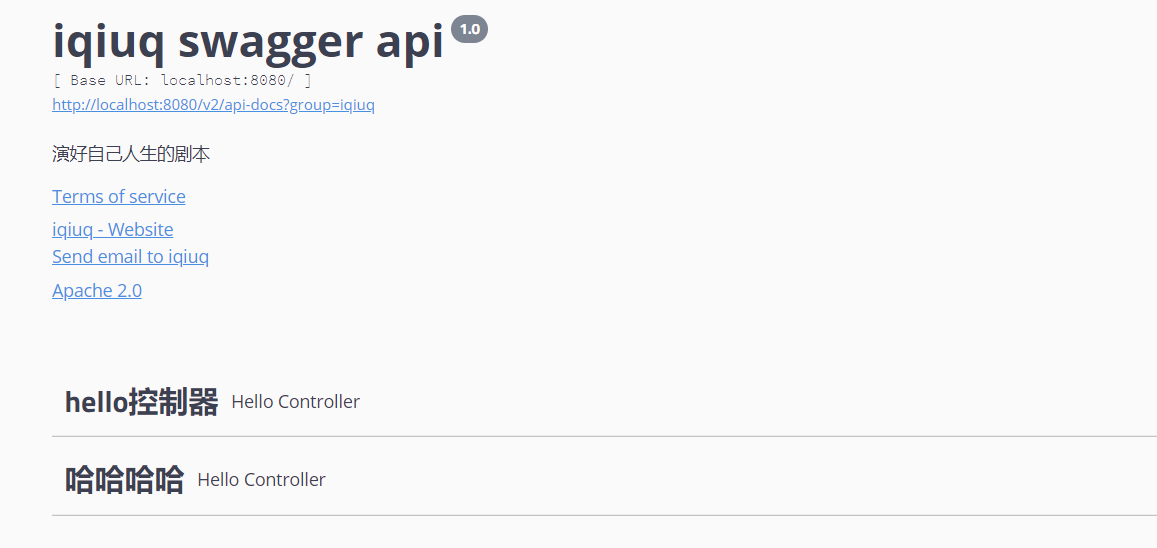
        return new ApiInfo(
                // 标题
                "iqiuq swagger api",
                // 文档描述
                "演好自己人生的剧本",
                // 版本号
                "1.0",
                // 服务组url地址
                "urn:tos",
                // 作者信息
                contact,
                // 开源组织
                "Apache 2.0",
                // 开源地址
                "http://www.apache.org/licenses/LICENSE-2.0",
                // 集合
                new ArrayList()
        );
    }
}
@Configuration
@EnableSwagger2 //开启swagger2
public class SwaggerConfig {

    // 创建swagger bean
    @Bean
    public Docket docket() {
        return new Docket(DocumentationType.SWAGGER_2)
                // swagger信息
                .apiInfo(apiInfo())
                // swagger 扫描包配置
                // select()获取Docket中的选择器,返回ApiSelectorBuilder构造选择器,如扫描扫描包的注解
                .select()
                /**
                 * requestHandlerSelectors:请求处理选择器
                 * basePackage():扫描指定包下的所有接口
                 * any():扫描所有的包
                 * none():不扫描
                 * withClassAnnotation():扫描指定类上的注解,参数是一个注解的放射对象
                 * withMethodAnnotation():扫描方法上的注解
                 */
                // 指定扫描器扫描的规则(断言)
                .apis(RequestHandlerSelectors.basePackage("com.iqiuq.swaggerdemo.controller"))
                /**
                 * pathSelectors:路径选择器,过滤路径
                 * ang():选择所有路径
                 * none():都不选择
                 * ant():选择指定路径
                 * regex():正则表达式
                 */
                .paths(PathSelectors.regex("/hello"))
                .build();
    }
        return new ApiInfo(
                // 标题
                "iqiuq swagger api",
                // 文档描述
                "演好自己人生的剧本",
                // 版本号
                "1.0",
                // 服务组url地址
                "urn:tos",
                // 作者信息
                contact,
                // 开源组织
                "Apache 2.0",
                // 开源地址
                "http://www.apache.org/licenses/LICENSE-2.0",
                // 集合
                new ArrayList()
        );
}
@Configuration
@EnableSwagger2 //开启swagger2
public class SwaggerConfig {

    // 创建swagger bean
    @Bean
    public Docket docket() {
        return new Docket(DocumentationType.SWAGGER_2)
                // swagger信息
                .apiInfo(apiInfo())
                // 配置是否开启swagger,若为false,则浏览器不能访问
                .enable(false);
    }

    // swagger文档信息
    public ApiInfo apiInfo() {
        // 作者信息
        Contact contact = new Contact(
                "iqiuq",
                "https://iqiuq.gitee.io/qiuqblogs/",
                "qiuyonghui258@163.com");
        return new ApiInfo(
                "iqiuq swagger api",
                "演好自己人生的剧本",
                "1.0",
                "urn:tos", contact,
                "Apache 2.0",
                "http://www.apache.org/licenses/LICENSE-2.0",
                new ArrayList());
    }
}
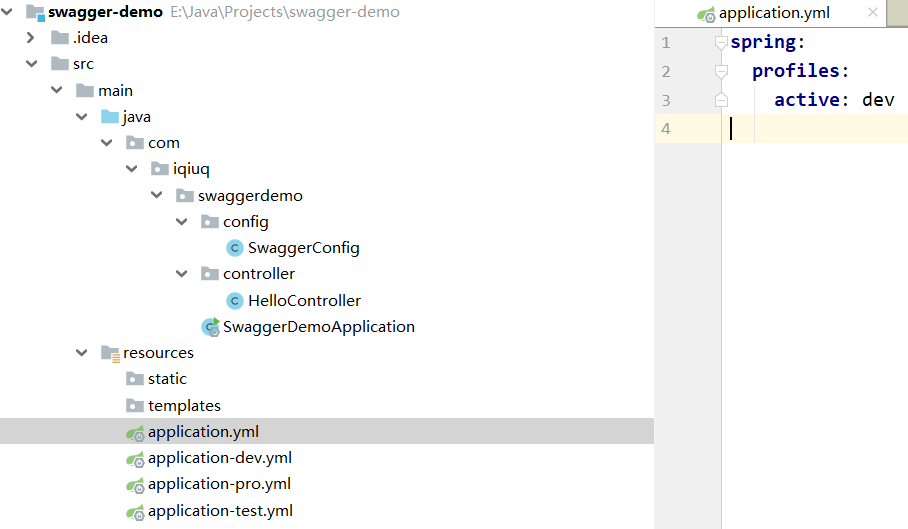
需求:开发和测试环境中开启swagger,其他环境不开启
@Configuration
@EnableSwagger2 //开启swagger2
public class SwaggerConfig {

    // 创建swagger bean
    @Bean
    public Docket docket(Environment environment) {
        // 配置swagger的docket的bean实例
        Profiles profiles = Profiles.of("dev","test");
        // 通过environment.acceptsProfiles()判断是否指定的环境中,是,则为true
        boolean flag = environment.acceptsProfiles(profiles);

        return new Docket(DocumentationType.SWAGGER_2)
                .apiInfo(apiInfo())
                .enable(flag)
                .select()
                .apis(RequestHandlerSelectors.basePackage("com.iqiuq.swaggerdemo.controller"))
                .paths(PathSelectors.regex("/hello"))
                .build();
    }

    // swagger文档信息
    public ApiInfo apiInfo() {
        Contact contact = new Contact(
                "iqiuq",
                "https://iqiuq.gitee.io/qiuqblogs/",
                "qiuyonghui258@163.com");
        return new ApiInfo(
                "iqiuq swagger api",
                "演好自己人生的剧本",
                "1.0",
                "urn:tos",
                contact,
                "Apache 2.0",
                "http://www.apache.org/licenses/LICENSE-2.0",
                new ArrayList());
    }
}
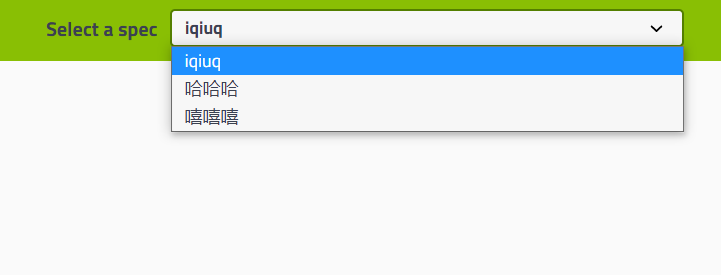
每个组就是一个docket实例,多个组就是创建多个docket的实例
@Configuration
@EnableSwagger2 //开启swagger2
public class SwaggerConfig {

    // 创建swagger bean
    @Bean
    public Docket docket1(Environment environment) {
        // 配置swagger的docket的bean实例
        Profiles profiles = Profiles.of("dev","test");
        // 通过environment.acceptsProfiles()判断是否指定的环境中,是,则为true
        boolean flag = environment.acceptsProfiles(profiles);

        return new Docket(DocumentationType.SWAGGER_2)
                // swagger信息
                .apiInfo(apiInfo())
                // 配置是否开启swagger,若为false,则浏览器不能访问
                .enable(flag)
                // 配置组名
                .groupName("iqiuq")
                .select()
                .apis(RequestHandlerSelectors.basePackage("com.iqiuq.swaggerdemo.controller"))
                .paths(PathSelectors.regex("/hello"))
                .build();
    }

    @Bean
    public Docket docket2(Environment environment) {
        Profiles profiles = Profiles.of("dev","test");
        boolean flag = environment.acceptsProfiles(profiles);

        return new Docket(DocumentationType.SWAGGER_2)
                .apiInfo(apiInfo())
                .enable(flag)
                .groupName("哈哈哈")
                .select()
                .apis(RequestHandlerSelectors.basePackage("com.iqiuq.swaggerdemo.controller"))
                .paths(PathSelectors.regex("/hello"))
                .build();
    }

    @Bean
    public Docket docket3(Environment environment) {
        Profiles profiles = Profiles.of("dev","test");
        boolean flag = environment.acceptsProfiles(profiles);

        return new Docket(DocumentationType.SWAGGER_2)
                .apiInfo(apiInfo())
                .enable(flag)
                .groupName("嘻嘻嘻")
                .select()
                .apis(RequestHandlerSelectors.basePackage("com.iqiuq.swaggerdemo.controller"))
                .paths(PathSelectors.regex("/hello"))
                .build();
    }
    // swagger文档信息
    public ApiInfo apiInfo() {
        Contact contact = new Contact(
                "iqiuq",
                "https://iqiuq.gitee.io/qiuqblogs/",
                "qiuyonghui258@163.com");
        return new ApiInfo(
                "iqiuq swagger api",
                "演好自己人生的剧本",
                "1.0",
                "urn:tos",
                contact,
                "Apache 2.0",
                "http://www.apache.org/licenses/LICENSE-2.0",
                new ArrayList());
    }
注意:
如果你使用的是swagger 3.0 你就需要使用
 <!-- https://mvnrepository.com/artifact/io.springfox/springfox-swagger-ui -->
<dependency>
    <groupId>io.springfox</groupId>
    <artifactId>springfox-swagger-ui</artifactId>
    <version>3.0.0</version>
</dependency>

访问:http://localhost:8080/swagger-ui/index.html  就可以实现swagger-ui.html的访问
swagger注解主要是用来给swagger生成的接口文档说明用的
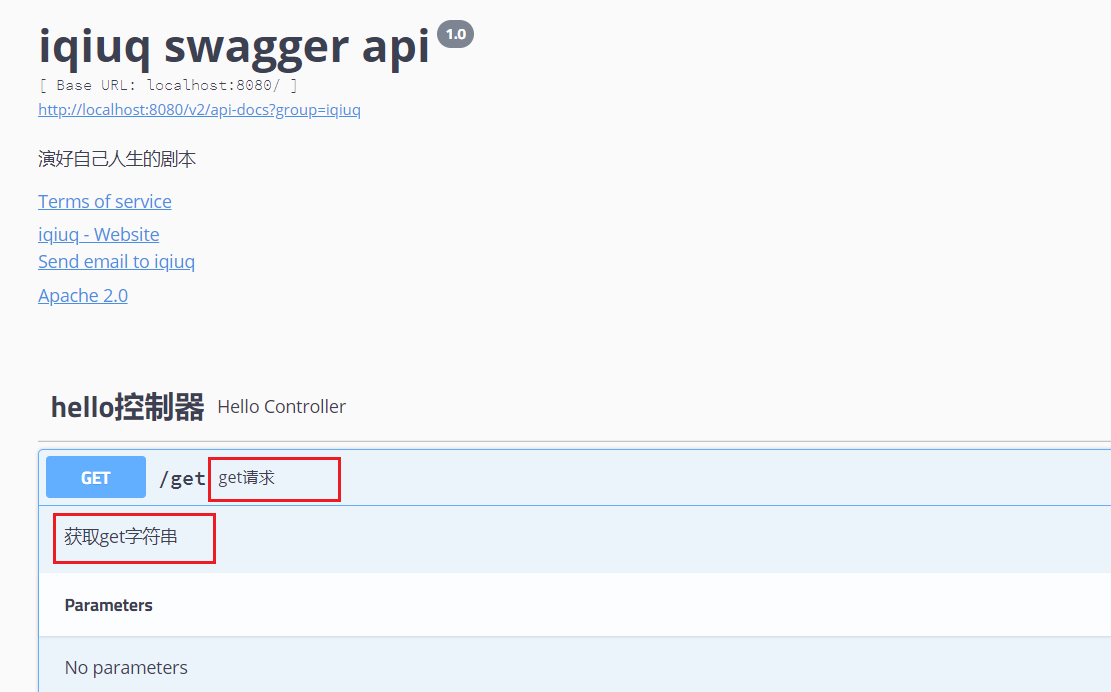
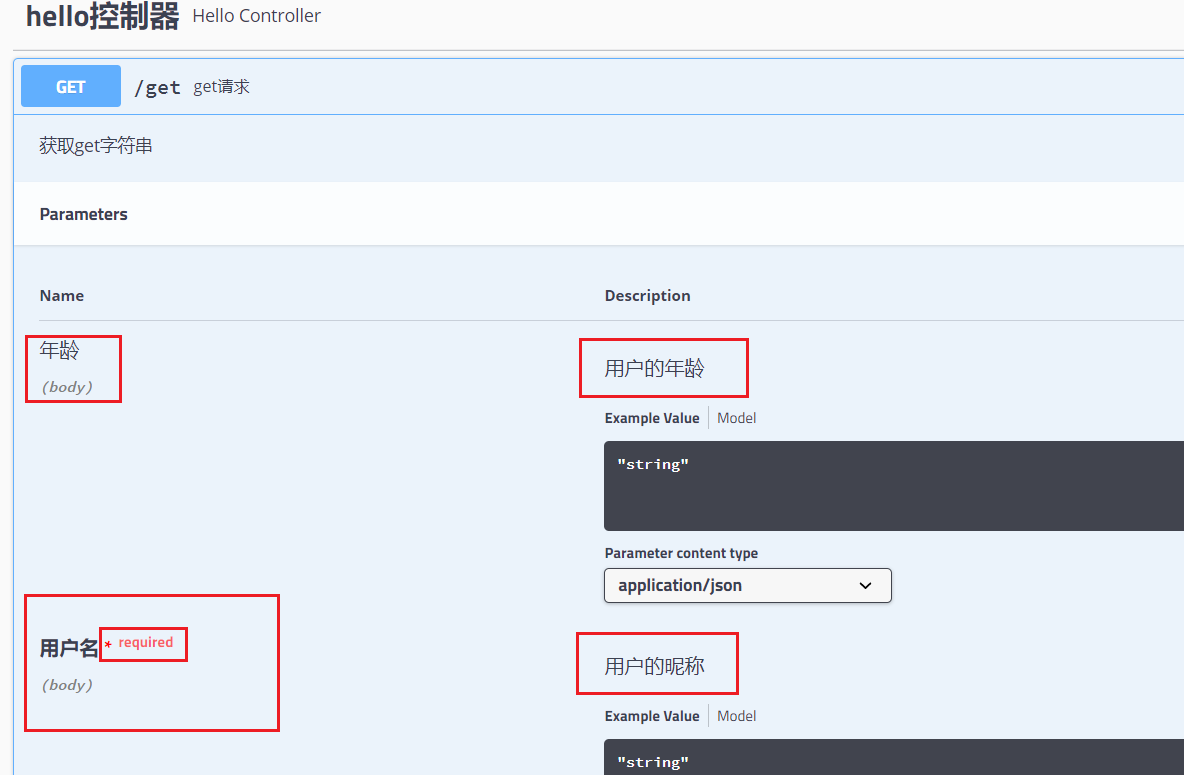

@ApiResponses、@ApiResponse方法返回值的说明
标签:poj 调用 bool any OLE response 规范 control 实体
原文地址:https://www.cnblogs.com/iqiuq/p/14883839.html