标签:The 外部 静态 restart add version 准备 ast 错误日志
使用docker安装Nginx非常简单,只需要准备如下YML文件即可:
version: "3"
services:
  nginx12:
    restart: always
    image: daocloud.io/library/nginx:1.12.0
    container_name: nginx12
    ports:
      - 80:80
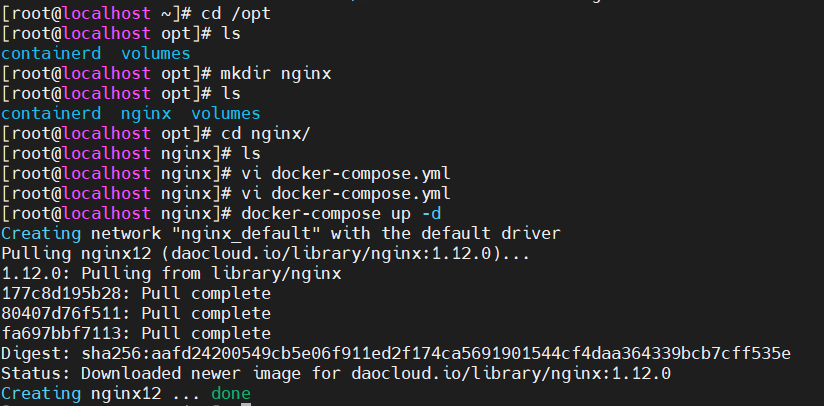
在 /opt 下创建nginx目录,在nginx目录中创建上述docker-compose.yml文件,执行docker-compose up -d命令:

查看docker容器:

在浏览器中测试访问,出现如下页面,即安装成功。

使用命令docker exec -it nginx容器id bash进入nginx容器内部:

进入容器的 /etc/nginx目录下:

可以看到一个配置文件nginx.conf 和 一个配置文件目录conf.d
# 全局块
user  nginx;
worker_processes  1; # 数值越大,nginx并发能力越强

error_log  /var/log/nginx/error.log warn; # nginx错误日志存放路径
pid        /var/run/nginx.pid;

# event块
events {
    worker_connections  1024; # 数值越大,nginx的并发能力越强
}

# HTTP块
http {
    include       /etc/nginx/mime.types; # 引入一个外部文件:mime.types 存放有大量的媒体类型(请求/响应头类型)
    default_type  application/octet-stream; # 默认使用的媒体类型

    log_format  main  ‘$remote_addr - $remote_user [$time_local] "$request" ‘
                      ‘$status $body_bytes_sent "$http_referer" ‘
                      ‘"$http_user_agent" "$http_x_forwarded_for"‘;

    access_log  /var/log/nginx/access.log  main;

    sendfile        on;
    #tcp_nopush     on;

    keepalive_timeout  65;

    #gzip  on;

    include /etc/nginx/conf.d/*.conf; # 引入/etc/nginx/conf.d目录下以.conf结尾的配置文件
}
默认情况下,nignx容器的/etc/nginx/conf.d路径下有一个default.conf配置文件

内容如下:
server {
    listen       80; # 监听端口号
    server_name  localhost; # nginx接收请求的IP或域名

    #charset koi8-r;
    #access_log  /var/log/nginx/log/host.access.log  main;

    location / {
        root   /usr/share/nginx/html; # 静态资源路径
        index  index.html index.htm; # 首页
    }

    #error_page  404              /404.html;

    # redirect server error pages to the static page /50x.html
    #
    error_page   500 502 503 504  /50x.html;
    location = /50x.html {
        root   /usr/share/nginx/html;
    }

    # proxy the PHP scripts to Apache listening on 127.0.0.1:80
    #
    #location ~ \.php$ {
    #    proxy_pass   http://127.0.0.1;
    #}

    # pass the PHP scripts to FastCGI server listening on 127.0.0.1:9000
    #
    #location ~ \.php$ {
    #    root           html;
    #    fastcgi_pass   127.0.0.1:9000;
    #    fastcgi_index  index.php;
    #    fastcgi_param  SCRIPT_FILENAME  /scripts$fastcgi_script_name;
    #    include        fastcgi_params;
    #}

    # deny access to .htaccess files, if Apache‘s document root
    # concurs with nginx‘s one
    #
    #location ~ /\.ht {
    #    deny  all;
    #}
}
由于nginx主要需要配置的是/etc/nginx/conf.d下的配置文件,所以在docker-compose.yml中配置一个数据卷。文件内容如下:
version: "3"
services:
  nginx12:
    restart: always
    image: daocloud.io/library/nginx:1.12.0
    container_name: nginx12
    ports:
      - 80:80
    volumes:
      - /opt/volumes/nginx12/conf.d:/etc/nginx/conf.d
然后重新创建nginx容器

进入数据卷目录,创建一个my.conf配置文件,添加如下内容:
server {
    listen       80;
    server_name  localhost;

    location / {
        root   /usr/share/nginx/html;
        index  index.html index.htm;
    }

}
重启nginx之后,在浏览器测试:

nginx实现反向代理非常简单,只需要修改配置文件即可。
修改my.conf如下:
server {
    listen       80;
    server_name  localhost;

    location / {
    	# 动态资源转发
    	proxy_pass	http://www.baidu.com/; # 转发请求至百度
    }

}
在浏览器中输入http://192.168.1.7/可以跳转至百度首页

标签:The 外部 静态 restart add version 准备 ast 错误日志
原文地址:https://www.cnblogs.com/wind-ranger/p/14891702.html