标签:集群 timeout volume exist http let 依赖 node key
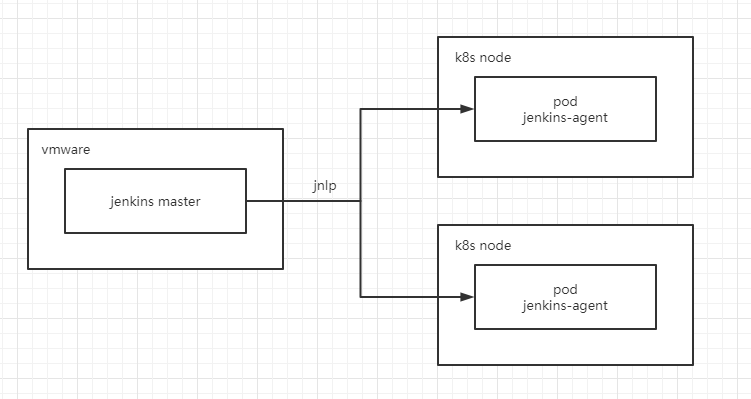
Jenkins的kubernetes plugin在执行构建时会在kubernetes集群中自动创建一个Pod,并在Pod内部创建一个名为jnlp的容器,该容器会连接Jenkins并运行Agent程序,形成一个Jenkins的Master和Slave架构,然后Slave会执行构建脚本进行构建。
jenkins连接K8s集群可参考此方法:https://www.cnblogs.com/cyleon/p/14893198.html
2.1 node前端项目编译部署脚本pipeline脚本
pipeline {
  agent {
    kubernetes {
      yaml """
kind: Pod
metadata:
  name: jenkins-agent
  namespace: default
spec:
  initContainers:
  - name: init
    image: busybox:latest
    imagePullPolicy: IfNotPresent
    securityContext:
      privileged: true
    command: ["sh", "-c", "chown -R 1000:1000 /home/jenkins/agent/workspace"]
    volumeMounts:
    - name: hostpathjenkins
      mountPath: "/home/jenkins/agent/workspace"

  containers:
  - name: jnlp
    image: ccr.ccs.tencentyun.com/jenkins-agent:4.3-4
    imagePullPolicy: IfNotPresent
    resources:
      requests:
        cpu: 100m
        memory: 256Mi
    volumeMounts:
    - name: hostpathjenkins
      mountPath: "/home/jenkins/agent/workspace"

  - name: node
    image: ccr.ccs.tencentyun.com/jenkins-node:v1
    imagePullPolicy: IfNotPresent
    command:
    - cat
    tty: true
    resources:
      requests:
        cpu: 100m
        memory: 512Mi
      limits:
        cpu: 2000m
        memory: 3072Mi
    volumeMounts:
    - name: hostpathjenkins
      mountPath: "/home/jenkins/agent/workspace"
  - name: ansible
    image: ccr.ccs.tencentyun.com/ansible:centos7
    imagePullPolicy: IfNotPresent
    command:
    - cat
    tty: true
    volumeMounts:
    - name: nfs-volume
      mountPath: /data
    - name: hostpathjenkins
      mountPath: "/home/jenkins/agent/workspace"
  restartPolicy: Never
  nodeSelector:
    jenkins: enable
  imagePullSecrets:
  - name: docker-registry
  volumes:
  - name: hostpathjenkins
    hostPath:
      path: /var/lib/kubelet/jenkins
  - name: nfs-volume
    nfs:
      server: 192.168.7.77
      path: "/eo97869g"
"""
    }
  }

    environment{
        CRED_ID=‘98ee5839-c832-4b64-92cf-77effbeeeb64‘
        GITLAB_URL="https://git.lzfn.cn/FE/fe-test.git"
        SERVER_GROUP="192.168.7.80"
        PROJECT_NAME="${JOB_BASE_NAME}"
        ANSIBLE_FILE="/data/script/k8s/yaml/main_static.yaml"
        }
    options {
        disableConcurrentBuilds()
        timeout(time: 1, unit: ‘HOURS‘)
        buildDiscarder logRotator(artifactDaysToKeepStr: ‘‘, artifactNumToKeepStr: ‘‘, daysToKeepStr: ‘‘, numToKeepStr: ‘15‘)
        timestamps ()
    }
    // 参数化构建
    parameters {
        choice choices: [‘NO‘, ‘YES‘], description: ‘是否执行 npm install ?‘, name: ‘npm_install‘
        choice choices: [‘node-v10.10.0‘, ‘node-v11.10.0‘, ‘node-v12.10.0‘, ‘node-v13.10.0‘, ‘node-v14.10.0‘], description: ‘请选择node版本‘, name: ‘npm_version‘
        choice choices: [‘https://registry.npm.taobao.org‘], description: ‘请选择 npm 的 registry‘, name: ‘npm_registry‘
        choice choices: [‘npm run build:test‘, ‘npm run build‘, ‘npm run build:h5‘, ‘npm run docs‘, ‘npm run test‘, ‘npm run build:prod‘], description: ‘请选择编译参数‘, name: ‘npm_run_build‘
            gitParameter name: ‘branch‘,
                branchFilter: ‘origin/(.*)‘,
                defaultValue: ‘master‘,
                listSize: ‘7‘,
                quickFilterEnabled: true,
                selectedValue: ‘TOP‘,
                sortMode: ‘DESCENDING_SMART‘,
                tagFilter: ‘*‘,
                type: ‘PT_BRANCH‘
        }
  stages {
    stage(‘代码下载‘) {
      steps {
        wrap([$class: ‘BuildUser‘]) {
          script {
            currentBuild.description = "<p><font color=‘red‘>branch: ${params.branch}</font></p><p><font color=‘green‘>npm_version: ${npm_version}</p><p>发布人员: ${BUILD_USER}</p>"
            }
          }
        checkout(
        [
            $class: ‘GitSCM‘,
            branches: [[name: "${params.branch}"]],
            doGenerateSubmoduleConfigurations: false,
            extensions: [],
            submoduleCfg: [],
            gitTool: ‘Default‘,
            userRemoteConfigs: [
        [
            credentialsId: "${CRED_ID}",
            url: "${GITLAB_URL}"
              ]
            ]
          ]
        )
      }
    }
    stage(‘安装依赖‘) {
      when { equals expected: "YES", actual: "${npm_install}" }
      steps {
        container(‘node‘) {
          sh ‘‘‘
            export NODE_HOME=/usr/local/${npm_version}-linux-x64
            export PATH=$PATH:$NODE_HOME/bin
            rm -rf node_modules
            ln -sv /usr/local/${npm_version}-linux-x64/bin/node /usr/bin/node
            /usr/local/${npm_version}-linux-x64/bin/npm install -g cnpm --registry=https://registry.npm.taobao.org
            /usr/local/${npm_version}-linux-x64/bin/cnpm config set registry ${npm_registry}
            /usr/local/${npm_version}-linux-x64/bin/cnpm get registry
            /usr/local/${npm_version}-linux-x64/bin/cnpm install
          ‘‘‘
        }
      }
    }
    stage(‘代码打包‘) {
      steps {
        container(‘node‘) {
          sh ‘‘‘
            export NODE_HOME=/usr/local/${npm_version}-linux-x64
            export PATH=$PATH:$NODE_HOME/bin
            /usr/local/${npm_version}-linux-x64/bin/${npm_run_build}
          ‘‘‘
        }
      }
    }
    stage(‘代码部署‘){
      steps{
        container(‘ansible‘) {
          ansiColor(‘xterm‘) {
            ansiblePlaybook(
              playbook: "${ANSIBLE_FILE}",
              colorized: true,
              extraVars: [
                project: [value: "${PROJECT_NAME}", hidden: false],
                server_group: [value: "${SERVER_GROUP}", hidden: false],
                project_group: [value: "${JOB_BASE_NAME}", hidden: false],
                workspace: [value: "${env.WORKSPACE}", hidden: false],
                ]
            )
          }
        }
      }
    }
  }
}
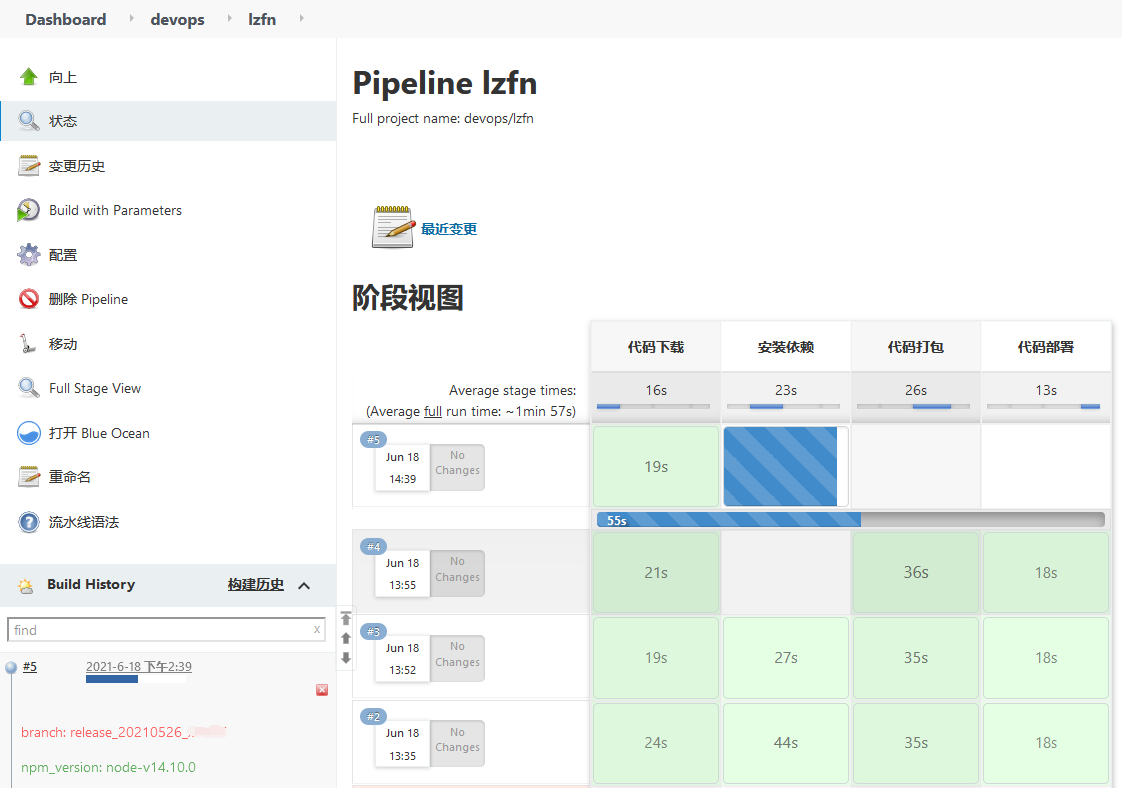
2.2 配置好Jenkins发布页面选项页面如下:

2.3 点击开始构建,构建过程如下:
2.4 构建的时候会在K8s集群内创建一个pod,其中包含3个容器,构建完成后会销毁pod。

jnlp 容器:用来连接jenkins master,直接使用官方的镜像即可;jenkins/inbound-agent:4.3-4
node容器:里面拷贝了多个node编译用的的二进制包
ansible容器:编译完成之后将代码推送到目标机器
3.1 node镜像
我是将node包提前下载到本地了,没有写在脚本中,经测试直接在容器中下载会使镜像稍大一点,提供两个下载地址
https://nodejs.org/dist/v10.10.0/node-v10.10.0-linux-x64.tar.xz
https://mirror.tuna.tsinghua.edu.cn/nodejs-release/v10.10.0/node-v10.10.0-linux-x64.tar.xz
# cat Dockerfile
FROM centos:7
MAINTAINER 532141928@qq.com
RUN cp /usr/share/zoneinfo/Asia/Shanghai /etc/localtime && echo ‘Asia/Shanghai‘ >/etc/timezone
ADD node-v10.10.0-linux-x64.tar.xz node-v11.10.0-linux-x64.tar.xz node-v12.10.0-linux-x64.tar.xz node-v13.10.0-linux-x64.tar.xz node-v14.10.0-linux-x64.tar.xz /usr/local/CMD ["cat"]
3.2 ansible镜像
# cat Dockerfile
FROM centos:7
MAINTAINER lzfn@qq.com
RUN cp /usr/share/zoneinfo/Asia/Shanghai /etc/localtime && echo ‘Asia/Shanghai‘ >/etc/timezone \
&& yum install epel-release -y && yum install ansible -y && yum clean all && mkdir /root/.ssh
COPY id_rsa /root/.ssh/id_rsa
COPY hosts /etc/ansible/hosts
RUN chmod 700 /root/.ssh && chmod 600 /root/.ssh/id_rsa && sed -i ‘s/#host_key_checking = False/host_key_checking = False/g‘ /etc/ansible/ansible.cfg
CMD ["cat"]

# cat hosts
[test-fe]
192.168.7.80 ansible_port=22 ansible_ssh_user=lzfn ansible_become=yes
# cat main_static.yaml
- hosts: "{{ server_group }}"
  vars:
    DIST_PATH: "{{ workspace }}"
  tasks:
   - name: Finding static dir
     shell:  "find {{ workspace }}/dist/ -type d -name static"
     ignore_errors: True
     connection: local
     register: STATIC

   - name: Create Folder
     file: path={{ item }} state=directory owner=www group=www
     with_items:
       - ‘/data/wwwroot/{{ project_group }}/{{project}}/‘
       - ‘/data/tmp/{{ project_group }}/{{project}}/‘

   - name: create static dir
     file: path={{ item }} state=directory owner=www group=www
     with_items:
       - ‘/data/wwwroot/{{ project_group }}/{{project}}/dist/static/‘     when: STATIC.stdout != ""

   - name: check directory exists
     local_action: stat path={{ DIST_PATH }}
     register: dist_path

   - fail: msg="not found dist"
     when: not dist_path.stat.exists and not dist_path.stat.isdir

   - name: Rsync dist file
     copy:
       src: "{{ DIST_PATH }}/dist/"
       dest: "/data/tmp/{{ project_group }}/{{ project }}/dist/"
       owner: www
       group: www
       mode: ‘0644‘

   - name: increment to static dir
     shell: "rsync -a /data/tmp/{{ project_group }}/{{ project }}/dist/static/ /data/wwwroot/{{ project_group }}/{{ project }}/dist/static/"
     when: STATIC.stdout != ""

   - name: Cover Code to Product Directory
     shell: "rsync -a --exclude ‘static‘ --delete /data/tmp/{{ project_group }}/{{ project }}/ /data/wwwroot/{{ project_group }}/{{ project }}/"
Jenkins在K8s的pod中实现docker in docker 构建镜像并发布到K8s集群中
标签:集群 timeout volume exist http let 依赖 node key
原文地址:https://www.cnblogs.com/cyleon/p/14894586.html