Squid 简介
Squid是比较知名的代理软件,不仅可以做正向代理,又可以做反向代理。
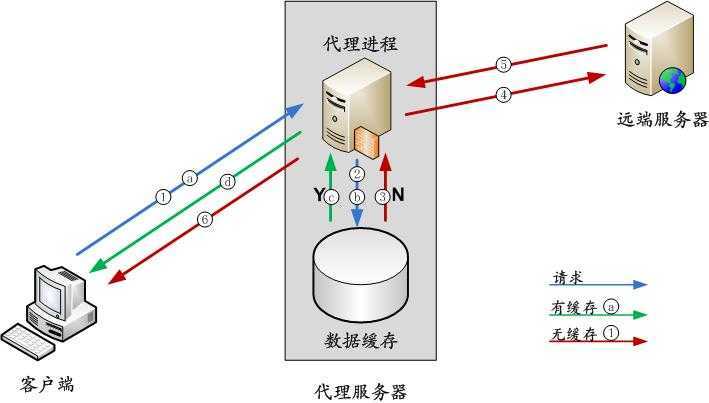
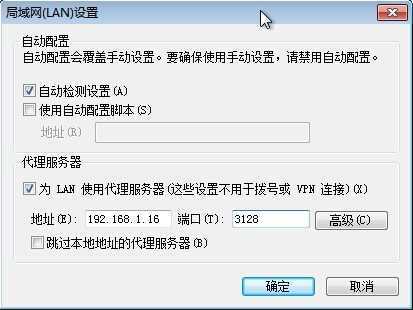
当作为正向代理时,Squid后面是客户端,客户端想上网不管什么网都得经过Squid. 当一个用户(客户端)想要请求一个主页时,它向Squid发出一个申请,要Squid替它请求,然后Squid 连接用户要请求的网站并请求该主页,接着把该主页传给用户同时保留一个备份,当别的用户请求同样的页面时,Squid把保存的备份立即传给用户,使用户觉得速度相当快。使用正向代理时,客户端需要做一些设置,才能实现,也就是平时我们在IE选项中设置的那个代理。
而反向代理是,Squid后面为某个站点的服务器,客户端请求该站点时,会先把请求发送到Squid上,然后Squid去处理用户的请求动作。教你一个特别容易的区分:正向代理,Squid后面是客户端,客户端上网要通过Squid去上;反向代理,Squid后面是服务器,服务器返回给用户数据需要走Squid.
正向代理的工作流程

搭建正向代理
CentOS系统自带Squid包,但是需要安装一下:
[root@localhost ~]# yum install -y squid
安装完后,可以查看squid版本和编译参数:
[root@localhost ~]# squid -v
Squid Cache: Version 3.1.10
重写配置文件
还记得之前重定向符号清空文档内容么
>/etc/squid/squid.conf
vim /etc/squid/squid.conf
http_port 3128                                                       //启动后监听3128端口
acl manager proto cache_object
acl localhost src 127.0.0.1/32 ::1                                   //定义本地网段
acl to_localhost dst 127.0.0.0/8 0.0.0.0/32 ::1
acl localnet src 10.0.0.0/8     # RFC1918 possible internal network
acl localnet src 172.16.0.0/12  # RFC1918 possible internal network
acl localnet src 192.168.0.0/16 # RFC1918 possible internal network
acl SSL_ports port 443
acl Safe_ports port 80 8080         # http
acl Safe_ports port 21          # ftp
acl Safe_ports port 443         # https
acl CONNECT method CONNECT
http_access allow manager localhost                                    //允许本地网段使用
http_access deny manager                                               //拒绝所有
http_access deny !Safe_ports
http_access deny CONNECT !SSL_ports
http_access allow localnet
http_access allow localhost
http_access allow all
cache_dir aufs /data/cache 10240 16 256                               //缓存分10个G
cache_mem 2048 MB                                                     //内存分2个G
hierarchy_stoplist cgi-bin ?
coredump_dir /var/spool/squid
refresh_pattern ^ftp:           1440    20%     10080
refresh_pattern ^gopher:        1440    0%      1440
refresh_pattern -i (/cgi-bin/|\?) 0     0%      0
refresh_pattern \.(jpg|png|gif|mp3|xml) 1440    50%     2880    ignore-reload
refresh_pattern .               0       20%     4320
配置文件保存好后,可以先检测一下是否有语法错误:
[root@localhost ~]# squid -kcheck
如果提示信息为:
squid: ERROR: No running copy
这是说squid还未启动,没有关系,显示成这样说明配置文件没有问题了。
在启动前还得再做一件事,就是初始化缓存目录:
[root@localhost ~]# mkdir /data/cache               //如果没有data目录请先建data
[root@localhost ~]# chown -R squid:squid /data/cache/
[root@localhost ~]# squid -z
2014/11/12 16:25:14| Creating Swap Directories
2013/11/12 16:25:14| /data/cache exists
好了,初始化完成后,就可以启动squid了:
[root@localhost ~]#
正在启动 squid:. [确定]
查看squid是否启动:
[root@localhost ~]# ps aux |grep squid
root      7201  0.0  0.7  14524  2444 ?        Ss   16:25   0:00 squid -f /etc/squid/squid.conf
squid     7204  0.0  2.7  17468  9024 ?        S    16:25   0:00 (squid) -f /etc/squid/squid.conf
squid     7205  0.0  0.2   3280   916 ?        S    16:25   0:00 (unlinkd)
验收结果
1.直接使用curl命令测试即可:
[root@localhost ~]# curl -xlocalhost:3128 http://www.baidu.com/
如果你看到了一大串,说明squid正向代理设置ok啦。另外我们也可以观察squid对图片的缓存:
<!DOCTYPE html><!--STATUS OK--><html><head><meta http-equiv="content-type" content="text/html;charset=utf-8"><meta http-equiv="X-UA-Compatible" content="IE=Edge"><link rel="dns-prefetch" href="//s1.bdstatic.com"/><link rel="dns-prefetch" href="//t1.baidu.com"/> href="//t12.baidu.com"/><link rel="dns-prefetch" href="//b1.bdstatic.com"/><title>百度一下,你就知道</title>
2.配置浏览器代理
打开浏览器(以IE为例,其他类似),菜单栏 -> 工具 -> Internet 选项 -> 连接 -> 局域网设置 -> 代理服务器,按照以下格式设置。

本文出自 “嘿linux” 博客,请务必保留此出处http://heilinux.blog.51cto.com/6123663/1580638
原文地址:http://heilinux.blog.51cto.com/6123663/1580638