标签:des style blog http io ar color os 使用
RichLabel基于Cocos2dx+Lua v3.x
解析字符串方面使用了labelparser,它可以将一定格式的字符串,转换为lua中的表结构
扩展标签极其简单,只需添加一个遵守规则的标签插件即可,无需改动已存在代码!!!
(标签插件都在labels文件夹下)
labelparser的详解
labelparser在github上的源码
RichLabel在github上的源码
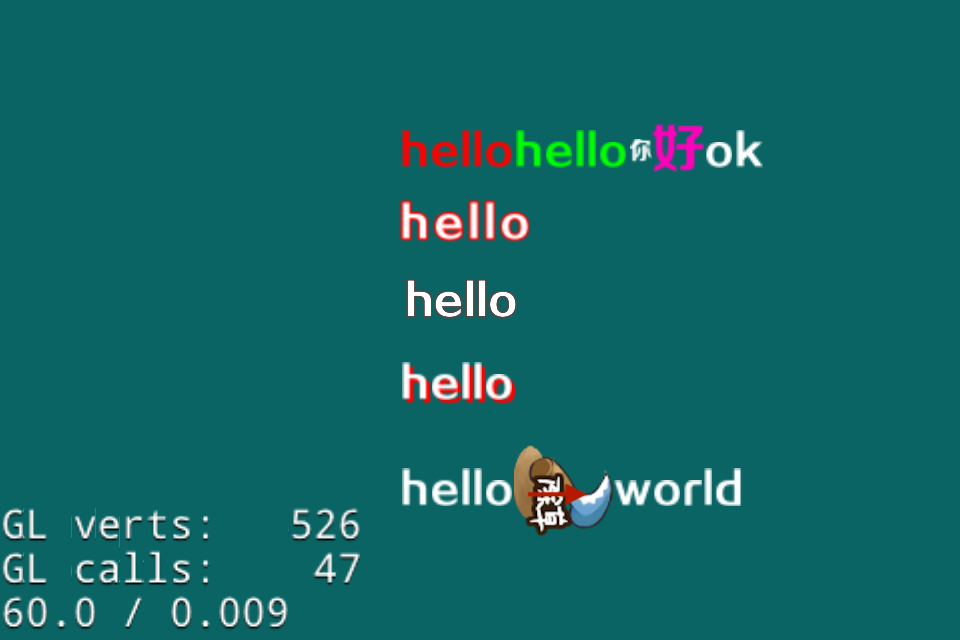
效果图:
由于解析字符串使用了labelparser,那么我们先简单了解一下它,详细了解 传送门
local text1 = "hello worldd   <div>hello world</div> 你好 <div fontName=‘nihao‘ fontColore=#ff33ee>hello,world</div><div></div>"
local parsedtable = labelparser.parse(text1)
-- output:
<parsedtable> = {
    {
        content = "hello worldd   ",
        labelname = "div",
    },
    {
        content = "hello world",
        labelname = "div",
    },
    {
        content = " 你好 ",
        labelname = "div",
    },
    {
        content = "hello,world",
        fontname = "nihao",
        fontsize = "#123456",
        labelname = "div",
    },
}
这中格式十分方便我们处理,它将每个文本片段及其属性分拆成table,然后按顺序组织好返回给我们
这样我们处理就可以简单多了
首先要说一下,这位前辈灵动君心他也有一个RichLabel,刚一开始我本来打算 使用他开源的RichLabel,但是我发现他的RichLabel无法满足我的需求,所以没办法只有自己实现了,我看了他的代码思路也大概和他的方式类似
大体思路:
第一步
解析字符串,解析字符串使用了我的另一个开源工具labelparser,直接解析就可以返回table
第二步
我们按照顺序从表第一项开始处理
每一项都可以获得对应的标签名,根据标签名调用对应的标签的处理函数,同时要将表项中的属性传入标签处理函数
(这个处理函数是以插件形式提供的,很便于扩展)
具体的标签处理下面标签解析处详解
第三步
此时我们就获得了设置好属性的node,我们要做的就是布局文本
首先我们处理换行,什么时候换行呢?
+ 如果设置了MaxWidth那么,每行最大宽度不能超过MaxWidth,否则就换行
+ 如果文本内容中存在换行符\n,则直接换行
我们遍历所有的node(node存在顺序)然后检测是否为Label,为Label则检测内容是否为\n,然后检测此时累加宽度若超过了最大宽度,则将当前的node直接放到下一行
代码
-- 自动适应换行处理方法,内部会根据最大宽度设置和‘\n‘自动换行
-- 若无最大宽度设置则不会自动换行
function RichLabel:adjustLineBreak_(allnodelist, charspace)
    -- 如果maxwidth等于0则不自动换行
    local maxwidth = self._maxWidth
    if maxwidth <= 0 then maxwidth = 999999999999
    end
    -- 存放每一行的nodes
    local alllines = {{}, {}, {}}
    -- 当前行的累加的宽度
    local addwidth = 0
    local rowindex = 1
    local colindex = 0
    for _, node in pairs(allnodelist) do
        colindex = colindex + 1
        -- 为了防止存在缩放后的node
        local box = node:getBoundingBox()
        addwidth = addwidth + box.width
        local totalwidth = addwidth + (colindex - 1) * charspace
        local breakline = false
        -- 若累加宽度大于最大宽度
        -- 则当前元素为下一行第一个元素
        if totalwidth > maxwidth then
            rowindex = rowindex + 1
            addwidth = box.width -- 累加数值置当前node宽度(为下一行第一个)
            colindex = 1
            breakline = true
        end

        -- 在当前行插入node
        local curline = alllines[rowindex] or {}
        alllines[rowindex] = curline
        table.insert(curline, node)

        -- 若还没有换行,并且换行符存在,则下一个node直接转为下一行
        if not breakline and self:adjustContentLinebreak_(node) then
            rowindex = rowindex + 1
            colindex = 0
            addwidth = 0 -- 累加数值置0
        end
    end
    return alllines
end

-- 判断是否为文本换行符
function RichLabel:adjustContentLinebreak_(node)
    -- 若为Label则有此方法
    if node.getString then
        local str = node:getString()
        -- 查看是否为换行符
        if str == "\n" then
            return true
        end
    end
    return false
end
这样我们就将混在一块的node拆分成一个table中存一行
虽然我们知道哪些node在第一行,哪些在第二行... ...
但是我们还没有布局呢!!!
下面我们就遍历每一行,然后调用行布局函数layoutLine_, 行累加函数还返回行的真实宽度和高度,这样我们就可以计算出最宽的一行,即为RichLabel的宽度
精简后代码
for index, line in pairs(alllines) do
    local linewidth, lineheight = self:layoutLine_(basepos, line, 1, charspace)
    -- todo
end
行布局函数(精简后)
-- 布局单行中的节点的位置,并返回行宽和行高
function RichLabel:layoutLine_(basepos, line, anchorpy, charspace)
    local pos_x = basepos.x
    local pos_y = basepos.y
    local lineheight = 0
    local linewidth = 0
    for index, node in pairs(line) do
        local box = node:getBoundingBox()
        -- 设置位置
        node:setPosition((pos_x + linewidth + box.width/2), pos_y)
        -- 累加行宽度
        linewidth = linewidth + box.width + charspace
        -- 查找最高的元素,为行高
        if lineheight < box.height then lineheight = box.height
        end
    end
    return linewidth, lineheight
end
这样我们就一行行布局好了
文本标签处理函数,首先要先将字符串拆分成一个个字符,如果字符串中存在中文那么直接拆分肯定是不行的
拆分字符串,支持Unicode编码
function RichLabel:stringToChars(str)
    -- 主要用了Unicode(UTF-8)编码的原理分隔字符串
    -- 简单来说就是每个字符的第一位定义了该字符占据了多少字节
    -- UTF-8的编码:它是一种变长的编码方式
    -- 对于单字节的符号,字节的第一位设为0,后面7位为这个符号的unicode码。因此对于英语字母,UTF-8编码和ASCII码是相同的。
    -- 对于n字节的符号(n>1),第一个字节的前n位都设为1,第n+1位设为0,后面字节的前两位一律设为10。
    -- 剩下的没有提及的二进制位,全部为这个符号的unicode码。
    local list = {}
    local len = string.len(str)
    local i = 1
    while i <= len do
        local c = string.byte(str, i)
        local shift = 1
        if c > 0 and c <= 127 then
            shift = 1
        elseif (c >= 192 and c <= 223) then
            shift = 2
        elseif (c >= 224 and c <= 239) then
            shift = 3
        elseif (c >= 240 and c <= 247) then
            shift = 4
        end
        local char = string.sub(str, i, i+shift-1)
        i = i + shift
        table.insert(list, char)
    end
    return list, len
end
字符串拆分成一个表之后,就可以给表每一个字符创建一个Label,并且设置属性(颜色,字体,大小...)
处理颜色也要说一下,由于使用HTML方式标记颜色,所以要解析#FF0099这种类型的颜色
-- 解析16进制颜色rgb值
function  RichLabel:convertColor(xstr)
    if not xstr then return
    end
    local toTen = function (v)
        return tonumber("0x" .. v)
    end

    local b = string.sub(xstr, -2, -1)
    local g = string.sub(xstr, -4, -3)
    local r = string.sub(xstr, -6, -5)

    local red = toTen(r)
    local green = toTen(g)
    local blue = toTen(b)
    if red and green and blue then
        return cc.c4b(red, green, blue, 255)
    end
end
因为也支持了图片,所以图片的加载必须要考虑,无论是从图集中加载还是碎图加载都应该正常
-- 创建精灵,现在帧缓存中找,没有则直接加载
-- 屏蔽了使用图集和直接使用碎图创建精灵的不同
function RichLabel:getSprite(filename)
    local spriteFrameCache = cc.SpriteFrameCache:getInstance()
    local spriteFrame = spriteFrameCache:getSpriteFrameByName(filename)

    if spriteFrame then
        return cc.Sprite:createWithSpriteFrame(spriteFrame)
    end
    return cc.Sprite:create(filename)
end
要详细了解还是去看看代码吧!!!
标签:des style blog http io ar color os 使用
原文地址:http://www.cnblogs.com/luweimy/p/4114449.html