标签:style blog http ar color os 使用 sp java
下个月又开始搞搜索了,几个月没动这块还好没有落下. 晚上在自己虚拟机上搭建了一个简易搜索集群,分享一下.
操作系统环境: Red Hat 4.8.2-16
elasticsearch : elasticsearch-1.4.1
集群搭建方式: 一台虚拟机上2个节点.
集群存放路径:/export/search/elasticsearch-cluster
必备环境: java运行环境
集群搭建实例展示:
1. 解压tar包,创建集群节点
#进入到集群路径
[root@localhost elasticsearch-cluster]# pwd
/export/search/elasticsearch-cluster
#重命名解压包
[root@localhost elasticsearch-cluster]# ls
elasticsearch-1.4.1
[root@localhost elasticsearch-cluster]# mv elasticsearch-1.4.1 elasticsearch-node1
#进入到节点配置路径
[root@localhost elasticsearch-cluster]# cd elasticsearch-node1/config/
[root@localhost config]# ls
elasticsearch.yml  logging.yml
2.创建集群配置信息:
# elasticsearch-node1配置
# 配置集群名称
cluster.name: elasticsearch-cluster-centos
# 配置节点名称
node.name: "es-node1"
# 为节点之间的通信设置一个自定义端口(默认为9300)
transport.tcp.port: 9300
# 设置监听HTTP传输的自定义端(默认为9200)
http.port: 9200
elasticsearch配置文件说明见: http://blog.csdn.net/an74520/article/details/10175603
3.安装head插件
#进入到节点bin路径
[root@localhost bin]# pwd
/export/search/elasticsearch-cluster/elasticsearch-node1/bin
安装插件
[root@localhost bin]# ./plugin -install mobz/elasticsearch-head
安装完插件之后会在es节点bin路径同级创建一个plugins目录,存放安装的插件
4.复制一份配置好的节点为elasticsearch-node2
[root@localhost elasticsearch-cluster]# ls
elasticsearch-node1  elasticsearch-node2
5.修改节点2中的集群配置信息
# elasticsearch-node2配置
# 配置集群名称
cluster.name: elasticsearch-cluster-centos
# 配置节点名称
node.name: "es-node2"
# 为节点之间的通信设置一个自定义端口(默认为9300)
transport.tcp.port: 9301
# 设置监听HTTP传输的自定义端(默认为9200)
http.port: 9201
说明:
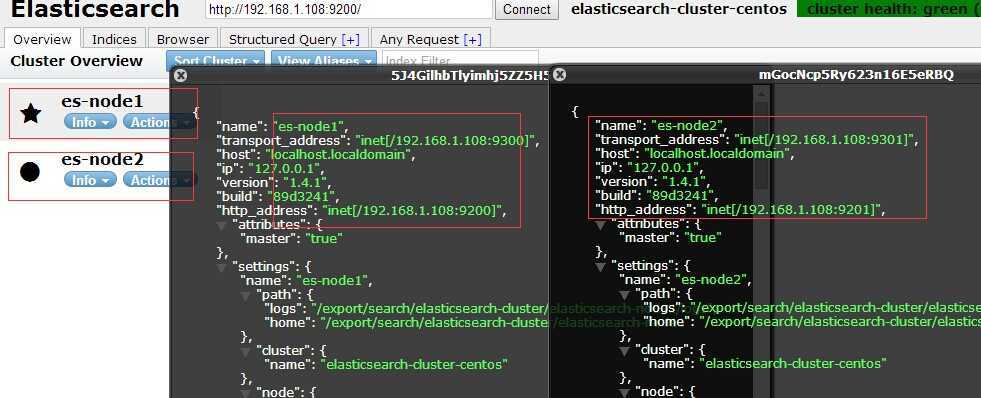
上面配置表示集群中有2个节点,节点名为别为,"es-node1"和 "es-node2",同属于集群"elasticsearch-cluster-centos"
节点二中端口可以不用配置,es在启动时会去检测,如果目标端口被占用,会检测下一个端口.因为两节点部署在同一天虚拟机上为了更好的说明问题,这里手动配置了对应的端口.
我们可以从es对应日志中()查看对应的启动信息,以及端口绑定信息。
6.分别启动节点
[root@localhost bin]# pwd
/export/search/elasticsearch-cluster/elasticsearch-node1/bin
[root@localhost bin]# ./elasticsearch -d -Xms512m -Xmx512m
如上,为启动节点1的命令,es启动配置相关日志查看elasticsearch-cluster-centos.log即可.
[root@localhost logs]# pwd
/export/search/elasticsearch-cluster/elasticsearch-node2/logs
[root@localhost logs]# ls
elasticsearch-cluster-centos_index_indexing_slowlog.log  elasticsearch-cluster-centos.log  elasticsearch-cluster-centos_index_search_slowlog.log
7. 至此我们的简易集群配置完成.查看集群
因为我们安装了head插件,所以可以通过该插件查看,虚拟机ip为192.168.1.108.
http://192.168.1.108:9200/_plugin/head/ (对应节点1)
http://192.168.1.108:9201/_plugin/head/ (对应节点2)
集群状态如图:
附录: elasticsearch使用JavaAPI开发相关
分布式搜索ElasticSearch构建集群与简单搜索实例应用:
http://www.cnblogs.com/dennisit/p/3346228.html
ElasticSearch搜索实例含高亮显示及搜索的特殊字符过滤
http://www.cnblogs.com/dennisit/p/3363851.html
基于Luence的分布式搜索引擎ElasticSearch搜索实例演示(Java API)
http://www.cnblogs.com/dennisit/archive/2013/04/08/3008631.html
转载请注明出处:[http://www.cnblogs.com/dennisit/p/4132269.html]
标签:style blog http ar color os 使用 sp java
原文地址:http://www.cnblogs.com/dennisit/p/4132269.html