标签:style blog http io ar color os 使用 sp
刚接触Maven不久,遇到一些问题,现将解决方案记录在此。长期更新。
刚开始时,我是先在Intellij Idea里写好Maven项目,再使用mvn package命令将项目进行打成war包,然后将war包拷贝到Tomcat的webapps目录下,手动启动Tomcat,最后在浏览器里访问该web项目。这么做很麻烦,特别是项目更改时,需要重新启动Tomcat。
后来想把Tomcat集成到Idea中,但发现Idea社区版不支持Tomcat,而商业版又太贵,于是想使用Jetty来代替Tomcat。
    <plugin>
        <groupId>org.mortbay.jetty</groupId>
        <artifactId>jetty-maven-plugin</artifactId>
        <version>8.1.13.v20130916</version>
</plugin>
    <build>
            <plugin>
                <groupId>org.mortbay.jetty</groupId>
                <artifactId>jetty-maven-plugin</artifactId>
                <configuration>
                    <webApp>
                        <contextPath>/</contextPath>
                    </webApp>
                    <connectors>
                        <connector implementation="org.eclipse.jetty.server.nio.SelectChannelConnector">
                            <port>8081</port>
                            <maxIdleTime>60000</maxIdleTime>
                        </connector>
                    </connectors>
                    <requestLog implementation="org.eclipse.jetty.server.NCSARequestLog">
                        <filename>target/access.log</filename>
                        <retainDays>90</retainDays>
                        <append>false</append>
                        <extended>false</extended>
                        <logTimeZone>GMT+8:00</logTimeZone>
                    </requestLog>
                    <systemProperties>
                        <systemProperty>
                            <name>productionMode</name>
                            <value>${productionMode}</value>
                        </systemProperty>
                    </systemProperties>
                </configuration>
            </plugin>
    </build>
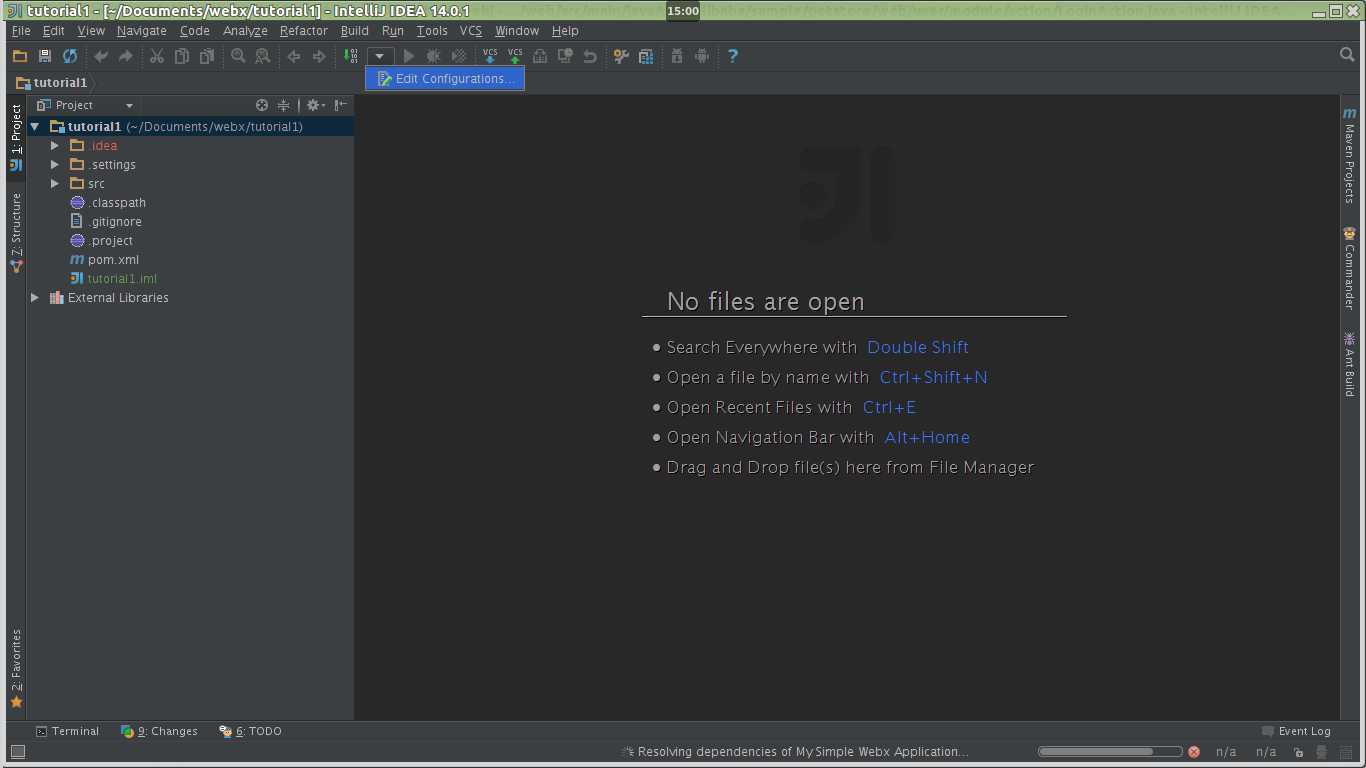
打开Edit Configurations:
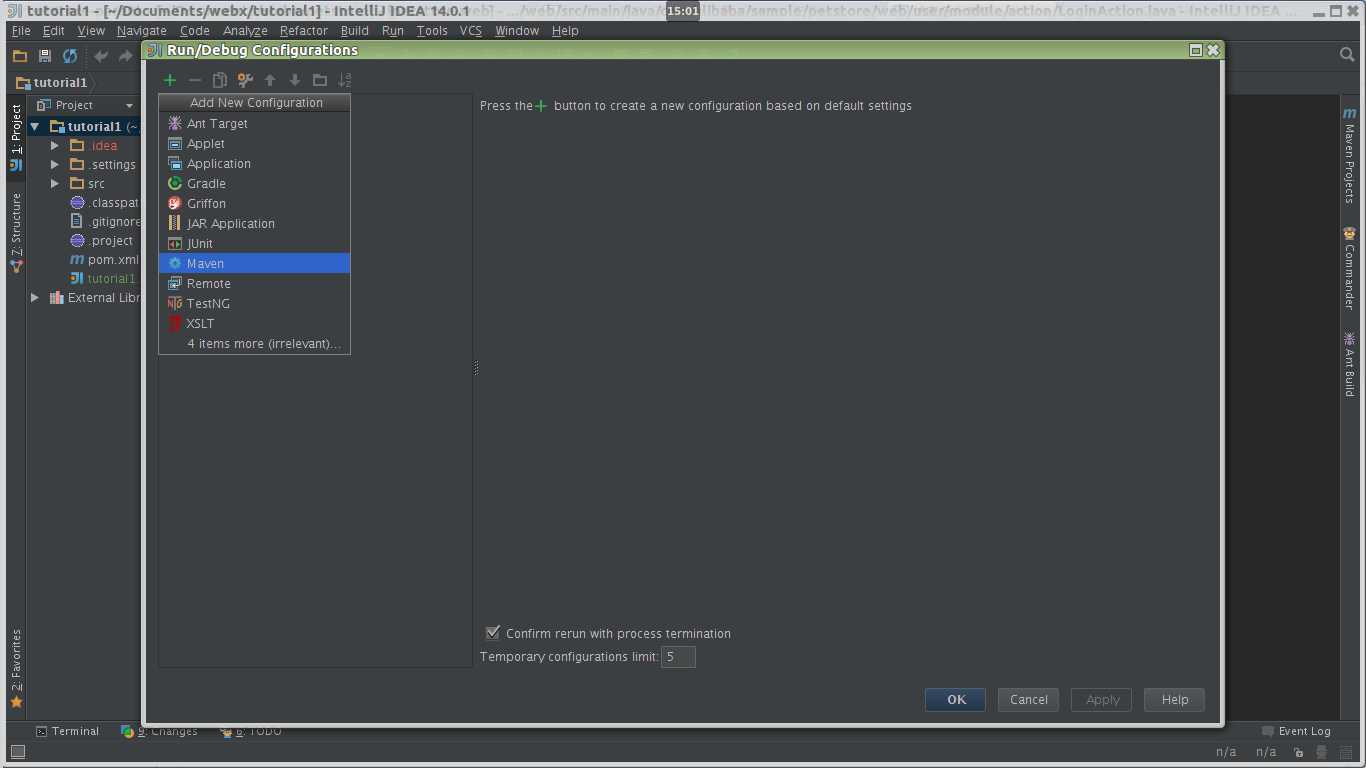
点击加号,选择Maven:
设置Working directory为工程的目录,并在Command line中输入:jetty:run
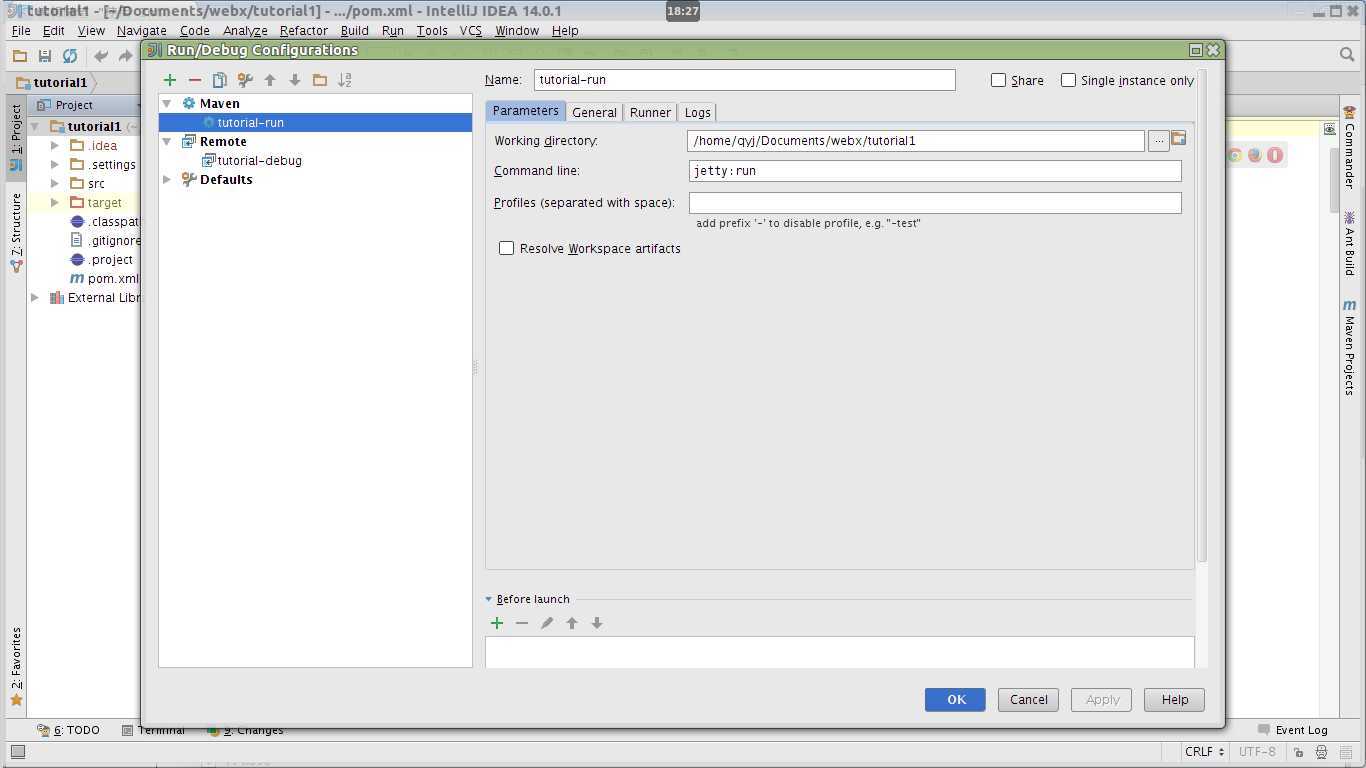
以上设置完毕后,会出现一个三角形的绿色按钮,点击即可运行。

在浏览器中访问 localhost:8081/a/url/of/one/page即可检验是否运行成功。
以上方法仅适用于单模块的项目,对于多模块的项目,还需要进行以下设置。此处多模块指的是在父项目下有一个web子模块,若干个其他模块。
(1)需要在web子模块的pom.xml中添加以下信息:
    <profiles>
        <!-- With this profile, jetty will run during the "test" phase -->
        <profile>
            <id>jetty-run</id>
            <build>
                <plugins>
                    <plugin>
                        <groupId>org.mortbay.jetty</groupId>
                        <artifactId>jetty-maven-plugin</artifactId>
                        <version>8.1.13.v20130916</version>
                        <configuration>
                            <webAppSourceDirectory>
                                ${project.build.directory}/${project.build.finalName}
                            </webAppSourceDirectory>
                        </configuration>
                        <executions>
                            <execution>
                                <id>jetty-run</id>
                                <phase>test</phase>
                                <goals>
                                    <goal>run</goal>
                                </goals>
                            </execution>
                        </executions>
                    </plugin>
                </plugins>
            </build>
        </profile>
    </profiles>
后续步骤跟第1节单模块的一致,但是在Command line应该填:test -DskipTests=true -Pjetty-run 而不是jetty:run
(1)run配置:
编辑第1节中新建的tutorial-run,设置Runner中的VM Options:-Xdebug -Xrunjdwp:transport=dt_socket,address=8787,server=y,suspend=y
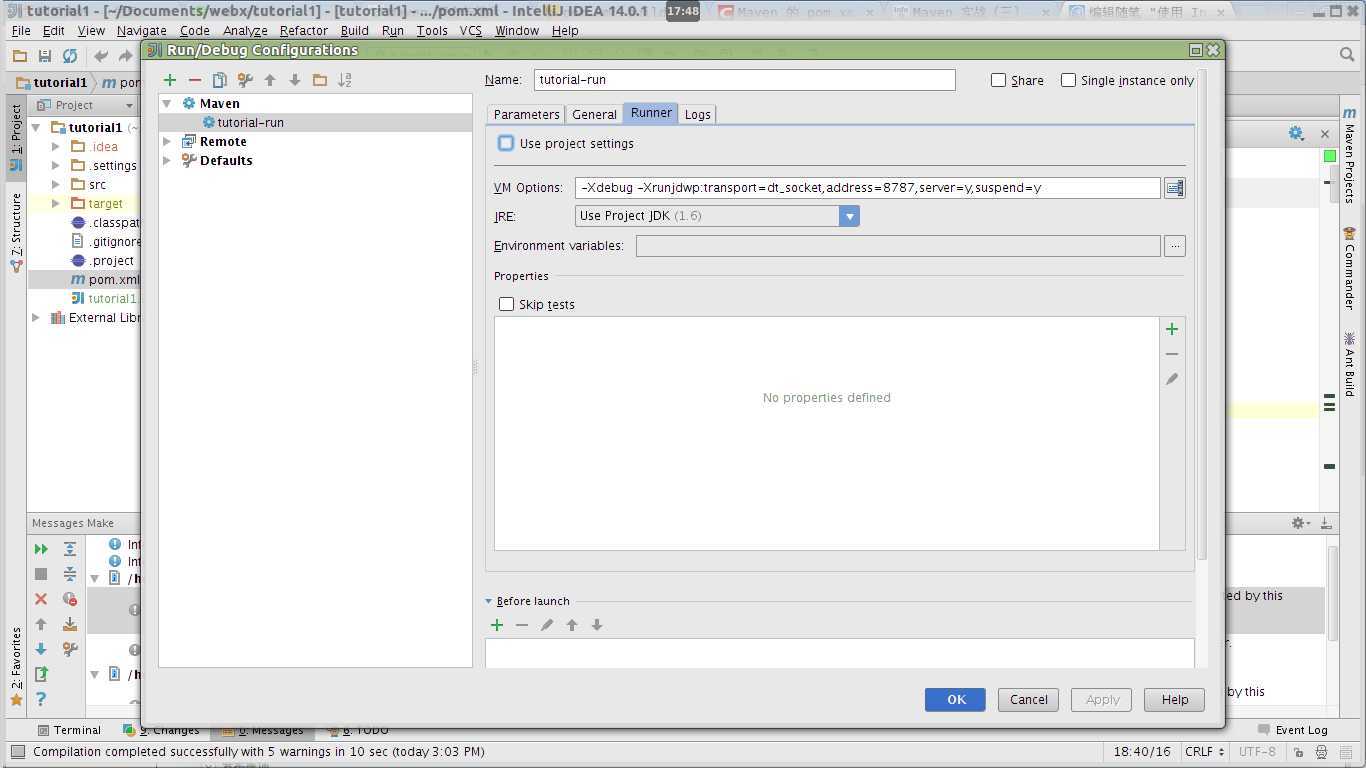
通过以上设置,tutorial1会开放8787端口以供调试。
(2)debug配置
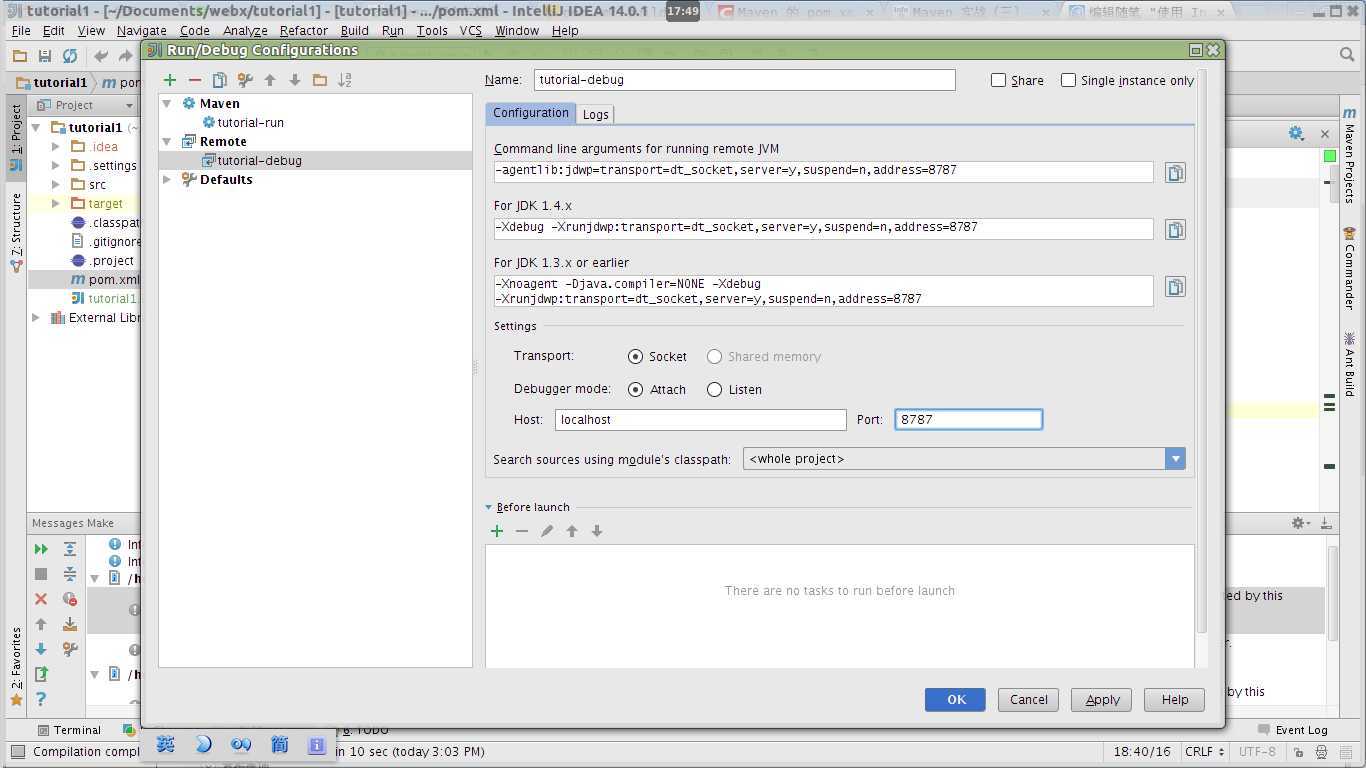
新建一个Remote configuration,如下:
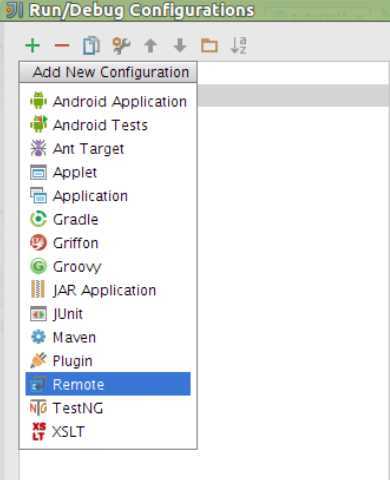
设置调试端口为8787,与run配置中的一致。
(3)启动运行和调试:
选择tutorial-run,点击绿色运行按钮,如果出现“Listening for transport dt_socket at address: 8787“的信息则说明运行成功。

然后选择tutorial-debug,点击调试按钮,如果出现“Connected to the target VM, address: ‘localhost:8787‘, transport: ‘socket‘“的信息则说明没有问题。

确定以上的运行和调试都成功启动吼,在代码中设置特定断点,在浏览器中访问localhost:8081/a/url/of/one/page,在断点处就会停下,可以进行相关调试操作。
使用Intellij Idea运行及调试多模块(module)的Maven项目
标签:style blog http io ar color os 使用 sp
原文地址:http://www.cnblogs.com/yjie/p/4133149.html