标签:des style blog http io ar color os 使用
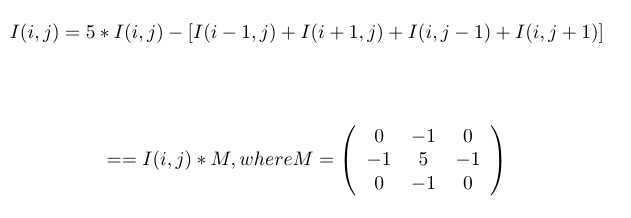
锐化方法:

函数方法:
 1 void Sharpen(const Mat& myImage, Mat& Result)
 2 {
 3     CV_Assert(myImage.depth() == CV_8U);//接受uchar类型存储的Mat
 4     Result.create(myImage.size(), myImage.type());
 5     const int nChannels = myImage.channels();
 6
 7     for (int j = 1; j < myImage.rows - 1; ++j)
 8     {
 9         const uchar* previous = myImage.ptr<uchar>(j - 1);
10         const uchar* current = myImage.ptr<uchar>(j);
11         const uchar* next = myImage.ptr<uchar>(j + 1);
12
13         uchar* output = Result.ptr<uchar>(j);
14
15         for (int i = nChannels; i < nChannels*(myImage.cols - 1); ++i)
16         {
17             *output++ = saturate_cast<uchar>(5 * current[i] - current[i - nChannels] - current[i + nChannels] - previous[i] - next[i]);
18         }
19     }
20
21     Result.row(0).setTo(Scalar(0));
22     Result.row(Result.rows - 1).setTo(Scalar(0));
23     Result.col(0).setTo(Scalar(0));
24     Result.col(Result.cols - 1).setTo(Scalar(0));
25 }
应用于图像:filter2D函数:
 1 #include <opencv2\opencv.hpp>
 2 #include <iostream>
 3 #include <string>
 4 #include <sstream>
 5
 6 #pragma comment( linker, "/subsystem:\"windows\" /entry:\"mainCRTStartup\"" )
 7
 8 using namespace std;
 9 using namespace cv;
10
11 void Show(std::string name,Mat img)
12 {
13     namedWindow(name, CV_WINDOW_AUTOSIZE);
14     imshow(name, img);
15 }
16
17 void Sharpen(const Mat& myImage, Mat& Result)
18 {
19     CV_Assert(myImage.depth() == CV_8U);//接受uchar类型存储的Mat
20     Result.create(myImage.size(), myImage.type());
21     const int nChannels = myImage.channels();
22
23     for (int j = 1; j < myImage.rows - 1; ++j)
24     {
25         const uchar* previous = myImage.ptr<uchar>(j - 1);
26         const uchar* current = myImage.ptr<uchar>(j);
27         const uchar* next = myImage.ptr<uchar>(j + 1);
28
29         uchar* output = Result.ptr<uchar>(j);
30
31         for (int i = nChannels; i < nChannels*(myImage.cols - 1); ++i)
32         {
33             *output++ = saturate_cast<uchar>(5 * current[i] - current[i - nChannels] - current[i + nChannels] - previous[i] - next[i]);
34         }
35     }
36
37     Result.row(0).setTo(Scalar(0));
38     Result.row(Result.rows - 1).setTo(Scalar(0));
39     Result.col(0).setTo(Scalar(0));
40     Result.col(Result.cols - 1).setTo(Scalar(0));
41 }
42
43 int main()
44 {
45     Mat I = imread("lena.png");
46     if (I.empty())
47     {
48         return-1;
49     }
50     Show("Re", I);
51     Mat K;
52     Mat kern = (Mat_<char>(3, 3) << 0, -1, 0, -1, 5, -1, 0, -1, 0);
53     filter2D(I, K, I.depth(), kern);
54     Show("Filter2D", K);
55     waitKey();
56     return 0;
57 }
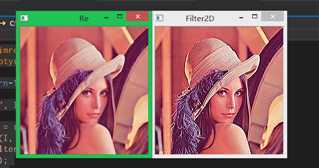
输出结果:

混合图片,使用alpha通道

addweighted函数:(注意,传给函数的src1和src2参数的图像大小必须一样)
 1 #include <opencv2\opencv.hpp>
 2 #include <iostream>
 3 #include <string>
 4
 5 #pragma comment( linker, "/subsystem:\"windows\" /entry:\"mainCRTStartup\"" )
 6
 7 using namespace std;
 8 using namespace cv;
 9
10 void Show(std::string name,Mat img)
11 {
12     namedWindow(name, CV_WINDOW_AUTOSIZE);
13     imshow(name, img);
14 }
15
16 int main()
17 {
18     double alpha = 0.5;
19     double beta;
20     double input=0.5;
21     Mat src1, src2, dest;
22     if (input >= 0 && input <= 1)
23         alpha = input;
24
25     src1 = imread("windows.png");
26     if (src1.empty())
27         return -1;
28
29     src2 = imread("tux.png");
30     if (src2.empty())
31         return -1;
32
33     Show("Windows", src1);
34     Show("Linux", src2);
35
36     beta = (1.0 - alpha);
37     addWeighted(src1, alpha, src2, beta, 0, dest);
38     Show("Blend", dest);
39
40     waitKey();
41     return 0;
42 }
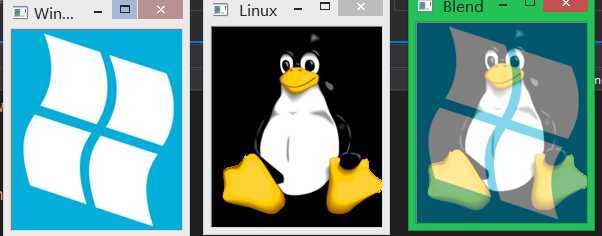
输出结果:

addWeighted(src1, alpha, src2, beta, 0, dest);函数
其中的数字参数分别是alpha,beta,gamma的值
产生的图像由如下算式运算:

标签:des style blog http io ar color os 使用
原文地址:http://www.cnblogs.com/lhyz/p/4139712.html