标签:style blog http io ar color os 使用 sp
基本图形的绘制,官方文档给了一个实例,绘制下面两幅图形,分别使用了圆,椭圆,矩形,多边形,线等构造。
主要是使我们了解到如何构建这些形状,以及如何使用两种数据类型Point和Scalar分别定义点和颜色;
先放图:

完整代码如下:
  1 #include <opencv2\opencv.hpp>
  2 #include <iostream>
  3 #include <string>
  4
  5 #pragma comment( linker, "/subsystem:\"windows\" /entry:\"mainCRTStartup\"" )
  6
  7 using namespace std;
  8 using namespace cv;
  9
 10 void Show(std::string name,Mat img)
 11 {
 12     namedWindow(name, CV_WINDOW_AUTOSIZE);
 13     imshow(name, img);
 14 }
 15
 16 //画线的自定义函数
 17 void MyLine(Mat img, Point start, Point end)
 18 {
 19     int thickness = 2;
 20     int linetype = 8;
 21
 22     //Scalar是用BGR来进行混合的调色类,0,0,0表示黑色
 23     line(img, start, end, Scalar(0, 0, 0), thickness, linetype);
 24 }
 25
 26 //画椭圆
 27 void MyEllipse(Mat img, double angle)
 28 {
 29     int w = 400;
 30     int thickness = 2;
 31     int linetype = 8;
 32
 33     //参数2是椭圆圆心,参数3是宽度和高度(就是长半轴和短半轴的长度),
 34     //参数4是旋转角度,参数5,6是圆绘制的起始角度(就是圆线的起始位置),
 35     //其余参数类似
 36     ellipse(img,
 37         Point(w / 2.0, w / 2.0),
 38         Size(w / 4.0, w / 16.0),
 39         angle,
 40         0,
 41         360,
 42         Scalar(255, 0, 0),//蓝色
 43         thickness,
 44         linetype);
 45 }
 46
 47 void MyPolygon(Mat img)
 48 {
 49     int w = 400;
 50     int linetype = 8;
 51
 52     //创建多边形的顶点集合
 53     Point root_points[1][20];
 54     root_points[0][0] = Point(w / 4.0, 7 * w / 8.0);
 55     root_points[0][1] = Point(3 * w / 4.0, 7 * w / 8.0);
 56     root_points[0][2] = Point(3 * w / 4.0, 13 * w / 16.0);
 57     root_points[0][3] = Point(11 * w / 16.0, 13 * w / 16.0);
 58     root_points[0][4] = Point(19 * w / 32.0, 3 * w / 8.0);
 59     root_points[0][5] = Point(3 * w / 4.0, 3 * w / 8.0);
 60     root_points[0][6] = Point(3 * w / 4.0, w / 8.0);
 61     root_points[0][7] = Point(26 * w / 40.0, w / 8.0);
 62     root_points[0][8] = Point(26 * w / 40.0, w / 4.0);
 63     root_points[0][9] = Point(22 * w / 40.0, w / 4.0);
 64     root_points[0][10] = Point(22 * w / 40.0, w / 8.0);
 65     root_points[0][11] = Point(18 * w / 40.0, w / 8.0);
 66     root_points[0][12] = Point(18 * w / 40.0, w / 4.0);
 67     root_points[0][13] = Point(14 * w / 40.0, w / 4.0);
 68     root_points[0][14] = Point(14 * w / 40.0, w / 8.0);
 69     root_points[0][15] = Point(w / 4.0, w / 8.0);
 70     root_points[0][16] = Point(w / 4.0, 3 * w / 8.0);
 71     root_points[0][17] = Point(13 * w / 32.0, 3 * w / 8.0);
 72     root_points[0][18] = Point(5 * w / 16.0, 13 * w / 16.0);
 73     root_points[0][19] = Point(w / 4.0, 13 * w / 16.0);
 74
 75     const Point* ppt[1] = { root_points[0] };
 76     int npt[] = { 20 };
 77
 78     //建立一个被填充的多边形
 79     //参数2是所有顶点的集合,参数3是每个多边形顶点个数的集合,参数4是要绘制的多边形的个数,其余参数类似
 80     fillPoly(img,
 81         ppt,
 82         npt,
 83         1,
 84         Scalar(255, 255, 255),
 85         linetype);
 86 }
 87
 88 void MyFiledCircle(Mat img, Point center)
 89 {
 90     int w = 400;
 91     int thickness = -1;//一旦此参数为-1.表明此时形状是被填充颜色而非边缘画线
 92     int linetype = 8;
 93
 94     //与构造椭圆的参数相同
 95     circle(img,
 96         center,
 97         w / 32.0,
 98         Scalar(0, 0, 255),
 99         thickness,
100         linetype);
101 }
102 int main()
103 {
104     int w = 400;//窗口大小
105
106     //窗口名称
107     char atom_window[] = "Drawing 1 : Atom";
108     char rook_window[] = "Drawing 2 : Rook";
109
110     //用0填充图形矩阵。并规定图像大小
111     Mat atom_img = Mat::zeros(w, w, CV_8UC3);
112     Mat rook_img = Mat::zeros(w, w, CV_8UC3);
113
114
115     //draw a simple atom
116
117     //以下四行是画椭圆,第二参数是旋转角度
118     MyEllipse(atom_img, 90);
119     MyEllipse(atom_img, 0);
120     MyEllipse(atom_img, 45);
121     MyEllipse(atom_img, -45);
122
123     //画中心的圆,第二参数是圆心位置
124     MyFiledCircle(atom_img, Point(w / 2.0, w / 2.0));
125
126
127     //draw a rook
128
129     //绘制多边形
130     MyPolygon(rook_img);
131
132     //绘制矩形,2参和3参是矩形左上和右下点,4参数是矩形颜色,-1是线粗细(填充图形),8是线类型
133     rectangle(rook_img,
134         Point(0, 7 * w / 8.0),
135         Point(w, w),
136         Scalar(0, 255, 255),
137         -1,
138         8);
139
140
141     //画线,参数2和3分别是起止点
142     MyLine(rook_img, Point(0, 15 * w / 16), Point(w, 15 * w / 16));
143     MyLine(rook_img, Point(w/4, 7 * w / 8), Point(w/4, w));
144     MyLine(rook_img, Point(w/2, 7 * w / 8), Point(w/2, w));
145     MyLine(rook_img, Point(3*w/4, 7 * w / 8), Point(3*w/4, w));
146
147
148     Show(atom_window, atom_img);
149     Show(rook_window, rook_img);
150
151     imwrite("./after/atom.jpg", atom_img);
152     imwrite("./after/rook.jpg", rook_img);
153
154     waitKey();
155     return 0;
156 }
注释已经解释得很明白了,如果不明白,请参阅2.4.9官方文档opencv_tutorialo.pdf的156页及以后。
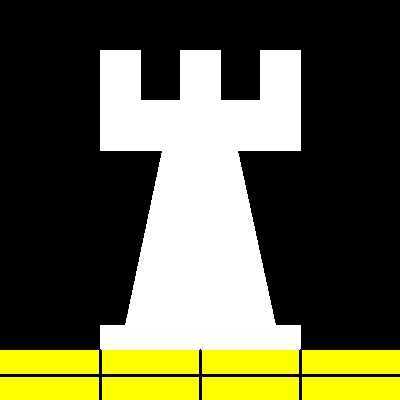
输出结果:

以上。
标签:style blog http io ar color os 使用 sp
原文地址:http://www.cnblogs.com/lhyz/p/4141617.html