标签:des style blog class c code
-
-
什么是:SNMP
Simple Network Management Protocol 简单网络管理协议 .
SNMP是基于TCP/IP协议族的网络管理标准,它的前身是简单网关监控协议(SGMP),用来对通信线路进行管理。随后,人们对SGMP进行了很大的修改,特别是加入了符合Internet定义的SMI和MIB:体系结构,改进后的协议就是著名的SNMP。SNMP的目标是管理互联网Internet上众多厂家生产的软硬件平台,因此SNMP受Internet标准网络管理框架的影响也很大。现在SNMP已经出到第三个版本的协议,其功能较以前已经大大地加强和改进了。
业务需求:
其实感觉这个东西运维的兄弟用的应该是比较多的,但是作为开发的我其实是第一次接触到,所以在使用的过程当中也遇到了些问题,但是经过各种查找资料总算是能够继续下去了。
先说说我们的业务需求,我们目前的项目是为一家企业做私有云的服务,其实“云”的最基本的东西就是虚拟资源的管理及合理使用,我们之前的虚拟资源的搭建与铺垫是通过openstack实现的,目前我的工作是需要30s去获取我们虚拟机的信息帮助客户那边的运维兄弟更直观的管理与监控多台虚拟机的状态,所以我需要去获取机器的信息,包括:cpu状态,内存状态,网络状态,磁盘使用状态,IO状态等。前端期望以图表的形式显示出来。
所以整个业务的最重要的就是怎样拿到虚拟机状态,考虑到去这么多虚拟机上装一个软件不太现实,所以准备使用snmp,由于snmp默认并未安装所以需要我们将其装在虚拟机上:
windows:
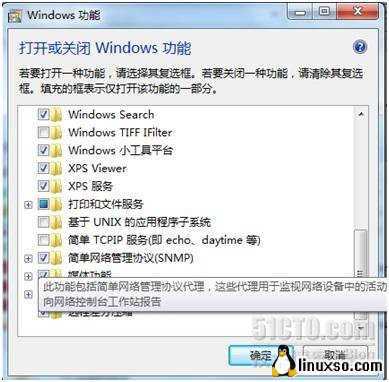
进入“控制面板”的"打开或关闭Windows功能"安装snmp:
进入本地服务,打开对应的snmp service:
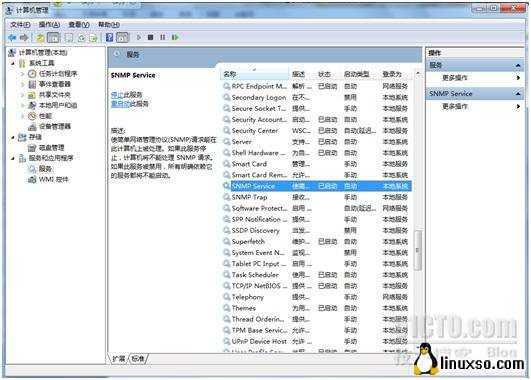
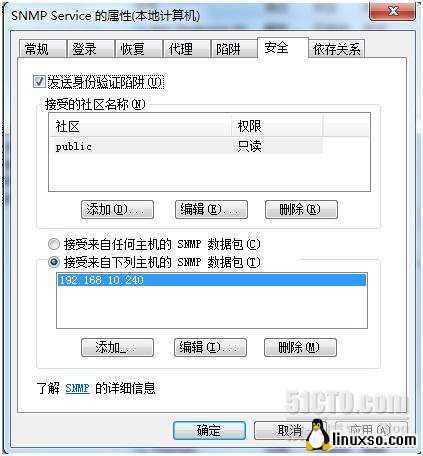
鼠标双击“SNMP Service”选项,在弹出的窗口中切换到“安全”选项卡中,如上图添加“接受的社区名称”和接收那些主机发出的SNMP数据包。
1.Installation
sudo -i
apt-get install snmpd snmp
2. Configuration
将/etc/snmp/snmpd.conf 这个配置文件,重命名为/etc/snmp/snmpd.conf.org:
mv /etc/snmp/snmpd.conf /etc/snmp/snmpd.conf.org
新建一个/etc/snmp/snmpd.conf文件:
rocommunity public
syslocation "Chengdu"
syscontact mail@mail.com
打开/etc/default/snmpd:
gedit /etc/default/snmpd
找到
# snmpd options (use syslog, close stdin/out/err).
SNMPDOPTS=‘-Lsd -Lf /dev/null -u snmp -I -smux -p/var/run/snmpd.pid 127.0.0.1‘
将其改成
# snmpd options (use syslog, close stdin/out/err).
#SNMPDOPTS=‘-Lsd -Lf /dev/null -u snmp -I -smux -p/var/run/snmpd.pid 127.0.0.1‘
SNMPDOPTS=‘-Lsd -Lf /dev/null -u snmp -I -smux -p/var/run/snmpd.pid -c /etc/snmp/snmpd.conf‘
重启snmpd
/etc/init.d/snmpd restart
3.Test
snmpwalk -v 1 -c public localhost
有信息输出表示snmp及snmpd安装完成。
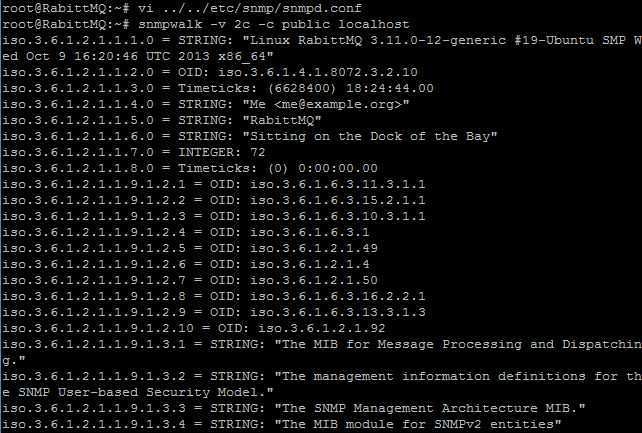
通过vi修改config文件之后,我们测试localhost得到了信息,说明本机没有问题了,我们为了达到远程机器可以访问snmp服务的目的同样去修改conf文件,然后重启snmpd保护进程:

然后我们远程尝试连接snmp服务提示成功。
下面是我找到的两个.net开发库
http://sharpsnmplib.codeplex.com/
我只是将里面的代码摘出来了:
#region 通过oid字符数组获得相应的值
        public static Dictionary<string, string> getOIDValue(string host,string[] oid) {
            Dictionary<string, string> dic = new Dictionary<string, string>();

            OctetString community = new OctetString("public");
            AgentParameters param = new AgentParameters(community);
            param.Version = SnmpVersion.Ver1;
            IpAddress agent = new IpAddress(host);
            UdpTarget target = new UdpTarget((IPAddress)agent,161,2000,1);
            Pdu pdu = new Pdu(PduType.Get);

            foreach (String singleOid in oid)
            {
                pdu.VbList.Add(singleOid);
            }

            SnmpV1Packet result = (SnmpV1Packet)target.Request(pdu,param);
            if (result != null) {
                if (result.Pdu.ErrorStatus == 0) {
                    for (int i = 0; i < result.Pdu.VbList.Count; i++)
                    {
                        dic.Add(result.Pdu.VbList[i].Oid.ToString()+"-"+i, result.Pdu.VbList[i].Value.ToString());
                    }
                }
            }
            target.Close();

            return dic;
        }
        #endregion
#region 通过snmpwalk返回oid根下面的所有值
        public static Dictionary<string, string> getWalkValue(string host, string irootOid)
        {
            Dictionary<string, string> dic = new Dictionary<string, string>();
            // SNMP community name
            OctetString community = new OctetString("public");

            // Define agent parameters class
            AgentParameters param = new AgentParameters(community);
            // Set SNMP version to 2 (GET-BULK only works with SNMP ver 2 and 3)
            param.Version = SnmpVersion.Ver2;
            // Construct the agent address object
            // IpAddress class is easy to use here because
            //  it will try to resolve constructor parameter if it doesn‘t
            //  parse to an IP address
            IpAddress agent = new IpAddress(host);

            // Construct target
            UdpTarget target = new UdpTarget((IPAddress)agent, 161, 2000, 1);

            // Define Oid that is the root of the MIB
            //  tree you wish to retrieve
            Oid rootOid = new Oid(irootOid); // ifDescr

            // This Oid represents last Oid returned by
            //  the SNMP agent
            Oid lastOid = (Oid)rootOid.Clone();

            // Pdu class used for all requests
            Pdu pdu = new Pdu(PduType.GetBulk);

            // In this example, set NonRepeaters value to 0
            pdu.NonRepeaters = 0;
            // MaxRepetitions tells the agent how many Oid/Value pairs to return
            // in the response.
            pdu.MaxRepetitions = 5;

            // Loop through results
            while (lastOid != null)
            {
                // When Pdu class is first constructed, RequestId is set to 0
                // and during encoding id will be set to the random value
                // for subsequent requests, id will be set to a value that
                // needs to be incremented to have unique request ids for each
                // packet
                if (pdu.RequestId != 0)
                {
                    pdu.RequestId += 1;
                }
                // Clear Oids from the Pdu class.
                pdu.VbList.Clear();
                // Initialize request PDU with the last retrieved Oid
                pdu.VbList.Add(lastOid);
                // Make SNMP request
                SnmpV2Packet result = (SnmpV2Packet)target.Request(pdu, param);
                // You should catch exceptions in the Request if using in real application.

                // If result is null then agent didn‘t reply or we couldn‘t parse the reply.
                if (result != null)
                {
                    // ErrorStatus other then 0 is an error returned by
                    // the Agent - see SnmpConstants for error definitions
                    if (result.Pdu.ErrorStatus == 0)
                    {
                        // Walk through returned variable bindings
                        foreach (Vb v in result.Pdu.VbList)
                        {
                            // Check that retrieved Oid is "child" of the root OID
                            if (rootOid.IsRootOf(v.Oid))
                            {
                                dic.Add(v.Oid.ToString(), v.Value.ToString());
                            }
                            else
                            {
                                // we have reached the end of the requested
                                // MIB tree. Set lastOid to null and exit loop
                                lastOid = null;
                            }
                        }
                    }
                }
            }
            target.Close();
            return dic;
        }
        #endregion
然后再找到适配windows,linux的oid信息就可以帮助我们拿到相对应的机器信息了。
万事开头难,使用SNMP的经验,布布扣,bubuko.com
标签:des style blog class c code
原文地址:http://www.cnblogs.com/xiguain/p/3738390.html