标签:style blog http io ar color os 使用 sp
先扫清前面的障碍,再慢慢进入核心
转一下网上的我关心的话题,实施起来
~~~
使用Nginx作为反向代理时,Tomcat的日志记录的客户端IP就不在是真实的客户端IP,而是Nginx代理的IP。要解决这个问题可以在Nginx配置一个新的Header,用来存储$remote_add,然后再Tomcat获取记录这个值。
1.Nginx新增配置:
可以参见:http://wiki.nginx.org/NginxHttpProxyModule
其实就是新增了一个名为X-Real-IP值为真实客户端IP的头信息。
2.修改tomcat日志配置:
可以参见:http://www.docjar.org/docs/api/org/apache/catalina/valves/AccessLogValve.html
没有Nginx这一层的时候直接用%a就可以获得客户端IP,现在我们得用%{X-Real-IP}i 来获得真实的IP了。
~~~~~~~~~~~~~~~~~~
Tomcat的访问日志是靠org.apache.catalina.valves.AccessLogValve来控制的,你可以修改$tomcat/conf/server.xml来启用它 ($tomcat是Tomcat安装的目录)。AccessLogValve默认应该是注释掉的,简单的将其注释去掉,然后重启Tomcat就可以了。
以下是Tomcat默认的配置:
<Valve className=“org.apache.catalina.valves.AccessLogValve”
directory=“logs” prefix=“localhost_access_log.” suffix=“.txt”
pattern=“common” resolveHosts=“false”/>
你可以设置日志保存的目录(directory),日志的文件名的前缀(prefix),后缀(suffix)和日志的具体格式。保存目录,文件名的前缀、后缀都很简单,一般默认设置也就可以了。resolveHost出于性能的考虑,一般也设为false. 但访问日志的格式(pattern)却有很多的选项供你选择。以下列出了一些基本的日志格式项:
你可以用以上的任意组合来定制你的访问日志格式,也可以用下面两个别名common和combined来指定常用的日志格式:
%h %l %u %t "%r" %s %b%h %l %u %t "%r" %s %b "%{Referer}i" "%{User-Agent}i"另外你还可以将cookie, 客户端请求中带的HTTP头(incoming header), 会话(session)或是ServletRequest中的数据都写到Tomcat的访问日志中,你可以用下面的语法来引用。
%{xxx}i – 记录客户端请求中带的HTTP头xxx(incoming headers)%{xxx}c – 记录特定的cookie xxx%{xxx}r – 记录ServletRequest中的xxx属性(attribute)%{xxx}s – 记录HttpSession中的xxx属性(attribute)比如下面是实际的一个访问日志格式的配置:
<Valve className=“org.apache.catalina.valves.AccessLogValve”
directory=“logs” prefix=“phone_access_log.” suffix=“.txt”
pattern=“%h %l %T %t %r %s %b %{Referer}i %{User-Agent}i MSISDN=%{x-up-calling-line-id}i”resolveHosts=“false”/>
其中日志格式(pattern)指定为”%h %l %T %t %r %s %b %{Referer}i %{User-Agent}i MSISDN=%{x-up-calling-line-id}i“,则实际的访问日志中将会包括:
实际的访问日志如下:
xxx.xxx.xx.xxx – 0.270 [14/Jul/2008:13:10:53 +0800] POST /phone/xxx/gprs HTTP/1.1 200 91812 – SonyEricssonW890i/R1EA Profile/MIDP-2.1 Configuration/CLDC-1.1 MSISDN=11111111111
~~~~~~~~~~~~~~~~~~~~
注意%D %T参数,是下一步的锚点!!
~~~~~~~~~~~~~~~~~~~~~
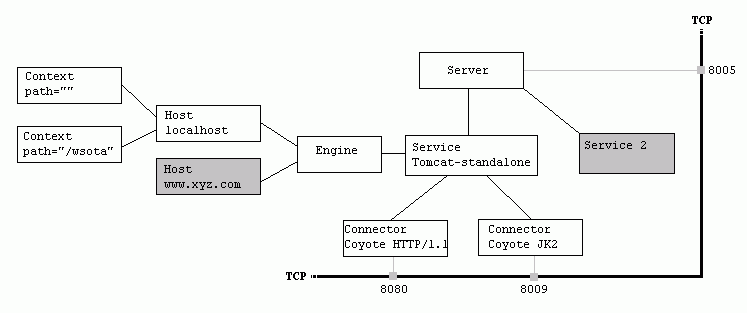
1 - Tomcat Server的组成部分
1.1 - Server
A Server element represents the entire Catalina servlet container. (Singleton)
1.2 - Service
A Service element represents the combination of one or more Connector components that share a single Engine
Service是这样一个集合:它由一个或者多个Connector组成,以及一个Engine,负责处理所有Connector所获得的客户请求
1.3 - Connector
一个Connector将在某个指定端口上侦听客户请求,并将获得的请求交给Engine来处理,从Engine处获得回应并返回客户
TOMCAT有两个典型的Connector,一个直接侦听来自browser的http请求,一个侦听来自其它WebServer的请求
Coyote Http/1.1 Connector 在端口8080处侦听来自客户browser的http请求
Coyote JK2 Connector 在端口8009处侦听来自其它WebServer(Apache)的servlet/jsp代理请求
1.4 - Engine
The Engine element represents the entire request processing machinery associated with a particular Service
It receives and processes all requests from one or more Connectors
and returns the completed response to the Connector for ultimate transmission back to the client
Engine下可以配置多个虚拟主机Virtual Host,每个虚拟主机都有一个域名
当Engine获得一个请求时,它把该请求匹配到某个Host上,然后把该请求交给该Host来处理
Engine有一个默认虚拟主机,当请求无法匹配到任何一个Host上的时候,将交给该默认Host来处理
1.5 - Host
代表一个Virtual Host,虚拟主机,每个虚拟主机和某个网络域名Domain Name相匹配
每个虚拟主机下都可以部署(deploy)一个或者多个Web App,每个Web App对应于一个Context,有一个Context path
当Host获得一个请求时,将把该请求匹配到某个Context上,然后把该请求交给该Context来处理
匹配的方法是“最长匹配”,所以一个path==""的Context将成为该Host的默认Context
所有无法和其它Context的路径名匹配的请求都将最终和该默认Context匹配
1.6 - Context
一个Context对应于一个Web Application,一个Web Application由一个或者多个Servlet组成
Context在创建的时候将根据配置文件$CATALINA_HOME/conf/web.xml和$WEBAPP_HOME/WEB-INF/web.xml载入Servlet类
当Context获得请求时,将在自己的映射表(mapping table)中寻找相匹配的Servlet类
如果找到,则执行该类,获得请求的回应,并返回
假设来自客户的请求为:
http://localhost:8080/wsota/wsota_index.jsp
1) 请求被发送到本机端口8080,被在那里侦听的Coyote HTTP/1.1 Connector获得
2) Connector把该请求交给它所在的Service的Engine来处理,并等待来自Engine的回应
3) Engine获得请求localhost/wsota/wsota_index.jsp,匹配它所拥有的所有虚拟主机Host
4) Engine匹配到名为localhost的Host(即使匹配不到也把请求交给该Host处理,因为该Host被定义为该Engine的默认主机)
5) localhost Host获得请求/wsota/wsota_index.jsp,匹配它所拥有的所有Context
6) Host匹配到路径为/wsota的Context(如果匹配不到就把该请求交给路径名为""的Context去处理)
7) path="/wsota"的Context获得请求/wsota_index.jsp,在它的mapping table中寻找对应的servlet
8) Context匹配到URL PATTERN为*.jsp的servlet,对应于JspServlet类
9) 构造HttpServletRequest对象和HttpServletResponse对象,作为参数调用JspServlet的doGet或doPost方法
10)Context把执行完了之后的HttpServletResponse对象返回给Host
11)Host把HttpServletResponse对象返回给Engine
12)Engine把HttpServletResponse对象返回给Connector
13)Connector把HttpServletResponse对象返回给客户browser

标签:style blog http io ar color os 使用 sp
原文地址:http://www.cnblogs.com/aguncn/p/4152118.html