标签:start uml
原文英文地址:http://www.codeweblog.com/startuml-class-diagram/
Apr 7 posted in
Java ,
comments.
1. Overview:
StarUML is a generating class diagrams and other types of Unified Modeling Language (UML) diagrams tool. This is a used Java language to describe the creation of class diagram concise handbook.
StarUML (referred to as SU), is to create UML class diagrams, and can automatically generate Java, "stub code" tool. SU is also JAVA can do reverse engineering to produce the corresponding
UML diagrams.
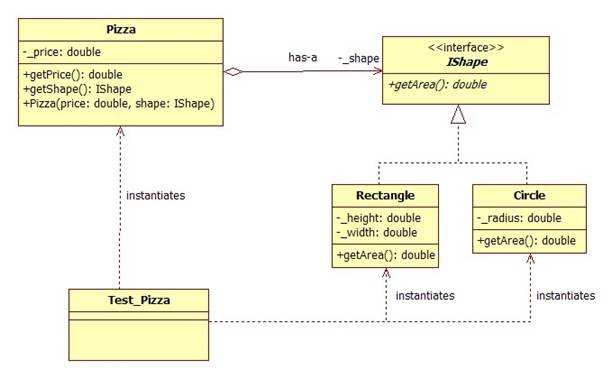
In this tutorial, we will use SU design a pizza pie. Perform the following steps, you can create a UML diagram as shown below. SU can be generated to reflect the class structure of the code,
rather than any object-specific actions. Therefore, the use of SU create a chart, you will end stub code to add the functionality of the remaining code, fill in each method should have been done.

2. Installation:
First, we must first install the software to be used. StarUML, is an open source software, followthe
agreement GPL license (GNU
Public License), and free for download.
3. Start
After installation you can start the program.
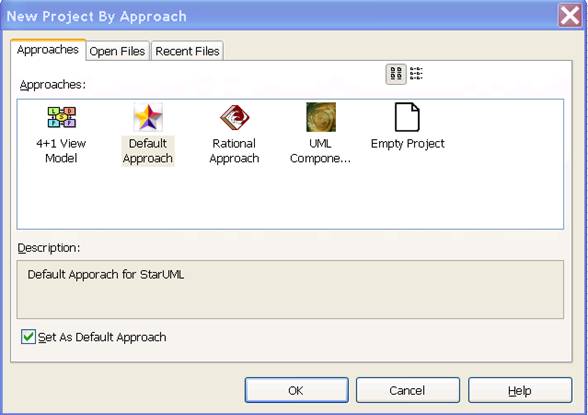
4. Add a new project
Then, one called: New Project By Approach of the dialog box will pop up. Select "Empty Project" and press "OK." Here suggest that you do not check the "set as the default practice of" check
box.

5. Select Module
On the right of the "Model Explorer" box, select "Untitled" module.
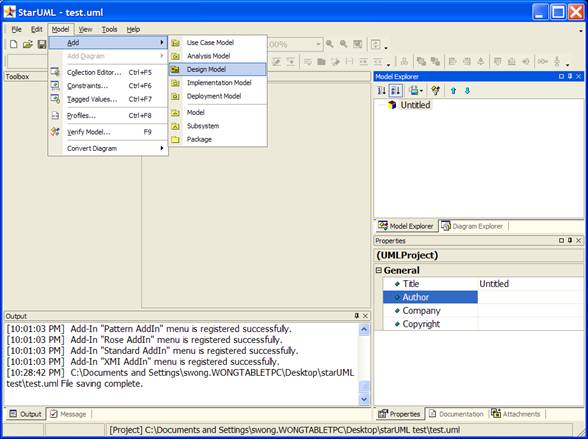
6. Add modules
Through the "Model" main menu, or right-click the selected model, you can "Add / Design Model"

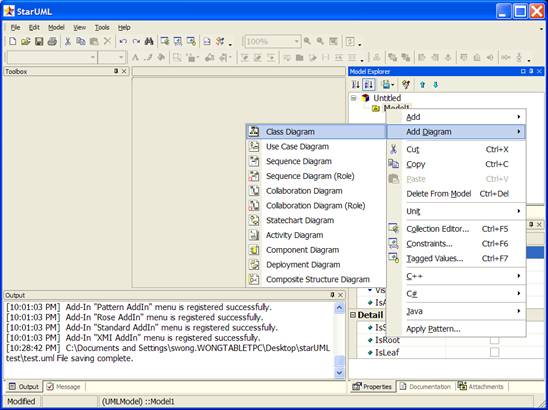
7. Add the class diagram
Through the "Model" main menu, or right-click the selected model, you can "Add Diagram / Class Diagram":

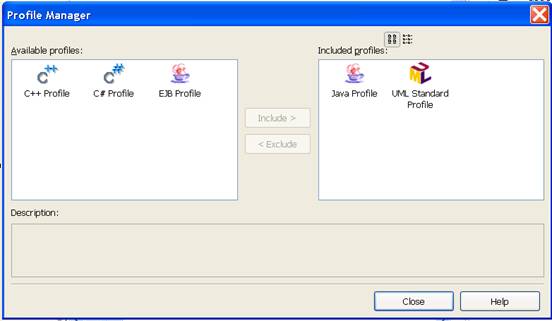
8. Set profile
Through the "Model / Profile ..." menu to set the project will require profile. This determines the project uses the rules and conventions. Be sure to include "JAVA Porfile" the project. 
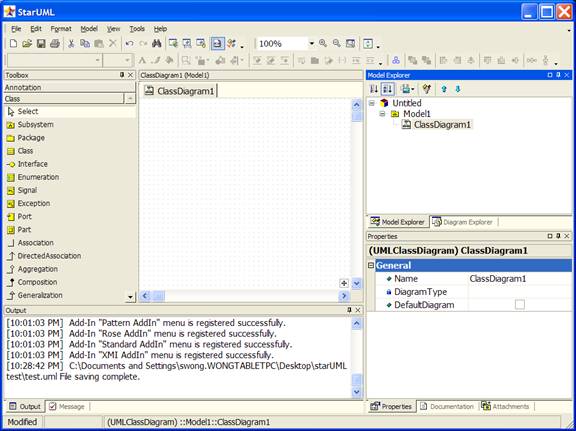
9. Save Project
Save the project immediately, so that when problems arise, you will not lose information.
From the "File" menu, select "Save", and select a place to save the project. Your project should now look StarUML is like this:

10. To create the chart
Now, begin to truly create a chart, from the default screen on the left side of the "Toolbox" select "category" icon, and then left-click somewhere in the diagram window. This use of generic
names has created a new class. Double-click, the class was renamed Circle.
11. Add Property
Right-click the target figure in the pop-up menu, select "Add" in the "Attribute" (marked as green), to add an attribute (or field), enter the desired name of "_radius".
l specific data types, in the Properties panel (lower right side of the window), by double-typing, in the "type" period. In the form right below the Properties panel, find the "Type" input
box, enter double as _radius type of property.
l class‘s internal data (field / property) are private, because they are strictly used internally by the class. Therefore, in the Properties panel will _radius is set to "private."
12. To continue to design
Repeat the same process, add the name of the so-called class called Rectangle and double-type private members _width and _height. (The following paragraphs were the idea of the use of words
is a matter of translation department always felt very good, 9 coming onto the original) You may notice using the "Model Explorer" on the right is faster to add these, but do however note that adding the classes and interfaces themselves in this toolbox (instead
of using the toolbox on the left and clicking on the palette to create the object) will not create the objects in the diagram.
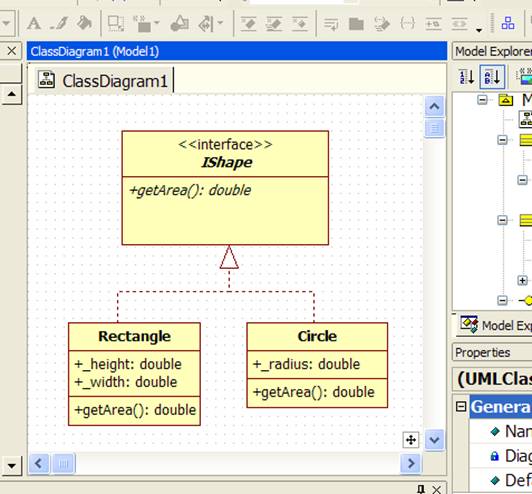
13. IShape interface creation
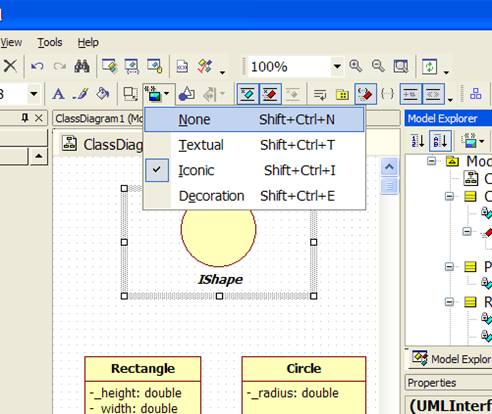
l From the toolbox, select the "Interface", and click on the chart somewhere. Be renamed IShape. Created later, select it.
l at the top toolbar, select "Stereotype Display" drop-down button to change the value "None". This will change the previous round shape, so that it becomes into a rectangle.
l or in the top toolbar, uncheck the "Suppress Operations". This will enable us to see the interface has a method.

l to add a return value of IShape interface double the getArea method.
n you can right-click the interface icon in the pop-up menu, click the red "Operation" button, and then enter the getArea.
n set the return value type. In the "Model Explorer" expand IShape node, right-click getArea method you just created and select "Add Parameter". In the "Properties" box, the parameter‘s
name becomes empty, the "DirectionKind" into a "RETURN", the "Type" becomes dboule.
l will IShape and getArea of IsAbstract property box Da Shanggou their name on the icon will become italic. This is the UML standard, that this is actual situation of pure interfaces or
any other body.
14. Add the relationship between classes and interfaces
l can be expressed from the toolbox, select "Realization" arrow, and drag from the Circle to IShape, so Circle Implement Interface IShape. Repeat the same process, in order to add Rectangle
relations. This is the addition of Circle and Rectangle for the implementation of the interface between IShape.
n If you want to make right-angle connector showed the way, right-click the connection line, and select "Format / Line Style / Rectilinear" menu. You have passed this way, so that the arrows
overlap together, you can make your map look more tidy.
15. Add Class-based interface, the behavior
l As the Circle and Rectangle classes are implemented IShape interface, it must have the same behavior (methods).
n In the "Model Explorer" panel, copy getArea Act (press Ctrl-C or right-click and select Copy menu), and paste it into the Circle and Rectangle classes.
n The implementation of the methods in Circle and Rectangle classes are not abstract, but concrete. This is because they actually perform some particular action (for example, for a circular
and rectangular area calculated separately), so do not IsAbstract check box.
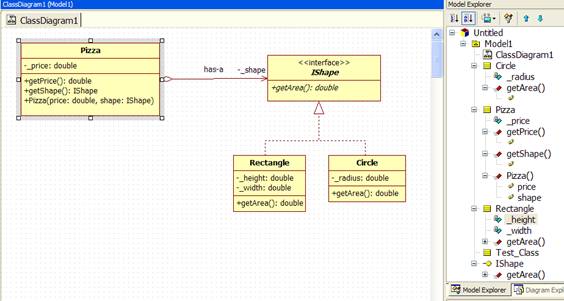
16. Your diagram should now look like this:

17. Add the Pizza category
l to Pizza Add a double-type private domain _price.
l Add a return to double type of total operating getPrice.
18. IShape for the Pizza class to add a reference to
l From the toolbox, select "DirectedAssociation" arrow, click the Pizza class, to IShape drag.
n Select the arrows on the right of the "Properties" box will be a column name changed to "has-a", "End1.Aggregation" column changed to "AGGREGATE" (the icon shows Pizza and shape the object
is "aggregation "relationship).
n the "End2.Name" column changed to _shape. This will automatically add a Pizza named _shape, the use of private IShape interface domain, the so-called _shape type ishape to pizza pie.
n the "End2.Visibility" changed to private.
l for the _shape create a "winner" method, called the getShape, return IShape. This is to create an act of name is getShape, return IShape.
19. To add the pizza class constructor
l Add a constructor for Pizza, right-click in the pop-up "Add" menu, select "Operation". From here, to add a normal price with a dboule type parameters and shape parameters of the operation
of IShape type
l an additional input parameter, as before the addition of a return to the same type of output parameter, you specify the name of the parameters, such as price and shape, as well as the
appropriate data types.
l for the Circle to increase the radius with a double-type parameter constructor.
l for the Rectangle to add a width and height with a double-type parameter constructor.
20. Your diagram should now look like this:

21. Add Test_Pizza class
UML class diagrams to illustrate more features, but also adds a called "Test_Pizza" class, which for testing purposes, and use the Pizza and IShape classes.
l the relationship between the two classes take many forms. For example, a class can be instantiated to another class, rather than as a member. Or, a class method may need another type as
an input parameter, to retain a reference only for the implementation of this method.
l from the toolbox, select "Dependency" arrow from one class to him by dragging it to the class, to add unreasonable dependencies between classes. In this case, Test_Pizza dependent on Pizza,
Circle and Rectangle classes, because it is an instance of them.
l From the Properties box option name attribute, or double-click on the chart "dependency line", you can add labels for the dependencies. In particular, when a class instance of another
class, we will rely on line called "instantiates".
l You can select and drag the labels rely on the line in order to achieve a more aesthetic results.
l dependence relations do not affect code generation.
22. Your plan should now be the very beginning, as shown in this article.
23. For your free to do modify the plan.
You can also drag your class diagram, and to make the arrows to show unreasonable manner (to the arrow is displayed as a straight line, select an arrow, right-click it, pop-up menu, select
"Line Style", and select "Rectilinear"). You must experience the tools and to understand it.
24. Save Project
In the "File" menu, select "Save". SU all the information is only a single project file, so you should be only one file is currently generated.
25. Export
Chart export to other formats, such as pictures, it is very useful. You can select "File" menu "Export Diagram", and select the appropriate file type to perform the change operation.
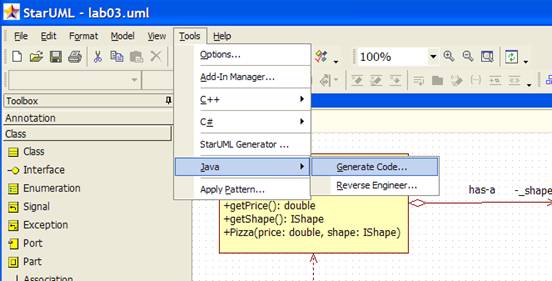
26. Generate the Java stub code:
l click on the main menu "Tools-> Java" menu, select "Generate Code".

l From the dialog box, select your module (in this case may be Model1), click on "Next".
l In order to make your icon in all of the modules or classes are generated stub code, choose "Select All" then click "Next".
l Select a valid output directory, "Next".
l In the "Options Setup", be sure to check both "Generate the Documentation by JavaDoc" and "Generate empty JavaDoc". All other checkboxes should be unchecked. Then press "Next". In the
"Options Setup", be sure to check "Generate the Documentation by JavaDoc", "Generate empty JavaDoc", all the other check box is not selected, "Next".
l Now StarUML map generated from your code, click on "Finish" exit the dialog box.
l Now, you can edit the generated code in order to increase usage.
27. Add the implementation code
Start now to define the actual procedure done, for example, your description of the icon to add the class implementation code.
l Use DrJava add the code for the relevant classes,. Java file to add the code. Code, and you use the HW02 is the same. (Note: In order to Test_Pizza some code, it is better DrJava automatically
generated, rather than manually creating the StarUML inside. We are here simply to illustrate.)
l remember that IShape of getArea () method is abstract, so there is no code.
l like you add comments as code examples. This comment is "JavaDoc" style. About JavaDoc You will learn more later.
28. Reverse Engineering
StarUML also available from the existing Java code to create a class diagram, which is known as "reverse engineering", when you want to generate charts from existing code, or if you modify
the SU-generated code, and would like to be reflected in the chart time, reverse engineering feature is very useful. Through the chart or DrJava a text editor such as repeatedly by the work process, called "round-trip engineering". This is also the object-oriented
to become a basic process.
l to the main menu bar select "Tools / Java / Reverse Engineer ...", can reverse engineering of existing code.
l Select the directory where the Java code, and click the "Add" or "Add All" button to include them in the reverse engineering process, and then click "Next".
l Select the category you want to join the module, here might be "Model1", then "Next".
l in the Option Setup inside:
n confirmed that "public", "package", "protected" and "private" is selected (this is the default setting).
n Similarly, by default, the radio button "Create the field to the Attribute" is selected.
n unless you want SU to create other things, for example, bad layout of the chart contains all classes, do not select the "Create Overview Diagram" box.
n When you have done a check on the options, click "Run".
n SU will now import the classes in the selected files into your model. Click "Finish" to exit the dialog when it is complete. Suu now import classes in the selected file to the product
model you need, click on "Finish" exit the dialog box when complete.
l SU will add to your module into the class, but not your chart. In order to add it to your map, simply drag them from the Model Explorer you can
StarUML是一种生成类图和其他类型的统一建模语言(UML)图表的工具。这是一个用Java语言描述的创建类图的简明手册。
StarUML(简称SU),是一种创建UML类图,并能够自动生成Java的“stub code” 的工具。SU也可以做JAVA逆向工程,以产生相应的UML图表。
在本教程中,我们将使用SU设计一个pizza饼。执行下列步骤,可以创建如下面所示的UML图。SU可以生成反映类结构的代码,而不是任何对象的具体行动。因此,在使用SU创建图表后,你会为此stub code添加剩余的功能性代码,填写每种方法本来应该做的事。
2.安装
首先,我们必须先安装将要使用的软件。StarUML ,是一个开放源码软件, 遵循GPL协议许可(GNU公共许可证) ,并免费提供下载。
3.启动
安装以后就可以启动该程序。
4.添加新工程
然后,一个名叫:New Project By Approach的对话框会弹出。选择“Empty Project”并且按下"确定"。这里建议你不要勾选"设置为默认的做法" 复选框。
5.选择模块
在右边的“Model Explorer”框中选定“Untitled”模块。
6.添加模块
通过“Model”主菜单,或右击选定的模型,可以" Add/Design Model "
7.添加类图
通过“Model”主菜单,或右击选定模型,可以“Add Diagram/Class Diagram”:
8.设置profile
通过“Model/Profile...”菜单去设置工程所需的profile。这决定了工程所使用的规则和约定。一定要包含"JAVA Porfile"这一项目。
9.保存工程
立即就保存工程,这样在出现问题的时候,您就不会丢失信息。
从“File ”菜单,选择“Save” ,并选择一个地方以保存工程。你的StarUML项目现在应该看起来的是这样的:
10.创造图表
现在,开始真正创造图表,从默认就在屏幕的左边的“Toolbox”选择“类”图标,然后左键单击diagram窗口的某处。这样就使用通用名字创造了一个新的类。双击,将类改名为Circle。
11.添加属性
右击图中的目标,在弹出菜单中选择“Add”中的“Attribute”(被标示为绿色),为其添加一个属性(或者域),填入期望的名字“_radius”。
l 具体的数据类型,在属性面板(右下侧的窗口) ,由双打字,在"类型"时段。 在窗体右下边的Properties面板中,找到“Type”输入框,输入double作为_radius属性的类型。
l 类的内部数据(域/属性)都是私有的,因为他们是严格由类内部使用的。所以,在Properties面板中将_radius设置为“私有”。
12.继续进行设计
重复同样的过程,添加所谓的名字叫做Rectangle的类和double型的私有成员_width和_height。 (下面者段话是使用方面的主意事项,总感觉翻译部太好,九原文搬上来了)You may notice using the "Model Explorer" on the right is faster to add these, but do however note that adding the classes and interfaces themselves in
this toolbox (instead of using the toolbox on the left and clicking on the palette to create the object) will not create the objects in the diagram.
13.创造 IShape interface
l 从toolbox中,选择“Interface”,并点击图表的某处。将其改名为IShape。创建以后,选中它。
l 在顶部工具栏,选择 “Stereotype Display” 下拉按钮,将值改变为“None”。这将改变以往的圆形形状,使其变为成长方形。
还是在顶部工具栏,取消选中" Suppress Operations "。这将使我们能够看到接口所拥有的方法。
l 向IShape 接口添加返回值为double的getArea方法。
n 可以通过右击interface的图标,在弹出菜单中点击红色的“Operation”按钮,然后输入getArea。
n 设定返回值类型。在“Model Explorer”中展开IShape节点,右击你刚刚创建的getArea方法,并选择“Add Parameter”。在“Properties”框中,将参数的名子变为空,将“DirectionKind”变为“RETURN”,将“Type”变为dboule。
l 将IShape和getArea的IsAbstract属性框打上勾,他们在图标上的名字将变为斜体。这是UML的标准,表示这是接口或者其他纯虚实体。
14.添加类和接口的关系
l 可以通过从toolbox中选择表示“Realization”的箭头,并从Circle拖拽向IShape,使Circle实现接口IShape。重复同样的过程,为Rectangle添加实现关系。这是添加了Circle 和 Rectangle对于IShape接口的实现关系。
n 如果想使连接线表现为直角的方式,右击连接线,并选择" Format/Line Style/Rectilinear"菜单。你通过这种方式,使箭头重叠在一起,可以使你的图看起来更整洁。
15.添加类基于接口的行为
l 由于Circle和Rectangle类都实现了IShape接口,就必须有同样的行为(方法)。
n 在“Model Explorer”面板中,复制getArea法(按Ctrl-C或者右键点击并选择Copy菜单),并粘贴到Circle和Rectangle类。
n 这些实现了的方法在Circle和Rectangle类中都不是抽象的,而是具体的。这是因为他们实际上是执行一些特定行为(例如,为一个圆形和长方形分别计算面积) ,所以不要勾选IsAbstract框。
16.你的图现在应该是这样的:
17.添加Pizza类
l 向Pizza添加double型的私有域_price。
l 添加返回double类型的共有操作getPrice。
18.为Pizza类添加IShape 的引用
l 从toolbox中选择" DirectedAssociation "箭头,点击Pizza类,并向IShape拖拽 。
n 选中箭头,在右边的“Properties”框上,将name一栏改为“has-a”,“End1.Aggregation” 一栏改为“AGGREGATE”(这个图示说明Pizza和shape对象是“聚合“的关系)。
n 将“End2.Name”一栏改为_shape 。这样就自动为Pizza添加一个名字为_shape,使用IShape接口的私有域,的所谓_shape型ishape以pizza饼。
n 将“End2.Visibility”改为私有。
l 为_shape创建一个“获得者”方法,名字叫做getShape,返回IShape 。这就是创建一个行为,名字是getShape,返回IShape 。
19.为pizza类添加构造函数
l 为Pizza添加构造函数,右击,在弹出的“Add” 菜单中选择“Operation”。从这里,增加一个普通的带有dboule型price参数和IShape类型shape参数的操作
l 增加一个输入参数,就像之前增加了一个返回型的输出参数一样,你指定的参数的名称,如价格和形状等,以及适当的数据类型。
l 为Circle增加一个带有double型的radius参数的构造函数。
l 为Rectangle增加一个带有double型width和height参数的构造函数。
20.你的图现在应该是这样的:
21.添加Test_Pizza类
为了说明UML类图更多的功能,又增加了一个叫做“Test_Pizza”的类,它用作测试目的,并使用到Pizza和IShape类。
l 两个类之间的关系有多种形式。举例来说,一个类可以实例化另一个类,而不是将其作为一个成员。又或,一类的方法可能需要另一个类作为输入参数,保留一个引用仅仅是为这个方法的执行。
l 通过从toolbox中选择“Dependency”箭头,从一个类拖向他所以来的类,来添加不通类之间的依赖关系。在这个例子中,Test_Pizza 依赖于Pizza,Circle和Rectangle类,因为它实例化了它们。
l 从Properties box选择name属性,或者双击图表上的“依赖线”,可以为依赖关系添加标签。特别的是,当一类实例化另一个类,我们会把依赖线叫做“instantiates”。
l 你可以选中并拖动依赖线的标签,以达到更美观的效果。
l 依赖关系不会影响代码生成。
22.你的图现在应该像本文最开始所示。
23.对你的图随意做些修改。
你还可以拖动你的类图,并且使箭头以不通的方式展示(使箭头显示为直线,选择一个箭头,右击它,弹出菜单中选择“Line Style”,并选择“Rectilinear” )。你一定要体验这个工具,并去了解它。
24.保存项目
在“File”菜单中,选择“Save”。 SU的所有资料只有一个单一的项目文件,所以你目前应该只有一个文件生成。
25.导出
将图表导出为其他格式,例如图片等,是非常有用的。您可以通过选择“File”菜单的“Export Diagram” ,并且选择合适的文件类型来执行改操作。
26.生成Java stub代码:
l 点击主菜单的“Tools->Java”菜单,选择“Generate Code”。
l 从对话框中选择你的模块(这里可能Model1),点击“Next”。
l 为了使你的模块或者图标的所有类都生成stub code,选择“Select All”然后按“Next”。
l 选择一个有效的输出目录,“Next”。
l In the "Options Setup", be sure to check both "Generate the Documentation by JavaDoc" and "Generate empty JavaDoc". All other checkboxes should be unchecked. Then press "Next".在“Options Setup” ,请务必选中“Generate the Documentation by
JavaDoc”,“Generate empty JavaDoc”,所有其他复选框不选中,“Next”。
l 现在StarUML将从你的图产生代码,点击“Finish”退出对话框。
l 现在,您可以编辑生成的代码,以增加应用。
27.添加实现代码
现在就开始定义程序实际做的事情,例如,为你图标中的类描述添加实现代码。
l 使用DrJava添加代码,为相关的类,.Java文件添加代码。 代码会和你使用HW02是一样的。(注意:为Test_Pizza些代码,最好由DrJava自动生成,而非手工在StarUML里面创建。我们这里只是为了说明。)
l 记得那IShape的getArea()方法是抽象的,因此没有代码。
l 请您像代码范例一样添加注释。这种注释是“JavaDoc”风格的。 关于JavaDoc您将会在随后学到更多。
28.逆向工程
StarUML还可以从现有的Java代码创建一个类图,这被称为“reverse engineering”,当你想从现有的代码生成图表,或者你修改了SU生成的代码,并且想在图表中反应出来的时候,逆向工程功能就非常有用了。通过图表或者DrJava这样的文本编辑器去反复工作的过程,称作“round-trip engineering”。这也是面向对象变成中的一个基本过程。
l 到主菜单栏中选择“Tools/Java/Reverse Engineer...”,可以将现有的代码逆向工程。
l 选择Java代码所在的目录,并点击“Add”或“Add All”按钮,将它们包括在逆向工程过程中,然后单击“Next” 。
l 选择你想将类加入的模块,这里可能是“Model1”,然后“Next”。
l 在Option Setup里面:
n 确认“public”,“package”,“protected”和“private”是选中的(这是默认设置)。
n 同样,在默认情况下,单选按钮“Create the field to the Attribute”也是选中的。
n 除非你想SU创建其他东西,例如布局很糟糕的包含所有类的图表,不要选中“Create Overview Diagram”框。
n 当你对选项做了检查后,点击“Run”。
n SU will now import the classes in the selected files into your model. Click "Finish" to exit the dialog when it is complete.苏现在进口班,在被选定的文件到你需要的产品型号,点击"完成"退出对话框时,就完成了。
l SU会向你的模块添加导入的类,但不是你的图表。为了将它添加到您的图,只需要简单地从Model Explorer拖动它们即可。
========================================================================================
免费的UML开发工具StarUML
StarUML是一款开放源码的UML开发工具,是由韩国公司主导开发出来的产品,可以直接到StarUML网站(http://www.staruml.com/)下载大约22MB的执行文件。在本书里,所使用的版本为5.0.2.1570。
◆完全免费:StarUML开发工具是一套开放源码的软件,不仅免费自由下载,连代码都免费开放。
◆多种格式影像文件:可导出JPG、JPEG、BMP、EMF和WMF等格式的影像文件。
◆语法检验:StarUML遵守UML的语法规则,不支持违反语法的动作。
◆正反向工程:StarUML开发工具可以依据类图的内容生成Java、C++、C#代码,也能够读取Java、C++、C#代码反向生成类图。反向工程有两个主要用途,其一是旧有的源码反转成图之后,可以构建UML模型的方式继续将新的设计添加上去;另一项用途是想要解析源码时,可以通过反转的类图来理解,不再需要查看一行又一行的代码,这将节省大量的时间和精力。
◆支持XMI:StarUML接受XMI1.1、1.2和1.3版的导入导出。XMI是一种以XML为基础的交换格式,用以交换不同开发工具所生成的UML模型。
◆导入Rose文件:StarUML可以读取RationalRose生成的文件,让原先Rose的用户可以转而使用免费的StarUML。早期,RationalRose是市场占有率最高的UML开发工具,同时也是相当昂贵的工具。由于RationalRose非常闻名,后来让IBM给收购了。
◆支持模式:支持23种GoF模式(Pattern),以及3种EJB模式。GoF模式出自于ErichGamma等4人合著的DesignPatterns:ElementsofReusableObject-OrientedSoftware一书,其内列出了23种软件模式,可解决软件设计上的特定问题。StarUML也支持3种常用的EJB模式,分别为EntityEJB、MessageDrivenEJB、SessionEJB。
StarUML也结合了模式和自动生成代码的功能,方便我们落实设计。
StarUML使用说明-指导手册
标签:start uml
原文地址:http://blog.csdn.net/u013467442/article/details/41809937


