标签:des style blog class c code
继上一篇讲了Put和Delete之后,这一篇我们讲Get和Scan, 因为我发现这两个操作几乎是一样的过程,就像之前的Put和Delete一样,上一篇我本来只打算写Put的,结果发现Delete也可以走这个过程,所以就一起写了。
我们打开HRegionServer找到get方法。Get的方法处理分两种,设置了ClosestRowBefore和没有设置的,一般来讲,我们都是知道了明确的rowkey,不太会设置这个参数,它默认是false的。
if (get.hasClosestRowBefore() && get.getClosestRowBefore()) {
    byte[] row = get.getRow().toByteArray();
    byte[] family = get.getColumn(0).getFamily().toByteArray();
    r = region.getClosestRowBefore(row, family);
} else {
   Get clientGet = ProtobufUtil.toGet(get);
   if (existence == null) {
      r = region.get(clientGet);
   }
}
所以我们走的是HRegion的get方法,杀过去。
public Result get(final Get get) throws IOException {
    checkRow(get.getRow(), "Get");
    // 检查列族,以下省略代码一百字
    List<Cell> results = get(get, true);
    return Result.create(results, get.isCheckExistenceOnly() ? !results.isEmpty() : null);
}
先检查get的row是否在这个region里面,然后检查列族,如果没有的话,它会根据表定义给补全的,然后它转身又进入了另外一个get方法,真是狠心啊!
    List<Cell> results = new ArrayList<Cell>();
    Scan scan = new Scan(get);
    RegionScanner scanner = null;
    try {
      scanner = getScanner(scan);
      scanner.next(results);
    } finally {
      if (scanner != null)
        scanner.close();
    }
从上面可以看得出来,为什么我要把get和Scanner一起讲了吧,因为get也是一种特殊的Scan的方法,它只寻找一个row的数据。
下面开始讲Scan,在《HTable探秘》里面有个细节不知道注意到没,在查询之前,它要先OpenScanner获得要给ScannerId,这个OpenScanner其实也调用了scan方法,但是它过去不是干活的,而是先过去注册一个Scanner,订个租约,然后再把这个返回的ScannerId再次发送一个scan请求,这次才开始调用开始扫描。
扫描的时候,走的是这一段

      if (!done) {
              long maxResultSize = scanner.getMaxResultSize();
              if (maxResultSize <= 0) {
                maxResultSize = maxScannerResultSize;
              }
              List<Cell> values = new ArrayList<Cell>();
              MultiVersionConsistencyControl.setThreadReadPoint(scanner.getMvccReadPoint());
              region.startRegionOperation(Operation.SCAN);
              try {
                int i = 0;
                synchronized(scanner) {
                  for (; i < rows && currentScanResultSize < maxResultSize; i++) {
                    // 它用的是这个nextRaw方法
                    boolean moreRows = scanner.nextRaw(values);
                    if (!values.isEmpty()) {
                       results.add(Result.create(values));
                    }
                    if (!moreRows) {
                      break;
                    }
                    values.clear();
                  }
                }
              } finally {
                region.closeRegionOperation();
              }
            }

            // 没找到设置moreResults为false,找到了把结果添加到builder里面去
            if (scanner.isFilterDone() && results.isEmpty()) {
              moreResults = false;
              results = null;
            } else {
              addResults(builder, results, controller);
            }
          }
        }
这里面有controller和result,这块的话,我求证了一下RpcServer那块,如果Rpc传输的时候使用了codec来压缩的话,就用controller返回结果,否则用response返回。
这块就不管了不是重点,下面我们看一下RegionScanner。
我们冲过去看RegionScannerImpl吧,它在HRegion里面,我们直接去看nextRaw方法就可以了,get方法的那个next方法也是调用了nextRaw方法。
if (outResults.isEmpty()) {// 把结果存到outResults当中
        returnResult = nextInternal(outResults, limit);
} else {
        List<Cell> tmpList = new ArrayList<Cell>();
        returnResult = nextInternal(tmpList, limit);
        outResults.addAll(tmpList);
}
去nextInternal方法吧,这方法真大,尼玛,我要歇菜了,我们进入下一个阶段吧。

/**  把查询出来的结果保存到results当中  */
    private boolean nextInternal(List<Cell> results, int limit)
    throws IOException {

      while (true) {
        //从storeHeap里面取出一个来
        KeyValue current = this.storeHeap.peek();

        byte[] currentRow = null;
        int offset = 0;
        short length = 0;
        if (current != null) {
          currentRow = current.getBuffer();
          offset = current.getRowOffset();
          length = current.getRowLength();
        }
        //检查一下到这个row是否应该停止了
        boolean stopRow = isStopRow(currentRow, offset, length);
        if (joinedContinuationRow == null) {
          // 如果要停止了,就用filter的filterRowCells过滤一下results.
          if (stopRow) {
            if (filter != null && filter.hasFilterRow()) {
              //使用filter过滤掉一些cells
              filter.filterRowCells(results);
            }
            return false;
          }
          // 如果有filter的话,过滤通过
          if (filterRowKey(currentRow, offset, length)) {
            boolean moreRows = nextRow(currentRow, offset, length);
            if (!moreRows) return false;
            results.clear();
            continue;
          }
          //把结果保存到results当中
          KeyValue nextKv = populateResult(results, this.storeHeap, limit, currentRow, offset,
              length);
          // Ok, we are good, let‘s try to get some results from the main heap.
          // 在populateResult找到了足够limit数量的
          if (nextKv == KV_LIMIT) {
            if (this.filter != null && filter.hasFilterRow()) {
              throw new IncompatibleFilterException(
                "Filter whose hasFilterRow() returns true is incompatible with scan with limit!");
            }
            return true; // We hit the limit.
          }

          stopRow = nextKv == null ||
              isStopRow(nextKv.getBuffer(), nextKv.getRowOffset(), nextKv.getRowLength());
          // save that the row was empty before filters applied to it.
          final boolean isEmptyRow = results.isEmpty();

          // We have the part of the row necessary for filtering (all of it, usually).
          // First filter with the filterRow(List). 过滤一下刚才找出来的
          if (filter != null && filter.hasFilterRow()) {
            filter.filterRowCells(results);
          }
          //如果result的空的,啥也没找到,这是。。。悲剧啊
          if (isEmptyRow) {
            boolean moreRows = nextRow(currentRow, offset, length);
            if (!moreRows) return false;
            results.clear();
            // This row was totally filtered out, if this is NOT the last row,
            // we should continue on. Otherwise, nothing else to do.
            if (!stopRow) continue;
            return false;
          }

          // Ok, we are done with storeHeap for this row.
          // Now we may need to fetch additional, non-essential data into row.
          // These values are not needed for filter to work, so we postpone their
          // fetch to (possibly) reduce amount of data loads from disk.
          if (this.joinedHeap != null) {
            KeyValue nextJoinedKv = joinedHeap.peek();
            // If joinedHeap is pointing to some other row, try to seek to a correct one.
            boolean mayHaveData =
              (nextJoinedKv != null && nextJoinedKv.matchingRow(currentRow, offset, length))
              || (this.joinedHeap.requestSeek(KeyValue.createFirstOnRow(currentRow, offset, length),
                true, true)
                && joinedHeap.peek() != null
                && joinedHeap.peek().matchingRow(currentRow, offset, length));
            if (mayHaveData) {
              joinedContinuationRow = current;
              populateFromJoinedHeap(results, limit);
            }
          }
        } else {
          // Populating from the joined heap was stopped by limits, populate some more.
          populateFromJoinedHeap(results, limit);
        }

        // We may have just called populateFromJoinedMap and hit the limits. If that is
        // the case, we need to call it again on the next next() invocation.
        if (joinedContinuationRow != null) {
          return true;
        }

        // Finally, we are done with both joinedHeap and storeHeap.
        // Double check to prevent empty rows from appearing in result. It could be
        // the case when SingleColumnValueExcludeFilter is used.
        if (results.isEmpty()) {
          boolean moreRows = nextRow(currentRow, offset, length);
          if (!moreRows) return false;
          if (!stopRow) continue;
        }

        // We are done. Return the result.
        return !stopRow;
      }
    }
上面那段代码真的很长很臭,尼玛。。被我折叠起来了,有兴趣的看一眼就行,我们先分解开来看吧,这里面有两个Heap,一个是storeHeap,一个是JoinedHeap,他们啥时候用呢?看一下它的构造方法吧
for (Map.Entry<byte[], NavigableSet<byte[]>> entry :
          scan.getFamilyMap().entrySet()) {
        //遍历列族和列的映射关系,设置store相关的内容
        Store store = stores.get(entry.getKey());
        KeyValueScanner scanner = store.getScanner(scan, entry.getValue());
        if (this.filter == null || !scan.doLoadColumnFamiliesOnDemand()
          || this.filter.isFamilyEssential(entry.getKey())) {
          scanners.add(scanner);
        } else {
          joinedScanners.add(scanner);
        }
      }
      this.storeHeap = new KeyValueHeap(scanners, comparator);
      if (!joinedScanners.isEmpty()) {
        this.joinedHeap = new KeyValueHeap(joinedScanners, comparator);
      }
}
如果joinedScanners不空的话,就new一个joinedHeap出来,但是我们看看它的成立条件,有点儿难吧。
1、filter不为null
2、scan设置了doLoadColumnFamiliesOnDemand为true
3、设置了的filter的isFamilyEssential方法返回false,这个估计得自己写一个,因为我刚才去看了几个filter的这个方法默认都是用的FilterBase的方法返回false。
好的,到这里我们有可以把上面那段代码砍掉很大一部分了,它的成立条件比较困难,所以很难出现了,那我们就挑重点的storeHeap来讲吧,我们先看着这三行。
Store store = stores.get(entry.getKey());
KeyValueScanner scanner = store.getScanner(scan, entry.getValue());
this.storeHeap = new KeyValueHeap(scanners, comparator);
通过列族获得相应的Store,然后通过getScanner返回scanner加到KeyValueHeap当中,我们应该去刺探一下HStore的getScanner方法,它new了一个StoreScanner返回,继续看StoreScanner。

public StoreScanner(Store store, ScanInfo scanInfo, Scan scan, final NavigableSet<byte[]> columns) throws IOException {

    matcher = new ScanQueryMatcher(scan, scanInfo, columns,
        ScanType.USER_SCAN, Long.MAX_VALUE, HConstants.LATEST_TIMESTAMP,
        oldestUnexpiredTS);

    // 返回MemStore、所有StoreFile的Scanner.
    List<KeyValueScanner> scanners = getScannersNoCompaction();

    //explicitColumnQuery:是否过滤列族 lazySeekEnabledGlobally默认是true 如果文件数量超过1个,isParallelSeekEnabled就是true
    if (explicitColumnQuery && lazySeekEnabledGlobally) {
      for (KeyValueScanner scanner : scanners) {
        scanner.requestSeek(matcher.getStartKey(), false, true);
      }
    } else {
      if (!isParallelSeekEnabled) {
        for (KeyValueScanner scanner : scanners) {
          scanner.seek(matcher.getStartKey());
        }
      } else {
     //一般走这里,并行查
        parallelSeek(scanners, matcher.getStartKey());
      }
    }

    // 一个堆里面包括了两个scanner,MemStore、StoreFile的Scanner
    heap = new KeyValueHeap(scanners, store.getComparator());

    this.store.addChangedReaderObserver(this);
  }
对上面的代码,我们再慢慢来分解。
1、先new了一个ScanQueryMatcher,它是一个用来过滤的类,传参数的时候,需要传递scan和oldestUnexpiredTS进去,oldestUnexpiredTS是个参数,是(当前时间-列族的生存周期),小于这个时间戳的kv视为已经过期了,在它初始化的时候,我们注意一下它的startKey和stopRow,这个startKey要注意,它可不是我们设置的那个startRow,而是用这个startRow来new了一个DeleteFamily类型的KeyValue。
this.stopRow = scan.getStopRow();
this.startKey = KeyValue.createFirstDeleteFamilyOnRow(scan.getStartRow())
2、接着我们看getScannersNoCompaction这个方法,它这里是返回了两个Scanner,MemStoreScanner和所有StoreFile的Scanner,在从StoreHeap中peak出来一个kv的时候,是从他们当中交替取出kv来的,StoreHeap从它的名字上面来看像是用了堆排序的算法,它的peek方法和next方法真有点儿复杂,下一章讲MemStore的时候再讲吧。
//获取所有的storefile,默认的实现没有用上startRow和stopRow
startRow和stopRow storeFilesToScan =
          this.storeEngine.getStoreFileManager().getFilesForScanOrGet(isGet, startRow, stopRow);
memStoreScanners = this.memstore.getScanners();
默认的getStoreFileManager的getFilesForScanOrGet是返回了所有的StoreFile的Scanner,而不是通过startRow和stopRow做过滤,它的注释里面给出的解释,里面的files默认是按照seq id来排序的,而不是startKey,需要优化的可以从这里下手。
3、然后就开始先seek一下,而不是全表扫啊!
//过滤列族的情况
scanner.requestSeek(matcher.getStartKey(), false, true);
//一般走这里,并行查
parallelSeek(scanners, matcher.getStartKey());
scanner.requestSeek不是所有情况都要seek,是查询Delete的时候,如果查询的kv的时间戳比文件的最大时间戳小,就seek到上次未查询到的kv;它这里可能会用上DeleteFamily删除真个family这种情况。
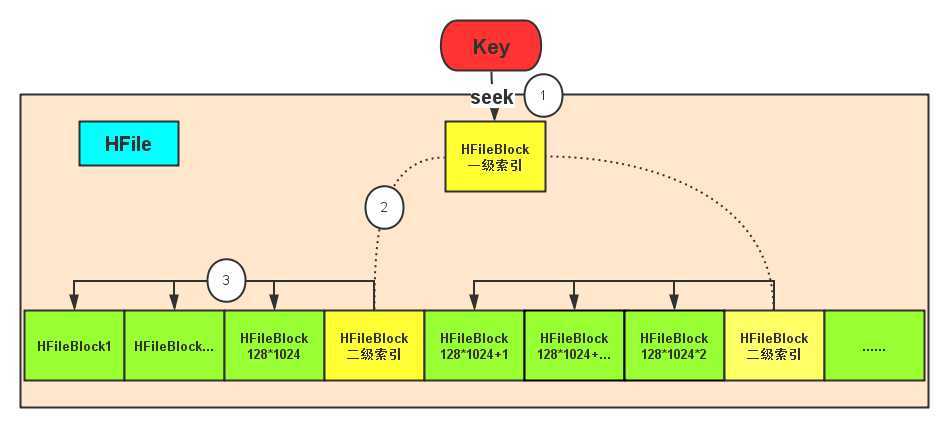
parallelSeek就是开多线程去调用Scanner的seek方法, MemStore的seek很简单,因为它的kv集合是一个排序好的集合,HFile的seek比较复杂,下面我用一个图来表达吧。

在搜索HFile的时候,key先从一级索引找,通过它定位到细的二级索引,然后再定位到具体的block上面,到了HFileBlock之后,就不是seek了,就是遍历,遍历没什么好说的,不熟悉的朋友建议先回去看看《StoreFile存储格式》。注意哦,这个key就是我们的startKey哦,所以大家知道为什么要在scan的时候要设置StartKey了吗?
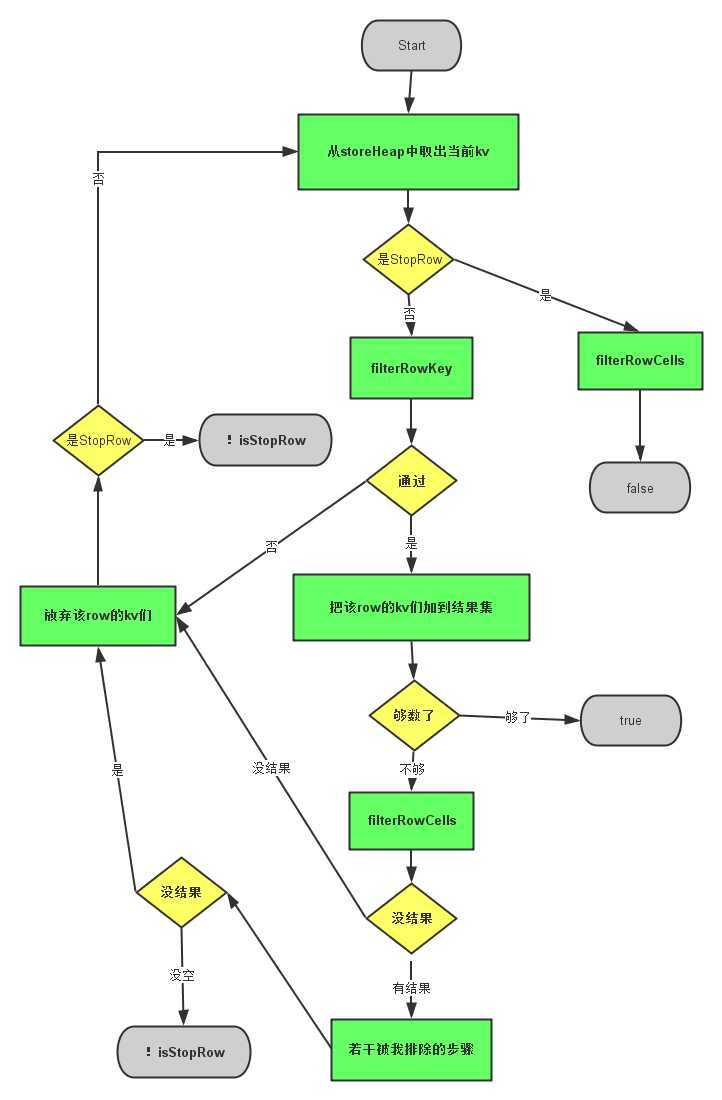
通过前面的分析,我们可以把nextInternal分解与拆分、抹去一些不必要的代码,我发现代码还是很难懂,所以我画了一个过程图出来代替那段代码。

特别注意事项:
1、个图是被我处理过的简化之后的图,还有在放弃该row的kv们 之后并非都要进行是StopRow的判断,只是为了合并这个流程,我加上去的isStopRow的判断,但并不影响整个流程。
2、!isStopRow代表返回代码的(!isStopRow)的意思, 根据isStopRow的当前值来返回true或者false
3、true意味着退出,并且还有结果,false意味着退出,没有结果
诶,看到这里,还是没看到它是怎么用ScanQueryMatcher去过滤被删除的kv们啊,好,接下来我们重点考察这个问题。
这个过程屏蔽在了filterRow之后通过的把该row的kv接到结果集的这一步里面去了。它在里面不停的调用KeyValueHeap的next方法,match的调用正好在这个方法。我们现在就去追踪这遗失的部分。
我们直接去看它的match方法就好了,别的不用看了,它处理的情况好多好多,尼玛,这是要死人的节奏啊。
ScanQueryMatcher是用来处理一行数据之间的版本问题的,在每遇到一个新的row的时候,它都会先被设置matcher.setRow(row, offset, length)。
if (limit < 0 || matcher.row == null || !Bytes.equals(row, offset, length, matcher.row,
      matcher.rowOffset, matcher.rowLength)) {
      this.countPerRow = 0;
      matcher.setRow(row, offset, length);
}
上面这段代码在StoreScanner的next方法里面,每当一行结束之后,都会调用这个方法。
在讲match方法之前,我先讲一下rowkey的排序规则,rowkey 正序->family 正序->qualifier 正序->ts 降序->type 降序,那么对于同一个行、列族、列的数据,时间越近的排在前面,类型越大的排在前面,比如Delete就在Put前面,下面是它的类型表。
//search用
Minimum((byte)0),
Put((byte)4),
Delete((byte)8),
DeleteFamilyVersion((byte)10),
DeleteColumn((byte)12),
DeleteFamily((byte)14),
//search用
Maximum((byte)255);
为什么这里先KeyValue的排序规则呢,这当然有关系了,这关系着扫描的时候,谁先谁后的问题,如果时间戳小的在前面,下面这个过滤就不生效了。
下面我们看看它的match方法的检查规则。
1、和当前行比较
//和当前的行进行比较,只有相等才继续,大于当前的行就要跳到下一行,小于说明有问题,停止
int ret = this.rowComparator.compareRows(row, this.rowOffset, this.rowLength,
        bytes, offset, rowLength);
if (ret <= -1) {
      return MatchCode.DONE;
} else if (ret >= 1) {
      return MatchCode.SEEK_NEXT_ROW;
 }
2、检查是否所有列都查过了
//所有的列都扫描过来
if (this.columns.done()) {
      stickyNextRow = true;
      return MatchCode.SEEK_NEXT_ROW;
}
3、检查列的时间戳是否过期
long timestamp = kv.getTimestamp();
// 检查列的时间是否过期
if (columns.isDone(timestamp)) {
    return columns.getNextRowOrNextColumn(bytes, offset, qualLength);
}
4a、如果是Delete的类型,加到ScanDeleteTraker。
if (kv.isDelete()) {
    this.deletes.add(bytes, offset, qualLength, timestamp, type);
}
4b、如果不是,如果ScanDeleteTraker里面有Delete,就要让它经历ScanDeleteTraker的检验了(进宫前先验一下身)
DeleteResult deleteResult = deletes.isDeleted(bytes, offset, qualLength,
          timestamp);
      switch (deleteResult) {
        case FAMILY_DELETED:
        case COLUMN_DELETED:
          return columns.getNextRowOrNextColumn(bytes, offset, qualLength);
        case VERSION_DELETED:
        case FAMILY_VERSION_DELETED:
          return MatchCode.SKIP;
        case NOT_DELETED:
          break;
        default:
          throw new RuntimeException("UNEXPECTED");
}
这里就要说一下刚才那几个Delete的了:
1)DeleteFamily是最凶狠的,生命周期也长,整个列族全删,基本上会一直存在
2)DeleteColum只删掉一个列,出现这个列的都会被干掉
3)DeleteFamilyVersion没遇到过
4)Delete最差劲儿了,只能删除指定时间戳的,时间戳一定要对哦,否则一旦发现不对的,这个Delete就失效了,可以说,生命周期只有一次,下面是源代码。

public DeleteResult isDeleted(byte [] buffer, int qualifierOffset,
      int qualifierLength, long timestamp) {
    //时间戳小于删除列族的时间戳,说明这个列族被删掉是后来的事情
    if (hasFamilyStamp && timestamp <= familyStamp) {
      return DeleteResult.FAMILY_DELETED;
    }
    //检查时间戳
    if (familyVersionStamps.contains(Long.valueOf(timestamp))) {
        return DeleteResult.FAMILY_VERSION_DELETED;
    }

    if (deleteBuffer != null) {

      int ret = Bytes.compareTo(deleteBuffer, deleteOffset, deleteLength,
          buffer, qualifierOffset, qualifierLength);

      if (ret == 0) {
        if (deleteType == KeyValue.Type.DeleteColumn.getCode()) {
          return DeleteResult.COLUMN_DELETED;
        }
        // 坑爹的Delete它只删除相同时间戳的,遇到不想的它就pass了
        if (timestamp == deleteTimestamp) {
          return DeleteResult.VERSION_DELETED;
        }

        //时间戳不对,这个Delete失效了
        deleteBuffer = null;
      } else if(ret < 0){
        // row比当前的大,这个Delete也失效了
        deleteBuffer = null;
      } else {
        throw new IllegalStateException(...);
      }
    }

    return DeleteResult.NOT_DELETED;
上一章说过,Delete new出来之后什么都不设置,就是DeleteFamily级别的选手,所以在它之后的会全部被干掉,所以你们懂的,我们也会用DeleteColum来删除某一列数据,只要时间戳在它之前的kv就会被干掉,删某个指定版本的少,因为你得知道具体的时间戳,否则你删不了。
假设我们有这些数据
KeyValue [] kvs1 = new KeyValue[] {
        KeyValueTestUtil.create("R1", "cf", "a", now, KeyValue.Type.Put, "dont-care"),
        KeyValueTestUtil.create("R1", "cf", "a", now, KeyValue.Type.DeleteFamily, "dont-care"),
        KeyValueTestUtil.create("R1", "cf", "a", now-500, KeyValue.Type.Put, "dont-care"),
        KeyValueTestUtil.create("R1", "cf", "a", now+500, KeyValue.Type.Put, "dont-care"),
        KeyValueTestUtil.create("R1", "cf", "a", now, KeyValue.Type.Put, "dont-care"),
        KeyValueTestUtil.create("R2", "cf", "z", now, KeyValue.Type.Put, "dont-care")
};
Scan的参数是这些。
Scan scanSpec = new Scan(Bytes.toBytes("R1"));
scanSpec.setMaxVersions(3);
scanSpec.setBatch(10);
StoreScanner scan = new StoreScanner(scanSpec, scanInfo, scanType, getCols("a","z"), scanners);
然后,我们先将他们排好序,是这样的。
R1/cf:a/1400602376242(now+500)/Put/vlen=9/mvcc=0,
R1/cf:a/1400602375742(now)/DeleteFamily/vlen=9/mvcc=0,
R1/cf:a/1400602375742(now)/Put/vlen=9/mvcc=0,
R1/cf:a/1400602375742(now)/Put/vlen=9/mvcc=0,
R1/cf:a/1400602375242(now-500)/Put/vlen=9/mvcc=0,
R2/cf:z/1400602375742(now)/Put/vlen=9/mvcc=0
所以到最后,黄色的三行会被删除,只剩下第一行和最后一行,但是最后一行也会被排除掉,因为它已经换行了,不是同一个行的,不在这一轮进行比较,返回MatchCode.DONE。
5、检查时间戳,即设置给Scan的时间戳,这个估计一般很少设置,时间戳国企,就返回下一个MatchCode.SEEK_NEXT_ROW。
6、检查列是否是Scan里面设置的需要查询的列。
7、检查列的版本,Scan设置的MaxVersion,超过了这个version就要赶紧闪人了哈,返回MatchCode.SEEK_NEXT_COL。
对于match的结果,有几个常见的:
1、MatchCode.INCLUDE_AND_SEEK_NEXT_COL 包括当前这个,跳到下一列,会引发StoreScanner的reseek方法。
2、MatchCode.SKIP 忽略掉,继续调用next方法。
3、MatchCode.SEEK_NEXT_ROW 不包括当前这个,继续调用next方法。
4、MatchCode.SEEK_NEXT_COL 不包括它,跳过下一列,会引发StoreScanner的reseek方法。
5、MatchCode.DONE rowkey变了,要留到下次进行比较了
Delete讲到这里基本算结束了。
呵呵,有兴趣测试的童鞋可以打开下hbase源码,找到TestStoreScanner这个类自己调试看下结果。
hbase源码系列(十二)Get、Scan在服务端是如何处理?,布布扣,bubuko.com
hbase源码系列(十二)Get、Scan在服务端是如何处理?
标签:des style blog class c code
原文地址:http://www.cnblogs.com/cenyuhai/p/3734512.html