标签:style blog http ar io color 使用 sp strong
前言
在上篇文章我的权限设计实现中提及到了Spring.NET这个IOC框架,不少园友通过QQ群向我咨询了IOC的概念,感觉有必要写一遍博文来简单介绍下IOC的演变过程,以及在实际项目中我们如何使用第三方成熟的IOC容器,希望能够起到抛砖引玉之用,也方便各位园友能更直观的来学习与理解IOC。
简单三层
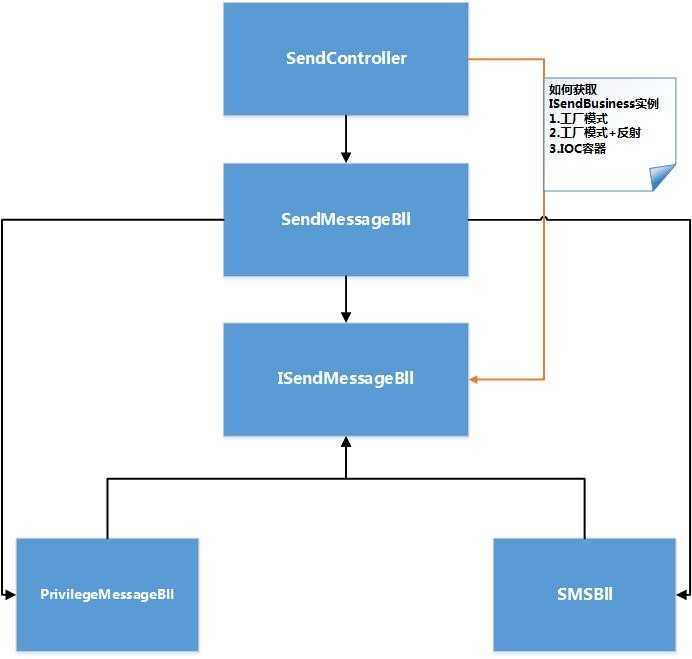
做过OA系统的朋友都会面临这样一个问题:OA流程提醒。假设系统设计初期,采用的提醒方式是站内私信。通常情况下我们会定义这么一种结构来完成这个功能。
程序依赖关系图
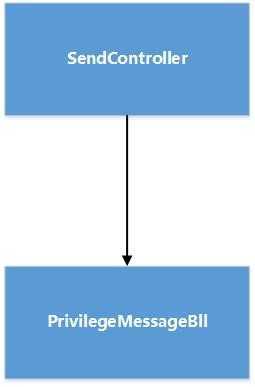
站内私信核心代码如下:
 1 /// <summary>
 2 /// 站内私信
 3 /// </summary>
 4 public class PrivilegeMessageBll
 5 {
 6         /// <summary>
 7         /// 发送私信
 8         /// </summary>
 9         /// <param name="message"></param>
10         public void SendMessage(string message)
11         {
12             //一些业务处理
13         }
14 }
程序调用核心代码如下:
1 PrivilegeMessageBll privilegeMessageBll = new PrivilegeMessageBll ();
2 string message = "你有新到达的流程";
3 privilegeMessageBll.SendMessage(message);
当你程序完成之时,沾沾自喜的时候,领导过来了。小李,人力资源部那边刚打电话过来要能支持短信提醒。带着纠结的情绪,小李在思考如何修改程序代码让变化影响最小,最后小李决定按照以下方案进行修改。
接口分离
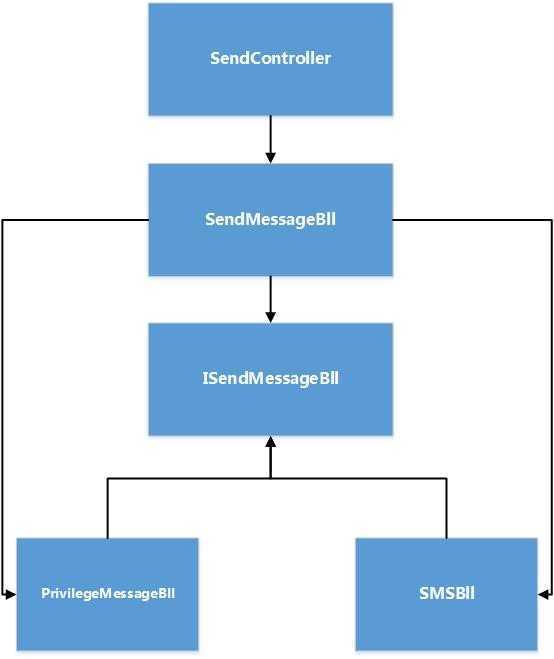
于是经过数个小时的奋斗,程序代码改成下面
消息发送接口层核心代码:
 1 /// <summary>
 2 /// 消息发送接口
 3 /// </summary>
 4 public interface ISendMessageBll
 5 {
 6         /// <summary>
 7         /// 发送消息接口
 8         /// </summary>
 9         /// <param name="message"></param>
10         void SendMessage(string message);
11 }
站内私信核心代码:
 1 /// <summary>
 2 /// 站内私信
 3 /// </summary>
 4 public class PrivilegeMessageBll : ISendMessageBll
 5 {
 6         /// <summary>
 7         /// 发送私信
 8         /// </summary>
 9         /// <param name="message"></param>
10         public void SendMessage(string message)
11         {
12             //一些业务处理
13         }
14 }
短信发送核心代码:
 1 /// <summary>
 2 ///短信发送
 3 /// </summary>
 4 public class SMSBll: ISendMessageBll
 5 {
 6         /// <summary>
 7         ///发送短信
 8         /// </summary>
 9         /// <param name="message"></param>
10         public void SendMessage(string message)
11         {
12             //一些业务处理
13         }
14 }
消息发送核心代码如下:
/// <summary>
/// 消息发送
/// </summary>
public class SendMessageBll
{
        ISendMessageBll ismBll;
       //接口作为参数屏蔽了子类区别,这是面向对象中的里氏替换原则
       //这里不管你传入的是站内私信、还是短信发送
        public SendMessageBll(ISendMessageBll paraBll)
        {
            ismBll = paraBll;
        }

        /// <summary>
        /// 发送消息
        /// </summary>
        /// <param name="message"></param>
        public void SendMessage(string message)
        {
            ismBll.SendMessage(message);
        }
 }
主程序调用:
1  ISendMessageBll ismBll = new PrivilegeMessageBll();
2   SendMessageBll smBLL = new SendMessageBll(ismBll);
3   string message = "你有新到达的流程";
4 smBLL.SendMessage(message);
在这里小李使用了接口做为参数,作用是用接口指向子类,屏蔽了子类的区别。可以理解为面向对象多态,这个应该不难理解吧。
在这里还涉及到了另外一个面向对象原则:依赖倒置。
什么是依赖倒置呢?依赖倒置可以简单理解为高层模块定义接口,低层模块负责实现。
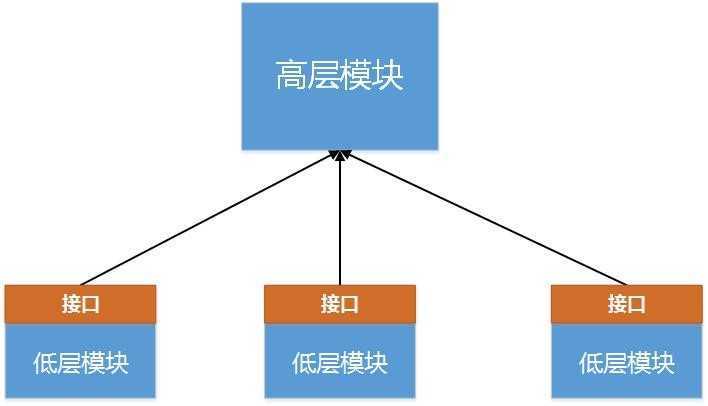
反过来就是依赖非倒置,可以简单理解为:低层模块定义接口,高层模块负责实现。
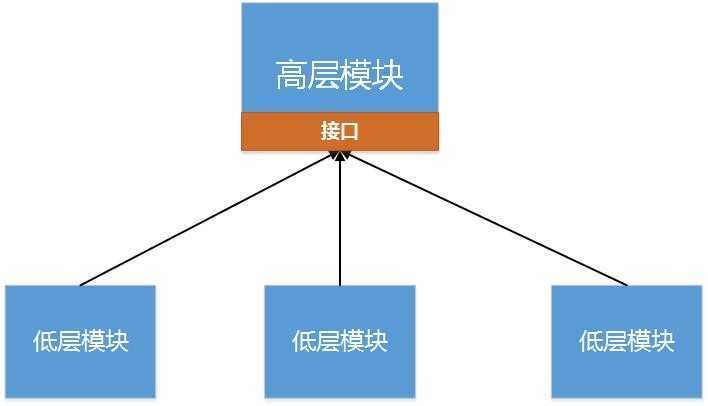
我们这里使用的是依赖倒置原则,高层模块定义接口(ISendMessageBll),低层模块负责实现(PrivilegeMessageBll、SMSBll)。
通过定义接口约束子类实现,尽可能的减少了日后新增提醒方式对程序代码的影响。程序总算完成, OA流程提醒稳定了运行了很长一段时间。
过了很长一段时间,人力资源又打电话过来了,小李,流程提醒还需要加上RTX消息提醒,这样可以方便员工更快更直观的接收到消息。这是小李发现了一个问题:每加入新的提醒方式,我们又要实例化一个新的对象,这是如此的痛苦,小李越看越不顺眼,因为考虑到以后可能还会再添加新的提醒方式,这种未来的不确定性,会不断的产生实例。
 1 //站内私信提醒方式
 2 ISendMessageBll privilegeMessageBll = new PrivilegeMessageBll();
 3 SendMessageBll smBLL = new SendMessageBll(privilegeMessageBll);
 4  string message = "你有新到达的流程";
 5 //短信提醒方式
 6 ISendMessageBll smsBll = new SMSBll();
 7 SendMessageBll smBLL = new SendMessageBll(smsBll);
 8 string message = "你有新到达的流程";
 9 //RTX提醒方式
10 ISendMessageBll rtxBll = new RTXBll();
11 SendMessageBll smBLL = new SendMessageBll(rtxBll);
12 string message = "你有新到达的流程";
此时,小李得出一个结论:如何控制实例化ISendMessageBll的次数?最好能够只实例化一次。
经过深入分析,关键问题在于如何获取ISendMessageBll实例。小李经过不断的查询资料,得知有三种方式可以得到ISendMessageBll实例
简单工厂
工厂模式的作用在于很优雅的解决了应用程序使用对象时的无限new()的操作,同时降低了系统应用之间的耦合性,提高了系统的可维护性和适应性。就是将不同提醒方式产生的变化,封装在一个独立的工厂类中,将其命名为SendMessageFactory类中,这样就算以后再有变化,只要更改此类中部分代码即可,而不影响程序中其他所有用到ISendMessageBll的地方。博客园关于简单工厂的介绍太多了,这里推荐一篇文章:http://www.cnblogs.com/hegezhou_hot/archive/2010/11/30/1892227.html
抽象工厂
抽象工厂的作用在于在工厂模式中依靠配置文件的节点信息,然后采用反射来动态创建相应的实例。好处在于当需求发生变化时我们只需要修改配置文件节点,无需修改代码和重新编译程序。例如所有流程提醒最后都采用站内私信方式提醒,那么我们只需要修改对应的XML值。博客园关于抽象工厂的介绍也非常多,我就不重复写了,这里也推荐一篇文章:http://www.cnblogs.com/hegezhou_hot/archive/2010/12/01/1893388.html
IOC容器
这里我们来重点说下IOC容器,以及使用Spring.NET实现依赖注入。
首先我们要明白下面概念:
控制反转(IOC):就是将依赖对象的创建和绑定转移到被依赖对象类的外部来实现。
依赖注入(DI):它提供一种机制,将需要依赖(低层模块)对象的引用传递给被依赖(高层模块)对象。常用方式有: 构造函数注入和属性注入
其实在上面的例子中,我们已经不知不觉的过程中接触了依赖注入(DI)和控制反转(IOC)这个两个概念,请看下面的例子。
 1 /// <summary>
 2 /// 消息发送  构造函数注入方式
 3 /// </summary>
 4 public class SendMessageBll
 5     {
 6         ISendMessageBll ismBll;
 7        //通过DI,我们可以在SendMessageBll类的外部将PrivilegeMessageBll、SMSMessageBll中任意一个对象的引用传递给SendMessageBll类对象
 8        //这里采用的是构造函数注入
 9         public SendMessageBll(ISendMessageBll paraBll)
10         {
11             ismBll = paraBll;
12         }
13    }
14
15
16 /// <summary>
17 /// 消息发送  属性注入方式
18 /// </summary>
19 public class SendMessageBll
20 {
21     //定义一个私有变量保存抽象
22     private ISendMessageBll _ismBll;
23        //通过DI,我们可以在SendMessageBll类的外部将PrivilegeMessageBll、SMSMessageBll中任意一个对象的引用传递给SendMessageBll类对象
24        //这里采用的是属性注入
25     public ISendMessageBll ismBll
26         {
27            set { _ismBll = value; }
28            get { return _ismBll; }
29         }
30
31         public SendMessageBll(ISendMessageBll paraBll)
32         {
33             ismBll = paraBll;
34         }
35    }
主程序调用方式:
 1 //构造函数注入方式调用
 2 ISendMessageBll ismBll = new PrivilegeMessageBll();
 3 SendMessageBll smBLL = new SendMessageBll(ismBll);
 4 string message = "你有新到达的流程";
 5 smBLL.SendMessage(message);
 6
 7 //属性注入方式调用
 8 PrivilegeMessageBll privilegeMessageBll=new PrivilegeMessageBll();
 9 SendMessageBll smBLL = new SendMessageBll();
10 smBLL.ismBll= privilegeMessageBll;
11  string message = "你有新到达的流程";
12 smBLL.SendMessage(message);
其实上面就是依赖注入(DI)的概念,大家应该有个初步认识了。
最后在简单介绍下Spring.NET是如何在上篇我的权限设计实现文章中注入不同数据库
详细解决方案
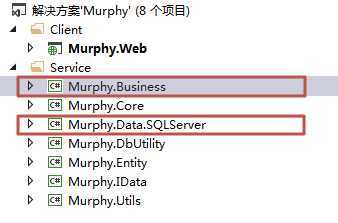
1.在WebConfig中配置Spring.NET节点,具体可查看官方帮助手册
 1 <!--配置spring-->
 2 <sectionGroup name="spring">
 3    <section name="context" type="Spring.Context.Support.ContextHandler, Spring.Core"/>
 4    <section name="objects" type="Spring.Context.Support.DefaultSectionHandler, Spring.Core"/>
 5 </sectionGroup>
 6
 7 <!--配置spring路径-->
 8 <spring>
 9     <context>
10       <resource uri="~/Config/Objects.xml"/>
11     </context>
12 </spring>
2.新建Objects.xml文件,配置节点
1 <?xml version="1.0" encoding="utf-8" ?>
2 <objects xmlns="http://www.springframework.net">
3   <object id="BaseAccessDal" type="Murphy.Data.SQLServer.BaseAccessDal, Murphy.Data.SQLServer" />
4 </objects>
其中type=“x,y”的x表示程序集名称,y表示程序集所在的命名空间
3.定义BaseBll基类
 1 /// <summary>
 2 /// 业务逻辑层基类
 3 /// </summary>
 4 /// <typeparam name="T"></typeparam>
 5  public abstract class BaseBll<T> where T : class
 6 {
 7         /// <summary>
 8         /// 数据接口层对象 等待被实例化
 9         /// </summary>
10         protected IBaseDal<T> idal = null;
11 }
4.BaseAccessBll继承BaseBLL
 1 /// <summary>
 2 /// 登陆日志
 3 /// </summary>
 4 public class BaseAccessBll : BaseBll<BaseAccess>
 5 {
 6         protected IBaseAccessDal baseAccessDal = null;
 7        //构造函数注入
 8         public BaseAccessBll()
 9         {
10             IApplicationContext springContext = ContextRegistry.GetContext();
11             baseAccessDal = springContext.GetObject("BaseAccessDal") as IBaseAccessDal;
12             base.idal = baseAccessDal;
13     }
14 }
通过以上四步就很简单的通过Spring.NET的依赖注入(DI)来实现注入不同数据库的需求,其实Spring.NET是帮我们做了反射那些事情。
如果大家感兴趣,就在右下角帮我【推荐】一下吧,在这里谢谢大家了。我接下来就按照模块列表一篇一篇的来写。最后我创建了一个技术交流群:263169088,欢迎大家来交流。
标签:style blog http ar io color 使用 sp strong
原文地址:http://www.cnblogs.com/yuahlee/p/4168740.html