标签:

yum -y groupinstall "Development Tools" "Development Libraries"
yum -y install pcre-devel
yum install openssl-devel #要开启SSL模块就必须要装这个包
Nginx编译:
ntpdate 172.16.0.1                  #编译前先校准时间
tar xf nginx-1.6.2.tar.gz            #解压
cd nginx-1.6.2
groupadd -r -g 108 nginx           #新建nginx组和用户
useradd -r -g 108-u 108 nginx
常用编译配置介绍参考:开始编译安装配置 ./configure --prefix=/usr/local/nginx --conf-path=/etc/nginx/nginx.conf --user=nginx --group=nginx --error-log-path=/var/log/nginx/error.log --http-log-path=/var/log/nginx/access.log --pid-path=/var/run/nginx/nginx.pid --lock-path=/var/lock/nginx.lock --with-http_ssl_module --with-http_flv_module --with-http_stub_status_module --with-http_gzip_static_module --http-client-body-temp-path=/var/tmp/nginx/client/ --http-proxy-temp-path=/var/tmp/nginx/proxy/ --http-fastcgi-temp-path=/var/tmp/nginx/fcgi/ --with-file-aio make && make install
编译完成后,先检查配置文件是否有问题 /usr/local/nginx/sbin/nginx -t # 检查是否有问题 mkdir -pv /var/tmp/nginx/{client,proxy,fastcgi} # 新建目录 /usr/local/nginx/sbin/nginx -t # 再次测试 nginx: the configuration file /etc/nginx/nginx.conf syntax is ok
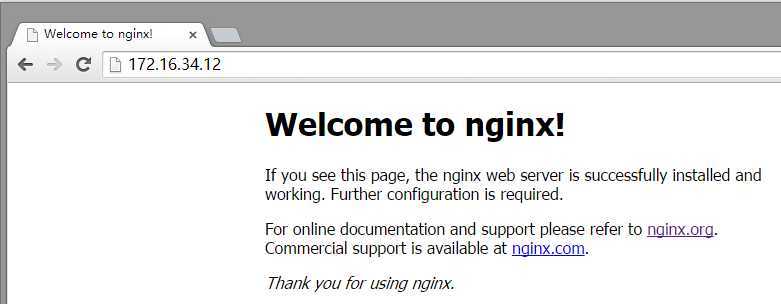
nginx: configuration file /etc/nginx/nginx.conf test is successful # 出现这两行就是提示就没问题 /usr/local/nginx/sbin/nginx # 启动nginx [root@null nginx-1.6.2]# ss -tnl | grep 80 # 查看是否启用nginx LISTEN 0128*:80*:* /usr/local/nginx/html/ # 网页默认路径在安装目录下的html目录下
新建文件/etc/rc.d/init.d/nginx,内容如下:
#!/bin/sh
#
# nginx - this script starts and stops the nginx daemon
#
# chkconfig: - 85 15
# description: Nginx is an HTTP(S) server, HTTP(S) reverse # proxy and IMAP/POP3 proxy server
# processname: nginx
# config: /etc/nginx/nginx.conf
# config: /etc/sysconfig/nginx
# pidfile: /var/run/nginx.pid
# Source function library.
./etc/rc.d/init.d/functions
# Source networking configuration.
./etc/sysconfig/network
# Check that networking is up.
["$NETWORKING"="no"]&& exit 0
nginx="/usr/local/nginx/sbini/nginx"
prog=$(basename $nginx)
NGINX_CONF_FILE="/etc/nginx/nginx.conf"
[-f /etc/sysconfig/nginx ]&&./etc/sysconfig/nginx
lockfile=/var/lock/subsys/nginx
make_dirs(){
# make required directories
user=`nginx -V 2>&1 | grep "configure arguments:" | sed ‘s/[^*]*--user=\([^ ]*\).*/\1/g‘ -`
options=`$nginx -V 2>&1 | grep ‘configure arguments:‘`
for opt in $options;do
if[`echo $opt | grep ‘.*-temp-path‘`];then
value=`echo $opt | cut -d "=" -f 2`
if[!-d "$value"];then
# echo "creating" $value
mkdir -p $value && chown -R $user $value
fi
fi
done
}
start(){
[-x $nginx ]|| exit 5
[-f $NGINX_CONF_FILE ]|| exit 6
make_dirs
echo -n $"Starting $prog: "
daemon $nginx -c $NGINX_CONF_FILE
retval=$?
echo
[ $retval -eq 0]&& touch $lockfile
return $retval
}
stop(){
echo -n $"Stopping $prog: "
killproc $prog -QUIT
retval=$?
echo
[ $retval -eq 0]&& rm -f $lockfile
return $retval
}
restart(){
configtest ||return $?
stop
sleep 1
start
}
reload(){
configtest ||return $?
echo -n $"Reloading $prog: "
killproc $nginx -HUP
RETVAL=$?
echo
}
force_reload(){
restart
}
configtest(){
$nginx -t -c $NGINX_CONF_FILE
}
rh_status(){
status $prog
}
rh_status_q(){
rh_status >/dev/null 2>&1
}
case"$1"in
start)
rh_status_q && exit 0
$1
;;
stop)
rh_status_q || exit 0
$1
;;
restart|configtest)
$1
;;
reload)
rh_status_q || exit 7
$1
;;
force-reload)
force_reload
;;
status)
rh_status
;;
condrestart|try-restart)
rh_status_q || exit 0
;;
*)
echo $"Usage: $0 {start|stop|status|restart|condrestart|try-restart|reload|force-reload|configtest}"
exit 2
esac
chmod +x /etc/rc.d/init.d/nginx                            # 为nginx添加执行权限
chkconfig --add nginx                                      # 添加到系统服务
service nginx start                                        # 可以启动nginx服务了

输入命令启动nginx,当然直接启动Nginx服务,如不需要这一步可以省略
vim /etc/profile.d/nginx.sh                                # 在/etc/profile.d/添加环境变量nginx.sh文件
export PATH=/usr/local/nginx/sbin:$PATH                    # 输入以下内容
./etc/profile.d/nginx.sh                                   # 重读nginx.sh文件
附带:常见脚本控制命令
start|stop|status|restart|condrestart|try-restart|reload|force-reload|configtest
start:开启
stop:关闭
status:查看是否开启
restart:重启服务
reload:重读配置文件
Nginx启动与停止
Nginx启动:经过以上配置,可以直接输入nginx、/usr/local/nginx/sbin/nginx、service nginx stast三种方法

Nginx停止:
格式:kill -信号类型‘/var/run/nginx/nginx.pid‘
  1)从容停止Nginx。
        kill - QUIT nginx主进程号
        或 kill - QUIT‘/var/run/nginx/nginx.pid‘
   2)快速停止Nginx
        kill - TERM nginx主进程号
        kill - TERM‘/var/run/nginx/nginx.pid‘
        或
        kill - INT nginx主进程号
        kill - INT ‘/var/run/nginx/nginx.pid‘
   3)强行停止所有Nginx进程
        pkill -9 nginx
        或killall nginx

安装方法:
下载
将nginx.vim 放置于~/.vim/syntax/目录
配置nginx.vim
而后在~/.vim/filetype.vim中添加如下行:
au BufRead,BufNewFile/etc/nginx/*,/usr/local/nginx/conf/*if&ft ==‘‘| setfiletype nginx | endif
其中“/etc/nginx”为nginx配置文件的目录。
[root@null ~]# mkdir -pv .vim/syntax 新建文件夹
mkdir: created directory `.vim‘
mkdir: created directory `.vim/syntax‘
[root@null ~]# cd .vim/syntax/
[root@null syntax]# mv ~/nginx.vim .
[root@null syntax]# vim nginx.vim 新建文件
au BufRead,BufNewFile /etc/nginx/*,/usr/local/nginx/conf/* if &ft == ‘‘ | setfiletype nginx | endif 插入以下文件
[root@null syntax]# vim /etc/nginx/nginx.conf 现在打开文件就有颜色了
vim /etc/nginx/nginx.conf                                     # 打开配置文件
#user nobody;                                                 # 使用的用户和组,编译时已经指定,所以注释掉了
worker_processes 1;                                           # 指定工作衍生的进程数(一般等于CPU的总核数或总核数的两倍,例如两个四核CPU,则总和数为8)
#error_log logs/error.log;                                    # 指定错误日志存放的路径,错误日志级别可选项为:[ debug | info | notice | warn | error | crit]
#error_log logs/error.log notice;
#error_log logs/error.log info;
#pid logs/nginx.pid;                                          # 指定pid存放的路径
events {
worker_connections 1024;                                      # 允许的连接数
}
http {                                                        # 设定http服务器
include mime.types;                                           # 文件扩展名与文件类型映射表
default_type application/octet-stream;                        # 默认文件类型
#log_format main ‘$remote_addr - $remote_user [$time_local] "$request" ‘
# ‘$status $body_bytes_sent "$http_referer" ‘
# ‘"$http_user_agent" "$http_x_forwarded_for"‘;
#access_log logs/access.log main;
sendfile on;                                                  # 开启高效文件传输模式,sendifile指定指定nginx是否调用sendfile函数来输出文件,对于普通段设为On,如果用来进行下载等应用IO重负载应用,可设置为off,以平衡磁盘与网络I/O处理速度,降低系统的负载。注意:如果图片显示不正常把这个改成off。
#tcp_nopush on;                                               # 防止网络阻塞

#keepalive_timeout 0;
keepalive_timeout 65;                                         # 长连接超时事件,单位为秒
#gzip on;                                                     # 开启gzip压缩输出
server {                                                      # 虚拟主机配置
listen 80;                                                    # 监听端口
server_name localhost;                                        # 域名可以有多个,用空格隔开
#charset koi8-r;
#access_log logs/host.access.log main;                        # 设置单个虚拟主机访问日志

location /{
root html;
index index.html index.htm;                                   # 指定虚拟主机首页文件
}
#error_page 404 /404.html;                                    # 指定错误404的网页文件
# redirect server error pages to the static page /50x.html    # 重定向服务器错误页面为静态页面
#
error_page 500502503504/50x.html;
location =/50x.html {
root html;
}
# proxy the PHP scripts to Apache listening on 127.0.0.1:80
#
#location ~ \.php$ {
# proxy_pass http://127.0.0.1;
#}
# pass the PHP scripts to FastCGI server listening on 127.0.0.1:9000
#
#location ~ \.php$ {
# root html;
# fastcgi_pass 127.0.0.1:9000;
# fastcgi_index index.php;
# fastcgi_param SCRIPT_FILENAME /scripts$fastcgi_script_name;
# include fastcgi_params;
#}
# deny access to .htaccess files, if Apache‘s document root
# concurs with nginx‘s one
#
#location ~ /\.ht {
# deny all;
#}
}
# listen 8000;
# listen somename:8080;
# server_name somename alias another.alias;
# location / {
# root html;
# index index.html index.htm;
# }
#}
# HTTPS server                                                    # https 服务
#
#server {
# listen 443 ssl;                                                 # 端口
# server_name localhost;                                          # 主机名
# ssl_certificate cert.pem;                                       # 证书文件路径
# ssl_certificate_key cert.key;                                   # 密钥文件路径
# ssl_session_cache shared:SSL:1m;
# ssl_session_timeout 5m;
# ssl_ciphers HIGH:!aNULL:!MD5;
# ssl_prefer_server_ciphers on;
# location / {
# root html;
# index index.html index.htm;
# }
#}
}
http {
    upstream {
        ....
    }

    server {
        listen IP:PORT;
        # 虚拟主机
        location /URL {
            if...{
                ...
            }
            root "/path/to/somewhere";
            ...
         }
    }

    server {
         ...
    }
}
配置文件:
    main配置段              主配置段
    http {
    }                      http相关配置段

    配置指令要以分号结尾,语法格式:
        directive value1 [value2...];

    支持使用变量:
        模块内置变量
        自定义变量
            set var_name value

    主配置段的指令的类别:
        用于调试、定位问题
        正常运行必备的配置
        优化性能的配置
        事件相关的配置

    正常运行的必备配置:
        1、user USERNAME [GROUPNAME];
            指定运行worker进程的用户 和组,例如:
            user nginx nginx;s

        2、pid /path/to/pid_file;
            指定nginx的pid文件;

        3、worker_rlimit_nofile #;
            指定一个worker进程所能够打开的最大文件句柄数;

        4、worker_rlimit_sigpending #;
            指定每个用户能够发往worker的信号的数量;

    优化性能相关的配置:
        1、worker_processes #:
            worker线程的个数;通常应该为物理CPU核心个数减1;

        2、worker_cpu_affinity cpumask ...;
            绑定worker进程至指定的CPU上;
                CPUMASK
                    0001
                    0010
                    0100
                    1000
                例如:
                    worker_cpu_affinity 00000001 00000010 00000100;

        3、timer_resolution t;
            gettimeofday();

        4、worker_priority nice;
            -20, 19

    事件相关的配置:
        1、accept_mutex [on|off]
            内部调用用户 请求至各worker时用的负载均衡锁;打开时表示能让多个worker轮流地、序列化地与响应新请求;

        2、lock_file /path/to/lock_file;

        3、accept_mutex_delay #ms;

        4、use [epoll|rgsig|select|poll];
            定义使用的事件模型;建议让Nginx自动选择;

        5、worker_connections #;
            每个worker进程所能够响应的最大并发请求数;

    用于调试、定位问题:
        1、daemon [off|on]
            是否以守护进程方式启动nginx;

        2、master_process on|off;
            是否以master/worker模型来运行nginx;

        3、error_log /path/to/error_log level;
            错误日志文件及其级别;出于调试的目的,可以使用debug级别,但此级别只有在编译nginx时使用了--with-debug选项才有效;
未完待续。。。。
标签:
原文地址:http://www.cnblogs.com/qq354381577/p/35321fd2f1ec568406d17cc9ceb3cd6b.html