标签:
生活中我们经常会遇到这样的问题,对话如下。路人:“同学,请问湘大图书馆怎么走啊?” 学生:“前面路口左转,然后直走,第三个路口左转,之后再右转就到了。”这里就涉及到创建二叉树来解决此类问题的方法了。
指路法定位结点
从根节点开始:
结点1的位置: { NULL }
结点2的位置: { 左 }
结点3的位置: { 右 }
结点4的位置: { 左,左 }
结点5的位置: { 左,右 }
结点6的位置: { 右,左 }
结点7的位置: { 右,右 }
结点8的位置: { 左,左,左 }
结点9的位置: { 左,左,右 }
结点10的位置: { 左,右,左 }
指路法通过根节点与目标结点的相对位置进行定位,可以通过避开二叉树递归的性质“线性”定位,,在C语言中,我们可以利用bit位进行指路,如下:
1 #define BT_LEFT 0
2 #define BT_RIGHT 1
3 typedef unsigned long long BTPos;
二叉树的存储结构是怎么样的呢?用结构体来定义二叉树的指针域,二叉树的头结点也可以用结构体来实现。
结点指针域定义如下:
1 typedef struct _tag_BTreeNode BTreeNode;
2 struct _tag_BTreeNode
3 {
4     BTreeNode* left;
5     BTreeNode* right;
6 };
头结点定义如下:
1 typedef struct _tag_BTree TBTree;
2 struct _tag_BTree
3 {
4     int count;
5     BTreeNode* root;
6 };
数据元素定义示例如下:
1 struct Node
2 {
3     BTreeNode header;
4     char v;
5 };
二叉树的操作
定位如下:
 1 while( ( count > 0 ) && ( current != NULL ) )
 2 {
 3     bit = pos & 1;
 4     pos = pos >>1;
 5
 6     count--;
 7
 8     parent = current;
 9
10     if( bit == BT_LEFT )
11     {
12         current = current -> left;
13     }
14     elsf if( bit == BT_RIGHT )
15     {
16         current = current -> right;
17     }
18 }
二叉树的实现,代码如下:

 1 #include <stdio.h>
 2 #include <stdlib.h>
 3 #include "BTree.h"
 4
 5 struct Node
 6 {
 7     BTreeNode header;
 8     char v;
 9 };
10
11 void printf_data(BTreeNode* node)
12 {
13     if( node != NULL )
14     {
15         printf("%c", ((struct Node*)node)->v);
16     }
17 }
18
19 int main(int argc, char *argv[])
20 {
21     BTree* tree = BTree_Create();
22
23     struct Node n1 = {{NULL, NULL}, ‘A‘};
24     struct Node n2 = {{NULL, NULL}, ‘B‘};
25     struct Node n3 = {{NULL, NULL}, ‘C‘};
26     struct Node n4 = {{NULL, NULL}, ‘D‘};
27     struct Node n5 = {{NULL, NULL}, ‘E‘};
28     struct Node n6 = {{NULL, NULL}, ‘F‘};
29
30     BTree_Insert(tree, (BTreeNode*)&n1, 0, 0, 0);
31     BTree_Insert(tree, (BTreeNode*)&n2, 0x00, 1, 0);
32     BTree_Insert(tree, (BTreeNode*)&n3, 0x01, 1, 0);
33     BTree_Insert(tree, (BTreeNode*)&n4, 0x00, 2, 0);
34     BTree_Insert(tree, (BTreeNode*)&n5, 0x02, 2, 0);
35     BTree_Insert(tree, (BTreeNode*)&n6, 0x02, 3, 0);
36
37     printf("Height: %d\n", BTree_Height(tree));
38     printf("Degree: %d\n", BTree_Degree(tree));
39     printf("Count: %d\n", BTree_Count(tree));
40     printf("Position At (0x02, 2): %c\n", ((struct Node*)BTree_Get(tree, 0x02, 2))->v);
41     printf("Full Tree: \n");
42
43     BTree_Display(tree, printf_data, 4, ‘-‘);
44
45     BTree_Delete(tree, 0x00, 1);
46
47     printf("After Delete B: \n");
48     printf("Height: %d\n", BTree_Height(tree));
49     printf("Degree: %d\n", BTree_Degree(tree));
50     printf("Count: %d\n", BTree_Count(tree));
51     printf("Full Tree: \n");
52
53     BTree_Display(tree, printf_data, 4, ‘-‘);
54
55     BTree_Clear(tree);
56
57     printf("After Clear: \n");
58     printf("Height: %d\n", BTree_Height(tree));
59     printf("Degree: %d\n", BTree_Degree(tree));
60     printf("Count: %d\n", BTree_Count(tree));
61
62     BTree_Display(tree, printf_data, 4, ‘-‘);
63
64     BTree_Destroy(tree);
65
66     return 0;
67 }
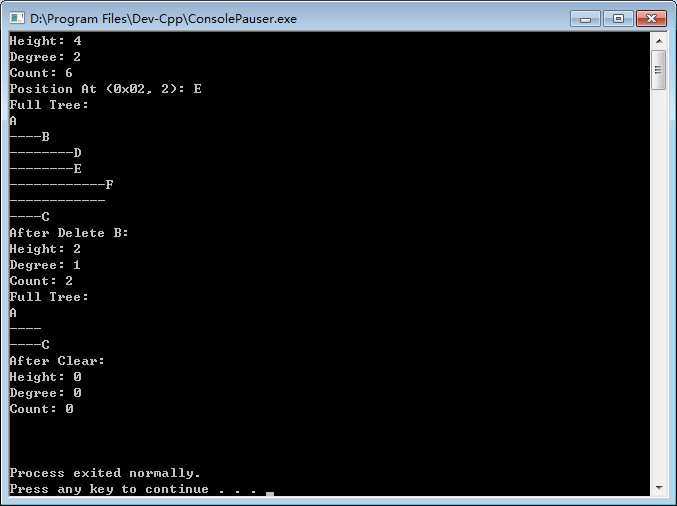
用Dev—C++实现代码的结构如下图,这里仅供大家参考体会。

小结:
二叉树在结构上不依赖组织链表;通过指路法可以方便的定位二叉树中的结点;基于指路法的二叉树在插入,删除以及获取操作的实现细节上与单链表相似(单链表就是特殊的二叉树,实现上相似,知识更简单一点啦)
标签:
原文地址:http://www.cnblogs.com/lihuidashen/p/4233111.html