标签:
因为前面写裸板程序的时候,已经详细的叙述过LED灯的控制,按键的控制,以及watchdog的配置,这里就不赘述了,主要是说明模块如何控制底层硬件的。
第一个程序是模块程序控制LED灯全亮。
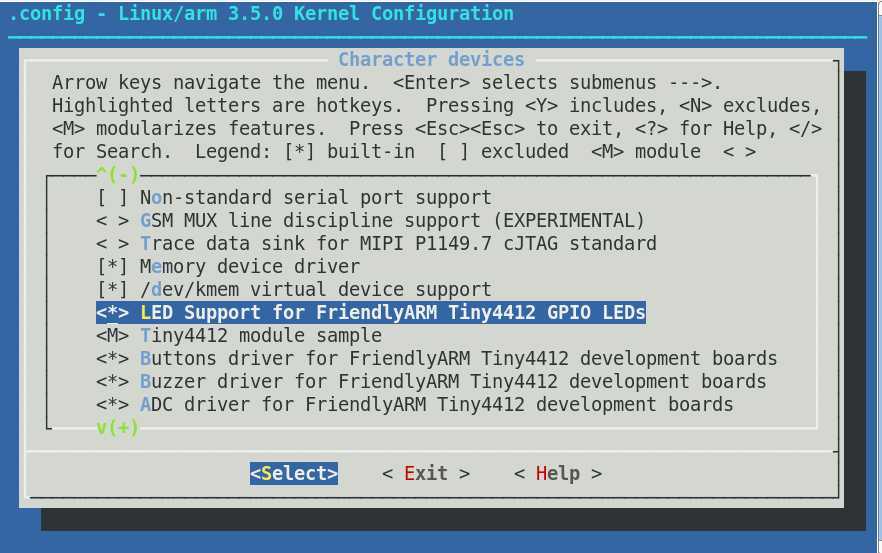
因为友善之臂将LED灯的驱动默认加载到内核中,编写模块驱动程序前就要先把原先的LED灯驱动裁剪掉。
首先进入linux源码目录。执行 make menuconfig
进入Device Drivers --->
Character devices --->

 1 #include <linux/init.h>
 2 #include <linux/module.h>
 3 #include <asm/io.h>
 4
 5 MODULE_LICENSE("GPL");
 6 MODULE_AUTHOR("BUNFLY");
 7
 8 unsigned long gpio_virt;
 9 unsigned long *gpm4con, *gpm4dat;
10
11 int test_init()
12 {
13     gpio_virt = ioremap(0x110002e0 & ~0xfff, SZ_4K);//映射4k空间
14     gpm4con = gpio_virt + (0x110002e0 & 0xfff);
15     gpm4dat = gpio_virt + (0x110002e4 & 0xfff);
16
17     *gpm4con = 0x1111;
18     *gpm4dat = 0;
19
20     return 0;
21 }
22
23 void test_exit()
24 {
25     iounmap(gpio_virt);
26     printk("bye bye\n");
27 }
28
29 module_init(test_init);
30 module_exit(test_exit);
实现了LED灯的控制后,现在要做的是通过watchdog中断实现LED的闪烁。
编写驱动程序之前,要先查看linux内核中是否有watchdog的驱动,在之前的学习中,我们得知lwatchdog的中断号是75,那么我们就使用
cat proc/interrupts | grep 75 命令查看。

由上图可以知道内核已经有watchdog驱动,现在我们要做的事情就是裁剪内核。按照下面目录找到S3C2410 Watchdog,将前面的*去掉。
Device Drivers --->
Watchdog Timer Support --->
<>S3C2410 Watchdog
用重新生成的内核来启动开发板,这时候内核中就不包含watchdog驱动了。

现在就通过watchdog每隔一段时间来打印一句话。
 1 #include <linux/init.h>
 2 #include <linux/module.h>
 3 #include <asm/io.h>
 4 #include <linux/irq.h>
 5 #include <linux/interrupt.h>
 6 #include <linux/gpio.h>
 7 #include <linux/clk.h>
 8
 9 MODULE_LICENSE("GPL");
10 MODULE_AUTHOR("BUNFLY");
11
12 unsigned long wdt_virt;
13 unsigned long *wtcon, *wtcnt, *wtdat, *wtclrint;
14 struct clk *wtclk;
15
16 irqreturn_t do_irq(int irq, void *data);
17
18 int test_init()
19 {
20     wdt_virt = ioremap(0x10060000, SZ_4K);
21     wtcon = wdt_virt + 0x00;
22     wtdat = wdt_virt + 0x04;
23     wtcnt = wdt_virt + 0x08;
24     wtclrint = wdt_virt + 0x0c;
25
26     int ret = request_irq(IRQ_WDT, do_irq,
27         0, "wangcai", "hahah");
28     if(ret < 0){
29         printk("request irq\n");
30         return 1;
31     }
32
33     wtclk = clk_get(NULL, "watchdog");
34     clk_enable(wtclk);
35
36     *wtcon = 0 | (1 << 2) | (2 << 3) | (1 << 5) | (50 << 8);
37     *wtcnt = 0x8000;
38     *wtdat = 0x8000;
39     printk("wdt set ok\n");
40
41     return 0;
42 }
43
44 void test_exit()
45 {
46     clk_disable(wtclk);
47     clk_put(wtclk);
48
49     free_irq(IRQ_WDT, "hahah");
50     iounmap(wdt_virt);
51     printk("bye bye\n");
52 }
编译成模块插入后显示:

这时候在/proc/interrupts 文件中就有下面一行:

首先是将配置看门口的寄存器的物理地址映射到CPU能访问到的存储器地址中。在使用request_irq函数注册中断。request_irq是一个回调函数,当中断发生的时候,就会去do_irq函数中执行,request_irq的最后一个参数是do_irq函数的data参数。
第三十三行和三十四行是配置时序。
最后一个程序是按键驱动程序。
 1 #include <linux/init.h>
 2 #include <linux/module.h>
 3 #include <asm/io.h>
 4 #include <linux/irq.h>
 5 #include <linux/interrupt.h>
 6 #include <linux/gpio.h>
 7
 8 MODULE_LICENSE("GPL");
 9 MODULE_AUTHOR("BUNFLY");
10
11 irqreturn_t do_irq(int irq, void *data);
12
13 int test_init()
14 {
15     int irq = gpio_to_irq(EXYNOS4_GPX3(2));
16     int ret = request_irq(irq, do_irq,
17         IRQ_TYPE_EDGE_FALLING, "key1", "hahah");
18     if(ret < 0){
19         printk("request irq\n");
20         return 1;
21     }
22
23     return 0;
24 }
25
26 void test_exit()
27 {
28     free_irq(gpio_to_irq(EXYNOS4_GPX3(2)), "hahah");
29     printk("bye bye\n");
30 }
31
32 module_init(test_init);
33 module_exit(test_exit);
34
35 irqreturn_t do_irq(int irq, void *data)
36 {
37     printk("key 1 down\n");
38     return IRQ_HANDLED;
39 }
这时候我们没有自己定义寄存器的地址,而是直接调用linux内核提供的EXYNOS4_GPX3宏来表示按键。
标签:
原文地址:http://www.cnblogs.com/linrong/p/4234934.html