标签:
LZ到目前已经写了九个设计模式,回过去看看,貌似写的有点凌乱,LZ后面会尽量改进。
那么本章LZ和各位读友讨论一个与JAVA中IO有着不解情缘的设计模式,装饰器模式。
定义:装饰模式是在不必改变原类文件和使用继承的情况下,动态的扩展一个对象的功能。它是通过创建一个包装对象,也就是装饰来包裹真实的对象。
这一个解释,引自百度百科,我们注意其中的几点。
1,不改变原类文件。
2,不使用继承。
3,动态扩展。
上述三句话一语道出了装饰器模式的特点,下面LZ给出装饰器模式的类图,先上图再解释。
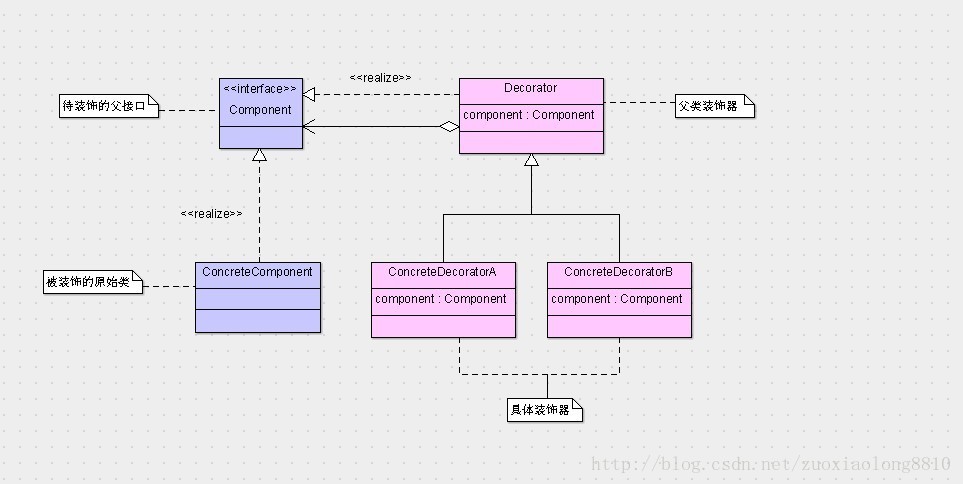
从图中可以看到,我们装饰的是一个接口的任何实现类,而这些实现类也包括了装饰器本身,装饰器本身也可以再被装饰。
另外,这个类图只是装饰器模式的完整结构,但其实里面有很多可以变化的地方,LZ给出如下两条。
1,Component接口可以是接口也可以是抽象类,甚至是一个普通的父类(这个强烈不推荐,普通的类作为继承体系的超级父类不易于维护)。
2,装饰器的抽象父类Decorator并不是必须的。
那么我们将上述标准的装饰器模式,用我们熟悉的JAVA代码给诠释一下。首先是待装饰的接口Component。
[java] view plaincopy
<EMBED id=ZeroClipboardMovie_1 name=ZeroClipboardMovie_1 type=application/x-shockwave-flash align=middle pluginspage=http://www.macromedia.com/go/getflashplayer height=18 width=18 src=http://static.blog.csdn.net/scripts/ZeroClipboard/ZeroClipboard.swf wmode="transparent" flashvars="id=1&width=18&height=18" allowfullscreen="false" allowscriptaccess="always" bgcolor="#ffffff" quality="best" menu="false" loop="false">
package com.decorator;
public interface Component {
void method();
}
接下来便是我们的一个具体的接口实现类,也就是俗称的原始对象,或者说待装饰对象。
[java] view plaincopy
<EMBED id=ZeroClipboardMovie_2 name=ZeroClipboardMovie_2 type=application/x-shockwave-flash align=middle pluginspage=http://www.macromedia.com/go/getflashplayer height=18 width=18 src=http://static.blog.csdn.net/scripts/ZeroClipboard/ZeroClipboard.swf wmode="transparent" flashvars="id=2&width=18&height=18" allowfullscreen="false" allowscriptaccess="always" bgcolor="#ffffff" quality="best" menu="false" loop="false">
package com.decorator;
public class ConcreteComponent implements Component{
public void method() {
System.out.println("原来的方法");
}
}
下面便是我们的抽象装饰器父类,它主要是为装饰器定义了我们需要装饰的目标是什么,并对Component进行了基础的装饰。
[java] view plaincopy
<EMBED id=ZeroClipboardMovie_3 name=ZeroClipboardMovie_3 type=application/x-shockwave-flash align=middle pluginspage=http://www.macromedia.com/go/getflashplayer height=18 width=18 src=http://static.blog.csdn.net/scripts/ZeroClipboard/ZeroClipboard.swf wmode="transparent" flashvars="id=3&width=18&height=18" allowfullscreen="false" allowscriptaccess="always" bgcolor="#ffffff" quality="best" menu="false" loop="false">
package com.decorator;
public abstract class Decorator implements Component{
protected Component component;
public Decorator(Component component) {
super();
this.component = component;
}
public void method() {
component.method();
}
}
再来便是我们具体的装饰器A和装饰器B。
[java] view plaincopy
<EMBED id=ZeroClipboardMovie_4 name=ZeroClipboardMovie_4 type=application/x-shockwave-flash align=middle pluginspage=http://www.macromedia.com/go/getflashplayer height=18 width=18 src=http://static.blog.csdn.net/scripts/ZeroClipboard/ZeroClipboard.swf wmode="transparent" flashvars="id=4&width=18&height=18" allowfullscreen="false" allowscriptaccess="always" bgcolor="#ffffff" quality="best" menu="false" loop="false">
package com.decorator;
public class ConcreteDecoratorA extends Decorator{
public ConcreteDecoratorA(Component component) {
super(component);
}
public void methodA(){
System.out.println("被装饰器A扩展的功能");
}
public void method(){
System.out.println("针对该方法加一层A包装");
super.method();
System.out.println("A包装结束");
}
}
[java] view plaincopy
<EMBED id=ZeroClipboardMovie_5 name=ZeroClipboardMovie_5 type=application/x-shockwave-flash align=middle pluginspage=http://www.macromedia.com/go/getflashplayer height=18 width=18 src=http://static.blog.csdn.net/scripts/ZeroClipboard/ZeroClipboard.swf wmode="transparent" flashvars="id=5&width=18&height=18" allowfullscreen="false" allowscriptaccess="always" bgcolor="#ffffff" quality="best" menu="false" loop="false">
package com.decorator;
public class ConcreteDecoratorB extends Decorator{
public ConcreteDecoratorB(Component component) {
super(component);
}
public void methodB(){
System.out.println("被装饰器B扩展的功能");
}
public void method(){
System.out.println("针对该方法加一层B包装");
super.method();
System.out.println("B包装结束");
}
}
下面给出我们的测试类。我们针对多种情况进行包装。
[java] view plaincopy
<EMBED id=ZeroClipboardMovie_6 name=ZeroClipboardMovie_6 type=application/x-shockwave-flash align=middle pluginspage=http://www.macromedia.com/go/getflashplayer height=18 width=18 src=http://static.blog.csdn.net/scripts/ZeroClipboard/ZeroClipboard.swf wmode="transparent" flashvars="id=6&width=18&height=18" allowfullscreen="false" allowscriptaccess="always" bgcolor="#ffffff" quality="best" menu="false" loop="false">
package com.decorator;
public class Main {
public static void main(String[] args) {
Component component =new ConcreteComponent();//原来的对象
System.out.println("------------------------------");
component.method();//原来的方法
ConcreteDecoratorA concreteDecoratorA = new ConcreteDecoratorA(component);//装饰成A
System.out.println("------------------------------");
concreteDecoratorA.method();//原来的方法
concreteDecoratorA.methodA();//装饰成A以后新增的方法
ConcreteDecoratorB concreteDecoratorB = new ConcreteDecoratorB(component);//装饰成B
System.out.println("------------------------------");
concreteDecoratorB.method();//原来的方法
concreteDecoratorB.methodB();//装饰成B以后新增的方法
concreteDecoratorB = new ConcreteDecoratorB(concreteDecoratorA);//装饰成A以后再装饰成B
System.out.println("------------------------------");
concreteDecoratorB.method();//原来的方法
concreteDecoratorB.methodB();//装饰成B以后新增的方法
}
}
下面看下我们运行的结果,到底是产生了什么效果。

从此可以看到,我们首先是使用的原始的类的方法,然后分别让A和B装饰完以后再调用,最后我们将两个装饰器一起使用,再调用该接口定义的方法。
上述当中,我们分别对待装饰类进行了原方法的装饰和新功能的增加,methodA和methodB就是新增加的功能,这些都是装饰器可以做的,当然两者并不一定兼有,但一般至少会有一种,否则也就失去了装饰的意义。
另外,文章开篇就说道了IO与装饰器的情缘,相信各位就算不太清楚,也都大致听说过JAVA的IO是装饰器模式实现的,所以LZ也不再废话,在给出一个标准的模板示例以后,直接拿出IO的示例,我们真枪实弹的来。
下面LZ直接给出IO包中的部分装饰过程,上面LZ加了详细的注释以及各个装饰器的功能演示,各位可以和上面标准的装饰器模式对比一下,LZ不得不感叹,IO与装饰器的孽缘。
[java] view plaincopy
<EMBED id=ZeroClipboardMovie_7 name=ZeroClipboardMovie_7 type=application/x-shockwave-flash align=middle pluginspage=http://www.macromedia.com/go/getflashplayer height=18 width=18 src=http://static.blog.csdn.net/scripts/ZeroClipboard/ZeroClipboard.swf wmode="transparent" flashvars="id=7&width=18&height=18" allowfullscreen="false" allowscriptaccess="always" bgcolor="#ffffff" quality="best" menu="false" loop="false">
package com.decorator;
import java.io.BufferedInputStream;
import java.io.BufferedReader;
import java.io.DataInputStream;
import java.io.FileInputStream;
import java.io.IOException;
import java.io.InputStream;
import java.io.InputStreamReader;
import java.io.LineNumberReader;
import java.io.PushbackInputStream;
import java.io.PushbackReader;
public class IOTest {
/* test.txt内容:
* hello world!
*/
public static void main(String[] args) throws IOException, ClassNotFoundException {
//文件路径可自行更换
final String filePath = "E:/myeclipse project/POITest/src/com/decorator/test.txt";
//InputStream相当于被装饰的接口或者抽象类,FileInputStream相当于原始的待装饰的对象,FileInputStream无法装饰InputStream
//另外FileInputStream是以只读方式打开了一个文件,并打开了一个文件的句柄存放在FileDescriptor对象的handle属性
//所以下面有关回退和重新标记等操作,都是在堆中建立缓冲区所造成的假象,并不是真正的文件流在回退或者重新标记
InputStream inputStream = new FileInputStream(filePath);
final int len = inputStream.available();//记录一下流的长度
System.out.println("FileInputStream不支持mark和reset:" + inputStream.markSupported());
System.out.println("---------------------------------------------------------------------------------");
/* 下面分别展示三种装饰器的作用BufferedInputStream,DataInputStream,PushbackInputStream,LZ下面做了三个装饰器的功能演示 */
//首先装饰成BufferedInputStream,它提供我们mark,reset的功能
BufferedInputStream bufferedInputStream = new BufferedInputStream(inputStream);//装饰成 BufferedInputStream
System.out.println("BufferedInputStream支持mark和reset:" + bufferedInputStream.markSupported());
bufferedInputStream.mark(0);//标记一下
char c = (char) bufferedInputStream.read();
System.out.println("LZ文件的第一个字符:" + c);
bufferedInputStream.reset();//重置
c = (char) bufferedInputStream.read();//再读
System.out.println("重置以后再读一个字符,依然会是第一个字符:" + c);
bufferedInputStream.reset();
System.out.println("---------------------------------------------------------------------------------");
//装饰成 DataInputStream,我们为了又使用DataInputStream,又使用BufferedInputStream的mark reset功能,所以我们再进行一层包装
//注意,这里如果不使用BufferedInputStream,而使用原始的InputStream,read方法返回的结果会是-1,即已经读取结束
//因为BufferedInputStream已经将文本的内容读取完毕,并缓冲到堆上,默认的初始缓冲区大小是8192B
DataInputStream dataInputStream = new DataInputStream(bufferedInputStream);
dataInputStream.reset();//这是BufferedInputStream提供的功能,如果不在这个基础上包装会出错
System.out.println("DataInputStream现在具有readInt,readChar,readUTF等功能");
int value = dataInputStream.readInt();//读出来一个int,包含四个字节
//我们转换成字符依次显示出来,可以看到LZ文件的前四个字符
String binary = Integer.toBinaryString(value);
int first = binary.length() % 8;
System.out.print("使用readInt读取的前四个字符:");
for (int i = 0; i < 4; i++) {
if (i == 0) {
System.out.print(((char)Integer.valueOf(binary.substring(0, first), 2).intValue()));
}else {
System.out.print(((char)Integer.valueOf(binary.substring(( i - 1 ) * 8 + first, i * 8 + first), 2).intValue()));
}
}
System.out.println();
System.out.println("---------------------------------------------------------------------------------");
//PushbackInputStream无法包装BufferedInputStream支持mark reset,因为它覆盖了reset和mark方法
//因为流已经被读取到末尾,所以我们必须重新打开一个文件的句柄,即FileInputStream
inputStream = new FileInputStream(filePath);
PushbackInputStream pushbackInputStream = new PushbackInputStream(inputStream,len);//装饰成 PushbackInputStream
System.out.println("PushbackInputStream装饰以后支持退回操作unread");
byte[] bytes = new byte[len];
pushbackInputStream.read(bytes);//读完了整个流
System.out.println("unread回退前的内容:" + new String(bytes));
pushbackInputStream.unread(bytes);//再退回去
bytes = new byte[len];//清空byte数组
pushbackInputStream.read(bytes);//再读
System.out.println("unread回退后的内容:" + new String(bytes));
System.out.println("---------------------------------------------------------------------------------");
/* 以上有两个一层装饰和一个两层装饰,下面我们先装饰成Reader,再进行其它装饰 */
//由于之前被PushbackInputStream将流读取到末尾,我们需要再次重新打开文件句柄
inputStream = new FileInputStream(filePath);
InputStreamReader inputStreamReader = new InputStreamReader(inputStream,"utf-8");//先装饰成InputStreamReader
System.out.println("InputStreamReader有reader的功能,比如转码:" + inputStreamReader.getEncoding());
System.out.println("---------------------------------------------------------------------------------");
BufferedReader bufferedReader = new BufferedReader(inputStreamReader);//我们进一步在reader的基础上装饰成BufferedReader
System.out.println("BufferedReader有readLine等功能:" + bufferedReader.readLine());
System.out.println("---------------------------------------------------------------------------------");
LineNumberReader lineNumberReader = new LineNumberReader(inputStreamReader);//我们进一步在reader的基础上装饰成LineNumberReader
System.out.println("LineNumberReader有设置行号,获取行号等功能(行号从0开始),当前行号:" + lineNumberReader.getLineNumber());
System.out.println("---------------------------------------------------------------------------------");
//此处由于刚才被readLine方法将流读取到末尾,所以我们再次重新打开文件句柄,并需要将inputstream再次包装成reader
inputStreamReader = new InputStreamReader(new FileInputStream(filePath));
PushbackReader pushbackReader = new PushbackReader(inputStreamReader,len);//我们进一步在reader的基础上装饰成PushbackReader
System.out.println("PushbackReader是拥有退回操作的reader对象");
char[] chars = new char[len];
pushbackReader.read(chars);
System.out.println("unread回退前的内容:" + new String(chars));
pushbackReader.unread(chars);//再退回去
chars = new char[len];//清空char数组
pushbackReader.read(chars);//再读
System.out.println("unread回退后的内容:" + new String(chars));
}
}
上述便是IO的装饰器使用,其中InputStream就相当于上述的Component接口,只不过这里是一个抽象类,这是我们装饰的目标抽象类。FileInputstream就是一个ConcreteComponent,即待装饰的具体对象,它并不是JAVA的IO结构中的一个装饰器,因为它无法装饰InputStream。剩下BufferedInputStream,DataInputstream等等就是各种装饰器了,对比上述的标准装饰器样板,JAVA的IO中也有抽象的装饰器基类的存在,只是上述没有体现出来,就是FilterInputStream,它是很多装饰器最基础的装饰基类。
在上述过程中,其中dataInputStream是经过两次装饰后得到的,它具有了dataInputStream和bufferedInputStream的双重功能,另外,InputStreamReader是一个特殊的装饰器,它提供了字节流到字符流的桥梁,其实它除了具有装饰器的特点以外,也有点像一个适配器,但LZ还是觉得它应当算是一个装饰器。
其它的IO装饰器各位可以自行尝试或者和上述的标准的装饰器模式代码比对一下,下面另附LZ的IO装饰器程序运行后结果。

从上面的展示中,已经可以充分体会到装饰器模式的灵活了,我们创建的一个FileInputstream对象,我们可以使用各种装饰器让它具有不同的特别的功能,这正是动态扩展一个类的功能的最佳体现,而装饰器模式的灵活性正是JAVA中IO所需要的,不得不赞一下JAVA类库的建造者实在是强悍。
上述的XXXXInputStream的各个类都继承了InputStream,这样做不仅是为了复用InputStream的父类功能(InputStream也是一种模板方法模式,它定义了read(byte[])方法的简单算法,并将read()方法交给具体的InputStream去实现),也是为了可以重叠装饰,即装饰器也可以再次被装饰,而过渡到Reader以后,Reader的装饰器体系则是类似的。
下面LZ给出上面IO包中所涉及的类的类图,各位可以自行和上面的标准装饰器模式对比一下。

LZ在类图上标注了各个类负责的角色,并且使用背景颜色将InputStream和Reader体系分开,其中左半部分就是InputStream的装饰体系,右半部分就是Reader的装饰体系,并且他们之间的桥梁是InputStreamReader,他们每一个装饰体系都与上面标准的装饰器模式类图极其相似,各位可以自己看一下,感受一下,尤其是InputStreamReader,它的位置比较特殊。
总之呢,装饰器模式就是一个可以非常灵活的动态扩展类功能的设计模式,它采用组合的方式取代继承,使得各个功能的扩展更加独立和灵活。
本次装饰器模式就到此结束了,感谢各位的收看,下期再见。
下期预告,外观模式。
标签:
原文地址:http://my.oschina.net/u/2287186/blog/374538