标签:
一、zabbix官网对proxy的介绍
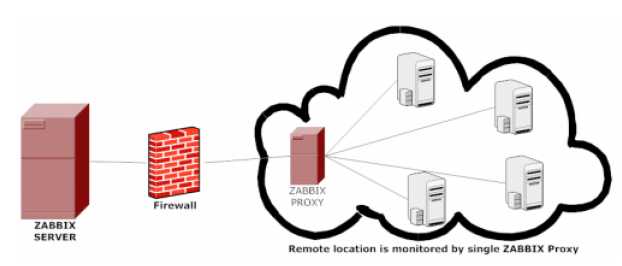
A Zabbix proxy can collect performance and availability data on behalf of the Zabbix server. This way, a proxy can take on itself some of the load of collecting data and offload the Zabbix server.
Also, using a proxy is the easiest way of implementing centralized and distributed monitoring, when all agents and proxies report to one Zabbix server and all data is collected centrally.
A Zabbix proxy can be used to:
The proxy requires only one TCP connection to the Zabbix server. This way it is easier to get around a firewall as you only need to configure one firewall rule.
Zabbix proxy must use a separate database. Pointing it to the Zabbix server database will break the configuration.
All data collected by the proxy is stored locally before transmitting it over to the server. This way no data is lost due to any temporary communication problems with the server. The ProxyLocalBuffer and ProxyOfflineBuffer parameters in the proxy configuration file control for how long the data are kept locally.
二、zabbix官网对node的介绍
You can use nodes to build a hierarchy of distributed monitoring.
Each node is a full Zabbix server and is responsible for monitoring its own location. Zabbix supports up to a thousand nodes in a distributed setup.
The benefits of using a node setup:
三、zabbix proxy安装
#./configure --prefix=/usr/local/zabbix --enable-agent --enable-proxy --with-mysql=/usr/local/mysql/bin/mysql_config --with-net-snmp --with-libcurl
//--prefix指定zabbix安装目录,--enable-server 支持zabbix服务器
--enable-agent支持zabbix代理
--enable-proxy 支持zabbix代理服务器
--with-mysql 使用MySQL客户端库可以选择指定路径mysql_config
--with-net-snmp 使用net - snmp软件包,择性地指定路径NET - SNMP配置
 --with-libcurl 使用curl包
#make && make install
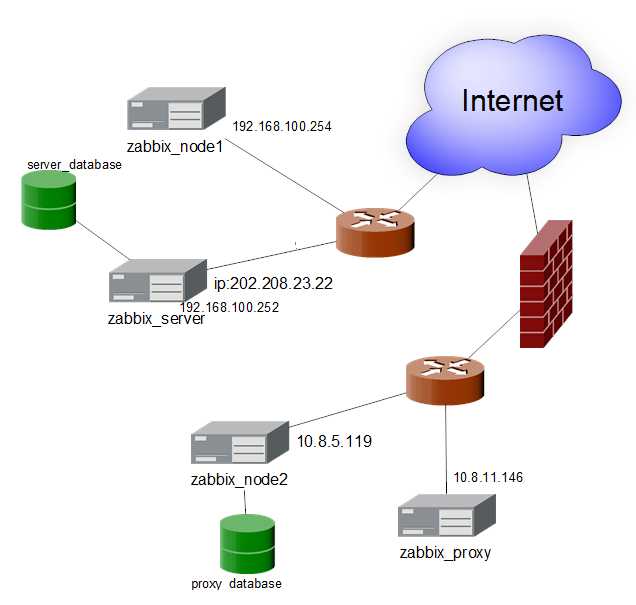
四、网络拓扑图介绍
五、相关配置
zabbix_server:
# egrep -v "(^$|^#)" ../etc/zabbix_server.conf
LogFile=/tmp/zabbix_server.log
DBHost=localhost
DBName=zabbix
DBUser=zabbix
DBPassword=redhat
DBSocket=/data/mysql/mysql.sock
DBPort=3306
# egrep -v "(^$|^#)" ../etc/zabbix_agentd.conf
LogFile=/tmp/zabbix_agentd.log
EnableRemoteCommands=1
Server=127.0.0.1
Hostname=Zabbix server
Timeout=30
Include=/usr/local/zabbix/etc/zabbix_agentd.conf.d/
UnsafeUserParameters=1
zabbix_node1:
# egrep -v ‘(^$|^#)‘ etc/zabbix_agentd.conf
LogFile=/tmp/zabbix_agentd.log
Server=192.168.100.252
ServerActive=127.0.0.1
Hostname=Zabbix server
Include=/usr/local/zabbix/etc/zabbix_agentd.conf.d/
zabbix_proxy:采用主动模式
# egrep -v "(^$|^#)" ../etc/zabbix_proxy.conf
ProxyMode=0 #指定proxy为主动模式
Server=202.208.23.22 #这里需要指定zabbix server所在ip
ServerPort=10051 #这里需要指定zabbix server监听的端口
Hostname=sgwar_proxy  #指定proxy的名字
ListenPort=8010  #指定proxy监听的端口
LogFile=/tmp/zabbix_proxy.log
DBHost=10.8.11.146  #proxy本地数据库ip
DBName=zabbix
DBUser=zabbix
DBPassword=redhat
HeartbeatFrequency=30
Timeout=30 #这里设置的超时不应为默认的3s,默认值会使proxy与agent通信超时
Include=/usr/local/zabbix/etc/zabbix_proxy.conf.d/
# egrep -v "(^$|^#)" ../etc/zabbix_agentd.conf
LogFile=/tmp/zabbix_agentd.log
Server=10.8.5.119 #指定zabbix proxy所在ip
ListenPort=10050
StartAgents=3
Hostname=sgwar_web
Timeout=30
Include=/usr/local/zabbix/etc/zabbix_agentd.conf.d/
zabbix_node2:采用被动模式
# egrep -v "(^$|^#)" ../etc/zabbix_agentd.conf
LogFile=/tmp/zabbix_agentd.log
Server=10.8.5.119  #指定zabbix proxy所在ip
ListenPort=10050
StartAgents=3
Hostname=sgwar_db
Timeout=30
Include=/usr/local/zabbix/etc/zabbix_agentd.conf.d/
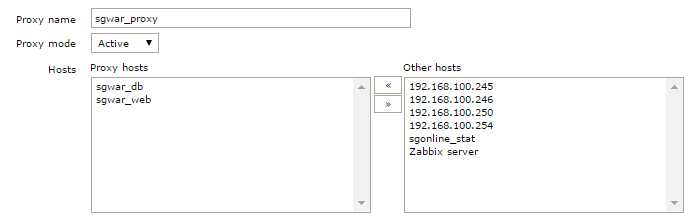
web端相关配置:
proxy配置:【注意:这里配置的proxy name需要和zabbix_proxy.conf配置的Hostname一致;Proxy mode需要和zabbix_proxy.conf中ProxyMode一致】
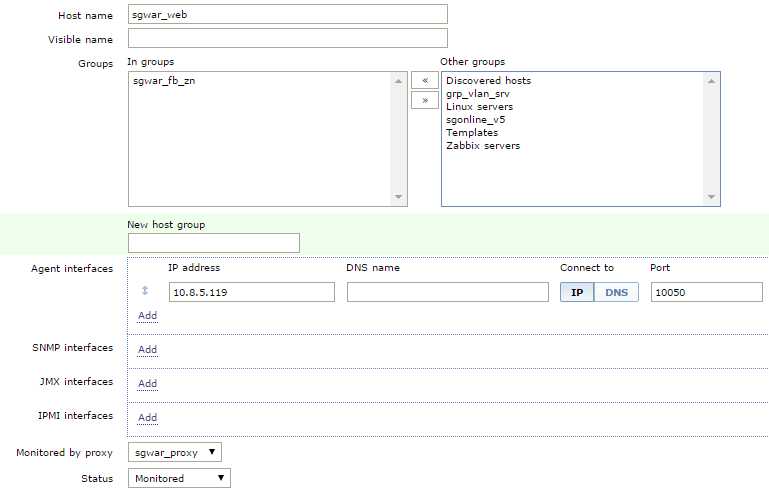
node配置:【注意:这里配置的Host name需要和前面zabbix_agentd.conf中配置的Hostname一致;IP address需要和proxy访问node时指定的ip一致;Monitored by proxy需要指定proxy的名字】
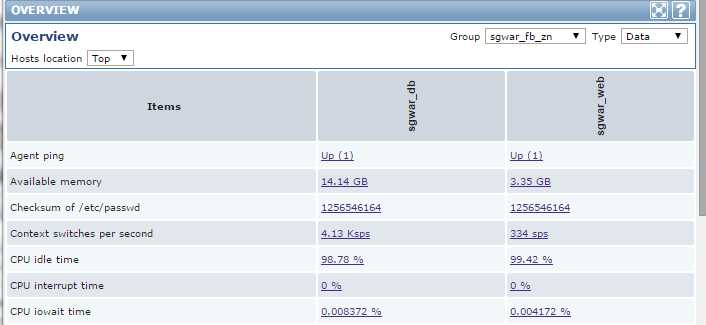
六、前台监控结果
七、总结
1. zabbix这套分布式的架构不是太难理解,但是官网对配置的介绍实在是太少,以至于配置proxy的时候感觉每个参数的配置都无法找到根源,再加上某墙把好的资源都拦在外面,想学好技术的同学还得再费点心思去爬墙。
2. 分析官网对proxy的解释,不难理解proxy小局域网中的作用相当明显,极大得减少了zabbix server的负担,但是如果zabbix proxy无法telnet通zabbix server的端口时,而zabbix server可以telnet通zabbix proxy的端口,请问这种单向连通的情况下,如何部署zabbix分布式监控?
3. 认真体会主动模式和被动模式的区别,如何避开安全风险,同时达到必要的监控效果,并且对服务器的负载不造成太大的影响。
4. 大过年的,今天是最后一天上班,吃完中饭就下班了,祝大家回家路上平平安安,开开心心过大年 ^_^
标签:
原文地址:http://www.cnblogs.com/forilen/p/4292821.html