标签:
【改进定时器】IMX257实现GPIO-IRQ定时器消抖驱动程序
2015-02-20 李海沿
前面我们的GPIO-IRQ按键的驱动程序实现了中断,阻塞,信号量,poll查询等功能,具体请进博客http://www.cnblogs.com/lihaiyan/
本文,我们还是在前面的按键驱动程序的基础上,引入定时器,来消除抖动。
一、内核定时器详解
1.timer_list结构体
在/include/linux/timer.h中。
|
struct timer_list { struct list_head entry; //定时器链表,用于存放软定时器,该链表根据定时器expirex字段的值将它们分组存放。 unsigned long expires; //定时器的到期时间,到达expires时间后,定时器将调用其成员函数function,其中将data字段作为function的参数。该字段表示的时间是以时间节拍为单位。例如如果你想定时一秒,则expires=jiffies+HZ*1。 void (*function)(unsigned long); //定时器到时处理函数 unsigned long data; //function 的参数 struct tvec_t_base_s *base; #ifdef CONFIG_TIMER_STATS void *start_site; char start_comm[16]; int start_pid; #endif }; |
时钟中断的发生频率设定为HZ,HZ是一个与体系结构无关的常数,在文件<linux/param.h>中定义,时钟中断对操作系统是非常重要的,当时钟中断发生时,将周期性地执行一些功能
2.初始化定时器
①init_timer
|
void init_timer(struct timer_list *timer) { debug_timer_init(timer); __init_timer(timer); }
static void __init_timer(struct timer_list *timer) { timer->entry.next = NULL; timer->base = __raw_get_cpu_var(tvec_bases); #ifdef CONFIG_TIMER_STATS timer->start_site = NULL; timer->start_pid = -1; memset(timer->start_comm, 0, TASK_COMM_LEN); #endif } |
init_timer()函数被定义在kernel/timer.c中,实际上是将timer的entry的next指针置为NULL,为base字段赋值。
②. timer=TIMER_INITIALIZER(function,expires,data);
采用这种初始化方式,必须首先先写好定时器处理函数function. TIMER_INITIALIZER宏的定义如下:
|
#define TIMER_INITIALIZER(_function, _expires, _data) { \ .entry = { .prev = TIMER_ENTRY_STATIC }, \ .function = (_function), \ .expires = (_expires), \ .data = (_data), \ .base = &boot_tvec_bases, \ } |
其中boot_tcec_bases是在kernel/timer中定义的一个全局的tvec_t_base_s类型的变量。
③.DEFINE_TIMER(timer,function,expires,data);
定义并初始化定时器timer,功能和前面差不多
|
#define DEFINE_TIMER(_name, _function, _expires, _data) \ struct timer_list _name = \ TIMER_INITIALIZER(_function, _expires, _data) |
④. setup_timer(&timer);
等同于前面,不过对base字段的赋值是调用了init_timer()函数。setup_timer()原型为:
|
static inline void setup_timer(struct timer_list * timer,void (*function)(unsigned long),unsigned long data) { timer->function = function; timer->data = data; init_timer(timer); } |
3.注册定时器
在定义并初始化了定时器之后,就要调用add_timer()函数来将该定时器注册到内核中,这样定时器才会工作。在注册之后,定时器就开始计时,在到达时间expires时,执行回调函数function(->data)。add_timer()函数的原型为:
|
static inline void add_timer(struct timer_list *timer) { BUG_ON(timer_pending(timer)); __mod_timer(timer, timer->expires); } |
4.删除定时器
int del_timer(struct timer_list *timer);
从内核中删除已经注册的定时器timer。如果该定时器是活动的,则返回1,否则返回0。
|
int del_timer(struct timer_list *timer) { tvec_base_t *base; unsigned long flags; int ret = 0; timer_stats_timer_clear_start_info(timer); if (timer_pending(timer)) { base = lock_timer_base(timer, &flags); if (timer_pending(timer)) { detach_timer(timer, 1); ret = 1; } spin_unlock_irqrestore(&base->lock, flags); } return ret; } |
5.修改定时器时间
如果所给的要修改的时间等于定时器原来的时间并且定时器现在正处于活动状态,则不修改,返回1,否则修改定时器时间,返回0。mod_timer()是一个非有效的更新处于活动状态的定时器的时间的方法,如果定时器处于非活动状态,则会激活定时器。在功能上,mod_timer()等价于:
del_timer(timer);
timer->expires=expires;
add_timer(timer);
|
int mod_timer(struct timer_list *timer, unsigned long expires) { BUG_ON(!timer->function); timer_stats_timer_set_start_info(timer); if (timer->expires == expires && timer_pending(timer)) return 1; return __mod_timer(timer, expires); } |
6.使用方法
1.创建定时器:struct timer_list my_timer;
2.初始化定时器:init_timer(&my_timer);
3.根据需要,设置定时器了:
my_timer.expires = jiffies + delay;
my_timer.data = 0;
my_timer.function = my_function;
4.激活定时器:add_timer(&my_timer);
7.实例解析
程序是在前面程序的基础上修改的,(博文地址:http://www.cnblogs.com/lihaiyan/p/4295961.html)
为了结构更简单,前面的程序使用了六个GPIO引脚,可能会相对复杂,为了更加坚定明了,此处简化为一个GPIO引脚了,思路和前面差不多,这里就是使用GPIO2_10这个引脚
① 定义定时器

②在打开函数中初始化定时器,并且申请GPIO2_10中断
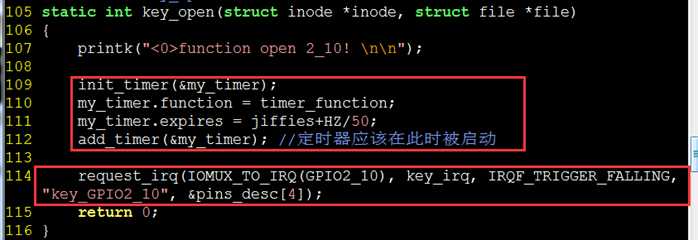
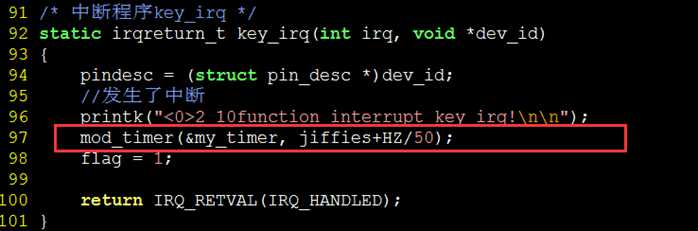
③在中断中修改定时器,并且激活定时器,则没发生一次中断则激活一次定时器达到消除抖动的目的
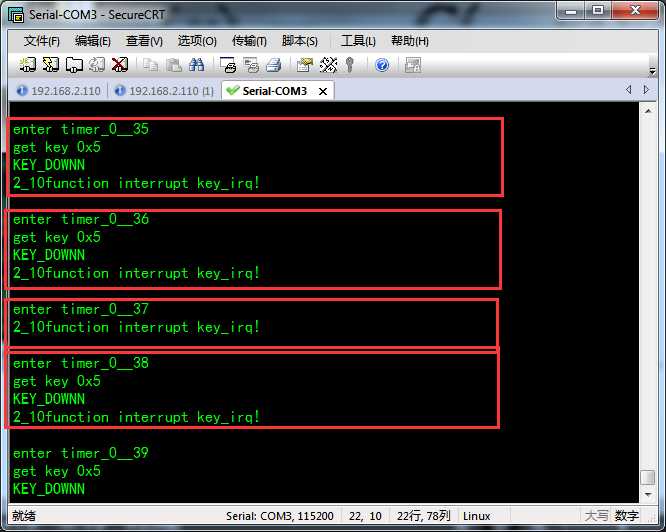
此处的中断函数只有一个任务,就是激活定时器,然后将其他的功能均转移至定时器调用的函数中。
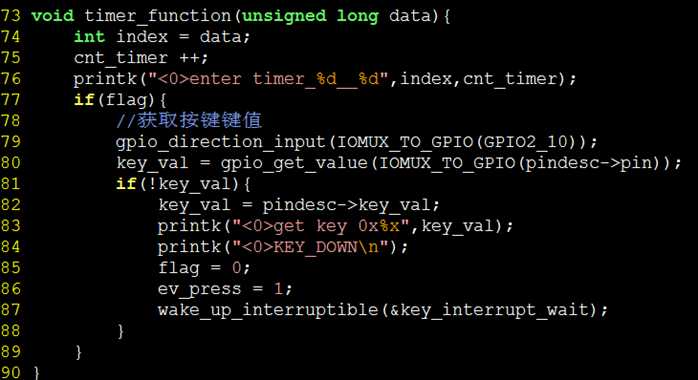
④可以发现,在定时器中,将前面中断中的功能全部实现了,一旦按键按下,接下来20ms内的抖动都无效,因为修改定时器无法修改已经激活的定时器,所以那20ms内高低电平的抖动都将无效,达到了消除抖动的功能
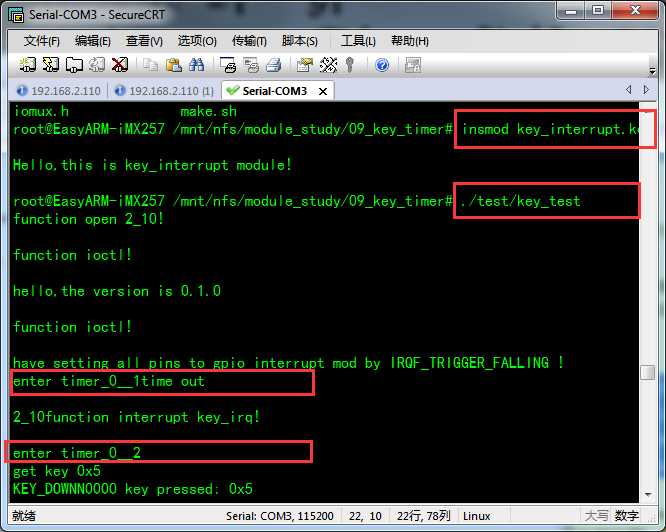
⑤编译测试。结果如下图所示:
附上驱动程序代码:

  1 /******************************
  2     linux key_query
  3  *****************************/
  4 #include <linux/module.h>
  5 #include <linux/init.h>
  6 #include <linux/kernel.h>
  7 #include <linux/delay.h>
  8 #include <linux/types.h>
  9 #include <linux/ioctl.h>
 10 #include <linux/gpio.h>
 11 #include <linux/fs.h>
 12 #include <linux/device.h>
 13 #include <linux/uaccess.h>
 14 #include <linux/irq.h>
 15 #include <linux/wait.h>
 16 #include <linux/sched.h>//error: ‘TASK_INTERRUPTIBLE‘ undeclared
 17 #include <linux/interrupt.h>
 18 #include <linux/poll.h>
 19
 20 #include "mx257_gpio.h"
 21 #include "mx25_pins.h"
 22 #include "iomux.h"
 23
 24 #define Driver_NAME "key_interrupt"
 25 #define DEVICE_NAME "key_interrupt"
 26
 27 #define GPIO2_21    MX25_PIN_CLKO
 28 #define GPIO3_15    MX25_PIN_EXT_ARMCLK
 29 #define GPIO2_10    MX25_PIN_A24
 30 #define GPIO2_11    MX25_PIN_A25
 31 #define GPIO2_8     MX25_PIN_A22
 32 #define GPIO2_9     MX25_PIN_A23
 33 #define GPIO2_6     MX25_PIN_A20
 34 #define GPIO2_7     MX25_PIN_A21
 35 //command
 36 #define key_input     0
 37 #define version        1
 38 //定义各个按键按下的键值
 39 struct pin_desc{
 40     unsigned int pin;
 41     unsigned int key_val;
 42 };
 43 //当按键按下时,键值分别为 以下值
 44 struct pin_desc pins_desc[8] = {
 45     {GPIO2_6,    0x01},
 46     {GPIO2_7,    0x02},
 47     {GPIO2_8,    0x03},
 48     {GPIO2_9,    0x04},
 49     {GPIO2_10,    0x05},
 50     {GPIO2_11,    0x06},
 51     {GPIO2_21,    0x07},
 52     {GPIO3_15,    0x08},
 53 };
 54 struct pin_desc * pindesc;
 55 static int flag=0;
 56 //定义一个全局变量,用于保存按下的键值
 57 static unsigned int key_val;
 58
 59 struct timer_list my_timer;
 60 unsigned int cnt_timer = 0;
 61 #define TIMER_DELAY_20MS  HZ/50
 62
 63 //interrupt head
 64 static DECLARE_WAIT_QUEUE_HEAD(key_interrupt_wait);
 65 static volatile unsigned char ev_press;
 66
 67 static int major=0;
 68
 69 //auto to create device node
 70 static struct class *drv_class = NULL;
 71 static struct class_device *drv_class_dev = NULL;
 72
 73 void timer_function(unsigned long data){
 74     int index = data;
 75     cnt_timer ++;
 76     printk("<0>enter timer_%d__%d",index,cnt_timer);
 77     if(flag){
 78         //获取按键键值
 79         gpio_direction_input(IOMUX_TO_GPIO(GPIO2_10));
 80         key_val = gpio_get_value(IOMUX_TO_GPIO(pindesc->pin));
 81         if(!key_val){
 82             key_val = pindesc->key_val;
 83             printk("<0>get key 0x%x",key_val);
 84             printk("<0>KEY_DOWN\n");
 85             flag = 0;
 86             ev_press = 1;
 87             wake_up_interruptible(&key_interrupt_wait);
 88         }
 89     }
 90 }
 91 /* 中断程序key_irq */
 92 static irqreturn_t key_irq(int irq, void *dev_id)
 93 {
 94     pindesc = (struct pin_desc *)dev_id;
 95     //发生了中断
 96     printk("<0>2_10function interrupt key_irq!\n\n");
 97     mod_timer(&my_timer, jiffies+HZ/50);
 98     flag = 1;
 99
100     return IRQ_RETVAL(IRQ_HANDLED);
101 }
102
103
104 /* 应用程序对设备文件/dev/key_query执行open(...)时,
105  * 就会调用key_open函数*/
106 static int key_open(struct inode *inode, struct file *file)
107 {
108     printk("<0>function open 2_10! \n\n");
109
110     init_timer(&my_timer);
111      my_timer.function = timer_function;
112     my_timer.expires = jiffies+HZ/50;
113       add_timer(&my_timer); //定时器应该在此时被启动
114
115     request_irq(IOMUX_TO_IRQ(GPIO2_10), key_irq, IRQF_TRIGGER_FALLING, "key_GPIO2_10", &pins_desc[4]);
116     return 0;
117 }
118
119
120
121 static int key_read(struct file *filp, char __user *buff, size_t count, loff_t *offp)
122 {
123     int ret;
124     if(filp->f_flags & O_NONBLOCK){
125         if(!ev_press)
126             return -EAGAIN;
127     }else{
128     //如果按键没有按下,没有中断,休眠
129         wait_event_interruptible(key_interrupt_wait,ev_press);
130     }
131     ret = copy_to_user(buff,&key_val,sizeof(key_val));
132     if(ret){
133         ;
134     }
135     ev_press = 0;
136     return sizeof(key_val);
137 }
138
139 static ssize_t key_write(struct file *file, const char __user *buf, size_t count, loff_t * ppos)
140 {
141     printk("<0>function write!\n\n");
142
143     return 1;
144 }
145
146 static int  key_release(struct inode *inode, struct file *filp)
147 {
148     printk("<0>function release!\n\n");
149     //释放中断
150     free_irq(IOMUX_TO_IRQ(GPIO2_10),  &pins_desc[4]);
151     return 0;
152 }
153
154 static int key_ioctl(struct inode *inode,struct file *flip,unsigned int command,unsigned long arg)
155 {
156     printk("<0>function ioctl!\n\n");
157     switch (command) {
158         case key_input:
159             printk("<0>have setting all pins to gpio interrupt mod by IRQF_TRIGGER_FALLING !\n");
160
161             break;
162         case version:
163             printk("<0>hello,the version is 0.1.0\n\n");
164             break;
165         default:
166               printk("<0>command error \n");
167             printk("<0>ioctl(fd, (unsigned int)command, (unsigned long) arg;\n");
168             printk("<0>command: <key_input> <version>\n\n");
169             return -1;
170     }
171     return 0;
172 }
173 static unsigned key_poll(struct file *file,poll_table *wait)
174 {
175     unsigned int mask = 0;
176     //程序不立即睡眠,而是继续等待
177     poll_wait(file,&key_interrupt_wait,wait);
178     //如果按键按下
179     if(ev_press)
180         mask |= POLLIN | POLLRDNORM;
181
182     return mask;
183 }
184
185 /* 这个结构是字符设备驱动程序的核心
186  * 当应用程序操作设备文件时所调用的open、read、write等函数,
187  * 最终会调用这个结构中指定的对应函数
188  */
189 static struct file_operations key_fops = {
190     .owner  =   THIS_MODULE,    /* 这是一个宏,推向编译模块时自动创建的__this_module变量 */
191     .open   =   key_open,
192     .read    =    key_read,
193     .write    =    key_write,
194     .release=   key_release,
195     .ioctl  =   key_ioctl,
196     .poll   =   key_poll,
197 };
198
199 /*
200  * 执行insmod命令时就会调用这个函数
201  */
202 static int __init  key_irq_init(void)
203 {
204     printk("<0>\nHello,this is %s module!\n\n",Driver_NAME);
205     //register and mknod
206     major = register_chrdev(0,Driver_NAME,&key_fops);
207     drv_class = class_create(THIS_MODULE,Driver_NAME);
208     drv_class_dev = device_create(drv_class,NULL,MKDEV(major,0),NULL,DEVICE_NAME);    /*/dev/key_query*/
209
210     mxc_request_iomux(GPIO2_10, MUX_CONFIG_ALT5);
211       gpio_request(IOMUX_TO_GPIO(GPIO2_10), "GPIO2_10");
212     gpio_direction_input(IOMUX_TO_GPIO(GPIO2_10));
213     mxc_iomux_set_pad(GPIO2_10,PAD_CTL_DRV_3_3V| PAD_CTL_HYS_SCHMITZ | PAD_CTL_PKE_ENABLE | PAD_CTL_PUE_PULL | PAD_CTL_100K_PU);
214
215     return 0;
216 }
217
218 /*
219  * 执行rmmod命令时就会调用这个函数
220  */
221 static void __exit key_irq_exit(void)
222 {
223     printk("<0>\nGoodbye,%s!\n\n",Driver_NAME);
224
225     unregister_chrdev(major,Driver_NAME);
226     device_unregister(drv_class_dev);
227     class_destroy(drv_class);
228
229     /* free gpios */
230     mxc_free_iomux(GPIO2_10, MUX_CONFIG_ALT5);
231     gpio_free(IOMUX_TO_GPIO(GPIO2_10));
232
233 }
234
235 /* 这两行指定驱动程序的初始化函数和卸载函数 */
236 module_init(key_irq_init);
237 module_exit(key_irq_exit);
238
239 /* 描述驱动程序的一些信息,不是必须的 */
240 MODULE_AUTHOR("Lover雪");
241 MODULE_VERSION("0.1.0");
242 MODULE_DESCRIPTION("IMX257 key Driver");
243 MODULE_LICENSE("GPL");
附上应用程序代码:
 1 #include <stdio.h>
 2 #include <stdlib.h>
 3 #include <unistd.h>
 4 #include <sys/types.h>
 5 #include <sys/stat.h>
 6 #include <fcntl.h>
 7 #include <termios.h>
 8 #include <errno.h>
 9 #include <limits.h>
10 #include <asm/ioctls.h>
11 #include <time.h>
12 #include <pthread.h>
13 #include <poll.h>
14
15 #include "mx257_gpio.h"
16
17 #define key_input     0
18 #define version       1
19
20
21 int main(int argc, char **argv)
22 {
23     int fd;
24     int i=0,cnt=0;
25     unsigned char key_val[1];
26     struct pollfd fds[1];
27     int ret;
28     fd = open("/dev/key_interrupt",O_RDWR | O_NONBLOCK);
29     if(fd < 0){
30         printf("can‘t open !!!\n");
31     }
32     ioctl(fd,version,NULL);
33     ioctl(fd,key_input,NULL);
34
35     fds[0].fd = fd;
36     fds[0].events = POLLIN;
37     while(1){
38         ret = poll(fds,1,5000);
39         if(ret == 0)
40             printf("time out\n");
41         else{
42             read(fd,key_val,1);
43             printf("%04d key pressed: 0x%x\n",cnt++,key_val[0]);
44         }
45     }
46     return 0;
47 }
二、其他简单延时函数
1.忙等待(也叫忙循环)
通常是最不理想的方法,因为处理器被白白占用旋转而无法做别的事情。该方法仅仅在想要延迟的时间是节拍的整数倍或者精确率要求不高时才可以使用。实现起来还是挺简单的,就是在循环中不断旋转直到希望的时钟节拍数耗尽。比如:
|
unsigned long delay = jiffies+10; //10个节拍 while(time_before(jiffies,delay)); |
其他长延时函数:
|
time_after(jiffies,delay); time_before(jiffies,delay); |
其中time_after和time_before分别被定义为:
|
#define time_after(a,b) \ (typecheck(unsigned long, a) && \ typecheck(unsigned long, b) && \ ((long)(b) - (long)(a) < 0)) #define time_before(a,b) time_after(b,a) |
2.改进忙等待函数
在代码等待时,允许内核重新调度执行其他任务,如下:
|
unsigned long delay = jiffies+10; //10个节拍 while(time_before(jiffies,delay)) cond_resched(); //内核发生任务调度 |
cond_resched()函数将调度一个新程序投入运行,但它只有在设置完need_resched标志后才能生效。换句话说,就是系统中存在更重要的任务需要运行。再由于该方法需要调用调度程序,所以它不能在中断上下文中使用----只能在进程上下文中使用。事实上,所有延迟方法在进程上下文中使用,因为中断处理程序都应该尽可能快的执行。另外,延迟执行不管在哪种情况下都不应该在持有锁时或者禁止中断时发生。
3.更加精确地延时函数
|
void ndelay(unsigned long nsecs); void udelay(unsigned long usecs); //微秒 void mdelay(unsigned long msecs); //毫秒 |
前者是依靠执行次数循环来达到延迟效果的,而mdelay()函数又是通过udelay()函数实现的。因为内核知道处理器在一秒内能执行多少次循环,所以udelay()函数仅仅需要根据指定的延迟时间在1秒中占的比例,就能决定需要进行多少次循环就能达到需要的推迟时间。udelay()函数仅能在要求的延迟时间很短的情况下执行,而在高速机器中时间很长的延迟会造成溢出,经验表明,不要试图在延迟超过1ms的情况下使用这个函数。这两个函数其实和忙等待一样,如果不是非常必要,还是不要用了算了。
三个宏最终都是将各自的参数(延时的时间)经过一定的换算调用delay_loop() 函数来循环耗时达到延时,delay_loop()如下:
|
static void delay_loop(unsigned long loops) { int d0;
__asm__ __volatile__( "\tjmp 1f\n" ".align 16\n" "1:\tjmp 2f\n" ".align 16\n" "2:\tdecl %0\n\tjns 2b" :"=&a" (d0) :"0" (loops)); } |
可以明显的看到每次自减loops,然后判断,如果为0,则结束,否则跳到标号2处,形成循环。这就是所谓的"忙等待"。
4. schedule_timeout()函数
其实更理想的延迟执行方法是使用schedule_timeout()函数,该方法会让需要延迟执行的任务睡眠到指定的延迟时间耗尽后再重新运行。但该方法也不能保证睡眠时间正好等于指定的延迟时间----只能尽量是睡眠时间接近指定的延迟时间。当指定的时间到期后,内核唤醒被延迟的任务并将其重新放回运行队列
|
set_current_state(TASK_INTERRUPTIBLE); schedule_timeout(s*HZ); |
唯一的参数是延迟的相对时间,单位是jiffies,上例中将相应的任务推入可中断睡眠队列,睡眠s秒。在调用函数schedule_timeout之前,不要要将任务设置成可中断或不和中断的一种,否则任务不会休眠。这个函数需要调用调度程序,所以调用它的代码必须保证能够睡眠,简而言之,调用代码必须处于进程上下文中,并且不能持有锁。有关这个函数的实现细节,可以看下源码,还是相当简单的。接下来就是当定时器超时,process_timeout()函数被调用:
|
void process_timeout(unsigned long data) { wake_up_process((task_t *)data); } |
该函数将任务置为TASK_RUNNING状态,然后将其放入运行队列。当任务重新被调度时,将返回代码进入睡眠前的位置继续执行(正好在调用schedule()后)。如果任务提前被唤醒(比如收到信号),那么定时器被销毁,process_timeout()函数返回剩余的时间。
5.睡眠延时
与忙等待延时相对的是睡眠延时,在延时的过程中,进程是处于睡眠状态,这意味着其他的任务可以在这是被调度执行,提高了CPU的有效利用率。在睡眠给定的时间后,任务又被重新调度执行。内核提供的睡眠延时函数是:
|
void msleep(unsigned int msecs); unsigned long msleep_interruptible(unsigned int msecs); |
这两个函数的区别是调用msleep()函数进行睡眠延时的进程不能被信号打断,而调用
msleep_interruptible()函数延时的进程可以被信号唤醒。一下给出msleep()函数的代码:
|
void msleep(unsigned int msecs){ unsigned long timeout = msecs_to_jiffies(msecs) + 1; while (timeout) timeout = schedule_timeout_uninterruptible(timeout); } |
可以看出msleep()本质还是依靠schedule_timeout_uninterruptible()函数实现的。在每次被重新调度执行时,如果睡眠没有完成,则重新进入睡眠直到到达睡眠的时间。
本文部分定义详解摘自http://www.cnblogs.com/hanyan225/archive/2011/07/26/2117158.html
20150220【改进定时器】IMX257实现GPIO-IRQ定时器消抖驱动程序
标签:
原文地址:http://www.cnblogs.com/lihaiyan/p/4296857.html
