标签:
注意点:在测试nova,在配置文件里面如果不指定网络id,那么默认是外网的网络(该网络是共享的),如果想要指定网络,那么该网络必须是共享的状态,否则将会报错:无法发现网络。如果测试多于50台的虚拟机需要修改默认值,因为默认值是有限制的可用如下命令查看:
[root@rally nova]# nova absolute-limits
+-------------------------+---------+
| Name                    | Value   |
+-------------------------+---------+
| maxServerMeta           | 128     |
| maxPersonality          | 100     |
| maxImageMeta            | 128     |
| maxPersonalitySize      | 10240   |
| maxTotalRAMSize         | 5120000 |
| maxSecurityGroupRules   | 20      |
| maxTotalKeypairs        | 100     |
| totalRAMUsed            | 58960   |
| maxSecurityGroups       | 10      |
| totalFloatingIpsUsed    | 0       |
| totalInstancesUsed      | 24      |
| totalSecurityGroupsUsed | 1       |
| maxTotalFloatingIps     | 10      |
| maxTotalInstances       | 200     |
| totalCoresUsed          | 51      |
| maxTotalCores           | 500     |
+-------------------------+---------+
修改默认值可以在界面,管理员->默认值,进行修改;其次可以在运行nova-api服务的节点上修改配置文件nova.conf
安装rally:
[root@rally nova]#git clone https://github.com/stackforge/rally.git
[root@rally rally]# /usr/bin/easy_install pip (安装pip,有就不需要装了)
[root@rally rally]# mkdir /root/.pip

[root@rally rally]# vim /root/.pip/pip.conf  (设置pip源,加快安装速度)
[global]
index-url=http://pypi.douban.com/simple
[root@rally nova]#pip install -U virtualenv 安装虚拟环境(可装可不装,一般为了系统的干净还是装个虚拟环境)
[root@rally nova]#virtualenv .venv
[root@rally nova]#. .venv/bin/activate
[root@rally nova]#yum install gcc-c++ (安装编译工具)
[root@rally nova]#cd rally
[root@rally rally]#./install_rally.sh
....
======================================================================
Information about your Rally installation:
* Method: system
* Database at: /var/lib/rally/database
* Configuration file at: /etc/rally
======================================================================
安装完成,数据库的配置这里暂时没做。
创建一个随便命名的.json格式文件:
[root@rally rally]# cat existing.json
{
"type": "ExistingCloud",
"auth_url": ‘http://172.16.105.189:35357/v2.0/‘,
"admin":{
    "username": admin,
    "password": admin,
    "tenant_name": admin
    }
}
[root@rally rally]# rally deployment create --file=existing.json --name=existing
+--------------------------------------+----------------------------+----------+------------------+--------+
| uuid | created_at | name | status | active |
+--------------------------------------+----------------------------+----------+------------------+--------+
| 15ef811a-6460-407c-b391-c0f435f1ae54 | 2015-03-05 10:09:36.468176 | existing | deploy->finished | |
+--------------------------------------+----------------------------+----------+------------------+--------+
Using deployment: 15ef811a-6460-407c-b391-c0f435f1ae54
[root@rally rally]# rally deployment check
keystone endpoints are valid and following services are available:
+------------+-----------+-----------+
| services | type | status |
+------------+-----------+-----------+
| ceilometer | metering | Available |
| cinder | volume | Available |
| cinderv2 | volumev2 | Available |
| glance | image | Available |
| keystone | identity | Available |
| neutron | network | Available |
| nova | compute | Available |
| nova_ec2 | ec2 | Available |
| novav3 | computev3 | Available |
+------------+-----------+-----------+
如此便可继续往下进行OpenStack基准测试了。
举个测试启动虚拟机的例子:boot.json文件内容如下:
doc/samples/tasks/scenarios/nova/boot.json
[root@rally nova]# cat boot.json
{
    "NovaServers.boot_server": [
        {
            "args": {
                "flavor": {
                    "name": "m1.large"
                },
                "image": {
                    "name": "Windows_Server_2008R2_SP1_Standard_64bit"
                },
                "nics":[{"net-id": "c7048568-c966-4d57-a927-90dd8830fb96"}],(默认是没有这行的)
            },
            "runner": {
                "type": "constant",
                "times": 100,                     (测试次数100)
                "concurrency": 2                 (并发数)
            },
            "context": {
                "users": {
                    "tenants": 3,                 ()
                    "users_per_tenant": 2
                }
            }
        }
    ]
}
[root@rally nova]# . /root/rally/.venv/bin/activate
[root@rally nova]# rally -v task start boot.json(/root/rally/doc/samples/tasks/scenarios/nova这是当前的目录)

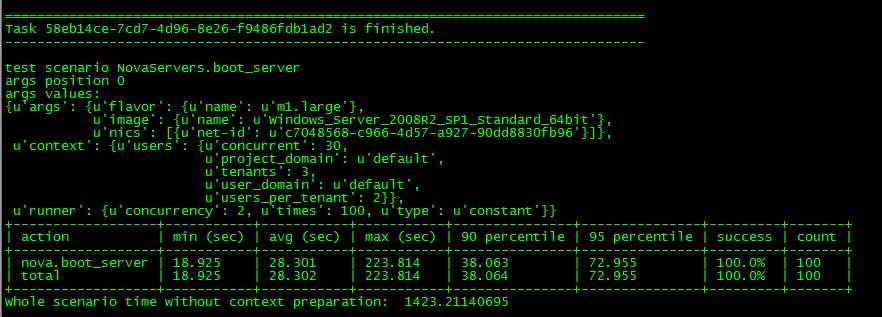
以上的图是测试结果。
相关链接:https://wiki.openstack.org/wiki/Rally
https://rally.readthedocs.org/en/latest/tutorial/step_0_installation.html
https://rally.readthedocs.org/en/latest/tutorial/step_1_setting_up_env_and_running_benchmark_from_samples.html
标签:
原文地址:http://www.cnblogs.com/wtfbk/p/4316335.html