标签:
Image Enhancement
1.Reasons for doing this:
2. Two broad categories of image enhancement
Spatial domain techniques
b. Frequency domain techniques
2.1 Techniques in spatial domain
a. Thresholding
 1 #include <opencv2\opencv.hpp>
 2 #include <iostream>
 3 #include <string>
 4 using namespace cv;
 5 using namespace std;
 6 int main()
 7 {
 8     IplImage* img; //声明IplImage指针
 9     //载入图像
10     img = cvLoadImage("C://Users//Administrator//Desktop//dip//moon.png",0) ;
11
12     cvNamedWindow( "Image1", 1 );//创建窗口
13     cvShowImage( "Image1", img );//显示图像
14
15     for(int row = 0; row<img->height; row++)
16     {
17         for (int col=0; col<img->width; col++)
18         {
19             if((unsigned char)(img->imageData[row*img->widthStep+col])>80)
20                 img->imageData[row*img->widthStep+col] = 255;
21             else
22                 img->imageData[row*img->widthStep+col] = 0;
23         }
24     }
25
26         cvNamedWindow( "Image", 1 );//创建窗口
27         cvShowImage( "Image", img );//显示图像
28         cvWaitKey(0); //等待按键
29
30         cvDestroyWindow( "Image" );//销毁窗口
31         cvDestroyWindow( "Image1" );//销毁窗口
32         cvReleaseImage( &img ); //释放图像
33         return 0;
34 }
结果:
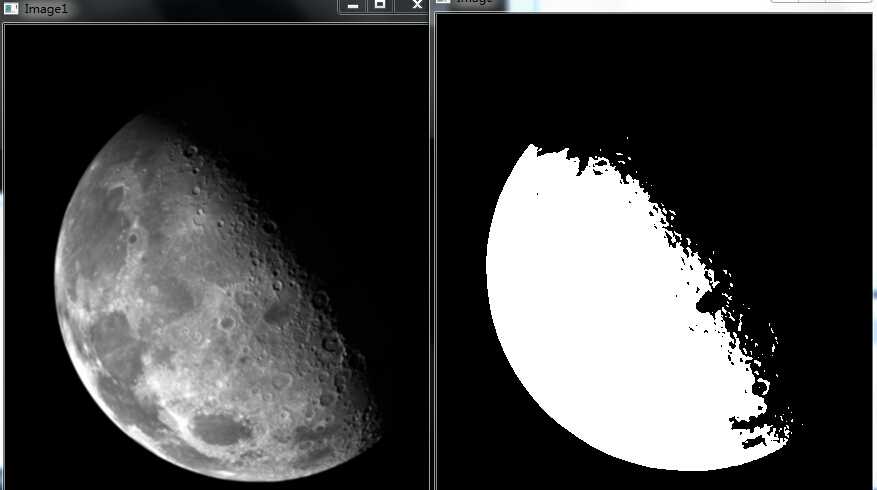
b. Logarithmic transformation
expression: s = c * log(1 + r)
 1 #include <opencv2\opencv.hpp>
 2 #include <iostream>
 3 #include <string>
 4 #include <math.h>
 5 #include <stdio.h>
 6 using namespace cv;
 7 using namespace std;
 8 int main()
 9 {
10     IplImage* img; //声明IplImage指针
11     //载入图像
12     img = cvLoadImage("C://Users//Administrator//Desktop//dip//light.png",0) ;
13
14     cvNamedWindow( "Image1", 1 );//创建窗口
15     cvShowImage( "Image1", img );//显示图像
16     /*printf("%x",img->imageData[(img->height)*(img->widthStep)/2+(img->width)/2]);*/
17
18     for(int row = 0; row<img->height; row++)
19     {
20         for (int col=0; col<img->width; col++)
21         {
22             //----------------关键代码在这儿----------------------
23                 (unsigned char)img->imageData[row*img->widthStep+col];
24                 img->imageData[row*img->widthStep+col] = (unsigned char)(20*(log(1+(double)img->imageData[row*img->widthStep+col])));
25         }
26     }
27
28         cvNamedWindow( "Image", 1 );//创建窗口
29         cvShowImage( "Image", img );//显示图像
30
31
32         cvWaitKey(0); //等待按键
33         cout<<"hello";
34         /*printf("%x",img->imageData[(img->height)*(img->widthStep)/2+(img->width)/2]);*/
35
36         cvDestroyWindow( "Image" );//销毁窗口
37         cvDestroyWindow( "Image1" );//销毁窗口
38         cvReleaseImage( &img ); //释放图像
39         return 0;
40 }
结果:
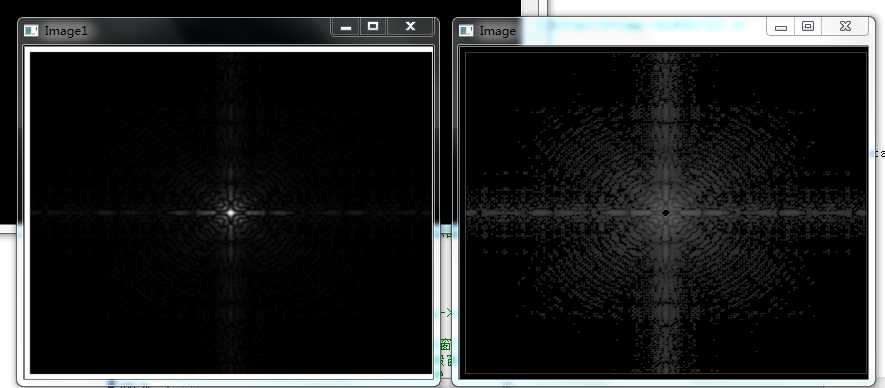
注意:程序让图像显示出了更多细节,但是不知道为什么中间的255白点变成了0?
Line16,32试图输出确切的灰度级,未果。。
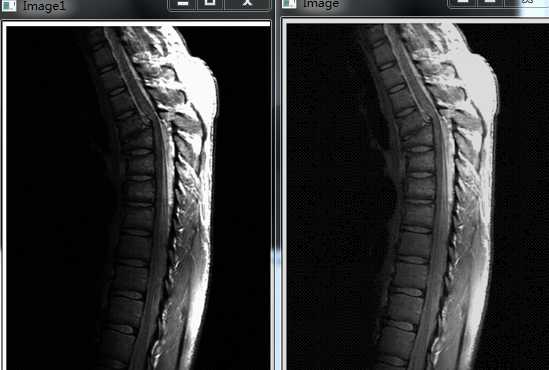
c. Power law transforms
expression: s = c * r ^γ
 1 #include <math.h>
 2 #include <stdio.h>
 3 using namespace cv;
 4 using namespace std;
 5 int main()
 6 {
 7     IplImage* img; //声明IplImage指针
 8     //载入图像
 9     img = cvLoadImage("C://Users//Administrator//Desktop//dip//spine.png",0) ;
10
11     cvNamedWindow( "Image1", 1 );//创建窗口
12     cvShowImage( "Image1", img );//显示图像
13
14     for(int row = 0; row<img->height; row++)
15     {
16         for (int col=0; col<img->width; col++)
17         {
18             //----------------关键代码在这儿----------------------
19                 (unsigned char)img->imageData[row*img->widthStep+col];
20                 img->imageData[row*img->widthStep+col] = 8*pow((double)(unsigned char)img->imageData[row*img->widthStep+col],0.6);
21         }
22     }
23
24         cvNamedWindow( "Image", 1 );//创建窗口
25         cvShowImage( "Image", img );//显示图像
26
27         cvWaitKey(0); //等待按键
28         cvDestroyWindow( "Image" );//销毁窗口
29         cvDestroyWindow( "Image1" );//销毁窗口
30         cvReleaseImage( &img ); //释放图像
31         return 0;
32 }
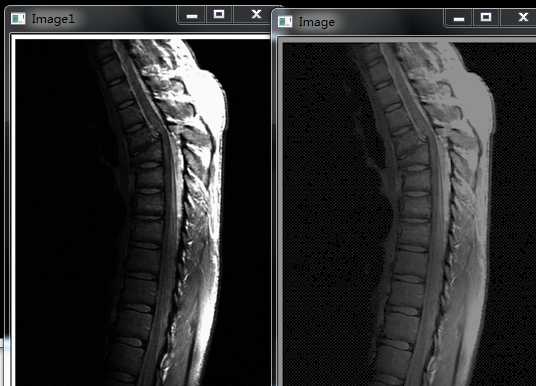
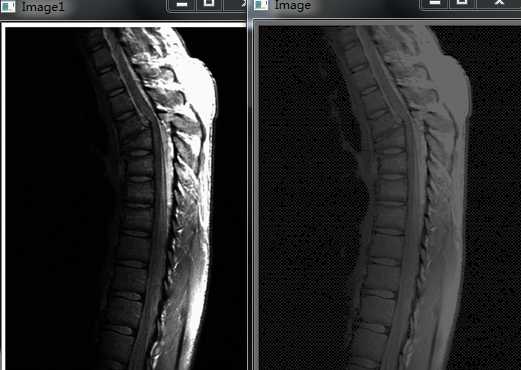
结果:c=8, γ=0.6 如下
c=16, γ=0.4 如下
%2J2`Y41_7)[3L)9O%YD.png)
c=20, γ=0.3 如下
d. Grey level slicing
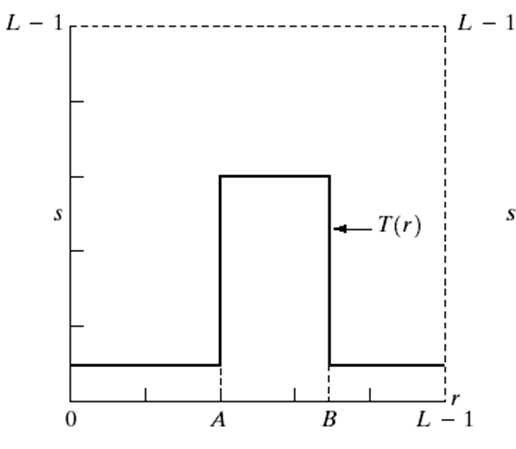

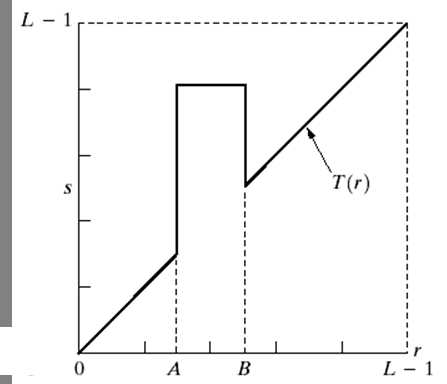

It is similar to thresholding
e. Bit plane slicing
 1 #include <opencv2\opencv.hpp>
 2 #include <iostream>
 3 #include <string>
 4 #include <math.h>
 5 #include <stdio.h>
 6 using namespace cv;
 7 using namespace std;
 8 int main()
 9 {
10     IplImage* img; //声明IplImage指针
11     IplImage* img2;
12     //载入图像
13     img = cvLoadImage("C://Users//Administrator//Desktop//dip//car.png",0) ;
14     img2 = cvLoadImage("C://Users//Administrator//Desktop//dip//cargone.png",0) ;
15     cout<<img->height<<endl;
16     cout<<img->width<<endl;
17     cout<<img2->height<<endl;
18     cout<<img2->width<<endl;
19
20     cvNamedWindow( "OriginalImage", 1 );//创建窗口
21     cvShowImage( "OriginalImage", img );//显示图像
22
23     cvNamedWindow( "OriginalImageCarGone", 1 );//创建窗口
24     cvShowImage( "OriginalImageCarGone", img2 );//显示图像
25
26     for(int row = 0; row<img->height; row++)
27     {
28         for (int col=0; col<img->width; col++)
29         {
30             //----------------关键代码在这儿----------------------
31                 (unsigned char)img->imageData[row*img->widthStep+col];
32                 (unsigned char)img2->imageData[row*img->widthStep+col];
33
34                 img->imageData[row*img->widthStep+col] = (255+(img2->imageData[row*img->widthStep+col])-(img->imageData[row*img->widthStep+col]))/2;
35         }
36     }
37
38         cvNamedWindow( "ProcessedImage", 1 );//创建窗口
39         cvShowImage( "ProcessedImage", img );//显示图像
40
41         cvWaitKey(0); //等待按键
42         cvDestroyWindow( "OriginalImage" );//销毁窗口
43         cvDestroyWindow( "OriginalImageCarGone" );//销毁窗口
44         cvDestroyWindow( "ProcessedImage" );//销毁窗口
45         cvReleaseImage( &img ); //释放图像
46         cvReleaseImage( &img2 ); //释放图像
47         return 0;
48 }
理想结果应该是这样:

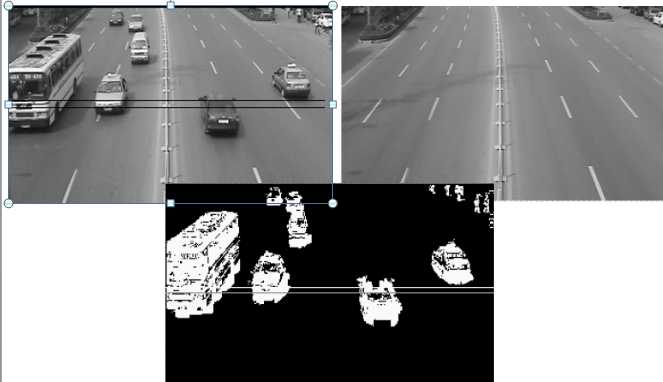
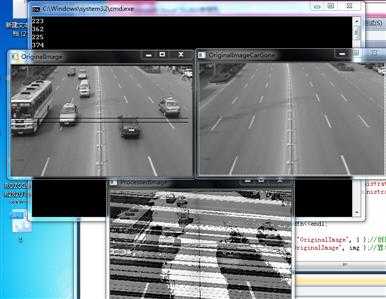
 1 #include <opencv2\opencv.hpp>
 2 #include <iostream>
 3 #include <string>
 4 #include <math.h>
 5 #include <stdio.h>
 6 using namespace cv;
 7 using namespace std;
 8 int main()
 9 {
10     IplImage* img; //声明IplImage指针
11     IplImage* img2;
12     //载入图像
13     img = cvLoadImage("C://Users//Administrator//Desktop//dip//banana.png",0) ;
14     img2 = cvLoadImage("C://Users//Administrator//Desktop//dip//bananamove.png",0) ;
15     cout<<"img1:height:"<<img->height<<endl;
16     cout<<"img1:width:"<<img->width<<endl;
17     cout<<"img2:height:"<<img2->height<<endl;
18     cout<<"img2:width:"<<img2->width<<endl;
19
20     cvNamedWindow( "OriginalImage", 1 );//创建窗口
21     cvShowImage( "OriginalImage", img );//显示图像
22
23     cvNamedWindow( "OriginalImageCarGone", 1 );//创建窗口
24     cvShowImage( "OriginalImageCarGone", img2 );//显示图像
25
26     for(int row = 0; row<img->height; row++)
27     {
28         for (int col=0; col<img->width; col++)
29         {
30             //----------------关键代码在这儿----------------------
31                 (unsigned char)img->imageData[row*img->widthStep+col];
32                 (unsigned char)img2->imageData[row*img->widthStep+col];
33
34                 img->imageData[row*img->widthStep+col] = (255+(img2->imageData[row*img->widthStep+col])-(img->imageData[row*img->widthStep+col]))/2;
35         }
36     }
37
38         cvNamedWindow( "ProcessedImage", 1 );//创建窗口
39         cvShowImage( "ProcessedImage", img );//显示图像
40
41         cvWaitKey(0); //等待按键
42         cvDestroyWindow( "OriginalImage" );//销毁窗口
43         cvDestroyWindow( "OriginalImageCarGone" );//销毁窗口
44         cvDestroyWindow( "ProcessedImage" );//销毁窗口
45         cvReleaseImage( &img ); //释放图像
46         cvReleaseImage( &img2 ); //释放图像
47         return 0;
48 }
结果:
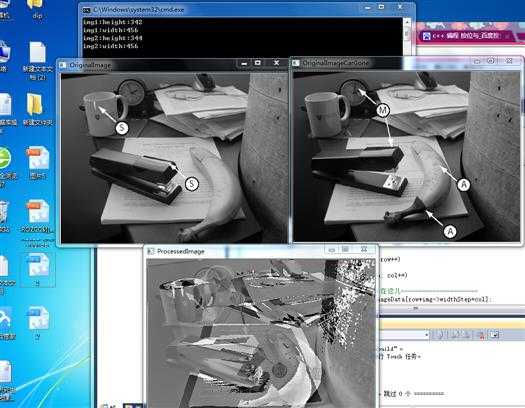
结果分析:
处理后的图片可以看到杯子移动、香蕉旋转、订书机的变化等,也就是图片不是标准的只动了一点,相机的位置估计有些变化,另外 大部分场景不是变成黑色,可能原因是光线变化。
An image f(x,y) with nois n(x,y)
![]()
To reduce the noise, we can collect a series of images of f(x,y) with different n(x,y), then get the averge image of them.
For example, we can get the Consecutive frames from a video.
3. Image Histograms(图像直方图)
通常,容易分辨的图片,其灰度直方图是比较均匀分布的,像曝光不足或过度的图像就会使图像灰度级整体偏小或偏大。
本节的内容是将不均匀的图像灰度直方图转换为比较均匀的。
![]()
转换公式可以是:

使用该公式有两点好处:a. 单调递增; b. 值域会映射到[0,1].
Example:
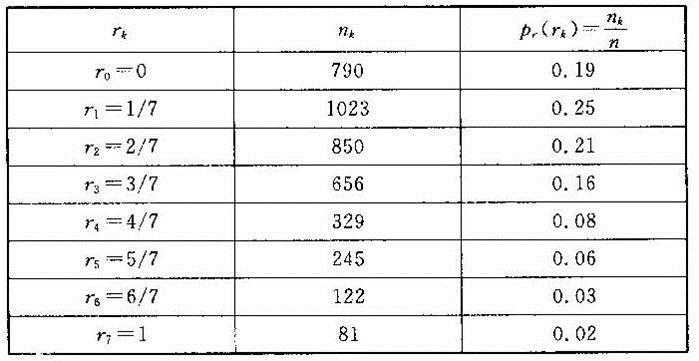
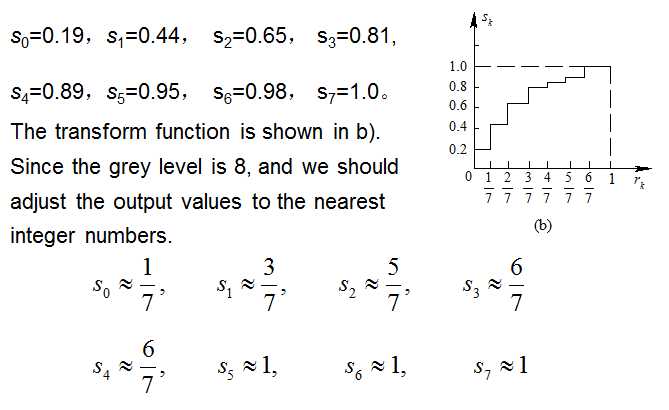
如此,就完成了整体灰度级的重新映射!
哈哈 竟然写完了 吃饭去喽~
DIP2-Enhancement(PointProcessing)
标签:
原文地址:http://www.cnblogs.com/luckyhtt/p/4340670.html