标签:
一句话:原型模式就是实现类的深度复制,而不是简单使用clone()。
1.直接用=只是复制了引用的地址,根本不算复制。
2.调用clone(),只保证引用的地址不同,该实例里面的对象(如果没实现clone)引用地址还是被直接复制(即里面回到了1的情况)。
public class 原型模式 {
    public static void main(String[] args) {
        //不使用clone来复制类
        foo f1 = new foo();
        System.out.println("f1: " + f1.i);
        foo f2 = f1;
        f2.i = 7;
        System.out.println("f1: " + f1.i);//可以看见原来的f1改变了

        //使用clone来复制类
        coo c1 = new coo();
        coo c2 = (coo) c1.clone();
        c2.i = 8;
        c2.s = "def";
        c2.f.i = 10;
        System.out.println("c1: " + c1.i + " " + c1.s + " " + c1.f.i);
        System.out.println("c2: " + c2.i + " " + c2.s + " " + c2.f.i);
    }
}

class foo {
    public int i = 3;
}

class coo implements Cloneable{
    public int i = 3;
    public String s = "abc";
    public foo f = new foo();

    @Override
    public Object clone() {
        Object obj = null;
        try {
            obj =  super.clone();
        } catch (Exception e) {
            e.printStackTrace();
        }
        return obj;
    }
}
结果: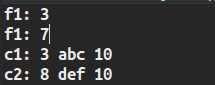
3.实现深度复制的方法
(1)不止被复制的对象要调用clone,该对象内部的属性也要实现clone()
public class 原型模式 {
    public static void main(String[] args) {
        //不使用clone来复制类
        foo f1 = new foo();
        System.out.println("f1: " + f1.i);
        foo f2 = f1;
        f2.i = 7;
        System.out.println("f1: " + f1.i);//可以看见原来的f1改变了

        //使用clone来复制类
        coo c1 = new coo();
        coo c2 = (coo) c1.clone();
        c2.i = 8;
        c2.s = "def";
        c2.f.i = 5;
        System.out.println("c1: " + c1.i + " " + c1.s + " " + c1.f.i);
        System.out.println("c2: " + c2.i + " " + c2.s + " " + c2.f.i);
    }
}

class foo  implements Cloneable{
    public int i = 3;

    @Override
    public Object clone() {
        Object obj = null;
        try {
            obj =  super.clone();
        } catch (Exception e) {
            e.printStackTrace();
        }
        return obj;
    }
}

class coo implements Cloneable{
    public int i = 3;
    public String s = "abc";
    public foo f = new foo();

    @Override
    public Object clone() {
        coo temp = new coo();
        try {
            temp.i = i;
            temp.s = s;
            temp.f = (foo) f.clone();
        } catch (Exception e) {
            e.printStackTrace();
        }
        return temp;
    }
}
(2)利用序列化
public class 原型模式 {
    public static void main(String[] args) {
        //不使用clone来复制类
        foo f1 = new foo();
        System.out.println("f1: " + f1.i);
        foo f2 = f1;
        f2.i = 7;
        System.out.println("f1: " + f1.i);//可以看见原来的f1改变了

        //使用clone来复制类
        coo c1 = new coo();
        coo c2 = c1.deepCopy();
        c2.i = 8;
        c2.s = "def";
        c2.f.i = 5;
        System.out.println("c1: " + c1.i + " " + c1.s + " " + c1.f.i);
        System.out.println("c2: " + c2.i + " " + c2.s + " " + c2.f.i);
    }
}

class foo implements Serializable{
    private static final long serialVersionUID = 1L;
    public int i = 3;

}

class coo implements Serializable{
    private static final long serialVersionUID = 3742135905473578347L;
    public int i = 3;
    public String s = "abc";
    public foo f = new foo();

    public coo deepCopy() {
        try {
            ByteArrayOutputStream buf = new ByteArrayOutputStream();
            ObjectOutputStream o = new ObjectOutputStream(buf);
            o.writeObject(this);

            ObjectInputStream in = new ObjectInputStream(new ByteArrayInputStream(buf.toByteArray()));
            return (coo)in.readObject();
        } catch (Exception e) {
            e.printStackTrace();
        }
        return null;
    }
}
结果同上。
总结:原型模式 <==> (深度)复制。
标签:
原文地址:http://www.cnblogs.com/programmer-kaima/p/4356749.html