标签:
演示一个案例,需求如下:
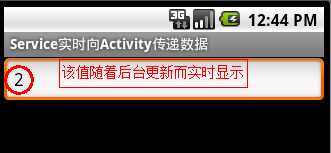
在Service组件中创建一个线程,该线程用来生产数值,每隔1秒数值自动加1,然后把更新后的数值在界面上实时显示。
步骤如下:
1、新建一个android项目工程,取名为demo。
2、新建一个Service类,用来实时生产数值,供界面实时显示。
package com.ljq.activity;

import android.app.Service;
import android.content.Intent;
import android.os.IBinder;
import android.util.Log;

public class CountService extends Service {
 private int count = 0;
 private boolean threadDisable=false;

 @Override
 public void onCreate() {
  super.onCreate();

  new Thread(new Runnable() {
   @Override
   public void run() {
    while (!threadDisable) {
     try {
      Thread.sleep(1000);
     } catch (InterruptedException e) {
      e.printStackTrace();
     }
     count++;
     Log.v("CountService", "Count is " + count);

     //发送广播
     Intent intent=new Intent();
     intent.putExtra("count", count);
     intent.setAction("com.ljq.activity.CountService");
     sendBroadcast(intent);
    }
   }
  }).start();

 }

 @Override
 public IBinder onBind(Intent intent) {
  return null;
 }

 @Override
 public void onDestroy() {
  super.onDestroy();
  count=0;
  threadDisable = true;
  Log.v("CountService", "on destroy");
 }


}
3、新建一个Activity类,显示数据。
package com.ljq.activity;

import android.app.Activity;
import android.content.BroadcastReceiver;
import android.content.Context;
import android.content.Intent;
import android.content.IntentFilter;
import android.os.Bundle;
import android.view.View;
import android.widget.Button;
import android.widget.EditText;

public class MainActivity extends Activity {
 private EditText editText=null;
 private MyReceiver receiver=null;

    @Override
    public void onCreate(Bundle savedInstanceState) {
        super.onCreate(savedInstanceState);
        setContentView(R.layout.main);

        editText=(EditText)findViewById(R.id.editText);

        //启动服务
        startService(new Intent(MainActivity.this, CountService.class));

  //注册广播接收器
  receiver=new MyReceiver();
  IntentFilter filter=new IntentFilter();
  filter.addAction("com.ljq.activity.CountService");
  MainActivity.this.registerReceiver(receiver,filter);
    }

    @Override
 protected void onDestroy() {
     //结束服务
        stopService(new Intent(MainActivity.this, CountService.class));
  super.onDestroy();
 }

    /**
     * 获取广播数据
     *
     * @author jiqinlin
     *
     */
    public class MyReceiver extends BroadcastReceiver {
     @Override
     public void onReceive(Context context, Intent intent) {
      Bundle bundle=intent.getExtras();
      int count=bundle.getInt("count");
      editText.setText(count+"");
     }
    }


}
4、main.xml布局文件
<?xml version="1.0" encoding="utf-8"?>
<LinearLayout xmlns:android="http://schemas.android.com/apk/res/android"
 android:orientation="vertical"
 android:layout_width="fill_parent"
 android:layout_height="fill_parent">
    <EditText android:layout_width="fill_parent"
        android:layout_height="wrap_content"
        android:cursorVisible="false"
        android:editable="false"
        android:id="@+id/editText"/>

</LinearLayout>
5、清单文件
<?xml version="1.0" encoding="utf-8"?>
<manifest xmlns:android="http://schemas.android.com/apk/res/android"
      package="com.ljq.activity"
      android:versionCode="1"
      android:versionName="1.0">
    <application android:icon="@drawable/icon" android:label="@string/app_name">
        <activity android:name=".MainActivity"
                  android:label="@string/app_name">
            <intent-filter>
                <action android:name="android.intent.action.MAIN" />
                <category android:name="android.intent.category.LAUNCHER" />
            </intent-filter>
        </activity>
  <service android:name =".CountService" />

    </application>
    <uses-sdk android:minSdkVersion="7" />

</manifest>
效果如下:
转自:http://www.cnblogs.com/linjiqin/p/3147764.html
标签:
原文地址:http://www.cnblogs.com/jasonkent27/p/4375379.html