标签:
1.背景
最近比较纠结,申请辞职后,一时走不了,因为还有一堆破事处理。我上一份职业,就是因为做得不开心,任性强行走人(一个月的薪水都不要了)。
这样做,真的好吗?作为过来人的体会,我以后肯定不会这样了,虽说走的潇洒,霸气,但会让一圈人脉断了,因为让你不好意思回头。
也许你不在乎,但确实在显摆个性的时候,形象也会受损的。有一句老话说:好聚好散!真是金玉良言啦。
连续奋战几天后,今天我美美地睡个好觉后,又不知道如何打发时光了。这人吧,很忙却挣钱少的时候,总会觉得累;可闲得没钱挣的时候,心却非常慌。
哎!还是写写博客吧,继续学习,才觉得充实自己。
2.说明
关于ASP.NET 5系列暂时不写了。微软不发布正式版,不能用于项目生产,搞得再明白也是白搭。
在myget.org发布的,已经beta5了,看样子进度很快,可何时到头,微软还是没有明确说明,让人期待却是没心底的等待,相当难受,索性就不关注也罢。
鉴于我还得多多学习,现在也遇到深一步提高水平的瓶颈。该总结什么好呢?不难觉得熟悉设计模式是提升自己编码水平的关键啦。
网上也大把介绍这些知识,市面上也很多这种书籍。可以说这是老生常谈的话题。
偶也买了一本王翔和孙逊写的《模式---工程化实现及扩展》C#版的书,园子里也有作者的博客。
以下总结的知识,大多吸取此书(书中除了代码排版乱点外,知识质量确实不错),自己概述不对之处,欢迎指点啦!
我在上一篇也写过依赖注入,但觉得不够详细。我觉得依赖注入,这项“技术”很重要,我把它再总结一遍,也是很好地再复习。
(注:大家提到设计模式,一般都是先讲设计原则,我在下一章再说吧。)
废话少说,进入正题:
3.场景
我们在讲道理,常常会举一些例子,才让人觉得好理解吧。在讲技术时,也是一样最好模拟一下场景,来介绍这项技术帮助我们解决了那些问题。
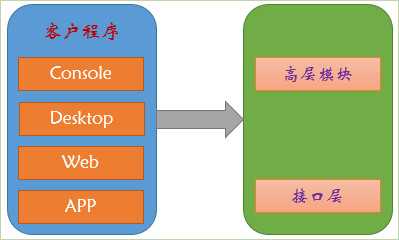
先说一下什么是客户程序?这里指的是UI表现层程序:

我们要实现客户程序获取年份,该如何实现呢?先写一个服务业务类:
using System;

namespace GiveCase.DI.Services
{
    /// <summary>
    /// 提供系统时间
    /// </summary>
    public class SystemTimeProvider
    {
        /// <summary>
        /// 获取当前日期
        /// </summary>
        public DateTime CurrentDate
        {
            get { return DateTime.Now; }
        }
    }
}
在客户程序代码:
using System;
using GiveCase.DI.Services;
namespace GiveCase.DI.Consoles
{
    class Program
    {
        static void Main(string[] args)
        {
            //实例化
            SystemTimeProvider stp = new SystemTimeProvider();

            //输出系统当前年份
            Console.WriteLine(stp.CurrentDate.Year);

            Console.ReadKey();
        }
    }
}
以上我们可以得到系统提供的年份,但是假如业务有变,我们获取其它来源提供的日期呢?
比如添加:OtherTimeProvider,客户程序要实例化使用它又得改变。我们该如何使用实例化呢?好吧,添加一个ITimeProvider接口:
using System;

namespace GiveCase.DI.Services
{
    public interface ITimeProvider
    {
        DateTime CurrentDate { get; }
    }
}
再修改一下SystemTimeProvider的实现(继承):
using System;

namespace GiveCase.DI.Services
{
    public class SystemTimeProvider : ITimeProvider
    {
        public DateTime CurrentDate
        {
            get { return DateTime.Now; }
        }
    }
}
你也可以添加OtherTimerProvider的实现:
using System;

namespace GiveCase.DI.Services
{
    /// <summary>
    /// 提供其它时间
    /// </summary>
    public class OtherTimeProvider : ITimeProvider
    {
        //TODO:更为精确的时间来源
        public DateTime CurrentDate
        {
            get { throw new NotImplementedException(); }
        }
    }
}
假如我们在客户程序使用系统时间获取年份,其代码改为:
using System;
using GiveCase.DI.Services;
namespace GiveCase.DI.Consoles
{
    class Program
    {
        static void Main(string[] args)
        {
            //接口引用具体实例
            ITimeProvider stp = new SystemTimeProvider();

            Console.WriteLine(stp.CurrentDate.Year);
            Console.ReadKey();
        }
    }
}
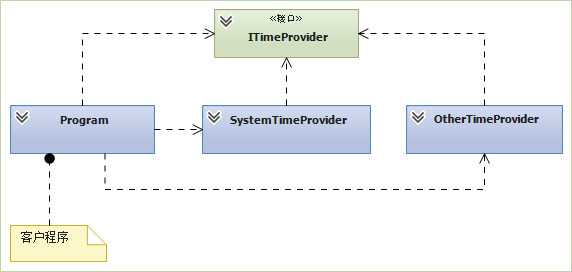
以上UML类图可以表示为:

注:业务不需要时OtherTimeProvider时,可以不画上。
客户程序依赖SystemTimeProvider的存在,显然没有达到解耦合目的。我们先用工厂模式,来解决这个问题,添加TimeProviderFactory:
using System;
using GiveCase.DI.Services;

namespace GiveCase.DI.Factories
{
    public static class TimeProviderFactory
    {
        public static ITimeProvider CreateTimeProvider(Genre genre)
        {
            switch (genre)
            {
                case Genre.A:
                    return new SystemTimeProvider();
                case Genre.B:
                    return new OtherTimeProvider();
                default:
                    throw new NotSupportedException();
            }
        }

        public enum Genre { A, B }
    }
}
这时客户程序调用工厂:
using System;
using GiveCase.DI.Services;
using GiveCase.DI.Factories;

namespace GiveCase.DI.Consoles
{
    class Program
    {
        static void Main(string[] args)
        {
            //接口引用工厂方法来生产对象实例
            ITimeProvider stp = TimeProviderFactory
                .CreateTimeProvider(GiveCase.DI.Factories.TimeProviderFactory.Genre.A);

            Console.WriteLine(stp.CurrentDate.Year);
            Console.ReadKey();
        }
    }
}
(注:这里只是使用简单工厂来演示,建议使用抽象工厂+反射)
此时类图:

我们利用工厂,已经不需要知道SystemTimProvider和OtherTimeProvider存在了。
这是不是一种完美解决方法呢?也许吧,毕竟工厂模式非常经典啦。
可是现在DI依赖注入框架大行其道,似乎用起来更方便,甚至可以控制对象的生命周期。
在使用DI框架前,我们自己先写一个保存实体类型的装配Assembler类,来体会各种注入方式:
using GiveCase.DI.Services;
using System;
using System.Collections.Generic;

namespace GiveCase.DI.Frameworks
{
    public class Assembler
    {
        //保存抽象类型和实体类型
        static Dictionary<Type, Type> d = new Dictionary<Type, Type>();

        static Assembler()
        {
            //注册抽象类型需要使用的实体类型
            d.Add(typeof(ITimeProvider), typeof(SystemTimeProvider));
        }

        public object Create(Type type)
        {
            if ((type == null) || !d.ContainsKey(type))
            {
                throw new NullReferenceException();
            }
            return Activator.CreateInstance(d[type]);
        }

        public T Create<T>()
        {
            return (T)Create(typeof(T));
        }
    }
}
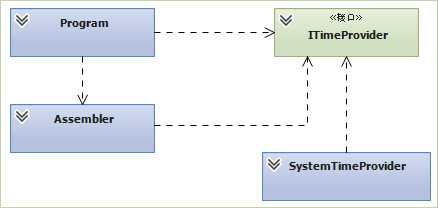
Assembler来装配类型(温馨提示:反射类型保存到Dictionary是一种方案,也可以保存到缓存或Key-Values型数据库中),就可以不用工厂:

注:演示就不再提OtherTimeProvier。
我们如何使用Assembler来装配类型,并注入客户程序使用呢?这里我们分为下面几种方式一一叙述。
4.构造注入
构造注入是在构造函数执行过程中,通过Assembler把抽象类型作为参数传递给客户类型,这也是一次性注入的。
其实现代码:
using GiveCase.DI.Services;

namespace GiveCase.DI.Tests.Constructors
{
    /// <summary>
    /// 构造注入
    /// </summary>
    public class Client
    {
        ITimeProvider _tp;
        public Client(ITimeProvider tp)
        {
            _tp = tp;
        }
    }
}
单元测试:
using Microsoft.VisualStudio.TestTools.UnitTesting;
using GiveCase.DI.Services;
using GiveCase.DI.Frameworks;

namespace GiveCase.DI.Tests.Constructors
{
    [TestClass]
    public class TestClient
    {
        [TestMethod]
        public void Test()
        {
            ITimeProvider tp = (new Assembler()).Create<ITimeProvider>();

            //判断抽象类型获取实例
            Assert.IsNotNull(tp);

            //在构造函数中注入
            Client c = new Client(tp);
        }
    }
}
5.设值注入
相对构造注入。设值注入给了客户类型后,还有修改的机会,它也适合生命周期较长的场景。
其实现代码:
using GiveCase.DI.Services;

namespace GiveCase.DI.Tests.Setters
{
    /// <summary>
    /// 设值注入
    /// </summary>
    public class Client
    {
        public ITimeProvider _tp { get; set; }
    }
}
单元测试:
using GiveCase.DI.Frameworks;
using GiveCase.DI.Services;
using Microsoft.VisualStudio.TestTools.UnitTesting;

namespace GiveCase.DI.Tests.Setters
{
    [TestClass]
    public class TestClient
    {
        [TestMethod]
        public void Test1()
        {
            ITimeProvider tp = (new Assembler()).Create<ITimeProvider>();

            //判断抽象类型获取实例
            Assert.IsNotNull(tp);

            Client c = new Client();
            c._tp = tp;
        }
    }
}
此测试方法也可以用Lamada简写成:
        [TestMethod]
        public void Test2()
        {
            var c = new Client()
            {
                _tp=(new Assembler()).Create<ITimeProvider>()
            };
        }
6.接口注入
接口注入是将抽象类型的入口以方法定义在一个接口中,如果客户类型需要获得这个方法,就以实现这个接口的方式完成注入。一般不建议使用这种方式。
定义要注入的ITimeProvider类型 接口:
using GiveCase.DI.Services;

namespace GiveCase.DI.Tests.Interfaces
{
    /// <summary>
    /// 定义要注入的类型
    /// </summary>
    public interface IObjectDI
    {
        ITimeProvider tp { get; set; }
    }
}
通过接口方式注入:
using GiveCase.DI.Services;
using System;

namespace GiveCase.DI.Tests.Interfaces
{
    public class Client : IObjectDI
    {
        public ITimeProvider tp { get; set; }
    }
}
单元测试:
using GiveCase.DI.Frameworks;
using GiveCase.DI.Services;
using Microsoft.VisualStudio.TestTools.UnitTesting;

namespace GiveCase.DI.Tests.Interfaces
{
    [TestClass]
    public class TestClient
    {
        [TestMethod]
        public void Test()
        {
            ITimeProvider _tp = (new Assembler()).Create<ITimeProvider>();

            //判断抽象类型获取实例
            Assert.IsNotNull(_tp);

            IObjectDI od = new Client();
            od.tp = _tp;
        }
    }
}
7.泛型版本的注入
这里举例泛型版的接口注入。
定义接口:
namespace GiveCase.DI.Tests.GenericInterfaces
{
    public interface IObjectDI<IType>
    {
        IType Provider { get; set; }
    }
}
客户程序实现:
using GiveCase.DI.Services;

namespace GiveCase.DI.Tests.GenericInterfaces
{
    public class Client : IObjectDI<ITimeProvider>
    {
        public ITimeProvider Provider { get; set; }
    }
}
单元测试:
using GiveCase.DI.Frameworks;
using GiveCase.DI.Services;
using Microsoft.VisualStudio.TestTools.UnitTesting;

namespace GiveCase.DI.Tests.GenericInterfaces
{
    [TestClass]
    public class TestClient
    {
        [TestMethod]
        public void Test()
        {
            var c = new Client()
            {
             Provider=(new Assembler()).Create<ITimeProvider>()
            };

            Assert.IsInstanceOfType(c.Provider, typeof(SystemTimeProvider));
        }
    }
}
注:关于接口注入,是比较暴力又啰嗦,就不要多用啦。上述别的方式也可以改成泛型版的(读者自己研究)。
8.特性注入
这项技术还是比较牛X的,我们改造Assembler,添加一个DecoratorAttribute:
using System;

namespace GiveCase.DI.Frameworks
{
    [AttributeUsage(AttributeTargets.Class, AllowMultiple = true)]
    public class DecoratorAttribute : Attribute
    {
        /// <summary>
        /// 实现客户类型实际需要的抽象类型的实体类型实例,即待注入到客户类型的内容
        /// </summary>
        public readonly object Injector;
        readonly Type _type;

        public DecoratorAttribute(Type type)
        {
            if (type == null)
            {
                throw new ArgumentNullException("type");
            }

            _type = type;
            Injector = (new Assembler()).Create(_type);
        }


        /// <summary>
        /// 客户类型需要的抽象对象类型
        /// </summary>
        public Type Type { get { return _type; } }
    }
}
再添加一个特性助手类:
using System;
using System.Linq;

namespace GiveCase.DI.Frameworks
{
    /// <summary>
    /// 用户帮助客户类型和客户程序获取其Attribute定义中需要的抽象类型实例
    /// </summary>
    public static class AttributeHelper
    {
        public static T Injector<T>(object target) where T : class
        {
            if (target == null) throw new ArgumentNullException("target");
            return (T)(((DecoratorAttribute[])target
                .GetType().GetCustomAttributes(typeof(DecoratorAttribute), false))
                .Where(x => x.Type == typeof(T))
                .FirstOrDefault()
                .Injector);
        }
    }
}
客户程序实现:
using GiveCase.DI.Frameworks;
using GiveCase.DI.Services;

namespace GiveCase.DI.Tests.Attributes
{
    [Decorator(typeof(ITimeProvider))]
    public class Client
    {
        public int GetYear()
        {
            // 与其他方式注入不同的是,这里使用的ITimeProvider来自自己的Attribute
            var provider = AttributeHelper.Injector<ITimeProvider>(this);
            return provider.CurrentDate.Year;
        }
    }
}
单元测试:
using Microsoft.VisualStudio.TestTools.UnitTesting;

namespace GiveCase.DI.Tests.Attributes
{
    [TestClass]
    public class TestClient
    {
        [TestMethod]
        public void Test()
        {
            Assert.IsTrue(new Client().GetYear() > 0);
        }
    }
}
嘎嘎!这种方式是不是爽呆了,有点象MEF框架了,下面我们介绍.NetFramework自带的MEF框架,它比我们自己写的特性注入强大得多。
9.MEF注入
导出部件:

客户程序代码:
using GiveCase.DI.Services;
using System;
using System.ComponentModel.Composition;
using System.ComponentModel.Composition.Hosting;

namespace GiveCase.DI.Tests.MEF
{
    public class Client
    {
        //导入部件
        [Import]
        public ITimeProvider _tp { get; set; }

        #region 此段代码一般写在程序入口
        private static CompositionContainer container;
        public void Compose()
        {
            //var catalog = new AssemblyCatalog(Assembly.GetExecutingAssembly());
            //container = new CompositionContainer(catalog);
            ////将部件和宿主程序添加到组合容器
            //container.ComposeParts(this, new SystemTimeProvider());

            var catalog = new DirectoryCatalog(AppDomain.CurrentDomain.BaseDirectory, "GiveCase.DI.Services.dll");
            container = new CompositionContainer(catalog);
            //将部件和宿主程序添加到组合容器
            container.ComposeParts(this);
        }
        #endregion
    }
}
单元测试:
using Microsoft.VisualStudio.TestTools.UnitTesting;

namespace GiveCase.DI.Tests.MEF
{
    [TestClass]
    public class TestClient
    {
        [TestMethod]
        public void Test()
        {
            var c = new Client();
            c.Compose();

            Assert.IsTrue(c._tp.CurrentDate.Year > 0);
        }
    }
}
关于MEF更多知识,建议读者另行了解。另外别的DI框架,本人不是很懂,就不在这里举例了。
对于ASP.NET 5 新技术来说,模块化的DI框架已经更为简单。上一章也简单说过了。
10.小结
本章内容是我对上一章重新整理,代码基本是参考书得来的,如有侵权行为,我广告补偿了,也够意思啦。
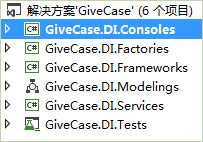
本章项目目录,如下图:

需要源码的(其实也没必要了,我贴码时,命名空间都带了……),请加QQ群:290576772 到群空间下载!
标签:
原文地址:http://www.cnblogs.com/givecase/p/4380689.html