0 本文的程序例子
先说说代码例子,文章最后面有个程序,直接将代码拷贝到新建的playground文件中,就可以这样展示和调试了
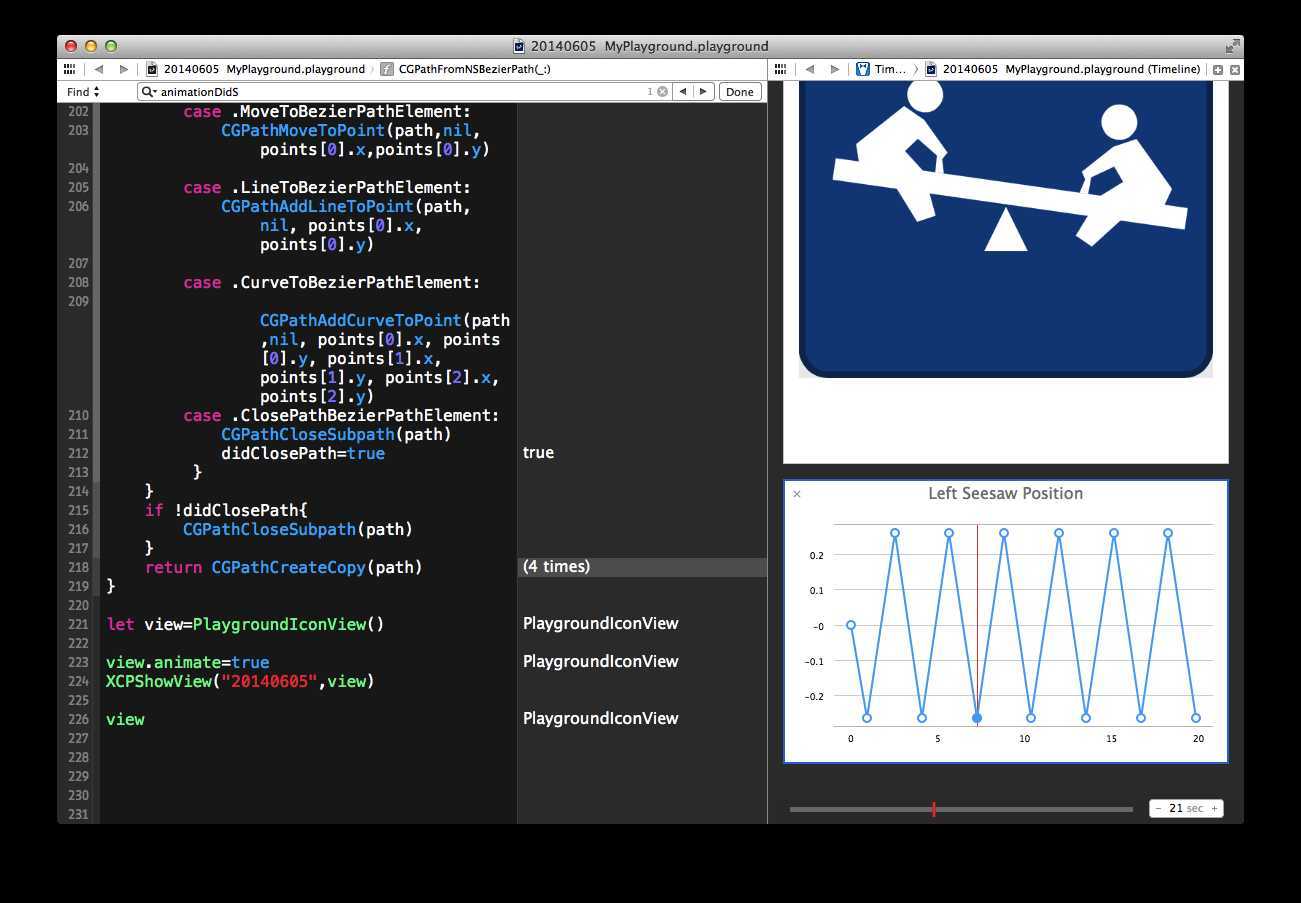
普通的代码编写过程中直接就在右栏中显示执行结果,点击执行结果右边有两个小图标,一个眼睛的图标,可以直观看到图形或数值(当前状态),另外一个是+号,可以回溯历史数据和变量之间的相关性。 点击+号就可以看到上面的跷跷板和变量执行图,还有右下角的时间轴,可以手动拖放回滚。
1、什么是playground?playground是Xcode的新的调试程序的一个工具,它提供灵活的数据展示方式,弥补了我们之前调试程序的手段的不足之处,它支持QuickLook多样式调试显示,不用添加测试代码、也不用按Run执行程序,就可以直观地查看运行情况,实时查看变量,可以直接查看的类型有:Color类型、String类型、Image类型、View类型、数据等等,可以自已开发动态展示的代码(实现接口),使用XCPCaptureValue函数观察和回溯动态过程。
有什么情况不用playground ?游乐场虽好,但毕竟还是游乐场,目前它不支持界面交互,也就是说暂时无法在Playground上玩你实现的游戏。只能看不能动,还有就是无法直接执行你的App程序,毕竟它不是模拟器。
2、playground有什么好处呢?从学习的用途上来说,它便于练习Swift,对初学编程的人来讲更是有好处,不用整天按F6,F7,也不用等虚拟机运行程序看结果。从开发者角度上来看,它便于调试核心算法,测试一些涉及绘制的程序、图像处理等一些又要看得见又不太方便用其他测试代码做到的
对使用开发环境的人来说,Playground有利于学习和尝试各种API,因为你不用为此设立项目,带着一个文件就可以到处跑
3、 用个例子说明playground怎么用,我们直接上代码吧,我从WWDC2014会上展示的内容好象没有找到代码下载,所以先从视频上抄下一些代码,动手测试一下。这些代码只要直接拷到playground里面去就可以了,我们只要做几个事情
a、在文件头引入 import XCPlayground,用于下文实现playground的一些接口
b、实现func XCPCaptureValue<T>(identifier: String, value: T)用于显示程序执行过程中的历史数据,你可以用时间轴回滚,同时也看到变量与变量之间的关系。
c、实现func XCPShowView(identifier: String, view: NSView),直接显示程序的动态执行过程,两个小孩在跷跷板上玩,然后你看到跷跷板变角度变量的历史过程和实现手动操作回滚
代码如下:
import Cocoa
import QuartzCore
import XCPlayground
class PlaygroundIconView:NSView {
let backgroundLayer=CAShapeLayer()
let seesawBaseLayer=CAShapeLayer()
let seesawLayer=CAShapeLayer()
init(){
super.init(frame:NSRect(x:0,y:0,width:568,height:568))
backgroundLayer.frame=self.bounds
seesawBaseLayer.frame=NSRect(x:254,y:124,width:60,height:111)
seesawLayer.frame=NSRect(x:40,y:197, width:488,height:30)
setUpBackgroundLayer()
setUpSeesawBaseLayer()
setUpSeesawLayer()
self.wantsLayer=true
self.layer.addSublayer(backgroundLayer)
self.layer.addSublayer(seesawBaseLayer)
self.layer.addSublayer(seesawLayer)
}
func setUpBackgroundLayer(){
let lineWidth=9.0
let backgroundPath=NSBezierPath(roundedRect:NSInsetRect(bounds, lineWidth/2, lineWidth/2),xRadius:35.0,yRadius:35.0)
backgroundPath.lineWidth=lineWidth
backgroundLayer.strokeColor=NSColor.playgroundIconStrokeColor().CGColor
backgroundLayer.fillColor=NSColor.playgroundIconFillColoer().CGColor
backgroundLayer.lineWidth=lineWidth
backgroundLayer.path=CGPathFromNSBezierPath(backgroundPath)
}
func setUpSeesawBaseLayer(){
let seesawBasePath=NSBezierPath()
let rectHeight:Int=50;
seesawBasePath.moveToPoint(NSPoint(x:0,y:rectHeight))
seesawBasePath.lineToPoint(NSPoint(x:seesawBaseLayer.bounds.width/2,y:seesawBaseLayer.bounds.height))
seesawBasePath.lineToPoint(NSPoint(x:seesawBaseLayer.bounds.width,y:50))
seesawBaseLayer.fillColor=NSColor.whiteColor().CGColor
seesawBaseLayer.path=CGPathFromNSBezierPath(seesawBasePath)
}
func setUpSeesawLayer(){
let createChildLayer:()->CAShapeLayer={
let childLayer=CAShapeLayer()
let headPath=NSBezierPath(ovalInRect:NSRect(x:60,y:150,width:49,height:49))
let bodyPath=NSBezierPath()
bodyPath.moveToPoint(NSPoint(x:58,y:155))
bodyPath.lineToPoint(NSPoint(x:88,y:140))
bodyPath.lineToPoint(NSPoint(x:126,y:100))
bodyPath.lineToPoint(NSPoint(x:120,y:90))
bodyPath.lineToPoint(NSPoint(x:125,y:71))
bodyPath.lineToPoint(NSPoint(x:113,y:71))
bodyPath.lineToPoint(NSPoint(x:112,y:94))
bodyPath.lineToPoint(NSPoint(x:83,y:113))
bodyPath.lineToPoint(NSPoint(x:68,y:94))
bodyPath.lineToPoint(NSPoint(x:97,y:70))
bodyPath.lineToPoint(NSPoint(x:122,y:12))
bodyPath.lineToPoint(NSPoint(x:98,y:0))
bodyPath.lineToPoint(NSPoint(x:64,y:41))
bodyPath.lineToPoint(NSPoint(x:7,y:71))
bodyPath.lineToPoint(NSPoint(x:0,y:94))
bodyPath.moveToPoint(NSPoint(x:58,y:155))
let childPath=NSBezierPath()
childPath.appendBezierPath(headPath)
childPath.appendBezierPath(bodyPath)
childLayer.fillColor=NSColor.whiteColor().CGColor
childLayer.path=CGPathFromNSBezierPath(childPath)
return childLayer
}
let leftChildLayer = createChildLayer()
let rightChildLayer = createChildLayer()
rightChildLayer.transform=CATransform3DMakeRotation(M_PI,0.0,0.0,1.0)
rightChildLayer.geometryFlipped=true
let benchLayer = CALayer()
benchLayer.frame=NSRect(x:0,y:41,width:self.seesawLayer.bounds.width,height:30)
benchLayer.backgroundColor=NSColor.whiteColor().CGColor
leftChildLayer.frame=NSRect(x:25,y:0,width:126,height:200)
rightChildLayer.frame=NSRect(x:488-(126+25),y:0,width:126,height:200)
seesawLayer.addSublayer(leftChildLayer)
seesawLayer.addSublayer(rightChildLayer)
seesawLayer.addSublayer(benchLayer)
seesawLayer.delegate=self
}
let maxSeesawAngle=M_PI / 12
var currentSeesawAngle = 0.0
var animate:Bool = false{
didSet(oldAnimate){
if animate != oldAnimate && animate {
if currentSeesawAngle == 0 {
//@Bailey
//设置捕捉动态记录和显示的参数
XCPCaptureValue("Left Seesaw Position",0 )
animateSeesawToAngle(maxSeesawAngle,duration: 0.75)
}
else
{
animateSeesawToAngle(currentSeesawAngle * -1)
}
}
}
}
func animateSeesawToAngle(angle:CGFloat,duration:CFTimeInterval = 1.5 )-> CAAnimation{
let angleAnimation = CABasicAnimation(keyPath:"transform")
angleAnimation.fromValue=NSValue(CATransform3D:seesawLayer.transform)
angleAnimation.toValue=NSValue(CATransform3D:CATransform3DMakeRotation(angle, 0.0, 0.0, 1.0))
angleAnimation.timingFunction = CAMediaTimingFunction(name:kCAMediaTimingFunctionEaseInEaseOut)
angleAnimation.duration = duration
angleAnimation.delegate=self
seesawLayer.addAnimation(
angleAnimation, forKey: "transform")
seesawLayer.transform=CATransform3DMakeRotation(angle,0.0, 0.0, 1.0)
currentSeesawAngle=angle
return angleAnimation
}
override func animationDidStop(_:CAAnimation!,finished:Bool){
if finished && animate {
//@Bailey
//设置捕捉动态记录和显示的参数
XCPCaptureValue("Left Seesaw Position",-currentSeesawAngle )
animateSeesawToAngle(currentSeesawAngle * -1)
}
}
}
extension NSColor {
class func playgroundIconFillColoer()->NSColor{
return NSColor(red:12/255,green:65/255,blue:135/255,alpha:1.0)
}
class func playgroundIconStrokeColor()->NSColor{
return NSColor(red:9/255,green:44/255,blue:91/255,alpha:1.0)
}
}
func CGPathFromNSBezierPath(nsPath:NSBezierPath)->CGPath! {
if nsPath.elementCount==0{
return nil
}
let path=CGPathCreateMutable()
var didClosePath=false
for i in 0..nsPath.elementCount{
var points=NSPoint[](count:3,repeatedValue:NSZeroPoint)
switch nsPath.elementAtIndex(i, associatedPoints: &points){
case .MoveToBezierPathElement:
CGPathMoveToPoint(path,nil,points[0].x,points[0].y)
case .LineToBezierPathElement:
CGPathAddLineToPoint(path, nil, points[0].x, points[0].y)
case .CurveToBezierPathElement:
CGPathAddCurveToPoint(path,nil, points[0].x, points[0].y, points[1].x, points[1].y, points[2].x, points[2].y)
case .ClosePathBezierPathElement:
CGPathCloseSubpath(path)
didClosePath=true
}
}
if !didClosePath{
CGPathCloseSubpath(path)
}
return CGPathCreateCopy(path)
}
let view=PlaygroundIconView()
view.animate=true
//@Bailey
//显示游乐场跷跷板动态图标以及时间轴用于程序计算回溯
XCPShowView("20140605",view)
view
Playground动手玩 (在OSx 10.9.3 、Xcode 6 beta环境下测试playground,只能用Swift语言),布布扣,bubuko.com
Playground动手玩 (在OSx 10.9.3 、Xcode 6 beta环境下测试playground,只能用Swift语言)
原文地址:http://www.cnblogs.com/bailey/p/3777071.html