标签:
学习PHP脚本编程语言之前,必须先搭建并熟悉开发环境,开发环境有很多种,例如LAMP ,WAMP,MAMP等。这里我介绍一下LAMP环境的搭建,即Linux、 Apache、 MySQL 、PHP环境。
一、首先安装操作系统
操作系统:centos6.5
操作系统安装步骤,此处不再详述。
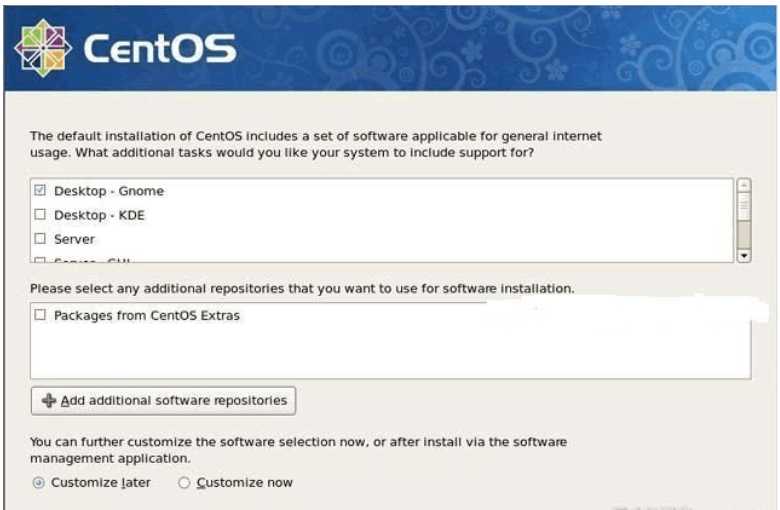
备注:服务器系统采用最小化安装,安装一下GCC编译工具和一个桌面即可。如下图所示:
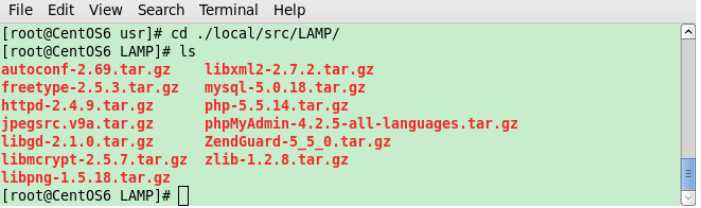
由于安装系统的时候我是最小化安装,只安装了一个桌面,GCC编译工具也是系统装完之后安装的,所以没有默认的LAMP环境,如下图示:

如果安装的时候有选择默认全部安装,就已经安装了LAMP环境,但是相对版本较低,而且安装的路径
等可能不是我们想要的结果。所以这里顺便介绍一下,如果存在默认的LAMP环境,进行卸载的方法,
以apache为例:
#rpm -qa | grep -i httd // 查询系统中已安装的Apache相关软件包
#service httpd stop //如果 apache已开启,停止运行apache服务器
#rpm -e httpd-xxx --nodeps //卸载 apache服务器 php、 mysql卸载方法同上。
【搭建LAMP环境须知】
搭建LAMP环境时,需要安装的所有软件都要按照一定的顺序安装,我们按照Apache->MySQL->PHP的顺序安装。但是在安装PHP之前,应先安装PHP5需要的最新版本库文件,例如libxml2、libmcrypt,以及GD2库等文件。安装GD2库是为了让PHP5支持 GIF、PNG和JPEG图片格式,所以在安装GD2库之前还要先安装最新的zlib、libpng、freetype和jpegsrc等库文件。而且中间还会穿插安装一些软件。
二、LAMP安装前的准备
1、获取软件包
httpd-2.4.9.tar.gz http://httpd.apache.org/
mysql-5.7.4.tar.gz http://dev.mysql.com/downloads/
php-5.5.14.tar.gz http://cn2.php.net/downloads.php
phpMyAdmin-4.2.5-all-languages.tar.gz http://www.phpmyadmin.net/home_page/downloads.php
libxml2-2.9.0.tar.gz ftp://xmlsoft.org/libxml2/
libmcrypt-2.5.8.tar.gz ftp://mcrypt.hellug.gr/pub/crypto/mcrypt/libmcrypt/
libgd-2.1.0.tar.gz https://bitbucket.org/libgd/gd-libgd/downloads
zlib-1.2.8.tar.gz http://www.zlib.net
autoconf-2.69.tar.gz http://ftp.gnu.org/gnu/autoconf/
freetype-2.5.3.tar.gz http://download.savannah.gnu.org/releases/freetype/
libpng-1.6.12.tar.gz ftp://ftp.simplesystems.org/pub/libpng/png/src/
jpegsrc.v9a.tar.gz http://www.ijg.org/files/
ZendGuard-5_5_0.tar.gz http://www.zend.com/en/products/guard/thank-you-zend-guard?package=415
apr-1.5.1.tar.gz http://apr.apache.org/download.cgi
apr-util-1.5.3.tar.gz http://apr.apache.org/download.cgi
pcre-8.35.zip http://sourceforge.net/projects/pcre
把上面下载的16个源代码包放到linux系统下的/usr/local/src/LAMP目录中
2、编译工具安装
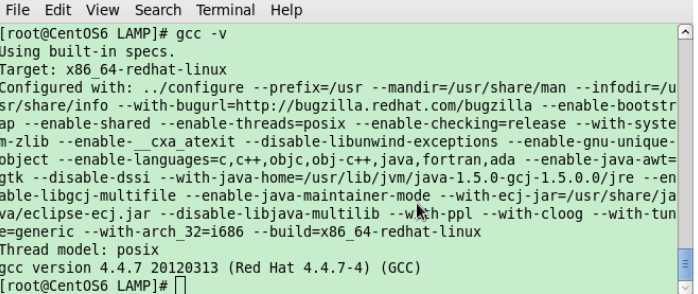
如果安装系统的时候已经安装了GCC编译工具,则显示上图中的信息,如果没有安装,可以使用下面的方法进行安装: 检查是否安装:
[root@centos6 ~]# rpm -q make gcc gcc-c++ zlib-devel libaio
备注:安装libpng时候需要zlib-devel 安装mysql时候需要libaio
如果没安装则yum安装:
[root@centos6 ~]# yum -y install make gcc gcc-c++ zlib-devel libaio
3、配置防火墙,开启80端口、3306端口
编辑/etc/sysconfig/iptables文件,配置防火墙
[root@centos6 ~]# vi /etc/sysconfig/iptables
添加下面两句,开启相应端口:
-A INPUT -m state --state NEW -m tcp -p tcp --dport 80 -j ACCEPT #允许80端口通过防火墙
-A INPUT -m state --state NEW -m tcp -p tcp --dport 3306 -j ACCEPT #允许3306端口通过防火墙
备注:很多网友把这两条规则添加到防火墙配置的最后一行,导致防火墙启动失败,正确的应该是添加到默认的22端口这条规则的下面如下所示:
######################## 添加好之后防火墙规则如下所示 ######################## # Firewall configuration written by system-config-firewall # Manual customization of this file is not recommended. *filter
:INPUT ACCEPT [0:0] :FORWARD ACCEPT [0:0] :OUTPUT ACCEPT [0:0]
-A INPUT -m state --state ESTABLISHED,RELATED -j ACCEPT -A INPUT -p icmp -j ACCEPT -A INPUT -i lo -j ACCEPT
-A INPUT -m state --state NEW -m tcp -p tcp --dport 22 -j ACCEPT -A INPUT -m state --state NEW -m tcp -p tcp --dport 80 -j ACCEPT -A INPUT -m state --state NEW -m tcp -p tcp --dport 3306 -j ACCEPT -A INPUT -j REJECT --reject-with icmp-host-prohibited -A FORWARD -j REJECT --reject-with icmp-host-prohibited COMMIT
######################## 添加好之后防火墙规则如上所示 ########################
最后重启防火墙使配置生效
[root@centos6 ~]# /etc/init.d/iptables restart
4、关闭SELINUX
编辑/etc/selinux/config文件
[root@centos6 ~]# vi /etc/selinux/config
详细修改如下所示:
#SELINUX=enforcing #注释掉
#SELINUXTYPE=targeted #注释掉
SELINUX=disabled #增加
:wq #保存,关闭
[root@centos6 ~]#shutdown -r now #重启系统
三、开始搭建LAMP环境 安装时的主要步骤:
(1)解压tar.gz为后缀的压缩包软件
LAMP环境搭建所需要的每个软件的源代码文件,都是以.tar.gz提供给我们的打包压缩文件,所以我们必须将其解压再解包。可通过命令#tar zxvf tarfile.tar.gz达到目的。
(2)在linux系统中源代码包安装过程
进行解压后的目录,LAMP环境搭建所需要的软件都使用C语言开发的,所以安装源代码文件最少需要配置(configure)、编译(make)、安装(make install)三个步骤。
1、确认搭建LAMP所需要的环境是否已经安装 此步骤前面已经完成。
2、编译安装libxml2
注:libxml2是一个xml的c语言版的解析器,不仅支持c语言,还支持c++、php、Pascal、Ruby、Tcl等语言的绑定
[root@centos6 LAMP]# pwd
/usr/local/src/LAMP
[root@centos6 LAMP]# tar -zxvf libxml2-2.7.8.tar.gz [root@centos6 LAMP]# cd ./libxml2-2.7.8
[root@centos6 libxml2-2.7.8]# ./configure --prefix=/usr/local/libxml2/ [root@centos6 libxml2-2.7.8]# make [root@centos6 libxml2-2.7.8]# make install
注:选项--prefix=/usr/local/libxml2作用是将软件安装到/usr/local/libxml2 目录下。
如果安装成功以后,在/usr/local/libxml2/目录下将生成bin,include,lib,share四个目录。在后面安装 PHP5
源代码的配置时,会通过在configure命令的选项中加上"--with-libxml-dir=/usr/local/libxml2"选项,用于指定安装libxml2库文件的位置。
3、编译安装libmcrypt
注:libmcrypt是加密算法扩展库。支持DES, 3DES, RIJNDAEL, Twofish, IDEA, GOST, CAST-256, ARCFOUR, SERPENT, SAFER+等算法。
[root@centos6 LAMP]# pwd
/usr/local/src/LAMP
[root@centos6 LAMP]# tar -zxvf libmcrypt-2.5.8.tar.gz
[root@centos6 LAMP]# cd ./libmcrypt-2.5.8
[root@centos6 libmcrypt-2.5.8]# ./configure --prefix=/usr/local/libmcrypt/
[root@centos6 libmcrypt-2.5.8]# make;make install
如果安装成功就会在/usr/local/libmcrypt/目录下生成bin,include,lib,man,share五个目录。然后在安 装 PHP5源代码包的配置时,就可以通过configure命令加上“--with-mcrypt-dir=/usr/local/libmcrypt” 选项,指定这个libmcrypt库文件的位置。
如./configure时报错:configure: error: C++ compiler cannot create executables 。
解决方案: 运行下面命令,然后重新configure(配置)
yum install gcc gcc-c++ gcc-g77
安装完成libmcrypt库以后,不同的linux系统版本有可能还要安装一下libltdl库。安装方法和前面的步骤相同,可以进入到解压缩的 目录/usr/local/src/libmcrypt-2.5.8下,找到libltdl库源代码所在的目录libltdl,进入这个目录按照下面几个 命令配置、编译、安装就可以了。
[root@localhost libltdl]# pwd
/usr/local/src/libmcrypt-2.5.8/libltdl //进入软件源代码目录
[root@localhost libltdl]# ./configure –enable-ltdl-install //配置ltdl库的安装
[root@localhost libltdl]# make //编译
[root@localhost libltdl]# make install //安装
4、编译安装zlib
注:zlib是提供数据压缩用的函式库
[root@centos6 LAMP]# pwd
/usr/local/src/LAMP
[root@centos6 LAMP]# tar -zxvf zlib-1.2.5.tar.gz
[root@centos6 LAMP]# cd ./zlib-1.2.5
[root@centos6 zlib-1.2.5]# ./configure --prefix=/usr/local/zlib/
[root@centos6 zlib-1.2.5]# make make install
如果安装成功将会在/usr/local /zlib目录下生成include,lib,share三个目录。在安装PHP5配置时,在 configure命令的选项中加上“--with- zlib-dir=/usr/local/libmcrypt”选项,用于指定zlib库文件位置。
5、编译安装libpng
[root@centos6 LAMP]# pwd
/usr/local/src/LAMP
[root@centos6 LAMP]# tar -zxvf libpng-1.5.4.tar.gz
[root@centos6 LAMP]# cd ./libpng-1.5.4
[root@centos6 libpng-1.5.4]# ./configure --prefix=/usr/local/libpng/ --enable-shared
[root@centos6 libpng-1.5.4]# make make install
在./configure --prefix=/usr/local/libpng这步最后会提示:configure: error: ZLib not installed
解决方法如下:
1)进入zlib的源文件目录,执行命令 make clean,清除zlib;
2)重新配置 ./configure,后面不要接--prefix参数;
3)make && make install;
4)进入libpng目录,执行命令 ./configure --prefix=/usr/local/libpng;
5)make && make install;
6)安装成功. 如果安装成功将会在/usr/local/libpng目录下生成bin,include,lib和share四个目录。在安装GD2库配置时,通 过在configure命令选项中加上“--with-png=/usr/local/libpng”选项,指定libpng库文件的位置。
6、编译安装jpeg
注:安装GD2库前所需的jpeg8库文件,需要自己手动创建安装需要的目录,它们在安装时不能自动创建。
[root@centos6 LAMP]# pwd
/usr/local/src/LAMP
[root@centos6 LAMP]# tar -zxvf jpegsrc.v8c.tar.gz
[root@centos6 LAMP]# cd ./jpeg-8c/
[root@centos6 jpeg-8c]# mkdir /usr/local/jpeg/ (创建jpeg软件的安装目录)
[root@centos6 jpeg-8c]# mkdir /usr/local/jpeg/bin/ (创建存放命令的目录)
[root@centos6 jpeg-8c]# mkdir /usr/local/jpeg/lib/ (创建jpeg库文件所在目录)
[root@centos6 jpeg-8c]# mkdir /usr/local/jpeg/include/ (创建存放头文件目录)
[root@centos6 jpeg-8c]# mkdir -p /usr/local/jpeg/man/man1 (建立存放手册的目录)
[root@centos6 jpeg-8c]# ./configure --prefix=/usr/local/jpeg/ \ > --enable-shared \ > --enable-static(建立共享库使用的GNU的libtool和静态库使用的GNU的libtool)
[root@centos6 jpeg-8c]# make make install
在安装GD2库配置时,可以在configure命令的选项中加上“--with-jpeg=/usr/local/jpeg8”选项,指定jpeg8 库文件的位置。安装PHP时也要指定该库文件的位置。
7、编译安装freetype
[root@centos6 LAMP]# pwd
/usr/local/src/LAMP
[root@centos6 LAMP]# tar -zxvf freetype-2.4.6.tar.gz
[root@centos6 LAMP]# cd ./freetype-2.4.6
[root@centos6 freetype-2.4.6]# ./configure --prefix=/usr/local/freetype/ --enable-shared
[root@centos6 freetype-2.4.6]# make make install
如果安装成功将会在/usr/local/freetype目录下存在bin,include,lib和share四个目录。并在安装GD2库 时,通过configure命令选项中加上“--with-freetype=/usr/local/freetype/”选项,指定freetype库文件位置。
8、编译安装autoconf
唯一注意的地方是configure时,不用指定路径。
[root@centos6 LAMP]# pwd
/usr/local/src/LAMP
[root@centos6 LAMP]# tar -zxvf autoconf-2.68.tar.gz
[root@centos6 LAMP]# cd ./autoconf-2.68
[root@centos6 autoconf-2.68]# ./configure
[root@centos6 autoconf-2.68]# make make install
9、 编译安装GD
[root@centos6 LAMP]# pwd
/usr/local/src/LAMP
[root@centos6 LAMP]# tar -zxvf gd-2.0.35.tar.gz
[root@centos6 LAMP]# cd ./gd-2.0.35
[root@centos6 gd-2.0.35]# ./configure \ //配置命令
> --prefix=/usr/local/gd \ //指定安装软件的位置
> --with-jpeg=/usr/local/jpeg/ \ //指定去哪找jpeg库文件
> --with-png=/usr/local/libpng/ \ //指定去哪找png库文件
> --with-zlib=/usr/local/zlib/ //指定去哪找zlib库文件
> --with-freetype=/usr/local/freetype/ //指定去哪找freetype 2.x字体库的位置
[root@centos6 gd-2.0.35]# make make install
如果安装成功会在/usr/local/gd/目录下存在bin、include和lib这三个目录。在安装PHP5时,通过在configure命令选项中加上“--with-gd=/usr/local/gd”选项,指定GD库文件的位置。
如果报错:
gd_png.c 中 gdMalloc函数的问题
make[2]: *** [gd_png.lo] Error 1
make[2]: Leaving directory `/tmp/gd-2.0.35‘
make[1]: *** [all-recursive] Error 1
make[1]: Leaving directory `/tmp/gd-2.0.35‘ make: *** [all] Error 2
解决方案:
vi gd_png.c
找到#include "png.h"改成#include "/usr/local/libpng/include/png.h" 如果报错:unrecognized option –with-zlib
那就重新安装一次zlib,注意,需要把原先解压出来的源码删掉,重新解压进行安装。
10、 安装apache
卸载apr、apr-util
[root@centos6 LAMP]# yum remove apr apr-util
编译安装apr-1.5.1.tar.gz
[root@centos6 LAMP]# tar zxvf apr-1.5.1.tar.gz
[root@centos6 LAMP]# cd apr-1.5.1
[root@centos6 apr-1.5.1]# ./configure --prefix=/usr/local/apr-httpd/ && make && make install
编译安装apr-util-1.5.3.tar.gz
[root@centos6 LAMP]# tar zxvf apr-util-1.5.3.tar.gz
[root@centos6 LAMP]# cd apr-util-1.5.1
[root@centos6 apr-util-1.5.3]# ./configure --prefix=/usr/local/apr-util-httpd/ --with-apr=/usr/local/apr-httpd/ && make && make install
编译安装pcre-8.35.zip
[root@centos6 LAMP]# unzip -o pcre-8.35.zip
[root@centos6 LAMP]# cd pcre-8.35 [root@centos6 pcre-8.35]# ./configure --prefix=/usr/local/pcre
[root@centos6 pcre-8.35]# make
[root@centos6 pcre-8.35]# make install
编译安装apache
[root@centos6 LAMP]# tar zxvf httpd-2.4.9.tar.gz
[root@centos6 LAMP]# cd httpd-2.4.9
[root@centos6 httpd-2.4.9]# ./configure \
> --prefix=/usr/local/apache249 \
> --enable-mods-shared=all \
> --enable-deflate \
> --enable-speling \
> --enable-cache \
> --enable-file-cache \
> --enable-disk-cache \
> --enable-mem-cache \
> --enable-so \
> --enable-expires=shared \
> --enable-rewrite=shared \
> --enable-static-support \
> --sysconfdir=/etc/httpd \
> --with-z=/usr/local/zlib/ \
> --with-apr=/usr/local/apr-httpd/ \
> --with-apr-util=/usr/local/apr-util-httpd/ \
> --with-pcre=/usr/local/pcre/ \
> --disable-userdir
[root@centos6 httpd-2.4.9]# make && make install
安装完成后,进入/usr/local/apache243/目录下,检查是否有以下文件: bin build cgi-bin error htdocs icons include logs man manual modules
启动Apache服务器,并查端口是否开启,启动Apache服务器的命令行如下:
[root@centos6 httpd-2.4.9]# /usr/local/apache249/bin/apachectl start
提示信息:
AH00558: httpd: Could not reliably determine the server‘s fully qualified domain name, using ::1. Set the ‘ServerName‘ directive globally to suppress this message
解决方案:
[root@centos6 httpd-2.4.9]# vi /etc/httpd/httpd.conf
加上下面一行,重启apache
ServerName localhost:80
查看端口命令行如下:
#netstat -tnl|grep 80
tcp 0 0 0.0.0.0:80 0.0.0.0:* LIST
测试安装结果,打开浏览器,在地址栏中输入URL为:http://192.168.146.129/
如果浏览器中出现It works!则表明Apache服务器可以使用。
每种服务器软件都有必要制成开机时自动启动,Apache服务器开机自动启动,只要在“/etc/rc.d/rc.local”文件,加上 Apache服务器的启动命令即可。可以直接打开“/etc/rc.d/rc.local”文件,在最后一行写入Apache启动命令,也可以用echo 命令追加进去,
如下命令行示:
[root@localhost apache243]# echo "/usr/local/apache243/bin/apachectl start" >> /etc/rc.d/rc.local
[root@centos6 LAMP]# /usr/local/apache/bin/apachectl start
[root@centos6 LAMP]# cp /usr/local/apache/bin/apachectl /etc/init.d/httpd
[root@centos6 LAMP]# chmod +x /etc/init.d/httpd
[root@centos6 ~]# chkconfig --add httpd
注意:
如果提示service httpd does not support chkconfig错误
解决办法:
编辑/etc/rc.d/init.d/httpd在文件第二行加入
#chkconfig:2345 10 90
#description:Activates/Deactivates Apache Web Server
[root@centos6 ~]# chkconfig --level 2345 httpd on
[root@centos6 LAMP]# service httpd restart
开机自动启动apache的另一种方法:
修改/etc/rc.local文件 # vim /etc/rc.local 在文件中添加/usr/local/apache/bin/apachectl start
11、编译安装mysql(新版本的mysql编译)
mysql版本5.5以上编译安装时需要用到软件cmake,cmake特性是独立于源码编译,编译工作可以在另外一个目录中而非源码目录中进行,好处是可以保证源码目录不受任何一次编译的影响。估计以后的版本也会采用这种方式,所以特地记录一下安装步骤及过程,以供参考。
注意:
此安装是默认centos下已经安装了最新工具包,比如GNU make, GCC, Perl, libncurses5-dev,如果在编译安装过程中发现有缺失的工具包,先yum install 单独下载安装再继续即可。 以下安装中涉及的几点需要提前说明的问题: ? 所有下载的文件将保存在 /usr/local/src/ 目录下
? mysql将以mysql用户运行,而且将加入 service 开机自动运行 ?
mysql将被安装在 /usr/local/mysql/ 目录下 ?
mysql默认安装使用 utf8 字符集
? mysql的数据和日志文件保存在 /usr/local/mysql/data/ 对应目录下 ?
mysql的配置文件保存于/etc/my.cnf
1.下载安装cmake
下载软件cmake-3.0.0.tar.gz http://www.cmake.org/
[root@centos6 ~]# tar zxvf cmake-3.0.0.tar.gz
[root@centos6 ~]# cd cmake-3.0.0 [root@centos6 ~]# ./bootstrap
[root@centos6 ~]# gmake
[root@centos6 ~]# make && make install
在使用时可能会出现error,若提示是/usr/bin/cmake文件不存在。
解决办法:
[root@centos6 ~]#whereis cmake
得到cmke的可执行文件的路径,如在:/usr/local/bin/cmake [root@centos6 ~]# ln -s /usr/local/bin/cmake /usr/bin/cmake 创建一个链接文件即可解决。
2.安装ncurses-devel
首先需要使用yum安装了下ncurses-devel
[root@centos6 ~]# yum –y install ncurses-devel
否则在下面安装过程中会出现缺少如下的ERROR:
Could NOT find Curses (missing: CURSES_LIBRARY CURSES_INCLUDE_PATH)
CMake Error at cmake/readline.cmake:83 (MESSAGE):
Curses library not found. Please install appropriate package,
3.安装mysql
(1)创建用户、组和目录
[root@centos6 ~]# groupadd mysql
[root@centos6 ~]# useradd mysql -g mysql
[root@centos6 ~]# passwd mysql //设置密码为:123
[root@centos6 ~]# mkdir /usr/local/mysql //创建安装目录
[root@centos6 ~]# mkdir /usr/local/mysql/data //创建数据仓库目录(不创建的话默认就
//是这个目录即$PREFIX_DIR/data)
[root@centos6 ~]# chown -R mysql.mysql /usr/local/mysql/
(2)编译安装mysql-5.7.4
[root@centos6 ~]# tar zxvf mysql-5.7.4.tar.gz
[root@centos6 ~]# cd mysql-5.7.4
[root@centos6 ~]# cmake -DCMAKE_INSTALL_PREFIX=/usr/local/mysql \
> -DMYSQL_UNIX_ADDR=/usr/local/mysql.sock \ //最好不要指定
> -DMYSQL_DATADIR=/usr/local/mysql/data \
> -DDEFAULT_CHARSET=utf8 \
> -DDEFAULT_COLLATION=utf8_general_ci \
> -DWITH_EXTRA_CHARSETS:STRING=utf8,gbk \
> -DWITH_MYISAM_STORAGE_ENGINE=1 \
> -DWITH_INNOBASE_STORAGE_ENGINE=1 \
> -DWITH_MEMORY_STORAGE_ENGINE=1 \
> -DWITH_READLINE=1 \
> -DENABLED_LOCAL_INFILE=1 \
> -DMYSQL_USER=mysql \
> -DMYSQL_TCP_PORT=3306
[root@centos6 ~]# make && make install
注意:
若第一次的配置错误,需要先删除当前mysql源码目录中的CMakeCache.txt (不是cmake源码目录中的),然后再重新进行cmake配置。
cmake参数说明:
-DCMAKE_INSTALL_PREFIX= 数据库程序安装路径;
-DMYSQL_DATADIR= 数据库文件存放路径(不配置的话会默认创建$PREFIX_DIR/data)
-DMYSQL_UNIX_ADDR= 默认位置是/var/lib/mysql/mysql.sock,如果指定其他路径,需要做一个软链接,或者在配置文件my.cnf中进行设置。
-DDEFAULT_CHARSET= 默认数据库编码
-DDEFAULT_COLLATION= 默认数据库整理编码
-DWITH_EXTRA_CHARSETS= 扩展支持编码(all | utf8,gbk,gb2312 | none)
-DWITH_MYISAM_STORAGE_ENGINE= MYISAM引擎支持(1|0)
-DWITH_INNOBASE_STORAGE_ENGINE= innoDB引擎支持(1|0)
-DWITH_MEMORY_STORAGE_ENGINE= MEMORY引擎支持(1|0)
(3)配置mysql
权限设置:
[root@resource mysql]# pwd
/usr/local/mysql //mysql安装目录
[root@localhost mysql]# chown -R root.mysql . //设置安装目录下所有文件的权限
[root@resource mysql]# chown -R mysql.mysql ./data //data的权限
[root@resource mysql]# chown -R mysql.mysql /var/lib/mysql //mysql.sock的权限
修改配置文件my.cnf
首先查看是否存在/etc/my.cnf文件,有则直接打开编辑,否则请复制配置文件,目标路径自己设定:
[root@centos6 ~]# cp support-files/my-medium.cnf /usr/local/mysql/my.cnf
修改my.cnf参数,没有则加入如下:
basedir = /usr/local/mysql(不配置的话默认为$PREFIX_DIR)
datadir = /usr/local/mysql/data(不配置的话默认为$PREFIX_DIR/data)
log-error = /usr/local/mysql/mysql_error.log(不配置的话默认为$PREFIX_DIR/data/$hostname.err)
pid-file = /usr/local/mysql/mysql.pid(不配置的话默认为$PREFIX_DIR/data/$hostname.pid)
user = mysql
tmpdir = /tmp(不配置的话默认为/tmp)
/etc/my.cnf的配置请参考下面的例子进行配置:
********************************** /etc/my.cnf配置示例 ****************************************
[mysqld] basedir=/usr/local/mysql
datadir=/usr/local/mysql/data
socket=/var/lib/mysql/mysql.sock //要正确配置
user=mysql
port=3306
# Disabling symbolic-links is recommended to prevent assorted security risks symbolic-links=0
[mysqld_safe]
log-error=/var/log/mysqld.log
pid-file=/usr/local/mysql/data/CentOS6.5.pid //这个要配置正确
********************************** /etc/my.cnf配置示例 ****************************************
注意:在/etc/my.cnf文件中的pid-file一定要设定正确,否则后面会出现无法登录的情况,我在这里被耽误 来好久好久。该pid-file的路径名在哪里,可使用下面的命令:
[root@centos6 ~]# ps aux | grep mysql
会出现类似下面的情况,如果没有则重新启动mysql就有了,在下面的输出信息中找到pid-file的路径名。
root 3534 0.0 0.0 106232 1408 pts/0 S 23:40 0:00 /bin/sh /usr/local/mysql/bin/mysqld_safe --datadir=/usr/local/mysql/data --pid-file=/usr/local/mysql/data/CentOS6.5.pid mysql 3741 2.0 26.8 1248408 550728 pts/0 Sl 23:40 0:00 /usr/local/mysql/bin/mysqld --basedir=/usr/local/mysql --datadir=/usr/local/mysql/data --plugin-dir=/usr/local/mysql/lib/plugin --user=mysql --log-error=/var/log/mysqld.log --pid-file=/usr/local/mysql/data/CentOS6.5.pid --socket=/var/lib/mysql/mysql.sock --port=3306
root 3952 0.0 0.0 103252 824 pts/3 S+ 23:41 0:00 grep mysql
初始化数据库
执行前需赋给scripts/mysql_install_db文件执行权限:
[root@centos6 ~]# pwd
/usr/local/mysql //mysql安装目录
[root@centos6 ~]# chmod 755 scripts/mysql_install_db
[root@centos6 ~]# scripts/mysql_install_db --user=mysql \
> --basedir=/usr/local/mysql \
> --datadir=/usr/local/mysql/data
注:basedir:mysql安装路径 datadir:数据库文件储存路径,(--user一定要加,其他可不加,默认会是$PREFIX_DIR和$PREFIX_DIR/data,因为--help看到说不加--user会以当前系统登录用户启动mysql) 在数据库成功初始化之后,可以根据现在屏幕上的提示信息来做,先启动mysql:
/usr/local/mysql574/bin/mysqld_safe --user=mysql & //启动mysql
/usr/local/mysql574/bin/mysqladmin --version //测试下
再修改root密码:
/usr/local/mysql574/bin/mysqladmin -u root password ‘123456‘
设置mysqld的开机启动
[root@centos6 ~]# cp support-files/mysql.server /etc/init.d/mysql
[root@centos6 ~]# chmod 755 /etc/init.d/mysql
[root@centos6 ~]# chkconfig mysql on
可使用chkconfig –list | grep mysql 命令查询刚才的设置情况。
为MySQL配置环境变量
将mysql的bin目录加到PATH中,有利于以后管理和维护,在/etc/profile中加入myslq/bin,同时增加两个别名方便操作。 注:后面两个别名不加也可以,加上以后的操作更方便。
[root@centos6 ~]# export PATH=/usr/local/mysql/bin:$PATH
[root@centos6 ~]# alias mysql_start="mysqld_safe &"
[root@centos6 ~]# alias mysql_stop="mysqladmin -u root -p shutdown"
启动mysql服务:
[root@centos6 ~]# /etc/init.d/mysql start
启动完成之后用ps -ef |grep mysql 命令查看是否启动
登陆mysql:
[root@centos6 ~]# mysql -u root -p
[问题] 如果出现错误:
MYSQL:The server quit without updating PID file。
一种可能是selinux惹的祸,如果是centos系统,默认会开启selinux。解决方法就是关闭它。
[root@centos6 ~]# vi /etc/selinux/config
详细修改如下所示:
#SELINUX=enforcing #注释掉
#SELINUXTYPE=targeted #注释掉
SELINUX=disabled #增加
:wq #保存,关闭
[root@centos6 ~]#shutdown -r now #重启系统
另外一种可能就是pid文件的路径设置不正确,可参考上文中对pid文件的设置方法。
[问题] Can’t connect to local Mysql server through socket ‘/tmp/mysql.sock’ (2)
问题分析:mysql安装之后,需要使用mysql.sock的socket文件链接mysql数据库,默认的引用位置为/tmp/mysql.sock,而mysql.sock文件一般在/var/lib/mysql/路径下,因此需要做一个软链接。另外注意mysql.sock的权限属性。 解决方法:
[root@centos6 ~]# ln -s /var/lib/mysql/mysql.sock /tmp/mysql.sock
[root@CentOS6 hcyj]# ll /tmp/mysql.sock lrwxrwxrwx 1 mysql mysql 25 Jul 17 23:21 /tmp/mysql.sock -> /var/lib/mysql/mysql.sock
[root@CentOS6 hcyj]# ll /var/lib/mysql/mysql.sock srwxrwxrwx 1 mysql mysql 0 Jul 18 10:05 /var/lib/mysql/mysql.sock
再次连接:
[root@centos6 ~]# /usr/local/mysql/bin/mysql -u root -p
连接上了,问题解决。
[问题] 若出现ERROR 1045 (28000): Access denied for user ‘root‘@‘localhost‘ (using password: YES(NO)) 这种情况。
解决方法,如下:
[root@centos6 ~]# /etc/init.d/mysql stop
[root@centos6 ~]# /usr/local/mysql/bin/mysqld_safe --user=mysql --skip-grant-tables --skip-networking &
[root@centos6 ~]# /usr/local/mysql/bin/mysql -u root mysql
mysql> UPDATE user SET Password=PASSWORD(‘newpassword‘) where USER=‘root‘; //请将 newpassword更换为自己设定的密码即可,其他不变
mysql> FLUSH PRIVILEGES;
mysql> quit
重启mysql并使用密码登录:
[root@centos6 ~]# /etc/init.d/mysql restart
[root@centos6 ~]# /usr/local/mysql/bin/mysql -uroot -p
Enter password: <输入新设的密码newpassword>
至此,就可以成功登录MySQL。
MySQL标准设置(仅供参考,本人未使用)
1) 为root帐户设置初始密码
[root@centos6 ~]# /usr/local/mysql/bin/mysqladmin -u root password ‘new-password‘
或者限制只能通过本机登陆
[root@centos6 ~]# /usr/local/mysql/bin/mysqladmin -u root -h ‘hostname’ password ‘new-password‘
2) 删除本机匿名连接的空密码帐号
本机登录mysql
mysql>use mysql; //选择默认数据库mysql
mysql>update user set password=’root123’ where user = ‘127.0.0.1‘;
mysql>delete from user where password="";//不允许root密码为空
mysql>flush privileges;
mysql>quit
容许root用户是远程登录
对于root账号,如果考虑安全应该新建其他账号用于远程登录,root账号可以不必开启远程登录。不过对于一般使用,没有太多安全需求,允许root用户远程登录可以方便管理,毕竟使用专用管理软件的图形界面在操作方面要方便的多。
3) 设置MySQL远程连接
mysql 数据库端设置
# /mysql -u root -p //进入数据库
mysql>use mysql
mysql>select user,password,host from user;
mysql>update user set host = ‘192.168.%‘ where user = ‘127.0.0.1‘;
mysql>grant all privileges on *.* to root@‘%‘ identified by "root123";//给以root@ip登录的远程连接赋予权限,能够连接数据库。远程无法连接的常见问题原因。并把远程登录用户的密码设置为root mysql> flush privileges; mysql>quit
12、编译安装php
安装PHP之前,需要先安装libXpm-devel,否则在安装php的时候会出现下面的错误:
/usr/local/src/LAMP/php-5.5.14/ext/gd/gd.c:57:22: error: X11/xpm.h: No such file or directory make: *** [ext/gd/gd.lo] Error 1
编译安装libXpm-devel:
[root@CentOS6 php-5.5.14]# yum -y install libXpm-devel
[root@CentOS6 php-5.5.14]# rpm -ql libXpm-devel /usr/bin/cxpm /usr/bin/sxpm
/usr/include/X11/xpm.h /usr/lib64/libXpm.so
/usr/lib64/pkgconfig/xpm.pc /usr/share/man/man1/cxpm.1.gz
/usr/share/man/man1/sxpm.1.gz
查找到libXpm-devel的安装位置为/usr/lib64/libXpm.so,将选项--with-xpm-dir=/usr/lib64添加到php的配置选项中。
编译安装php
[root@centos6 LAMP]# pwd /usr/local/src/LAMP
[root@centos6 LAMP]# tar -zxvf php-5.4.11.tar.gz
[root@centos6 LAMP]# cd ./php-5.4.11
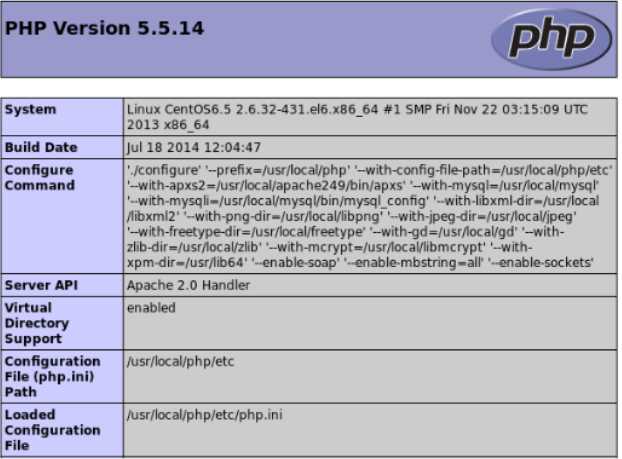
[root@localhost php-5.4.11]# ./configure \
> --prefix=/usr/local/php \
> --with-config-file-path=/usr/local/php/etc \ //配置文件路径,指定php.ini位置
> --with-apxs2=/usr/local/apache249/bin/apxs \ // apxs功能是使用mod_so中的
// LoadModule指令,加载指定模块到 apache,要求 apache 要打开SO模块
> --with-mysql=/usr/local/mysql \ //mysql安装目录,对mysql的支持
> --with-mysqli=/usr/local/mysql/bin/mysql_config \ //mysqli文件目录,优化支持
> --with-libxml-dir=/usr/local/libxml2 \ //打开libxml2库的支持
> --with-png-dir=/usr/local/libpng \ //打开对png图片的支持
> --with-jpeg-dir=/usr/local/jpeg \ //打开对jpeg图片的支持
> --with-freetype-dir=/usr/local/freetype \ //打开对freetype字体库的支持
> --with-gd=/usr/local/gd \ //打开gd库的支持
> --with-zlib-dir=/usr/local/zlib \ //打开zlib库的支持
> --with-mcrypt=/usr/local/libmcrypt \ //打开libmcrypt库的支持
> --with-xpm-dir=/usr/lib64 //打开libXpm库的支持 > --enable-soap \ //
> --enable-mbstring=all \ //多字节,字符串的支持 > --enable-sockets //打开 sockets 支持
[root@localhost php-5.4.11]# make;make install
安装完成后,需要建立PHP配置文件。在使用configure命令安装配置时使用“--with-config-file-path=/usr /local/php/etc/”选项,指定了配置文件的位置。将源码包下面的php.ini-development 文件复制到/usr/local /php/etc/中,并改名为php.ini即可,如下所示:
[root@localhost php-5.4.11]# cp php.ini-development /usr/local/php/etc/php.ini
修改php.ini 把;date.timezone 前面的分号去掉,改成date.timezone ="PRC"
[问题] pear有什么作用?PHP-PEAR
13、更改apache的配置文件,达到解析php文件的目的
编辑配置文件/etc/httpd/httpd.conf,在LoadModule最后面添加以下内容
LoadModule php5_module modules/libphp5.so
##通常正确编译安装PHP后会自动增加,如果没有,需要手工添加。
接下来要检查apache目录下生成的php动态连接库文件,在目录/usr/local/apache/modules,找到是否存在libphp5.so文件。若不存在呢?则说明php安装不正确。
[root@centos6 ~]# vim /etc/httpd/httpd.conf
在/etc/httpd/conf/httpd.conf文件中添加如下内容:
AddType application/x-compress .Z
AddType application/x-gzip .gz .tgz
Addtype application/x-httpd-php .php .phtml
Addtype application/x-httpd-php-source .phps
将下面一行:
DirectoryIndex index.html
修改为:
DirectoryIndex index.php index.html index.htm
配置结束后重启Apache
[root@centos6 ~]#service httpd restart
14、 验证
Apache服务器的根目录默认为:/usr/local/apache/htdocs/,此目录下面存放资源:
[root@centos6 ~]# vim /usr/local/apache/htdocs/index.php
添加内容为
<?php
echo phpinfo();
?>
在客服端验证,出现下图说明php搭建成功
标签:
原文地址:http://www.cnblogs.com/Darlin356230410/p/4467286.html