标签:
对于新版的QQ界面,左侧增加了一个滑动效果,相信小伙伴们早已按耐不住激动的心情,这种效果是如何实现的呢?本篇我们就一起来探讨一二。既然是滑动效果这里就要使用到HorizontalScrollView类,一个水平滑动的效果。
对于这个效果我们可以分为一个Item Menu和Layout,通过对Item Menu设置padding值来隐藏和显示左侧的Menu菜单。
我们的Menu设计代码:
<?xml version="1.0" encoding="utf-8"?>
<RelativeLayout xmlns:android="http://schemas.android.com/apk/res/android"
    android:layout_width="match_parent"
    android:layout_height="match_parent"
    android:background="@drawable/img_frame_background" >

    <LinearLayout
        android:layout_width="match_parent"
        android:layout_height="wrap_content"
        android:layout_centerInParent="true"
        android:orientation="vertical">

        <RelativeLayout
            android:layout_width="match_parent"
            android:layout_height="match_parent">
            <ImageView
               android:id="@+id/img1"
               android:layout_width="50dp"
               android:layout_height="50dp"
               android:src="@drawable/img_1"
               android:layout_marginLeft="20dp"
               android:layout_marginTop="20dp"
               android:layout_centerVertical="true"
                />
            <TextView
                android:layout_width="wrap_content"
                android:layout_height="wrap_content"
                android:layout_marginLeft="20dp"
                android:textColor="#fff"
                android:text="第一个item"
                android:layout_toRightOf="@id/img1"
                android:layout_centerVertical="true"
                />
       </RelativeLayout>

        <RelativeLayout
            android:layout_width="match_parent"
            android:layout_height="match_parent">
            <ImageView
               android:id="@+id/img2"
               android:layout_width="50dp"
               android:layout_height="50dp"
               android:src="@drawable/img_2"
               android:layout_marginLeft="20dp"
               android:layout_marginTop="20dp"
               android:layout_centerVertical="true"
                />
            <TextView
                android:layout_width="wrap_content"
                android:layout_height="wrap_content"
                android:layout_marginLeft="20dp"
                android:textColor="#fff"
                android:text="第二个item"
                android:layout_toRightOf="@id/img2"
                android:layout_centerVertical="true"
                />
       </RelativeLayout>

    </LinearLayout>

</RelativeLayout>
我们的主Activity的Layout代码:
<RelativeLayout xmlns:android="http://schemas.android.com/apk/res/android"
    xmlns:tools="http://schemas.android.com/tools"
    android:layout_width="match_parent"
    android:layout_height="match_parent"
    android:paddingBottom="@dimen/activity_vertical_margin"
    android:paddingLeft="@dimen/activity_horizontal_margin"
    android:paddingRight="@dimen/activity_horizontal_margin"
    android:paddingTop="@dimen/activity_vertical_margin"
    tools:context=".MainActivity" >

    <com.example.menu.SlidingMenu
        android:layout_width="match_parent"
        android:layout_height="match_parent">
        <LinearLayout
            android:layout_width="wrap_content"
            android:layout_height="match_parent"
            android:orientation="horizontal"
            >

            <include layout="@layout/left_menu"/>

            <LinearLayout
                android:layout_width="match_parent"
                android:layout_height="match_parent"
                android:background="@drawable/qq"
                />

        </LinearLayout>
    </com.example.menu.SlidingMenu>

</RelativeLayout>
我们自定义的SlidingMenu:
package com.example.menu;

import android.content.Context;
import android.util.AttributeSet;
import android.util.DisplayMetrics;
import android.util.TypedValue;
import android.view.MotionEvent;
import android.view.ViewGroup;
import android.view.WindowManager;
import android.widget.HorizontalScrollView;
import android.widget.LinearLayout;

public class SlidingMenu extends HorizontalScrollView {

    private LinearLayout mWapper;
    private ViewGroup mMenu;
    private ViewGroup mContent;
    private int mScreenWidth;//屏幕的宽度
    private int mMenuWidth;//设置Menu的宽度

    //dp
    private int mMenuRightPadding;
    private boolean once = false;

    /**
     * 未使用自定义属性时调用此方法
     * @param context
     * @param attrs
     */
    public SlidingMenu(Context context, AttributeSet attrs) {
        super(context, attrs);
        WindowManager wm = (WindowManager) context.getSystemService(context.WINDOW_SERVICE);
        DisplayMetrics outMetrics = new DisplayMetrics();
        wm.getDefaultDisplay().getMetrics(outMetrics );
        mScreenWidth = outMetrics.widthPixels;

        //将dp转换为px
        mMenuRightPadding = (int) TypedValue.applyDimension(TypedValue.COMPLEX_UNIT_DIP, 50, context.getResources().getDisplayMetrics());

    }

    /**
     * 设置内部View的宽和高,以及自己的宽和高
     */
    @Override
    protected void onMeasure(int widthMeasureSpec, int heightMeasureSpec) {
        super.onMeasure(widthMeasureSpec, heightMeasureSpec);

        if(!once){
            mWapper = (LinearLayout) getChildAt(0);
            mMenu = (ViewGroup) mWapper.getChildAt(0);
            mContent = (ViewGroup) mWapper.getChildAt(1);
            mMenuWidth = mMenu.getLayoutParams().width = mScreenWidth - mMenuRightPadding;
            mContent.getLayoutParams().width = mScreenWidth;
            once = true;
        }

    }

    /**
     * 设置子View的放置位置
     * 通过设置偏移量来隐藏Menu
     */
    @Override
    protected void onLayout(boolean changed, int l, int t, int r, int b) {
        super.onLayout(changed, l, t, r, b);
        if(changed){
            this.scrollTo(mMenuWidth, 0);
        }
    }

    /**
     * 控制手指的滑动效果
     */
    @Override
    public boolean onTouchEvent(MotionEvent ev) {
        int action = ev.getAction();
        switch (action) {
        case MotionEvent.ACTION_UP:
            int scrollx = getScrollX();//Menu左侧隐藏的区域宽度
            if(scrollx >= mMenuWidth/2){
                this.smoothScrollTo(mMenuWidth, 0);
            }else{
                this.smoothScrollTo(0, 0);
            }
            return true;
        }
        return super.onTouchEvent(ev);
    }

}
我们的主Activity:
public class MainActivity extends Activity {

    @Override
    protected void onCreate(Bundle savedInstanceState) {
        super.onCreate(savedInstanceState);
        requestWindowFeature(Window.FEATURE_NO_TITLE);//去除标题
        setContentView(R.layout.activity_main);

    }
}
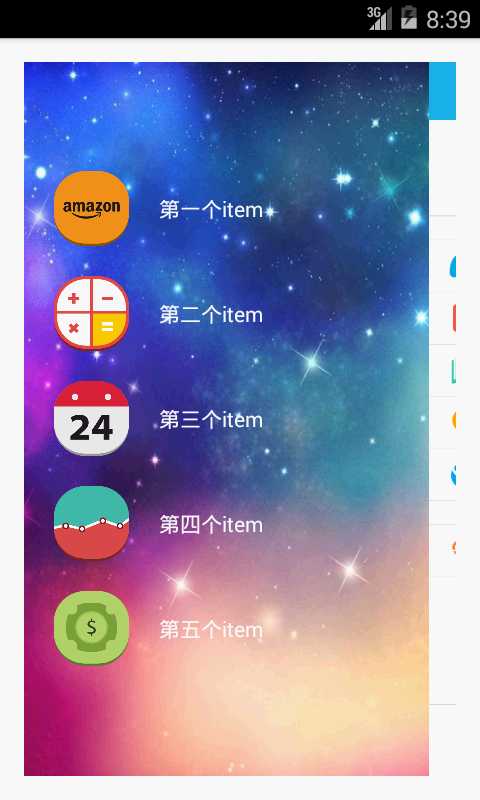
效果图:

标签:
原文地址:http://www.cnblogs.com/AndroidJotting/p/4469885.html