funtoo 安装手册阅读 (博客第 100 篇文章纪念)
Table of Contents
这里是我的 org 文件的 source code
Introduction
This document was written to help you install Funtoo Linux on PC-compatible systems, while keeping distracting options regarding system configuration to a minimum.
If you‘ve had previous experience installing Gentoo Linux then a lot of steps will be familiar, but you should still read through as there are a few differences.
Installation Overview
This is a basic overview of the Funtoo installation process:
- Download and boot the live CD of your choice
- Prepare your disk
- Create and mount filesystems
- Install the Funtoo stage tarball of your choice
- Chroot into your new system
- Download the Portage tree
- Configure your system and network
- Install a kernel
- Install a bootloader
- Complete final steps
- Reboot and enjoy
Live CD
Funtoo doesn‘t provide an "official" Funtoo Live CD. We recommend using the Gentoo-based System Rescue CD as it contains lots of tools and utilities and supports both 32-bit and 64-bit systems. Download it here:
Note
If using an older version of System Rescue CD, be sure to select the rescue64 kernel at the boot menu if you are installing a 64-bit system. By default, System Rescue CD used to boot in 32-bit mode though the latest version attempts to automatically detect 64-bit processors.
Network Access
Once you have booted System Rescue CD, see if you have Internet access. Internet access is required for installing Funtoo Linux:
# ping www.google.com
PING www.google.com (216.58.217.36) 56(84) bytes of data.
64 bytes from den03s10-in-f4.1e100.net (216.58.217.36): icmp_seq=1 ttl=57 time=30.1 ms
If the ping is successful (you see 64 bytes messages as above,) then your Network is set up. Hit Control-C to stop the ping.
If you need to set up a WiFi connection for Internet access, then this needs to be done using the System Rescue CD graphical environment. Run startx to start a graphical session:
startx
Then, use the NetworkManager applet (icon in lower right) to connect to a WiFi network of your choice. Next, open a terminal inside your graphical environment, and you should be able to use the terminal to complete the rest of the steps.
Remote Install
Alternatively, you can log into System Rescue CD over the network via SSH to perform the install from another computer, and this may be more convenient way to install Funtoo Linux.
If you‘d like to complete the install remotely, here‘s how. First, you will need to ensure that System Rescue CD has a functioning network connection. Then, you will need to set a root password for System Rescue CD:
# passwd
New password: ********
Retype new password: ********
passwd: password updated successfully
#
Once you have typed in a password, you will now need to determine the IP address of System Rescue CD, and then you can use ssh to connect to it. To determine the IP address currently being used by System Rescue CD, type ifconfig:
# ifconfig
Note
If you‘d like to connect remotely from an existing Microsoft Windows system, you‘ll need to download an SSH client for Windows, such as PuTTY
After you‘ve logged in via SSH, you‘re now connected remotely to System Rescue CD and can perform the installation steps.
Prepare Hard Disk
In this section, we‘ll learn about the different ways that Funtoo Linux can be installed on – and boot from – a hard disk.
Introduction
官方建议有两种选择, 如何选择下面会有说明
- BIOS + GRUB (MBR): 一种老式的
- UEFI + GRUB (GPT): 一种新的安装方式
And yes, there are even more methods, some of which are documented on the Boot Methods page. We used to recommend a BIOS + GRUB (GPT) method but it is not consistently supported across a wide variety of hardware.
The big question is – which boot method should you use? Here‘s how to tell.
- Principle 1 - Old School (保守派)
If you can reliably boot System Rescue CD and it shows you aninitial light blue menu, you are booting the CD using the BIOS, and it‘s likely that you can thus boot Funtoo Linux using the BIOS. So, go old-school and use BIOS booting, unless you have some reason to use UEFI, such as having a >2.2TB system disk. In that case, see Principle 2, as your system may also support UEFI booting.
- Principle 2 - New School
If you can reliably boot System Rescue CD and it shows you an initial black and white menu – congratulations, your system is configured to support UEFI booting. This means that you are ready to install Funtoo Linux to boot via UEFI. Your system may still support BIOS booting, but just be trying UEFI first. You can poke around in your BIOS boot configuration and play with this.
What‘s the Big Difference between Old School and New School?
Here‘s the deal. If you go with old-school MBR partitions, your /boot partition will be an ext2 filesystem, and you‘ll use fdisk to create your MBR partitions. If you go with new-school GPT partitions and UEFI booting, your /boot partition will be a vfat filesystem, because this is what UEFI is able to read, and you will use gdisk to create your GPT partitions. And you‘ll install GRUB a bit differently. That‘s about all it comes down to, in case you were curious.
Also Note
To install Funtoo Linux to boot via the New School UEFI method, you must boot System Rescue CD using UEFI – and see an initial black and white screen. Otherwise, UEFI will not be active and you will not be able to set it up!
Old-School (BIOS/MBR) Method
如果你选择用 UEFI 的方式, 直接到下面来 这里
注意屏幕的颜色 是 蓝色
Preparation
First, it‘s a good idea to make sure that you‘ve found the correct hard disk to partition. Try this command and verify that /dev/sda is the disk that you want to partition:
# fdisk -l /dev/sda

Disk /dev/sda: 640.1 GB, 640135028736 bytes, 1250263728 sectors
Units = sectors of 1 * 512 = 512 bytes
Sector size (logical/physical): 512 bytes / 512 bytes
I/O size (minimum/optimal): 512 bytes / 512 bytes
Disk label type: gpt


#         Start          End    Size  Type            Name
 1         2048   1250263694  596.2G  Linux filesyste Linux filesystem
# fdisk /dev/sda
## 连续按 d 删除所有分区
Partitioning
- Empty the partition table:
# fdisk /dev/sda
Command (m for help): m ↵
...
...
Create a new label
   g   create a new empty GPT partition table
   G   create a new empty SGI (IRIX) partition table
   o   create a new empty DOS partition table
   s   create a new empty Sun partition table

Command (m for help): o ↵
- Create Partition 1 (boot):
Command (m for help): n ↵ Partition type (default p): ↵ Partition number (1-4, default 1): ↵ First sector: ↵ Last sector: +128M ↵ - Create Partition 2 (swap):
Command (m for help): n ↵ Partition type (default p): ↵ Partition number (2-4, default 2): ↵ First sector: ↵ Last sector: +2G ↵ - Let sda2 be a swap partition
Command (m for help): t ↵
Partition number (1,2, default 2):  2 ↵
Partition type (type L to list all types): L ↵
...
 1  FAT12           27  Hidden NTFS Win 82  Linux swap / So c1  DRDOS/sec (FAT-
...
Hex code (type L to list all codes): 82 ↵
- Create the root partition: (如果你还要建立单独的 sda4 作用 home 或者其他分区, 可以自己建立一个)
Command (m for help): n ↵ Partition type (default p): ↵ Partition number (3,4, default 3): ↵ First sector: ↵ Last sector: ↵ - Verify the partition table:
Command (m for help): p

Disk /dev/sda: 298.1 GiB, 320072933376 bytes, 625142448 sectors
Units: sectors of 1 * 512 = 512 bytes
Sector size (logical/physical): 512 bytes / 512 bytes
I/O size (minimum/optimal): 512 bytes / 512 bytes
Disklabel type: dos
Disk identifier: 0x82abc9a6

Device    Boot     Start       End    Blocks  Id System
/dev/sda1           2048    264191    131072  83 Linux
/dev/sda2         264192   4458495   2097152  82 Linux swap / Solaris
/dev/sda3        4458496 625142447 310341976  83 Linux
- Write the parition table to disk:
Command (m for help): w
Your new MBR partition table will now be written to your system disk.
确认上面的都正常完成之后, 就可以来到这里, Creating filesystems. (因为下面的是 UEFI 的安装)
New-School (UEFI/GPT) Method
注意屏幕的颜色是 黑白
The gdisk commands to create a GPT partition table are as follows. Adapt sizes as necessary, although these defaults will work for most users. Start gdisk:
# gdisk /dev/sda
Command (? for help): ? ↵
....
d       delete a partition
....
l       list known partition types
....
n       add a new partition
o       create a new empty GUID partition table (GPT)
....
Command (? for help): l
....
7f02 ChromeOS reserved     8200 Linux swap            8300 Linux filesystem
8301 Linux reserved        8302 Linux /home           8303 Linux x86 root (/)
8304 Linux x86-64 root (/  8305 Linux ARM64 root (/)  8306 Linux /srv
8400 Intel Rapid Start     8e00 Linux LVM             a500 FreeBSD disklabel
....
Press the <Enter> key to see more codes: ↵
c001 HP-UX data            c002 HP-UX service         ea00 Freedesktop $BOOT
eb00 Haiku BFS             ed00 Sony system partitio  ed01 Lenovo system partit
ef00 EFI System            ef01 MBR partition scheme  ef02 BIOS boot partition
f800 Ceph OSD              f801 Ceph dm-crypt OSD     f802 Ceph journal
f803 Ceph dm-crypt journa  f804 Ceph disk in creatio  f805 Ceph dm-crypt disk i
fb00 VMWare VMFS           fb01 VMWare reserved       fc00 VMWare kcore crash p
fd00 Linux RAID
- Create a new empty partition table
Command: o ↵
This option deletes all partitions and creates a new protective GPT.
Proceed? (Y/N): y ↵
- Create Partition 1 (boot):
Command: n ↵
Partition Number: 1 ↵
First sector: ↵
Last sector: +500M ↵
Hex Code: EF00 ↵
- Create Partition 2 (swap):
Command: n ↵
Partition Number: 2 ↵
First sector: ↵
Last sector: +4G ↵
Hex Code: 8200 ↵
- Create Partition 3 (root): (如果你还要建立单独的 sda4 作用 home 或者其他分区, 可以自己建立一个)
Command: n ↵
Partition Number: 3 ↵
First sector: ↵
Last sector: ↵ (for rest of disk)
Hex Code: ↵
Along the way, you can type "p" and hit Enter to view your current partition table. If you make a mistake, you can type "d" to delete an existing partition that you created. When you are satisfied with your partition setup, type "w" to write your configuration to disk:
- Write Partition Table To Disk:
Command: w ↵
Do you want to proceed? (Y/N): Y ↵
Creating filesystems
Are you using old-school MBR partitions? If so, let‘s create an ext2 filesystem on /dev/sda1:
# mkfs.ext2 /dev/sda1
If you‘re using new-school GPT partitions for UEFI, you‘ll want to create a vfat filesystem on /dev/sda1, because this is what UEFI is able to read:
# mkfs.vfat -F 32 /dev/sda1
激活 swap
# mkswap /dev/sda2
# swapon /dev/sda2
We generally recommend ext4 or XFS root filesystems. If you‘re not sure, choose ext4. Here‘s how to create a root ext4 filesystem: (一般使用的是 ext4)
# mkfs.ext4 /dev/sda3
…and here‘s how to create an XFS root filesystem, if you choose to use XFS:
# mkfs.xfs /dev/sda3
使用 XFS 的同学这里有个警告
Warning
When deploying an OpenVZ host, please use ext4 exclusively. The Parallels development team tests extensively with ext4, and modern versions of openvz-rhel6-stable are not compatible with XFS, and you may experience kernel bugs.
Mounting filesystems
# mkdir /mnt/funtoo
# mount /dev/sda3 /mnt/funtoo
# mkdir /mnt/funtoo/boot
# mount /dev/sda1 /mnt/funtoo/boot
Optionally, if you have a separate filesystem for /home or anything else:
那么就需要重新 建立个分区 sda4
# mkdir /mnt/funtoo/home
# mount /dev/sda4 /mnt/funtoo/home
If you have /tmp or /var/tmp on a separate filesystem, be sure to change the permissions of the mount point to be globally-writeable after mounting, as follows:
# chmod 1777 /mnt/funtoo/tmp
Setting the Date
在我自己原来的系统上查看当前时间
# date -u
2015 年 05 月 03 日 星期日 14:16:08 UTC
修改要安装的系统的时间
# date 050314162015
....
Once you have set the system clock, it‘s a very good idea to copy the time to the hardware clock, so it persists across reboots:
# hwclock --systohc
Installing the Stage 3 tarball
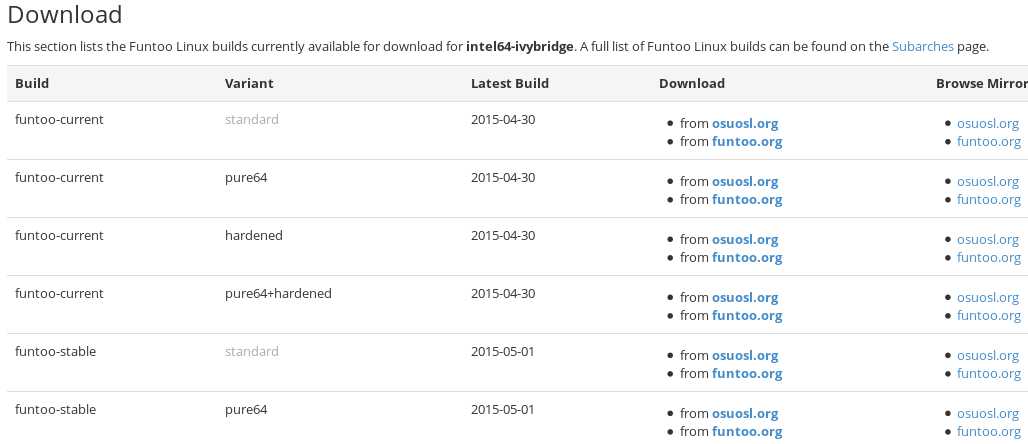
To download the correct build of Funtoo Linux for your system, head over to the Subarches page. Subarches are builds of Funtoo Linux that are designed to run on a particular type of CPU, to offer the best possible performance. They also take advantage of the instruction sets available for each CPU.
model name : Intel(R) Core(TM) i5-3230M CPU @ 2.60GHz
我的电脑上面贴着 第三代 xxx 酷睿 xxxx
所以我下载的是
intel64-ivybridge The intel64-ivybridge subarch specifically supports processors based on Intel‘s Ivy Bridge microarchitecture and AVX instructions. These processors are branded as 3rd Generation Intel Core i3, Core i5, and Core i7 Processors.
选择下载哪个?
If you‘re not sure, pick funtoo-current.
funtoo-current The most commonly-selected build of Funtoo Linux. Receives rapid updates and preferred by desktop users.
funtoo-stable Emphasizes less-frequent package updates and trusted, reliable versions of packages over the latest versions.
Which Variant?
If you‘re not sure, pick standard.
standard The "standard" version of Funtoo Linux
pure64 A 64-bit build that drops multilib (32-bit compatibility) support. Can be ideal for server systems.
hardened Includes PIE/SSP toolchain for enhanced security. PIE does require the use of PaX in the kernel, while SSP works with any kernel, and provides enhanced security in user-space to avoid stack-based exploits.
Download the Stage3
cd /mnt/funtoo
tar xpf stage3-latest.tar.xz
It is very important to use tar‘s "p" - it tells tar to preserve any permissions and ownership that exist within the archive. Without this option, your Funtoo Linux filesystem permissions will be incorrect.
Chroot into Funtoo
# cd /mnt/funtoo
# mount -t proc none proc
# mount --rbind /sys sys
# mount --rbind /dev dev
You‘ll also want to copy over resolv.conf in order to have proper DNS name resolution from inside the chroot:
# cp /etc/resolv.conf etc
Now you can chroot into your new system. Use env before chroot to ensure that no environment variables from the installation media are used by your new system:
# env -i HOME=/root TERM=$TERM chroot . bash -l
Note
Users of live CDs with 64-bit kernels installing 32-bit systems: Some software may use uname -r to check whether the system is 32 or 64-bit. You may want append linux32 to the chroot command as a workaround, but it‘s generally not needed.
Important
If you receive the error "chroot: failed to run command `/bin/bash‘: Exec format error", it is probably because you are running a 32-bit kernel and trying to execute 64-bit code. SystemRescueCd boots with a 32-bit kernel by default.
# export PS1="(chroot) $PS1"
Downloading the Portage tree
# cd /usr
# wget http://ftp.osuosl.org/pub/funtoo/funtoo-current/snapshots/portage-latest.tar.xz
# tar xf portage-latest.tar.xz
# rm portage-latest.tar.xz
# cd /usr/portage
# git checkout funtoo.org
# emerge --sync
Important
If you receive the error with initial emerge --sync due to git protocol restrictions, change SYNC variable in /etc/portage/make.conf:
SYNC="https://github.com/funtoo/ports-2012.git"
Configuring your system
nano -w /etc/fstab
To save the file, press Control-X, and answer y
Configuration Files
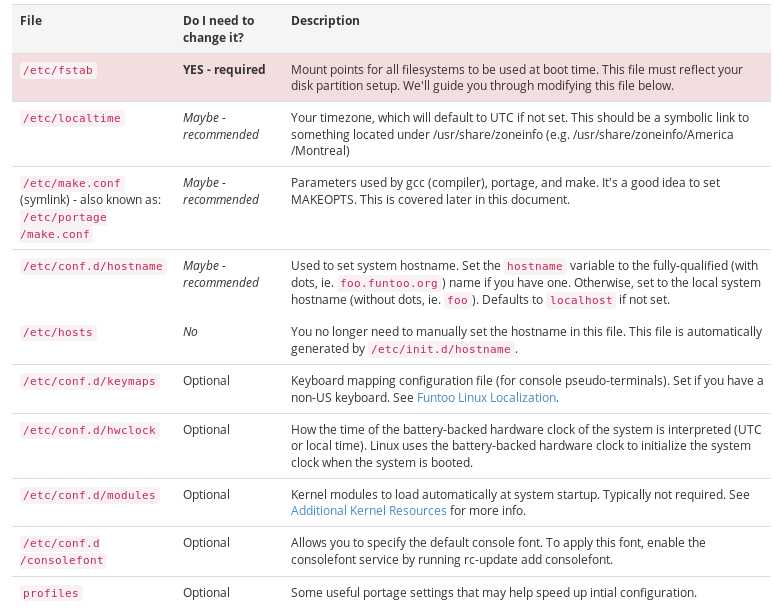
If you‘re installing an English version of Funtoo Linux, you‘re in luck as most of the configuration files can be used as-is. If you‘re installing for another locale, don‘t worry. We will walk you through the necessary configuration steps on the Funtoo Linux Localization (强烈推荐要看)
/etc/fstab
(chroot) # nano -w /etc/fstab
# The root filesystem should have a pass number of either 0 or 1.
# All other filesystems should have a pass number of 0 or greater than 1.
#
# NOTE: If your BOOT partition is ReiserFS, add the notail option to opts.
#
# See the manpage fstab(5) for more information.
#
# <fs>       <mountpoint>  <type>  <opts>         <dump/pass>

/dev/sda1    /boot         ext2    noauto,noatime 1 2
/dev/sda2    none          swap    sw             0 0
/dev/sda3    /             ext4    noatime        0 1
#/dev/sda4   /home         ext4    default        0 0
#/dev/cdrom  /mnt/cdrom    auto    noauto,ro      0 0
Note
Currently, our default /etc/fstab has the root filesystem as /dev/sda4 and the swap partition as /dev/sda3. These will need to be changed to /dev/sda3 and /dev/sda2, respectively.
Note
If you‘re using UEFI to boot, change the /dev/sda1 line so it says vfat instead of ext2. Similarly, make sure that the /dev/sda3 line specifies either xfs or ext4, depending on which filesystem you chose at filesystem-creation time.
Note
UEFI users
/dev/sda1    /boot         vfat    noauto,noatime 1 2
/etc/localtime
(chroot) # ln -sf /usr/share/zoneinfo/Asia/Shanghai /etc/localtime
/etc/portage/make.conf
# (chroot) # nproc
4
Set MAKEOPTS to this number plus one:
MAKEOPTS="-j5"
LINGUAS="zh zh_CN zh_CN.UTF-8"
/etc/conf.d/hwclock
If you dual-boot with Windows, you‘ll need to edit this file and change the value of clock from UTC to local, because Windows will set your hardware clock to local time every time you boot Windows. Otherwise you normally wouldn‘t need to edit this file.
(chroot) # nano -w /etc/conf.d/hwclock
Localization
By default, Funtoo Linux is configured with Unicode (UTF-8) enabled, and for the US English locale and keyboard. If you would like to configure your system to use a non-English locale or keyboard, see Funtoo Linux Localization
Introducing Portage
安装软件
(chroot) # emerge packagename
When you install a package by specifying its name in the command-line, Portage records its name in the /var/lib/portage/world file. It does so because it assumes that, since you have installed it by name, you want to consider it part of your system and want to keep the package updated in the future. This is a handy feature, since when packages are being added to the world set, we can update our entire system by typing:
(chroot) # emerge --sync
(chroot) # emerge -auDN @world
a - show us what will be emerged, and ask us if we want to proceed
u - update the packages we specify -- don‘t emerge them again if they are already emerged.
D - Consider the entire dependency tree of packages when looking for updates. In other words, do a deep update.
N - Update any packages that have changed (new) USE settings.
You should also consider passing –with-bdeps=y when emerging @world, at least once in a while. This will update build dependencies as well.
Of course, sometimes we want to install a package but not add it to the world file. This is often done because you only want the package installed temporarily or because you know the package in question is a dependnecy of another package. If this behavior is desired, you call emerge like this:
(chroot) # emerge -1 packagename
emerge 的用法
make.conf
Video_Cards: NVIDIA
Laptop Mice: http://www.funtoo.org/Package:Synaptics 触摸板
ACCEPT_LICENSE="*"
CFLAGS="-march=core-avx-i -O2 -pipe"

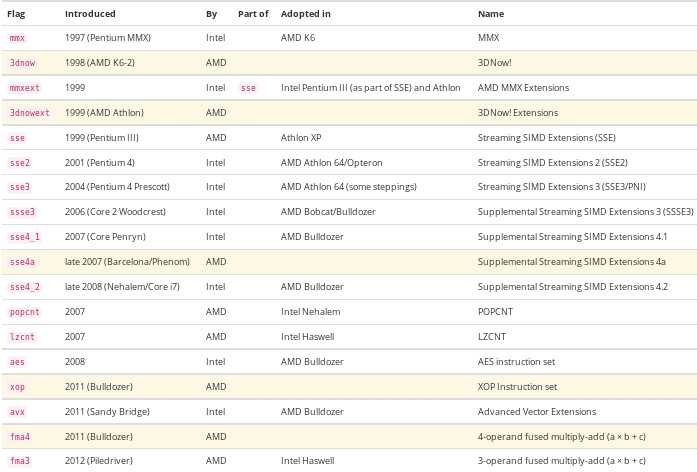
USE flags: /etc/portage/make.conf - Example of Turning On Hardware Optimizations
# cat /proc/cpuinfo | grep "flags" | uniq
MAKEOPTS="-j5"
Configuring and installing the Linux kernel
先把上面的弄懂再继续下面的会更好
特别是 make.conf, USE, Video_Cards, CFLAGS, USE, MAKEOPTS
Package Sets
软件集合
Kernel Package Set
To create the kernel package set, perform the following steps:
(chroot) # mkdir /etc/portage/sets
(chroot) # echo sys-kernel/debian-sources > /etc/portage/sets/kernel
Now, we‘ll want to set a USE variable to tell debian-sources to build a "universal" kernel and initramfs for us, to take the guess-work out of getting Funtoo Linux booted. To do this, we‘re going to set the binary USE variable for debian-sources, as follows:
(chroot) # echo "sys-kernel/debian-sources binary" >> /etc/portage/package.use
Now, when we just want to update our system‘s packages, we‘ll type emerge -auDN @world, and it will update our world set, leaving out the kernel. Likewise, when we just want to update our kernel, we‘ll type emerge -au @kernel, and it will update our kernel, leaving out the world set.
Building the Kernel
Note
See Funtoo Linux Kernels for a full list of kernels supported in Funtoo Linux. We recommend debian-sources for new users.
Important
debian-sources with binary USE flag requires at least 14GB free in /var/tmp and takes around 1 hour to build on a Intel Core i7 Processor.
Let‘s emerge our kernel:
(chroot) # emerge -1 @kernel
Important
Right now, the -1 option is required to not add our @kernel set to world-sets. This allows you to emerge it independently from @world. If you forget to use this option, edit /var/lib/portage/world-sets and remove the @kernel line. This will prevent kernel updates from being included in @world updates.
Note
NVIDIA card users: the binary USE flag installs the Nouveau drivers which cannot be loaded at the same time as the proprietary drivers, and cannot be unloaded at runtime because of KMS. You need to blacklist it under /etc/modprobe.d/.
Installing a Bootloader
First, emerge boot-update. This will also cause grub-2 and efibootmgr to be merged, since they are dependencies:
(chroot) # emerge boot-update
Then, edit /etc/boot.conf using nano and specify "Funtoo Linux genkernel" as the default setting at the top of the file, replacing "Funtoo Linux".
/etc/boot.conf should now look like this:
boot {
      generate grub
      default "Funtoo Linux genkernel"
      timeout 3
}

"Funtoo Linux" {
      kernel bzImage[-v]
}

"Funtoo Linux genkernel" {
      kernel kernel[-v]
      initrd initramfs[-v]
      params += real_root=auto
}

"Funtoo Linux better-initramfs" {
      kernel vmlinuz[-v]
      initrd /initramfs.cpio.gz
}
If you are booting a custom or non-default kernel, please read man boot.conf for information on the various options available to you.
- Old School (BIOS) MBR
When using "old school" BIOS booting, run the following command to install GRUB to your MBR, and generate the
/boot/grub/grub.cfgconfiguration file that GRUB will use for booting:
(chroot) # grub-install --target=i386-pc --no-floppy /dev/sda
(chroot) # boot-update
- New School (UEFI) Boot Entry
If you‘re using "new school" UEFI booting, run of the following sets of commands, depending on whether you are installing a 64-bit or 32-bit system. This will add GRUB as a UEFI boot entry.
- For x86-64bit systems:
(chroot) # grub-install --target=x86_64-efi --efi-directory=/boot --bootloader-id="Funtoo Linux [GRUB]" --recheck /dev/sda
(chroot) # boot-update
- For x86-32bit systems:
(chroot) # grub-install --target=i386-efi --efi-directory=/boot --bootloader-id="Funtoo Linux [GRUB]" --recheck /dev/sda
(chroot) # boot-update
- For x86-64bit systems:
First Boot, and in the future…
OK – you are ready to boot!
You only need to run grub-install when you first install Funtoo Linux, but you need to re-run boot-update every time you modify your /etc/boot.conf file or add new kernels to your system. This will regenerate /boot/grub/grub.cfg so that you will have new kernels available in your GRUB boot menu, the next time you reboot.
Configuring your network
Wi-Fi
Using NetworkManager
(chroot) # emerge linux-firmware
(chroot) # emerge networkmanager
(chroot) # rc-update add NetworkManager default
Note
The following command will not work as long as you are in chroot environment. The reason for this is that addwifi will need dbus and rfkill to be set up. So don‘t forget to reboot!
# addwifi -S wpa -K ‘wifipassword‘ mywifinetwork
This network configuration entry is stored in /etc/NetworkManager/system-connections
Using wpa_supplicant
(chroot) # emerge linux-firmware
(chroot) # emerge -a wpa_supplicant
Now, edit the wpa_supplicant configuration file, located at /etc/wpa_supplicant/wpa_supplicant.conf. The syntax is very easy:
network={
ssid="MyWifiName"
psk="lol42-wifi"
}

network={
ssid="Other Network"
psk="6d96270004515a0486bb7f76196a72b40c55a47f"
}
You will need to add both wpa_supplicant and dhcpcd to the default runlevel. wpa_supplicant will connect to your access point, and dhcpcd will acquire an IP address via DHCP:
(chroot) # rc-update add dhcpcd default
(chroot) # rc-update add wpa_supplicant default
Desktop (Wired Ethernet)
(chroot) # rc-update add dhcpcd default
Server (Static IP)
Finishing Steps
(chroot) # passwd
Restart your system
(chroot) # exit
# cd /mnt
# umount -l funtoo
# reboot
Profiles
Funtoo profiles are used to define defaults for Portage specific to your needs. There are five basic profile types: arch, build, subarch, flavor, and mix-ins:
- arch
typically x86-32bit or x86-64bit, this defines the processor type and support of your system. This is defined when your stage was built and should not be changed.
- build
defines whether your system is a current, stable or experimental build. current systems will have newer packages unmasked than stable systems. This is defined when your stage is built and is typically not changed.
- subarch
Defines optimizations for your CPU. The subarch is set at the time the stage3 is built, but can be changed later to better settings if necessary. Be sure to pick a setting that is compatible with your CPU.
- flavor
defines the general type of system, such as server or desktop, and will set default USE flags appropriate for your needs.
- mix-ins
define various optional settings that you may be interested in enabling.
One arch, build and flavor must be set for each Funtoo Linux system, while mix-ins are optional and you can enable more than one if desired.
Remember that profiles can often be inherited. For example, the desktop flavor inherits the workstation flavor settings, which in turn inherits the X and audio mix-ins. You can view this by using epro:
(chroot) # # epro show

=== Enabled Profiles: ===

        arch: x86-64bit
       build: current
     subarch: intel64-haswell
      flavor: desktop
     mix-ins: gnome


=== All inherited flavors from desktop flavor: ===

                     workstation (from desktop flavor)
                            core (from workstation flavor)
                         minimal (from core flavor)

=== All inherited mix-ins from desktop flavor: ===

                               X (from workstation flavor)
                           audio (from workstation flavor)
                             dvd (from workstation flavor)
                           media (from workstation flavor)
      mediadevice-audio-consumer (from media mix-in)
                mediadevice-base (from mediadevice-audio-consumer mix-in)
      mediadevice-video-consumer (from media mix-in)
                mediadevice-base (from mediadevice-video-consumer mix-in)
        mediaformat-audio-common (from media mix-in)
          mediaformat-gfx-common (from media mix-in)
        mediaformat-video-common (from media mix-in)
                  console-extras (from workstation flavor)
                           print (from desktop flavor)
To view available profiles:
(chroot) # epro list
Enabled profiles will be highlighted in cyan. Directly enabled profiles will be in bold and have a * appended.
To change the profile flavor:
(chroot) # epro flavor desktop
To add a mix-in:
(chroot) # epro mix-in +gnome
Next Steps
If you are brand new to Funtoo Linux and Gentoo Linux, please check out Funtoo Linux First Steps, which will help get you acquainted with your new system. We also have a category for our official documentation, which includes all docs that we official documentation for installation and operation of Funtoo Linux.
We also have a number of pages dedicated to setting up your system, which you can find below. If you are interested in adding a page to this list, add it to the "First Steps" MediaWiki category.
- ACPI Daemon
- AMD Catalyst Video Drivers
- APC UPS Daemon
- Cloud Backup
- Create a boot option for easy nvidia or nouveau display driver switching
- Emerge
- File permissions
- Funtoo Resources on LAN
- GNOME First Steps
- IPv6 Networking
- Keychain
- Lib users
- Litecoin Mining for Funtoo
- Mutt
- NVIDIA Linux Display Drivers
- Nftables
- Rsync Backup
- SFTP Only Access
- Stacked Runlevels
- Web Browsers
- Windows 7 Virtualization with KVM
- X Window System
- Xfce
- Zero Configuration Networking
If your system did not boot correctly, see Installation Troubleshooting for steps you can take to resolve the problem.