标签:style class blog code java http
环境:cocos2d-x 2.2.3/XCode 5.1
创建plugin-x
1. 在cocos2d-x/plugin/plugins 创建目录(用plugin-x名称命名),下层创建目录proj.ios,工程就创建在proj.ios目录下。
2. 创建的方式是iOS->Framework & Library ->Cocoa Touch Static Library
3. 修改位置 XCode在创建程序的时候,会自动把工程所有文件放在一个与工程名同名的目录下,你需要把工程文件(*.xcodeproj)移动到proj.ios目录下
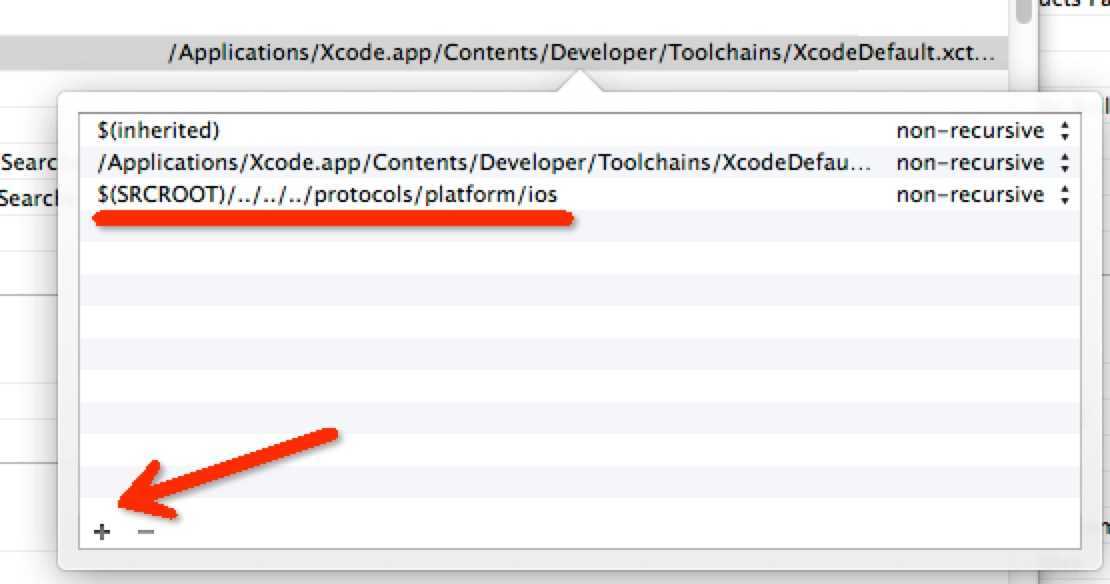
4. 工程设置 修改Target的Build Settings属性,找到Search Paths区域下的Header Search Paths,双击右侧,弹出窗口如下:

点击“+”,添加红色下划线上的路径。
实现cocos2d-x根目录/plugin/protocols/platform/ios目录下定义的协议。这里继承InterfaceSocial
头文件PluginTest.h
 1 #import <Foundation/Foundation.h>
 2 #import "InterfaceSocial.h"
 3
 4 @interface PluginTest2 : NSObject<InterfaceSocial>
 5
 6 #pragma mark - InerfaceSocial协议定义的方法
 7 - (void) configDeveloperInfo : (NSMutableDictionary*) cpInfo;
 8 - (void) share: (NSMutableDictionary*) shareInfo;
 9 - (void) setDebugMode: (BOOL) debug;
10 - (NSString*) getSDKVersion;
11 - (NSString*) getPluginVersion;
12
13 #pragma mark - 自定义方法和属性
14 - (void) someMethod;
15 - (void) anotherMethod:(NSMutableDictionary *)dict;
16
17 @end
m文件PluginTest.m
 1 #import "PluginTest.h"
 2 #import "SocialWrapper.h"
 3
 4 @implementation PluginTest2
 5
 6 - (void) configDeveloperInfo : (NSMutableDictionary*) cpInfo{}
 7 - (void) share: (NSMutableDictionary*) shareInfo{}
 8 - (void) setDebugMode: (BOOL) debug{}
 9 - (NSString*) getSDKVersion
10 {
11     return @"1.0";
12 }
13 - (NSString*) getPluginVersion
14 {
15     return @"1.0.1";
16 }
17 - (void) someMethod
18 {
19     NSLog(@"someMethod");
20     [SocialWrapper onShareResult:self withRet:kShareSuccess withMsg:@"接收到的信息"];
21 }
22 - (void) anotherMethod:(NSMutableDictionary *)dict
23 {
24     for (NSString *str in [dict allValues])
25     {
26         NSLog(@"%@", str);
27     }
28 }
29
30 @end
创建和设置使用plugin-x的程序
1. 使用命令行创建一个cocos2d-x程序SomeGame
2. 添加项目引用 添加ProtocolProtocol(路径是cocos2d-x根目录/plugin/protocols/proj.ios)和PluginTest项目的引用,或者直接添加两个项目的静态库。
添加程序应用的方法,打开SomeGame项目,在目录中找到要添加引用的项目,然后把工程文件拖拽到SomeGame项目中即可;或者右键点击程序,选择,添加文件,选取要添加引用的项目的工程文件。
3. 修改工程配置
Target->Build Settings->Linkings->Other Linker Flags 双击右侧,添加-ObjC
Target->Build Settings->Search Paths->Header Search Paths 双击右侧,添加$(SRCROOT)/../../../plugin/protocols/include
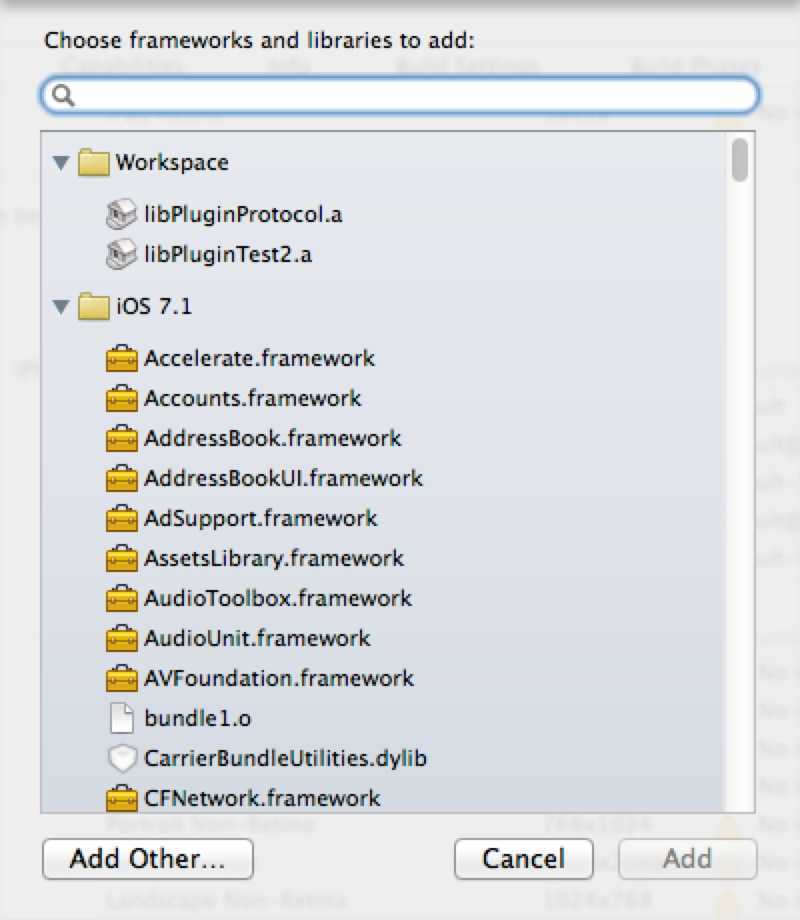
Target->General->Linked Framework and Libraries 点击左下方的“+”按钮,弹出如下图

workspace下的*.a文件全部添加,另外还要添加一个SystemConfiguration.framework
4. 添加代码调用plugin-x
创建监听器类
 1 class UDListener : public ShareResultListener
 2 {
 3     void onShareResult(ShareResultCode ret, const char* msg)
 4     {
 5         if (ret == kShareSuccess)
 6         {
 7             CCLOG("msg = %s", msg);
 8         }
 9     }
10 };
调用plugin-x
1 #include "PluginManager.h" 2 #include "ProtocolSocial.h" 3 #include "PluginParam.h" 4 #include "cocos-ext.h" 5 6 USING_NS_CC; 7 USING_NS_CC_EXT; 8 using namespace cocos2d::plugin; 9 10 void HelloWorld::invokePluginx() 11 { 12 ProtocolSocial *pluginTest = dynamic_cast<ProtocolSocial *>(PluginManager::getInstance()->loadPlugin("PluginTest")); 13 UDListener * listener = new UDListener; 14 pluginTest->setResultListener(listener); 15 PluginParam url("http://www.baidu.com"); 16 PluginParam param("hehe"); 17 pluginTest->callFuncWithParam("someMethod", NULL); 18 pluginTest->callFuncWithParam("anotherMethod", &url, ¶m, NULL); 19 }
程序与plugin-x交互
1. 程序调用插件是通过callFuncWithParam以及相关的方法,传参数是通过PluginParam,类似上面代码中的18行,传递多个参数就直接写在方法中,在plugin-x中得到的是NSMutableDictionary *类型的字典,参数值是value,key是Param1、Param2....。如果传递的是一个参数,则参数的类型只能是int、float、bool、const char *,plugin-x接收到的类型是NSNumber、NSNumber、NSNumber、NSString
2. plugin-x反馈给程序,可以通过函数返回值。
举个栗子:
plugin-x中
int returnInt(NSNumber * a)
{
int num = [a intValue];
return
num*2;
}
程序中
PluginParam a(5);
int num = pluginTest->callIntFuncWithParam("returnInt", &a, NULL);
CCLOG("num = %d", num);
输出结果是10
或者通过SocialWrapper
plugin-x中
[SocialWrapperonShareResult:selfwithRet:kShareSuccesswithMsg:@"接收到的信息"];
程序中
在监听器中处理
cocos2d-x使用plugin-x,布布扣,bubuko.com
标签:style class blog code java http
原文地址:http://www.cnblogs.com/bigfish2013/p/3782599.html