标签:

序
程序实现自动画画,以后玩你画我猜再也不用担心被吐槽了.
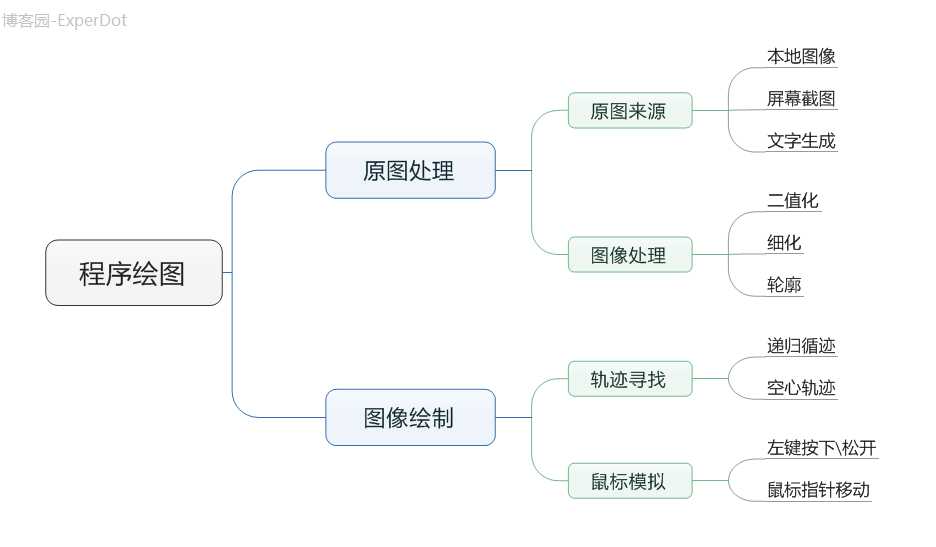
1.原图来源
程序绘图得有一张图片作为模板,然后按照模板绘制,所以首先需要导入原图
1.导入本地图像
直接导入本地图像
Dim NativeBitmap As New Bitmap("FileName As String")
2.屏幕截图
利用搜索引擎搜图,然后直接截图,这样更便捷
        Dim NativeBitmap As Bitmap= GetScreen(0,0,100,100)

        Public Function GetScreen(ByVal gX As Integer, ByVal gY As Integer, ByVal gWidth As Integer, ByVal gHeight As Integer) As Bitmap
        Dim ResultBitmap As New Bitmap(gWidth, gHeight)
        Dim pg As Graphics = Graphics.FromImage(ResultBitmap)
        pg.CopyFromScreen(gX, gY, 0, 0, New Size(gWidth, gHeight))
        pg.Dispose()
        Return ResultBitmap
        End Function
3.文字生成
下载TureType字体,随时生成好看的文字图片
 Dim NativeBitmap As Bitmap = GetTextImage("示例", "叶根友毛笔行书简体", 24,100,100)

 Public Function GetTextImage(ByVal gString As String, ByVal gFont As String, ByVal gSize As Int32, ByVal gWidth As Int32, ByVal gHeight As Int32) Dim ResultBitmap As New Bitmap(gWidth, gHeight)
    Dim pg As Graphics = Graphics.FromImage(ResultBitmap)
    Dim myfont As New Font(gFont, gSize, FontStyle.Regular)
    pg.SmoothingMode = Drawing2D.SmoothingMode.AntiAlias ‘抗锯齿
    pg.DrawString(gString, myfont, Brushes.Black, 0, 0)
    pg.Dispose()
    Return ResultBitmap
 End Function
2.图像处理
接下来就要对模板进行处理了,以便于下一步的轨迹寻找
1.二值化
基于一个阈值T,大于T的像素群设定为白色,小于T的像素群设定为黑色,也就是将整个图像呈现出明显的只有黑和白的视觉效果
    ‘图像二值化
    Public Function GetThreshold(ByVal gBitmap As Bitmap, ByVal gSplitNum As Byte) As Bitmap
        Dim ResultBitmap As New Bitmap(gBitmap.Width, gBitmap.Width)
        Dim hHd As Integer
        For i = 0 To gBitmap.Width - 1
            For j = 0 To gBitmap.Height - 1
                hHd = gethHD(gBitmap.GetPixel(i, j))
                ResultBitmap.SetPixel(i, j, IIf(hHd < gSplitNum, Color.Black, Color.White))
            Next
        Next
        Return ResultBitmap
    End Function
    ‘ 获取颜色中值
    Public Function gethHD(ByVal color1 As Color)
        Dim hHD, r, g, b As Integer
        r = color1.R : g = color1.G : b = color1.B
        hHD = (r + g + b) / 3
        Return hHD
    End Function
二次元例子:(全局二值化,不同阈值效果不同)

2.细化
顾名思义,将粗线条细化为细线条(通常为宽度为一像素),参考过多个细化算法后发现效果均不理想,用自己写的轮廓算法和空心绘制等效代替
3.轮廓
就是找出图像的轮廓
    ‘返回Btimap,图像轮廓线
    Public Function GetOutLine(ByVal gBitmap As Bitmap, ByVal gDistance As Byte) As Bitmap
        Dim xArray2() As Short = {0, 1, 0, -1}
        Dim yArray2() As Short = {-1, 0, 1, 0}
        Dim ResultBitmap As New Bitmap(gBitmap) ‘在原图的基础上绘图
        Dim Color1, Color2 As Color
        For i = 1 To gBitmap.Width - 2
            For j = 1 To gBitmap.Height - 2
                For p = 0 To 3
                    Color1 = gBitmap.GetPixel(i, j)
                    Color2 = gBitmap.GetPixel(i + xArray2(p), j + yArray2(p))
                    If CompareRGB(Color1, Color2, gDistance) = False And gethHD(Color1) - gethHD(Color2) > 0 Then
                        ResultBitmap.SetPixel(i, j, Color.Black)
                    End If
                Next
            Next
        Next
        Return ResultBitmap
    End Function
    ‘比较两个颜色的相似度
    Public Function CompareRGB(ByVal Color1 As Color, ByVal Color2 As Color, ByVal Distance As Byte) As Boolean
        Dim r As Integer = Int(Color1.R) - Int(Color2.R)
        Dim g As Integer = Int(Color1.G) - Int(Color2.G)
        Dim b As Integer = Int(Color1.B) - Int(Color2.B)
        Dim absDis As Integer = Math.Sqrt(r * r + g * g + b * b)
        If absDis < Distance Then
            Return True
        Else
            Return False
        End If
    End Function
    ‘获取颜色中值
    Public Function gethHD(ByVal color1 As Color)
        Dim hHD, r, g, b As Integer
        r = color1.R : g = color1.G : b = color1.B
        hHD = (r + g + b) / 3
        Return hHD
    End Function
二次元例子:

3.循迹算法
1.递归循迹
‘‘‘ 首先将图像的二值化数据保存在一个二维数组里,程序绘图时仅绘制值为1的元素所对应的位置
    ‘返回图像的二值化数组,0表示白色,1表示黑色
    Public Function GetImageBol(ByVal gBitmap As Bitmap)
        Dim ResultArray(gBitmap.Width - 1, gBitmap.Height - 1) As Integer
        For i = 0 To gBitmap.Width - 1
            For j = 0 To gBitmap.Height - 1
                If gBitmap.GetPixel(i, j).Equals(Color.FromArgb(0, 0, 0)) = True Then
                    ResultArray(i, j) = 1
                Else
                    ResultArray(i, j) = 0
                End If
            Next
        Next
        Return ResultArray
    End Function
‘‘‘ 然后寻找画笔起点位置,依次检查每个元素,当对应值为1时该点即为起点
    Dim BitmapBol1(,) As Integer
    Dim BitmapBol2(,) As Integer=GetImageBol(CurrentBitmap)
    Private Sub StartPaint()
        ‘On Error Resume Next
        Dim BWidth As Integer = BitmapBol2.GetUpperBound(0) + 1
        Dim BHeight As Integer = BitmapBol2.GetUpperBound(1) + 1
        ReDim BitmapBol1(BWidth - 1, BHeight - 1)
        Array.Copy(BitmapBol2, BitmapBol1, BitmapBol1.Length)
        For i = 0 To BWidth - 1 Step 1
            For j = 0 To BHeight - 1 Step 1
                If BitmapBol1(i, j) = 1 Then
                    BitmapBol1(i, j) = 0
                    MMove(i, j)
                    MDownUp(0, 0, True)
                    CheckMove(i, j)
                    MDownUp(0, 0, False)
                End If
            Next
        Next
    End Sub
‘‘‘ 最后递归检查每一个点,同步模拟鼠标操作
    Dim xArray() As Short = {-1, 0, 1, 1, 1, 0, -1, -1}
    Dim yArray() As Short = {-1, -1, -1, 0, 1, 1, 1, 0}
    ‘检查移动
    Private Sub CheckMove(ByVal x As Integer, ByVal y As Integer)
        Dim dx, dy As Integer
        For i = 0 To 7
            dx = x + xArray(i) : dy = y + yArray(i)
            If Not (dx > 0 And dy > 0 And dx < BitmapBol2.GetUpperBound(0) And dy < BitmapBol2.GetUpperBound(1)) Then MDownUp(0, 0, False) : NewStart = True : Exit Sub
            If CheckCircle(dx, dy) = False Then
                If BitmapBol1(dx, dy) = 1 Then
                    BitmapBol1(dx, dy) = 0
                    MMove(dx, dy)
                    If NewStart = True Then MDownUp(0, 0, True) : NewStart = False
                    CheckMove(dx, dy)
                    MDownUp(0, 0, False)
                    NewStart = True
                End If
            Else
                BitmapBol1(dx, dy) = 0
            End If
        Next
    End Sub
2.空心轨迹
‘‘‘ 只要元素位置上下左右位置均为1即认为该点在实体内部,绘制时跳过该元素就可以实现空心(主要用于空心字体的绘制)
    ‘检查空心
    Private Function CheckCircle(ByVal x As Integer, ByVal y As Integer) As Boolean
        If Not (x > 0 And y > 0 And x < BitmapBol2.GetUpperBound(0) And y < BitmapBol2.GetUpperBound(1)) Then Return False
        If CheckBox1.Checked = True And BitmapBol2(x - 1, y) = 1 And BitmapBol2(x + 1, y) = 1 And BitmapBol2(x, y - 1) = 1 And BitmapBol2(x, y + 1) = 1 Then
            Return True ‘当前点为实体内部
        Else
            Return False ‘当前点为实体边缘
        End If
    End Function
4.鼠标模拟
1.左键按下\松开
调用API实现
    Private Declare Sub mouse_event Lib "user32" (ByVal dwFlags As Int32, ByVal dx As Int32, ByVal dy As Int32, ByVal cButtons As Int32, ByVal dwExtraInfo As Int32)
    Private Sub MDownUp(ByVal dx As Integer, ByVal dy As Integer, ByVal type As Boolean)
        If type = True Then
            mouse_event(&H2, 0, 0, 0, IntPtr.Zero)‘鼠标左键按下
        Else
            mouse_event(&H4, 0, 0, 0, IntPtr.Zero)‘鼠标左键松开
        End If
        System.Threading.Thread.Sleep(sleeptime)
    End Sub
2.鼠标移动
也可以调用SetCursorPos实现模拟鼠标移动
    Private Sub MMove(ByVal dx As Integer, ByVal dy As Integer)
        AbsX = Form2.PointToScreen(New Point(0, 0)).X
        AbsY = Form2.PointToScreen(New Point(0, 0)).Y
        Cursor.Position = New Point(AbsX + dx, AbsY + dy)
    End Sub
附录:
程序&源码网盘下载链接: http://pan.baidu.com/s/1gdy9ZfP
标签:
原文地址:http://www.cnblogs.com/experdot/p/4494351.html