标签:
要想让MapView画路径,必然要传给mapView某些东西,没错,类似Annotation(大头针),添加路径也有类似的操作函数和相应传入CLLocation返回路径的协议方法。
1.搭建界面
拖一个全屏的MapView,连线到controller,如下
1 @property (weak, nonatomic) IBOutlet MKMapView *mapView;
2. 创建一个编码器(地理编码,不要误解)
1 @property (nonatomic, strong) CLGeocoder *geocoder;
并让它成为懒加载对象:
1 - (CLGeocoder *)geocoder
2 {
3     if (!_geocoder) {
4         self.geocoder = [[CLGeocoder alloc] init];
5     }
6     return _geocoder;
7 }
上面这些不走都是无脑完成的,写的多了都轻车熟路。下面才是重头戏。
3. 开始之前先拿到起始点和终点的地理信息再说
(1) 在这之前我们是不是要设置mapView的代理呢
遵守协议
1 @interface ViewController () <MKMapViewDelegate>
设置代理:
1 self.mapView.delegate = self;
(2) 开始干活
 1 NSString *address1 = @"北京";
 2     NSString *address2 = @"上海";
 3
 4     [self.geocoder geocodeAddressString:address1 completionHandler:^(NSArray *placemarks, NSError *error) {
 5         if (error) return;
 6
 7         CLPlacemark *fromPm = [placemarks firstObject];
 8
 9         [self.geocoder geocodeAddressString:address2 completionHandler:^(NSArray *placemarks, NSError *error) {
10             if (error) return;
11
12             CLPlacemark *toPm = [placemarks firstObject];
13
14             [self addLineFrom:fromPm to:toPm];
15         }];
16     }];
有心的同志可能观察到:怎么两个反地理编码是嵌套的。呐,这里是你要注意的,在一个controller中只能同时存在一个地理编码信息。如果反编码完起始点就跳出block,那么当反编码完第二个的时候,第一个就被销毁了。而嵌套block则不会。这里你可以理解为block里面的信息还不归属controller管理。
我们反地理编码得到的总是一系列的符合结果的地理信息数组,但是只有最好的那个才是我们需要的,所以总是取出数组中的第一个object。地理信息的类型是CLPlacemark类型,这个类型在添加大头针的时候肯定不会陌生。它就是封装了地理坐标CLLocationCoordinate的一个类型。
我们通过反地理编码的得到了两个地理信息,那接下来就开始划线吧。方法
addLineFrom:fromPm to:toPm
是我们自己创建的,这样防止一个方法里面放置太多的代码,也实现代码的聚合性(一段代码只实现一个功能)。
4. 实现addLineFrom:(CLPlacemark *)from to:(CLPlacemark *)to
(1) 虽然我们设置了开始和结束,但是我们并没有告诉mapView到底是从"北京"到"上海",还是"上海"到"北京",我们现在设置的信息都只是我们单方面的一厢情愿的。
1     // 方向请求
2     MKDirectionsRequest *request = [[MKDirectionsRequest alloc] init];
3     // 设置起点
4     MKPlacemark *sourcePm = [[MKPlacemark alloc] initWithPlacemark:fromPm];
5     request.source = [[MKMapItem alloc] initWithPlacemark:sourcePm];
6
7     // 设置终点
8     MKPlacemark *destinationPm = [[MKPlacemark alloc] initWithPlacemark:toPm];
9     request.destination = [[MKMapItem alloc] initWithPlacemark:destinationPm];
传进来的CLPlacemark对象又一次被封装到MKPlacemark中了。这是可以理解的,毕竟MapView和CLLocation还是有一点区别的。
这还没完,到这里我们只是设置了请求(request),还没有请求,下面我们请求设置方向
1     // 方向对象
2     MKDirections *directions = [[MKDirections alloc] initWithRequest:request];
方向,和两个地点都有了,至少我们认为不缺少什么东西了,告诉你方向,从哪里出发,到那里出发,你还不知道怎么走,那你就去死吧。或许你担心可能现在的数据还要进一步封装,但是你并不知道怎么封装,那么我告诉你,到这里已经不需要封装了,我们得到了mapView能识别的数据类型。
(2) 那下面我们开始添加咯
前面我们说过,类似添加大头针的addAnnotation:,这里有一个addOverlay:,只要我们点用这个就能添加路线了。但是添加了显示还是一回事(就向添加普通view时没有设置frame一样,添加了但是没有显示。但是这里缺不是frame的问题,后面会介绍的)。
从我们现在的信息获得路线,调用addOverlay:
1 [directions calculateDirectionsWithCompletionHandler:^(MKDirectionsResponse *response, NSError *error) {
2 //        NSLog(@"总共%lu条路线",   [response.routes count]);
3
4         // code
5
6 }];
我们调用了MKDirections的方法,你问我为什么是这个?这他妈就是这么用的哪有那么多为什么。
这个方法会帮你计算路线,完事之后还会回调一个block,而得到的路线和其他信息都封装在response中让你操作,同事还烦会给你了错误信息。
那我们就不客气了,解析出路线(路线在iOS中是MKRoute对象)
1 for (MKRoute *route in response.routes) {
2          // 添加路线遮盖
3         [self.mapView addOverlay:route.polyline];
4  }
奥,这里叫路线遮盖,可能你从addOverlay就开始疑问了,为什么不是addRoute?可以这么理解,你添加的路线是盖在mapView上面的,而不是mapView自带的属性。
ok,我们暴力添加了所有得到的路线遮盖,但是运行一下你就知道,并没有显示路线,为什么呢,我们的逻辑到现在都都没有错,难道是哪里错了我不知道?其实是没有错的,是还没完成。
(3) 实现代理方法
需要实现代理方法才能显示。
还记得添加大头针的时候需要实现一个代理方法返回大头针view吗,这里也是
1 #pragma mark - MKMapViewDelegate
2 - (MKOverlayRenderer *)mapView:(MKMapView *)mapView rendererForOverlay:(id<MKOverlay>)overlay
3 {
4     MKPolylineRenderer *renderer = [[MKPolylineRenderer alloc] initWithOverlay:overlay];
5     renderer.strokeColor = [UIColor redColor];
6     return renderer;
7 }
就是这个逼,每次调用addOverlay时,都会调用一次这个代理方法。
这个方法传入MapView和录像遮盖overlay,返回MKOverlayRender类型,而MKOverlayRender是第一次出现,是什么鬼?看来得创建MKOverlayRender这个对象并返回他了。
代码中你就看出了,我们并没有用MKOverlayRender这个类型,而是用了MKPolylineRender(MKOverlayRender的子类)。因为MKOverlayRender连个属性都没有。试想一下你添加的路径没有线宽和颜色,那你他妈看得见吗。所以我们使用MKPolylineRender子类。他有一系列的属性(按住command,左键点击MKPolylineRender即可查看)可以设置,根据喜好自己发挥吧。
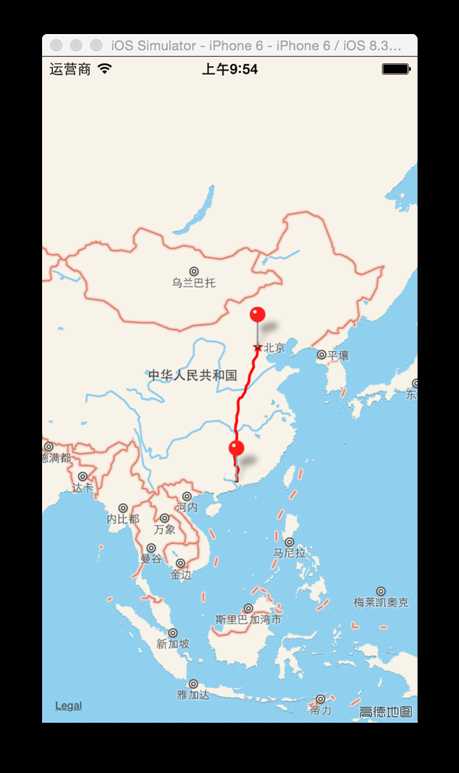
运行你就发现所言非虚了。
5. 添加大头针
这里纯属拓展
在- (void)addLineFrom:(CLPlacemark *)fromPm to:(CLPlacemark *)toPm方法实现开始时添加代码
 1 // 1.添加2个大头针
 2     LSAnnotation *fromAnno = [[LsAnnotation alloc] init];
 3     fromAnno.coordinate = fromPm.location.coordinate;
 4     fromAnno.title = fromPm.name;
 5     [self.mapView addAnnotation:fromAnno];
 6
 7     LsAnnotation *toAnno = [[LsAnnotation alloc] init];
 8     toAnno.coordinate = toPm.location.coordinate;
 9     toAnno.title = toPm.name;
10     [self.mapView addAnnotation:toAnno];
这里就是纯添加两个大头针,利用传进来的两个地点信息。LsAnnotation时自己创建的实现了<MKAnnotation>协议的大头针,并添加了几个属性,添加出来的就是一个红色的大头针,你想要其他样式请移步到其他教程。
这里给出.h文件,.m文件没有任何实现,所以不给了
1 #import <Foundation/Foundation.h>
2 #import <MapKit/MapKit.h>
3 @interface LsAnnotation : NSObject <MKAnnotation>
4 @property (nonatomic) CLLocationCoordinate2D coordinate;//required
5 @property (nonatomic, copy) NSString *title;
6 @property (nonatomic, copy) NSString *subtitle;
7
8 @end
ok,结束了。
给出controller的完整代码
  1 //
  2 //  LsViewController.m
  3 //  07-导航画线
  4 //
  5 //
  6
  7 #import "LsViewController.h"
  8 #import "LsAnnotation.h"
  9 #import <MapKit/MapKit.h>
 10 #import <CoreLocation/CoreLocation.h>
 11
 12 @interface MJViewController () <MKMapViewDelegate>
 13 @property (weak, nonatomic) IBOutlet MKMapView *mapView;
 14 @property (nonatomic, strong) CLGeocoder *geocoder;
 15 @end
 16
 17 @implementation MJViewController
 18
 19 - (CLGeocoder *)geocoder
 20 {
 21     if (!_geocoder) {
 22         self.geocoder = [[CLGeocoder alloc] init];
 23     }
 24     return _geocoder;
 25 }
 26
 27 - (void)viewDidLoad
 28 {
 29     [super viewDidLoad];
 30
 31     self.mapView.delegate = self;
 32
 33     NSString *address1 = @"北京";
 34     NSString *address2 = @"广州";
 35
 36     [self.geocoder geocodeAddressString:address1 completionHandler:^(NSArray *placemarks, NSError *error) {
 37         if (error) return;
 38
 39         CLPlacemark *fromPm = [placemarks firstObject];
 40
 41         [self.geocoder geocodeAddressString:address2 completionHandler:^(NSArray *placemarks, NSError *error) {
 42             if (error) return;
 43
 44             CLPlacemark *toPm = [placemarks firstObject];
 45
 46             [self addLineFrom:fromPm to:toPm];
 47         }];
 48     }];
 49
 50
 51 }
 52
 53 /**
 54  *  添加导航的线路
 55  *
 56  *  @param fromPm 起始位置
 57  *  @param toPm   结束位置
 58  */
 59 - (void)addLineFrom:(CLPlacemark *)fromPm to:(CLPlacemark *)toPm
 60 {
 61     // 1.添加2个大头针
 62     LsAnnotation *fromAnno = [[LsAnnotation alloc] init];
 63     fromAnno.coordinate = fromPm.location.coordinate;
 64     fromAnno.title = fromPm.name;
 65     [self.mapView addAnnotation:fromAnno];
 66
 67     LsAnnotation *toAnno = [[LsAnnotation alloc] init];
 68     toAnno.coordinate = toPm.location.coordinate;
 69     toAnno.title = toPm.name;
 70     [self.mapView addAnnotation:toAnno];
 71
 72     // 2.查找路线
 73
 74     // 方向请求
 75     MKDirectionsRequest *request = [[MKDirectionsRequest alloc] init];
 76     // 设置起点
 77     MKPlacemark *sourcePm = [[MKPlacemark alloc] initWithPlacemark:fromPm];
 78     request.source = [[MKMapItem alloc] initWithPlacemark:sourcePm];
 79
 80     // 设置终点
 81     MKPlacemark *destinationPm = [[MKPlacemark alloc] initWithPlacemark:toPm];
 82     request.destination = [[MKMapItem alloc] initWithPlacemark:destinationPm];
 83
 84     // 方向对象
 85     MKDirections *directions = [[MKDirections alloc] initWithRequest:request];
 86
 87     // 计算路线
 88     [directions calculateDirectionsWithCompletionHandler:^(MKDirectionsResponse *response, NSError *error) {
 89 //        NSLog(@"总共%lu条路线",   [response.routes count]);
 90
 91         // 遍历所有的路线
 92         for (MKRoute *route in response.routes) {
 93             // 添加路线遮盖
 94             [self.mapView addOverlay:route.polyline];
 95         }
 96     }];
 97 }
 98
 99 #pragma mark - MKMapViewDelegate
100 - (MKOverlayRenderer *)mapView:(MKMapView *)mapView rendererForOverlay:(id<MKOverlay>)overlay
101 {
102     MKPolylineRenderer *renderer = [[MKPolylineRenderer alloc] initWithOverlay:overlay];
103     renderer.strokeColor = [UIColor redColor];
104     return renderer;
105 }
106 @end

标签:
原文地址:http://www.cnblogs.com/angryli/p/4499423.html