标签:
在文件夹"Models"中创建新类,如下图所示:
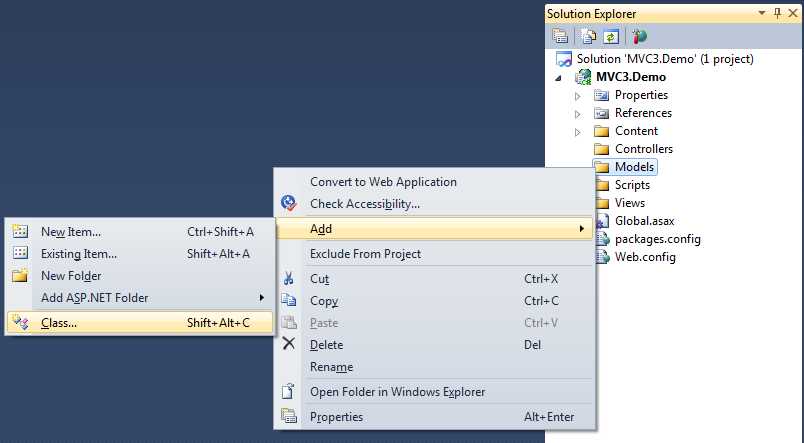
1、命名:Model的命名规则一般以Model结尾,如:以业务为主的命名UserModel或以页面为主的命名LoginModel。
2、作用:开发过三层的朋友都知道,我们在表示层、业务逻辑层、数据操作层进行数据传输的时候会用到的DTO一般都单独建立成名称为Model的类库项目。其实此处的Models文件夹中的类与我们曾经用到的数据传输对象本质上是一致的。当然也会有些区别,我们后面再说。
3、代码示例:
 1 /*
 2  *
 3  * 创建人:李林峰
 4  *
 5  * 时  间:2013-2-24
 6  *
 7  * 描  述:用户模型
 8  *
 9  */
10
11 using System;
12
13 namespace MVC3.Demo.Models
14 {
15     //以业务为主的用户模式
16     public class UserModel
17     {
18         public int UserID { get; set; }                 //用户编号
19         public string UserName { get; set; }            //用户名
20         public string Password { get; set; }            //密码
21         public int Sex { get; set; }                    //性别,0男,1女
22         public int Age { get; set; }                    //年龄
23         public int Political { get; set; }              //政治面貌
24         public int Height { get; set; }                 //身高
25         public int Weight { get; set; }                 //体重
26         public string Graduated { get; set; }           //毕业院校
27         public string Professional { get; set; }        //专业
28         public DateTime GraduatedDate { get; set; }         //毕业日期
29         public string Address { get; set; }             //现住地址
30         public string Phone { get; set; }               //联系电话
31         public string ImagePath { get; set; }           //头相地址
32         public string Other { get; set; }               //其他描述
33     }
34
35     //以页面为主的用户登陆模型
36     public class LoginModel
37     {
38         public string UserName { get; set; }            //用户名
39         public string Password { get; set; }            //密码
40     }
41     //以页面为主的用户注册模式
42     public class RegeditModel
43     {
44         public string UserName { get; set; }            //用户名
45         public string Password { get; set; }            //密码
46         public int Sex { get; set; }                    //性别
47         public int Age { get; set; }                    //年龄
48     }
49 }
在创建视图以前我们先要创建一个名称为User的文件夹,在User文件夹中创建视图("Add"-->"View"),如下图所示:
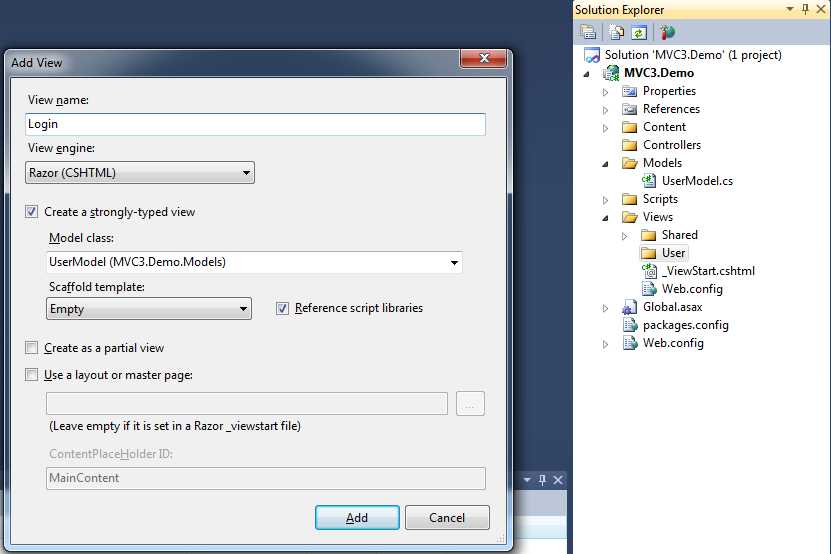
1、名称:同以往的名称一样,以页面的功能为主,此处为:Login。
2、模板引擎:此处选择Razor(原因请看我的上一篇文章)。
3、创建强类型视图:此处勾选后一拉列表中会自动罗列出我们已建的模型(注意:这里显示的只是Build以后的,有时候刚刚建立完Model在此处是没有的,Build以后才可以出现),如我们刚才建立的三个Model都会在此处显示。勾选与不勾选的区别仅仅在于创建后的View文件中是否存在与Model关联的代码,这点在代码块中我会加注释说明。
4、框架模板:只有选择了Model class后此项才是可选的,其中有“创建、删除、详细、编辑、空、列表”选择项,当选择了其中的某项模板后VS2010会自动生成对应Model的操作代码。该功能实际上是VS2010的一个View代码生成器。
5、创建部分页:与传统的aspx页面UserControl作用是一样的,可以一次创建应用在不同的View中。
6、选择母板页:可选择是否选择母板页
7、代码示例:
 1 @model MVC3.Demo.Models.LoginModel
 2 <!--如果是创建强类型的视图并选择了LoginModel,上面的代码则由vs自动生成,仅仅是一段代码,手写的效果是一样的,所以一般情况我不会勾选“强类型视图”-->
 3 @{
 4     Layout = null;
 5 }
 6 <!--Layout用于母板页的布局,在本系列的第四篇文章中会详细讲解-->
 7 <!DOCTYPE html>
 8 <html>
 9 <head>
10     <title>用户登陆</title>
11 </head>
12 <body>
13     <!--Html.BeginForm()等同于在html代码里写<form>.....</form>是一样的-->
14     @using (Html.BeginForm())
15     {
16         <div>
17             用户名:
18         </div>
19         <div>
20             <!--创建用户名文本框,等同于<input type="text" />-->
21             @Html.TextBoxFor(model => model.UserName)
22         </div>
23         <div>
24             密码:
25         </div>
26         <div>
27             <!--创建用户名文本框,等同于<input type="password" />-->
28             @Html.PasswordFor(model => model.Password)
29         </div>
30         <div>
31             <input type="submit" value="登录" />
32         </div>
33     }
34 </body>
35 </html>
在Control文件夹中创建"UserController",如下图所示:
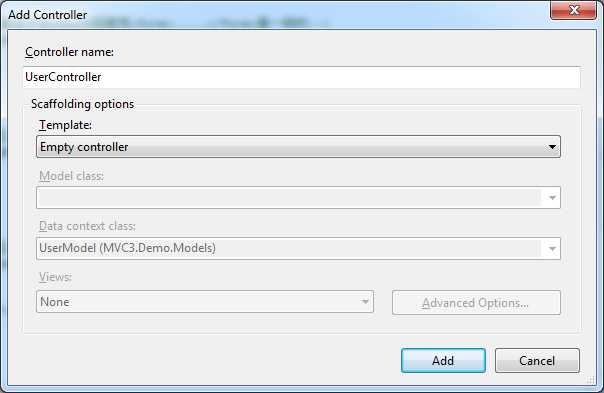
1、名称:必须以Controller结尾。
2、模板:其中有三项可选,分别为“空、使用EF、直接读写”,功能类似代码生成器,选择后VS2010自动在创建的类中添加方法代码块。
3、代码示例:
 1 /*
 2  *
 3  * 创建人:李林峰
 4  *
 5  * 时  间:2013-2-24
 6  *
 7  * 描  述:用户控制器
 8  *
 9  */
10
11 using System;
12 using System.Collections.Generic;
13 using System.Web;
14 using System.Web.Mvc;
15
16 namespace MVC3.Demo.Controllers
17 {
18     public class UserController : Controller
19     {
20         ////系统自动生成,可以删除
21         //public ActionResult Index()
22         //{
23         //    return View();
24         //}
25
26         //登陆控制器
27         public ActionResult Login()
28         {
29             return View();
30         }
31     }
32 }
4、UserControl中包含一个方法Login执行Views/User/Login.schtml并返回。
1、调试:MVC与传统的ASPX页面不同,不能通过“鼠标右键-->浏览”直接浏览视图。调试MVC要在“MVC3.Demo项目-->右键点击属性”设置起始页,如下图所示:
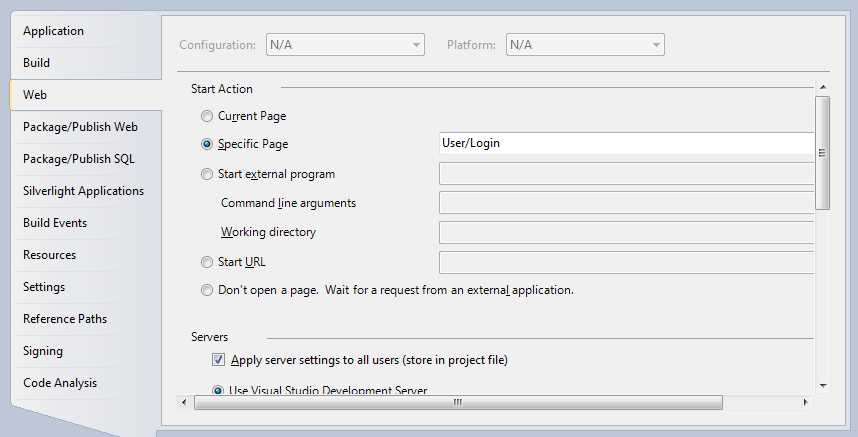
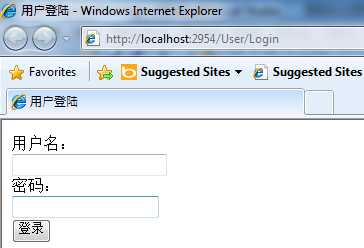
2,运行效果:按F5运行,加断点与传统的ASPX页面一样,如下图所示。
1.修改LoginControl代码如下:
 1 /*
 2  *
 3  * 创建人:李林峰
 4  *
 5  * 时  间:2013-2-24
 6  *
 7  * 描  述:用户控制器
 8  *
 9  */
10
11 using System;
12 using System.Collections.Generic;
13 using System.Web;
14 using System.Web.Mvc;
15
16 namespace MVC3.Demo.Controllers
17 {
18     public class UserController : Controller
19     {
20         ////系统自动生成,可以删除
21         //public ActionResult Index()
22         //{
23         //    return View();
24         //}
25
26         //登陆控制器
27         public ActionResult Login()
28         {
29             return View();
30         }
31
32         [HttpPost]//登陆控制器
33         public ActionResult Login(Models.LoginModel loginModel)
34         {
35             if (loginModel.UserName == "张三" && loginModel.Password == "123456")
36                 Response.Write("正确!");
37             else
38                 Response.Write("不正确!");
39             return View();
40         }
41     }
42 }
在LoginControl中存在两个同名方法Login,无参数的是在用户通过地址栏打开登陆窗口时的方法,加了[HttpPost]的方法是用户点击提交时处理回发时的方法。
2、MVC执行流程图(粗略):
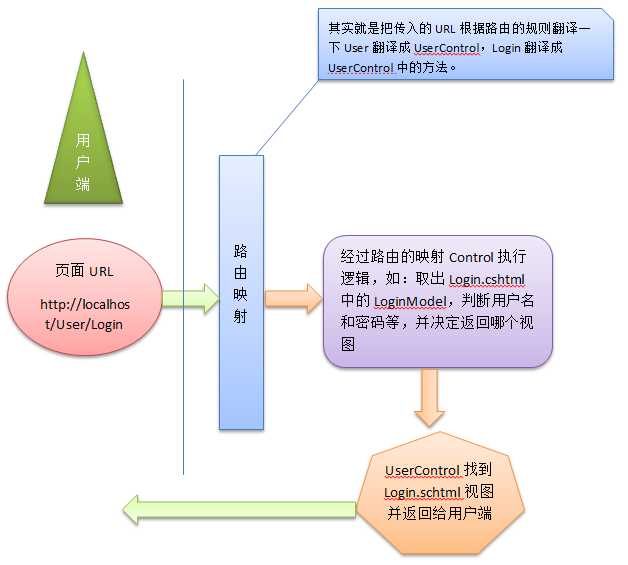
3、本例执行流程:
标签:
原文地址:http://www.cnblogs.com/ganting/p/4503849.html