标签:
Conceptual Overview
(官网对Angular里的概念做出的最原味的解释。)
(先贴地址:https://code.angularjs.org/1.3.15/docs/guide/concepts)
A first example: Data binding
 1 <div ng-app ng-init="qty=1;cost=2">
 2     <b>Invoice:</b>
 3
 4     <div>
 5         <label>Quantity(数量):</label> <input type="number" min="0" ng-model="qty">
 6     </div>
 7     <div>
 8         <label>Costs(单价):</label> <input type="number" min="0" ng-model="cost">
 9     </div>
10     <div>
11         <b>Total(总价):</b> {{qty * cost | currency}}
12     </div>
13 </div>
This looks like normal HTML, with some new markup. In Angular, a file like this is called a “template”. When Angular starts your application, it parses and processes this new markup from the template using the so-called “compiler”. The loaded, transformed and rendered DOM is then called the “view”.
The first kind of new markup are the so-called “directives”. They apply special behavior to attributes or elements in the HTML.
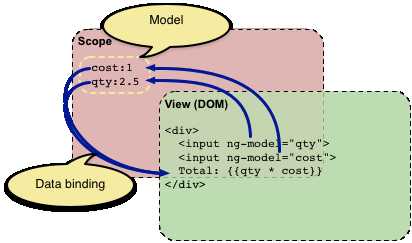
The second kind of new markup are the double curly braces {{ expression | filter }}: when the compiler encounters this markup, it will replace it with the evaluated value of the markup. An “expression” in a template is a JavaScript-like code snippet that allows to read and write variables. Note that those variables are not global variables. Just like variables in a JavaScript function live in a scope, Angular provides a “scope” for the variables accessible to expressions. The values that are stored in variables on the scope are referred to as the “model”.
上面的代码看着就是一般的HTML嘛,只不过多了些新的标记。在Angular里,这种带新标记的HTML,称为模板(template)。当Angular启动你的应用时,它就会使用它自己的“编译器(compiler)”解析并处理模板中这种新的标记。而经过加载,转换和渲染之后的DOM,就称为视图(view)。
新的标记有2种:
(图还是看看好,万一理解更深刻了呢)

注意:
Custom directives to access the DOM: In Angular, the only place where an application should access the DOM is within directives. This is important because artifacts that access the DOM are hard to test. If you need to access the DOM directly, you should write a custom directive for this.
一定要自定义指令去访问DOM啊!:在Angular里,一个应用访问DOM的唯一位置,应该限定在自定义指令中。为啥呢?因为其他途径访问DOM的话,Angular恐怕会检测不到(你有想过维持双向数据绑定之类的有关MVC和谐发展的事有多辛苦吗?)。所以呢,如果你要访问DOM,先自定义一个指令吧。
A filter formats the value of an expression for display to the user. In the example above, the filter currency formats a number into an output that looks like money.
The important thing in the example is that Angular provides live bindings: Whenever the input values change, the value of the expressions are automatically recalculated and the DOM is updated with their values. The concept behind this is “two-way data binding”.
一个过滤器可以把表达式所表达的内容格式化之后展示给用户。上面例子里,过滤器currency把一个数字格式化成了钱钱的样子。
Angular的犀利之处在于它提供动态绑定:
只要数据变了,表达式就会自动被重新计算,再通过更新DOM来展示出来。这就是(传说中的)“双向数据绑定”的概念。
Adding UI logic: Controllers
html:
 1 <!DOCTYPE html>
 2 <html>
 3 <head>
 4     <meta charset="UTF-8">
 5     <script src="../../angularjs1.3.15/angular.min.1.3.15.js"></script>
 6     <script src="invoice1.js"></script>
 7     <title>Adding UI logic: Controllers</title>
 8 </head>
 9 <body>
10 <div ng-app="invoice1" ng-controller="InvoiceController as invoice">
11     <b>Invoice:</b>
12
13     <div>
14         Quantity: <input type="number" min="0" ng-model="invoice.qty" required>
15     </div>
16     <div>
17         Costs: <input type="number" min="0" ng-model="invoice.cost" required>
18         <select ng-model="invoice.inCurr">
19             <option ng-repeat="c in invoice.currencies">{{c}}</option>
20         </select>
21     </div>
22     <div>
23         <b>Total:</b>
24     <span ng-repeat="c in invoice.currencies">
25       {{invoice.total(c) | currency:c}}
26     </span>
27         <button class="btn" ng-click="invoice.pay()">Pay</button>
28     </div>
29 </div>
30 </body>
31 </html>
JavaScript (invoice1.js):
angular.module(‘invoice1‘, [])
    .controller(‘InvoiceController‘, function () {
        this.qty = 1;
        this.cost = 2;
        this.inCurr = ‘EUR‘;
        this.currencies = [‘USD‘, ‘EUR‘, ‘CNY‘];
        this.usdToForeignRates = {
            USD: 1,
            EUR: 0.74,
            CNY: 6.09
        };

        this.total = function total(outCurr) {
            return this.convertCurrency(this.qty * this.cost, this.inCurr, outCurr);
        };
        this.convertCurrency = function convertCurrency(amount, inCurr, outCurr) {
            return amount * this.usdToForeignRates[outCurr] / this.usdToForeignRates[inCurr];
        };
        this.pay = function pay() {
            window.alert("Thanks!");
        };
    });
What changed?
First, there is a new JavaScript file that contains a so-called “controller”. More exactly, the file contains a constructor function that creates the actual controller instance. The purpose of controllers is to expose variables and functionality to expressions and directives.
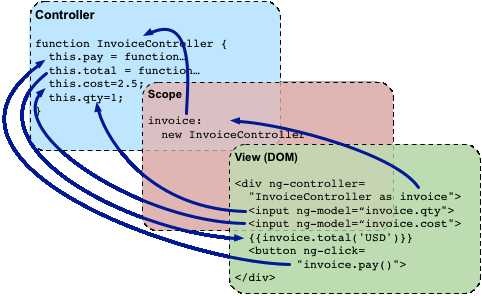
Besides the new file that contains the controller code, we also added an ng-controller directive to the HTML. This directive tells Angular that the new InvoiceController is responsible for the element with the directive and all the element’s children. The syntax InvoiceController as invoice tells Angular to instantiate the controller and save it in the variable invoice in the current scope.
这一次有什么改变呢?
首先,这次创建了个新JavaScript文件,其中包含一个所谓的“控制器”。也就是说,这个JavaScript文件包含一个构造函数,而正是这个构造函数会创建一个真正的控制器实例。控制器的目的就是把变量和方法暴露给表达式和指令来使用。
除了增加控制器代码的文件外,我们还在HTML理添加了一个ng-controller指令。这个指令告诉Angular,InvoiceController负责为这个元素和它的子元素里的指令服务(上面不是说了,控制器给表达式和指令提供变量和方法么)。InvoiceController as invoice这个语法同时还告诉Angular,创建一个InvoiceController的实例,并且在当前作用域里存储它的时候命名为invoice。

We also changed all expressions in the page to read and write variables within that controller instance by prefixing them with invoice. The possible currencies are defined in the controller and added to the template using ng-repeat. As the controller contains a total function we are also able to bind the result of that function to the DOM using {{invoice.total(...)}}.
Again, this binding is live, i.e. the DOM will be automatically updated whenever the result of the function changes. The button to pay the invoice uses the directive ngClick. This will evaluate the corresponding expression whenever the button is clicked.
其次,我们把所有表达式里用到的变量,都添加了控制器实例的前缀,这样变量就都是从控制器里获取了。例子里使用控制器中的变量和方法的有:
再次,这些绑定都是动态的,DOM会在函数结果变动之后自动更新。写着pay的按钮使用了ngClick指令,这个指令会在按钮被点击之后执行指定的函数。
(图还是看看好,万一真看懂了呢)
View-independent business logic: Services
Right now, the InvoiceController contains all logic of our example. When the application grows, it is good practice to move view-independent logic from the controller into a service, so it can be reused by other parts of the application as well. Later on, we could also change that service to load the exchange rates from the web.
独立于界面展示的业务逻辑:服务
现在,InvoiceController这个控制器包含所有的逻辑处理。随着应用越来越大,最好是把跟界面展示无关的逻辑放进服务(service)里,从而在应用的其他部分需要的时候,可以重复使用。
Let’s refactor our example and move the currency conversion into a service in another file:(重构代码,添加服务)
index.html:
 1 <!DOCTYPE html>
 2 <html>
 3 <head>
 4     <meta charset="UTF-8">
 5     <script src="../../angularjs1.3.15/angular.min.1.3.15.js"></script>
 6     <script src="invoice2.js"></script>
 7     <script src="finance2.js"></script>
 8     <title>Adding Service</title>
 9 </head>
10 <body>
11 <div ng-app="invoice2" ng-controller="InvoiceController as invoice">
12     <b>Invoice:</b>
13     <div>
14         Quantity: <input type="number" min="0" ng-model="invoice.qty" required >
15     </div>
16     <div>
17         Costs: <input type="number" min="0" ng-model="invoice.cost" required >
18         <select ng-model="invoice.inCurr">
19             <option ng-repeat="c in invoice.currencies">{{c}}</option>
20         </select>
21     </div>
22     <div>
23         <b>Total:</b>
24     <span ng-repeat="c in invoice.currencies">
25       {{invoice.total(c) | currency:c}}
26     </span>
27         <button class="btn" ng-click="invoice.pay()">Pay</button>
28     </div>
29 </div>
30 </body>
finance2.js:
 1 angular.module(‘finance2‘, [])
 2     .factory(‘currencyConverter‘, function () {
 3         var currencies = [‘USD‘, ‘EUR‘, ‘CNY‘];
 4         var usdToForeignRates = {
 5             USD: 1,
 6             EUR: 0.74,
 7             CNY: 6.09
 8         };
 9         var convert = function (amount, inCurr, outCurr) {
10             return amount * usdToForeignRates[outCurr] / usdToForeignRates[inCurr];
11         };
12
13         return {
14             currencies: currencies,
15             convert: convert
16         };
17     });
invoice2.js:
angular.module(‘invoice2‘, [‘finance2‘])
    .controller(‘InvoiceController‘, [‘currencyConverter‘, function (currencyConverter) {
        this.qty = 1;
        this.cost = 2;
        this.inCurr = ‘EUR‘;
        this.currencies = currencyConverter.currencies;

        this.total = function total(outCurr) {
            return currencyConverter.convert(this.qty * this.cost, this.inCurr, outCurr);
        };
        this.pay = function pay() {
            window.alert("Thanks!");
        };
    }]);
What changed?
We moved the convertCurrency function and the definition of the existing currencies into the new file finance2.js. But how does the controller get a hold of the now separated function?
我们把一些函数和变量的定义移动到了finance2.js里。但是,控制器怎么去获取它们呢?(都跑别的文件里了的说)
This is where “Dependency Injection” comes into play. Dependency Injection (DI) is a software design pattern that deals with how objects and functions get created and how they get a hold of their dependencies. Everything within Angular (directives, filters, controllers, services, ...) is created and wired using dependency injection. Within Angular, the DI container is called the “injector”.
这个时候就轮到“依赖注入”出场了。依赖注入是一种设计模式,它控制对象和方法的创建,以及它们如何获取它们的依赖项。Angular中的所有内容(指令,过滤器,控制器,服务,…)都是使用依赖注入创建并串起来的。在Angular里,依赖注入的容器叫做“注入器”。
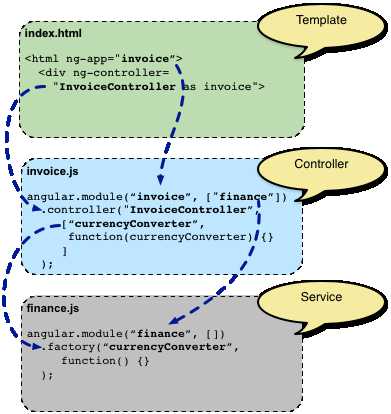
To use DI, there needs to be a place where all the things that should work together are registered. In Angular, this is the purpose of the so-called “modules”. When Angular starts, it will use the configuration of the module with the name defined by the ng-app directive including the configuration of all modules that this module depends on.
要使用DI,首先要有个地方把所有要用到的组件登记一下(不然Angular怎么给你创建,供你使用?)。在Angular里,完成这个工作的家伙叫做“模块”。当Angular启动的时候,它会根据ng-app找到入口模块并去载配置,也包括入口模块所依赖的其他模块的配置。(废话,不加载怎么玩?)
In the example above: The template contains the directive ng-app=”invoice2”. This tells Angular to use the invoice2 module as the main module for the application. The code snippet angular.module(‘invoice2’, [‘finance2’]) specifies that the invoice2 module depends on the finance2 module. By this, Angular uses the InvoiceController as well as the currencyConverter service.
在上例中,模板里包含这样一个指令ng-app=”invoice2”。这个指令告诉Angular去用invoice2这个模块作为这个应用的主模块。angular.module(‘invoice2’, [‘finance2’])则指明invoice2依赖于finance2这个模块。由此,Angular使用InvoiceController这个控制器和currencyConverter这个服务。
Now that Angular knows of all the parts of the application, it needs to create them. In the previous section, we saw that controllers are created using a factory function. For services there are multiple ways to define their factory. In the example above, we are using a function that returns the currencyConverter function as the factory for the service.
Angular在前面提到的注入之后,对应用的每一部分都知道怎么加载,它现在就要创建这些部分了。前面的例子里我们看到,控制器是被一个工厂函数创建的,而要加载服务,我们有很多种方法去定义它们的加载工厂函数。上例中,我们(这里我实在翻不下去了)
Back to the initial question: How does the InvoiceController get a reference to the currencyConverter function? In Angular, this is done by simply defining arguments on the constructor function. With this, the injector is able to create the objects in the right order and pass the previous created objects into the factories of the objects that depend on them. In our example, the InvoiceController has an argument named currencyConverter. By this, Angular knows about the dependency between the controller and the service and calls the controller with the service instance as argument.
那么问题又来了:我们怎么在InvoiceController里拿currencyConverter(的引用)?(毕竟这次不是在自己内部,随便调用,而是依赖注入进来的,注入完怎么用?)在Angular里,这个很简单的,只要在构造函数上加个参数就可以了。只要你敢加参,注入器就敢按套路给你把全部依赖的对象创建出来,并传递给依赖它们的对象。我们的例子里,InvoiceController就有个参数叫currencyConverter。你这么一传,Angular就知道这个控制器是依赖那个服务的,它调用这个控制器的时候,就把依赖的服务(的实例)作为参数传了进去。
The last thing that changed in the example between the previous section and this section is that we now pass an array to the module.controller function, instead of a plain function. The array first contains the names of the service dependencies that the controller needs. The last entry in the array is the controller constructor function. Angular uses this array syntax to define the dependencies so that the DI also works after minifying the code, which will most probably rename the argument name of the controller constructor function to something shorter like a.
我再说最后一个这个例子跟上个例子的不同。那就是这次我们把一个array传给了module.controller,而不是只传一个函数。为啥呢?因为这个array里面前面的东西,都是最后这个控制器所依赖的服务的名字。只有array最后一项才是真正的构造函数。Angular这样定义依赖的关系,就可以在代码被压缩之后,还可以正常使用依赖注入。毕竟,压缩后的代码,参数名都变成了a啊b啊c啊什么的,让依赖注入去注入这些乱七八糟的东西,它也做不到啊。(可你用string这种东西注入,显然压缩之后,值也不会变的)
(上面这段可以就着这个图来看)

标签:
原文地址:http://www.cnblogs.com/amile1860/p/4518302.html