标签:
//
//  ViewController.m
//  UITableView
//
//  Created by City--Online on 15/5/21.
//  Copyright (c) 2015年 XQB. All rights reserved.
//

#import "ViewController.h"

@interface ViewController ()<UITableViewDataSource,UITableViewDelegate>
@property(nonatomic,strong) UITableView *tableView;
@end

@implementation ViewController

- (void)viewDidLoad {
    [super viewDidLoad];
    _tableView=[[UITableView alloc]initWithFrame:self.view.bounds style:UITableViewStylePlain];
    _tableView.delegate=self;
    _tableView.dataSource=self;
    _tableView.separatorInset=UIEdgeInsetsZero;
    _tableView.separatorStyle=UITableViewCellSeparatorStyleSingleLine;
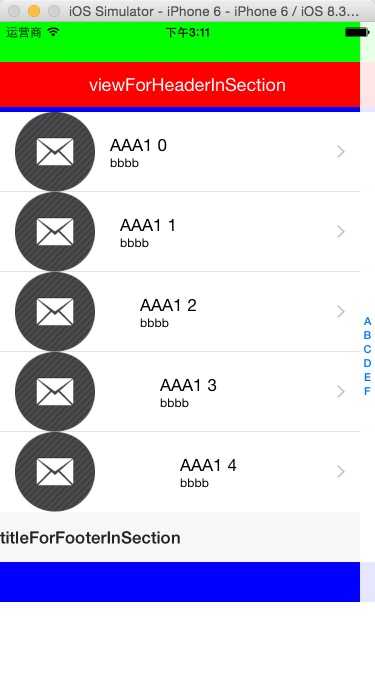
    UIView *v=[[UIView alloc]initWithFrame:CGRectMake(0, 0, self.view.bounds.size.width, 40)];
    v.backgroundColor=[UIColor greenColor];
    UIView *v1=[[UIView alloc]initWithFrame:CGRectMake(0, 0, self.view.bounds.size.width, 40)];
    v1.backgroundColor=[UIColor blueColor];
     _tableView.tableHeaderView=v;
    _tableView.tableFooterView=v1;
    [self.view addSubview:_tableView];
}
//UITableViewDataSource

//节数
-(NSInteger)numberOfSectionsInTableView:(UITableView *)tableView
{
    return 3;
}
//单元格
- (UITableViewCell *)tableView:(UITableView *)tableView cellForRowAtIndexPath:(NSIndexPath *)indexPath
{
    static NSString *Identifier=@"Identifier";
    UITableViewCell *cell=[tableView dequeueReusableCellWithIdentifier:Identifier];
    if (!cell) {
        cell=[[UITableViewCell alloc]initWithStyle:UITableViewCellStyleSubtitle reuseIdentifier:Identifier];
    }
    if (indexPath.row%2) {
        cell.textLabel.text=[NSString stringWithFormat:@"AAA%@ %ld",@"1",indexPath.row];

    }
    else
    {
        cell.textLabel.text=[NSString stringWithFormat:@"AAA%@ %ld",@"1",indexPath.row];
    }

    cell.detailTextLabel.text=@"bbbb";
    cell.imageView.image=[UIImage imageNamed:@"email.png"];
    return cell;
}
//每节的行数
- (NSInteger)tableView:(UITableView *)tableView numberOfRowsInSection:(NSInteger)section
{
    return 5;
}
//section头标题
- (NSString *)tableView:(UITableView *)tableView titleForHeaderInSection:(NSInteger)section
{
    return @"titleForHeaderInSection";
}
//section尾标题 viewForFooterInSection设为nil时显示,否则不显示
- (NSString *)tableView:(UITableView *)tableView titleForFooterInSection:(NSInteger)section
{
    return @"titleForFooterInSection";
}
// 指定行的可编辑状态
- (BOOL)tableView:(UITableView *)tableView canEditRowAtIndexPath:(NSIndexPath *)indexPath
{
    return YES;
}
//编辑行的可移动状态
- (BOOL)tableView:(UITableView *)tableView canMoveRowAtIndexPath:(NSIndexPath *)indexPath
{
    return YES;
}
//返回分区索引的名称,使用此方法会在表视图右侧创建一个索引栏,通过点击索引可以快速跳转到指定分区
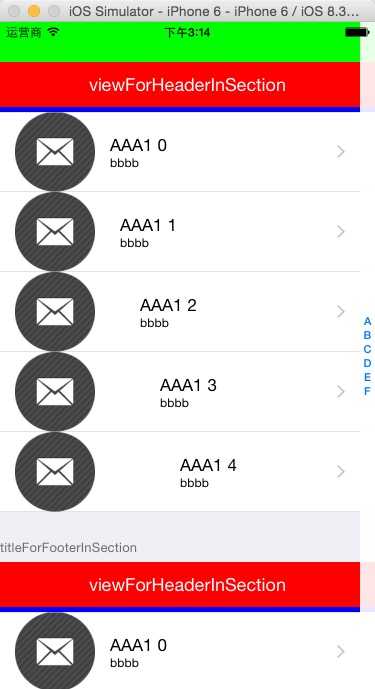
- (NSArray *)sectionIndexTitlesForTableView:(UITableView *)tableView
{
    return @[@"A",@"B",@"C",@"D",@"E",@"F"];
}
//点击索引栏会调用此事件,通过点击的标题与索引返回分区的索引。简单来说,就是设定点击右侧索引栏会跳转到的分区,如return 0,那么无论点击什么,都会跳转到分区0
- (NSInteger)tableView:(UITableView *)tableView sectionForSectionIndexTitle:(NSString *)title atIndex:(NSInteger)index
{
    NSLog(@"%@",title);
    return index;
}
//要求数据源提交插入或者删除指定行的事件。即每次删除或者插入完成后都会响应该方法,commitEditingStyle参数标识此次操作是UITableViewCellEditingStyleInsert(插入)or UITableViewCellEditingStyleDelete(删除)
- (void)tableView:(UITableView *)tableView commitEditingStyle:(UITableViewCellEditingStyle)editingStyle forRowAtIndexPath:(NSIndexPath *)indexPath
{
    NSLog(@"tableView commitEditingStyle forRowAtIndexPath");
}
//移动行之后调用的方法,可以在里面设置表视图数据list的一些操作
- (void)tableView:(UITableView *)tableView moveRowAtIndexPath:(NSIndexPath *)sourceIndexPath toIndexPath:(NSIndexPath *)destinationIndexPath
{

    NSLog(@"moveRowAtIndexPath=%ld  toIndexPath=%ld",sourceIndexPath.row,destinationIndexPath.row);
}


//UITableViewDelegate

//即将显示UITableViewCell时调用
-(void)tableView:(UITableView *)tableView willDisplayCell:(UITableViewCell *)cell forRowAtIndexPath:(NSIndexPath *)indexPath
{
    if ([cell respondsToSelector:@selector(setSeparatorInset:)]) {
        [cell setSeparatorInset:UIEdgeInsetsZero];
    }
    // UIView默认的layoutMargins的值为 {8, 8, 8, 8}.在我们改变View的layoutMargins这个属性时,会触发- (void)layoutMarginsDidChange这个方法。我们在自己的View里面可以重写这个方法来捕获layoutMargins的变化。在大多数情况下,我们可以在这个方法里触发drawing和layout的Update。preservesSuperviewLayoutMargins这个属性默认是NO。如果把它设为YES,layoutMargins会根据屏幕中相关View的布局而改变。
#ifdef __IPHONE_8_0
    if ([cell respondsToSelector:@selector(setLayoutMargins:)]) {
        [cell setLayoutMargins:UIEdgeInsetsZero];
    }

    if([cell respondsToSelector:@selector(setPreservesSuperviewLayoutMargins:)]){
        [cell setPreservesSuperviewLayoutMargins:NO];
    }
#endif
}
//即将显示节头时显示
- (void)tableView:(UITableView *)tableView willDisplayHeaderView:(UIView *)view forSection:(NSInteger)section
{
//    UITableViewCell *cell=(UITableViewCell *)view;
//    cell.contentView.backgroundColor=[UIColor blueColor];
    view.backgroundColor=[UIColor blueColor];
    NSLog(@"willDisplayHeaderView");
    return ;
}
//即将显示节尾时显示
- (void)tableView:(UITableView *)tableView willDisplayFooterView:(UIView *)view forSection:(NSInteger)section
{

//    UITableViewCell *cell=(UITableViewCell *)view;
//    cell.contentView.backgroundColor=[UIColor redColor];
    view.backgroundColor=[UIColor redColor];
    NSLog(@"willDisplayFooterView");
    return;
}
//UITableViewCell显示完成
- (void)tableView:(UITableView *)tableView didEndDisplayingCell:(UITableViewCell *)cell forRowAtIndexPath:(NSIndexPath*)indexPath
{
    NSLog(@"didEndDisplayingCell");
    return;
}
//节的HeaderView显示完成
- (void)tableView:(UITableView *)tableView didEndDisplayingHeaderView:(UIView *)view forSection:(NSInteger)section
{
    NSLog(@"didEndDisplayingHeaderView");
    return;
}
//节的FooterView显示完成
- (void)tableView:(UITableView *)tableView didEndDisplayingFooterView:(UIView *)view forSection:(NSInteger)section
{
    NSLog(@"didEndDisplayingFooterView");
    return;
}
//indexPath对应行的高度
- (CGFloat)tableView:(UITableView *)tableView heightForRowAtIndexPath:(NSIndexPath *)indexPath
{
    return 80;
}
//section对应HeaderView的高度
- (CGFloat)tableView:(UITableView *)tableView heightForHeaderInSection:(NSInteger)section
{
    return 50;
}
//section对应的FooterView的高度
- (CGFloat)tableView:(UITableView *)tableView heightForFooterInSection:(NSInteger)section
{
    return 50;
}
//在每次 reload tableview 的时候,程序会先计算出每一个 cell 的高度,等所有高度计算完毕,确定了 tableview 的总的高度后,才开始渲染视图并显示在屏幕上。这意味着在显示 table view 之前需要执行一堆的计算,并且这是在主线程中进行的,如果计算量太大程序就很有可能出现卡顿感 .这个方法用于返回一个 cell 的预估高度,如果在程序中实现了这个方法,tableview 首次加载的时候就不会调用heightForRowAtIndexPath 方法,而是用 estimatedHeightForRowAtIndexPath 返回的预估高度计算 tableview 的总高度,然后 tableview 就可以显示出来了,等到 cell 可见的时候,再去调用heightForRowAtIndexPath 获取 cell 的正确高度
- (CGFloat)tableView:(UITableView *)tableView estimatedHeightForRowAtIndexPath:(NSIndexPath *)indexPath
{
    return 40;
}
- (CGFloat)tableView:(UITableView *)tableView estimatedHeightForHeaderInSection:(NSInteger)section
{
    return 60;
}
- (CGFloat)tableView:(UITableView *)tableView estimatedHeightForFooterInSection:(NSInteger)section
{
    return 60;
}

- (UIView *)tableView:(UITableView *)tableView viewForHeaderInSection:(NSInteger)section
{
    UIView *v=[[UIView alloc]initWithFrame:CGRectMake(0, 0, self.view.bounds.size.width, 45)];
    v.backgroundColor = [UIColor purpleColor];
    UIButton *btn=[[UIButton alloc] initWithFrame:v.bounds];
    btn.backgroundColor=[UIColor redColor];
    [btn setTitle:@"viewForHeaderInSection" forState:UIControlStateNormal];
    [v addSubview:btn];
    return v;
}
//由于返回的是nil所以- (void)tableView:(UITableView *)tableView willDisplayFooterView:(UIView *)view forSection:(NSInteger)section设置View属性是没用的
- (UIView *)tableView:(UITableView *)tableView viewForFooterInSection:(NSInteger)section
{
    return nil;
}
//显示辅助视图类型 Cell右边的
- (UITableViewCellAccessoryType)tableView:(UITableView *)tableView accessoryTypeForRowWithIndexPath:(NSIndexPath *)indexPath
{
//    typedef NS_ENUM(NSInteger, UITableViewCellAccessoryType) {
//        UITableViewCellAccessoryNone,                   // don‘t show any accessory view
//        UITableViewCellAccessoryDisclosureIndicator,    // regular chevron. doesn‘t track  点击不响应accessoryButtonTappedForRowWithIndexPath方法
//        UITableViewCellAccessoryDetailDisclosureButton, // info button w/ chevron. tracks  点击响应accessoryButtonTappedForRowWithIndexPath方法
//        UITableViewCellAccessoryCheckmark,              // checkmark. doesn‘t track         点击不响应accessoryButtonTappedForRowWithIndexPath方法
//        UITableViewCellAccessoryDetailButton NS_ENUM_AVAILABLE_IOS(7_0) // info button. tracks   点击响应accessoryButtonTappedForRowWithIndexPath方法
//    };
    return UITableViewCellAccessoryDisclosureIndicator;
}
//上面辅助视图点击响应方法
- (void)tableView:(UITableView *)tableView accessoryButtonTappedForRowWithIndexPath:(NSIndexPath *)indexPath
{
    NSLog(@"accessoryButtonTappedForRowWithIndexPath=%ld",indexPath.row);
}
//是否开启点击高亮显示
- (BOOL)tableView:(UITableView *)tableView shouldHighlightRowAtIndexPath:(NSIndexPath *)indexPath
{
    return YES;
}
//图的指定行被高亮显示
- (void)tableView:(UITableView *)tableView didHighlightRowAtIndexPath:(NSIndexPath *)indexPath
{
    NSLog(@"didHighlight=%ld",indexPath.row);
}
//视图的指定行不在高亮显示,一般是点击其他行的时候
- (void)tableView:(UITableView *)tableView didUnhighlightRowAtIndexPath:(NSIndexPath *)indexPath
{
     NSLog(@"didUnhighlight=%ld",indexPath.row);
}
//即将选中行的indexPath,返回nil时不执行didSelectRowAtIndexPath方法
- (NSIndexPath *)tableView:(UITableView *)tableView willSelectRowAtIndexPath:(NSIndexPath *)indexPath
{
     NSLog(@"willSelectRowAtIndexPath=%ld",indexPath.row);
    return indexPath;
}
//选中行触发
- (void)tableView:(UITableView *)tableView didSelectRowAtIndexPath:(NSIndexPath *)indexPath
{
    NSLog(@"didSelectRowAtIndexPath=%ld",indexPath.row);

}
//即将取消选中的行返回nil时不执行didDeselectRowAtIndexPath方法
- (NSIndexPath *)tableView:(UITableView *)tableView willDeselectRowAtIndexPath:(NSIndexPath *)indexPath
{
    NSLog(@"willDeselectRowAtIndexPath=%ld",indexPath.row);
    return indexPath;
}
//取消选中时出发
- (void)tableView:(UITableView *)tableView didDeselectRowAtIndexPath:(NSIndexPath *)indexPath
{
    NSLog(@"didDeselectRowAtIndexPath=%ld",indexPath.row);

}
//对当前行设置编辑模式,删除、插入或者不可编辑
- (UITableViewCellEditingStyle)tableView:(UITableView *)tableView editingStyleForRowAtIndexPath:(NSIndexPath *)indexPath
{
    return UITableViewCellEditingStyleDelete;
}
//在删除模式启动下,改变每行删除按钮的文字(默认为“Delete”)
- (NSString *)tableView:(UITableView *)tableView titleForDeleteConfirmationButtonForRowAtIndexPath:(NSIndexPath *)indexPath
{
    return @"删除";
}
- (void)didReceiveMemoryWarning {
    [super didReceiveMemoryWarning];
    // Dispose of any resources that can be recreated.
}
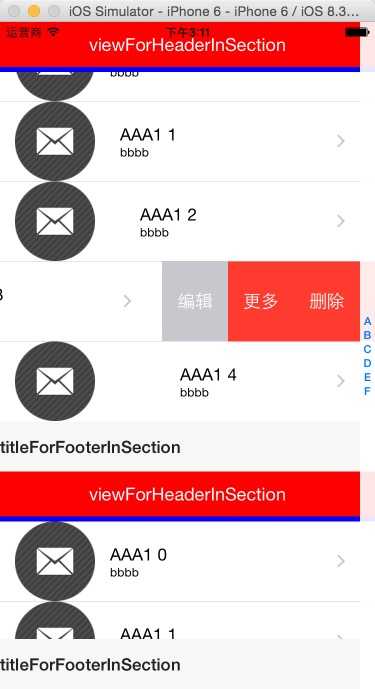
//滑动手势删除某一行时显示更多按钮 IOS8
- (NSArray *)tableView:(UITableView *)tableView editActionsForRowAtIndexPath:(NSIndexPath *)indexPath
{
    UITableViewRowAction *deleteRowAction=[UITableViewRowAction rowActionWithStyle:UITableViewRowActionStyleDestructive title:@"删除" handler:^(UITableViewRowAction *action, NSIndexPath *indexPath) {
        NSLog(@"点击删除");
    }];
    UITableViewRowAction *moreRowAction=[UITableViewRowAction rowActionWithStyle:UITableViewRowActionStyleDefault title:@"更多" handler:^(UITableViewRowAction *action, NSIndexPath *indexPath) {
        NSLog(@"点击更多");
    }];
    UITableViewRowAction *editRowAction=[UITableViewRowAction rowActionWithStyle:UITableViewRowActionStyleNormal title:@"编辑" handler:^(UITableViewRowAction *action, NSIndexPath *indexPath) {
        NSLog(@"点击编辑");
    }];
    return @[deleteRowAction,moreRowAction,editRowAction];

}
//在编辑模式下是否需要对表视图指定行进行缩进,NO为关闭缩进,这个方法可以用来去掉move时row前面的空白
- (BOOL)tableView:(UITableView *)tableView shouldIndentWhileEditingRowAtIndexPath:(NSIndexPath *)indexPath
{
    return YES;
}
//表视图将要被编辑(删除或者插入,而是不是编辑cell文字哦)
- (void)tableView:(UITableView*)tableView willBeginEditingRowAtIndexPath:(NSIndexPath *)indexPath
{
    NSLog(@"willBeginEditingRowAtIndexPath");

}
//表视图完成编辑
- (void)tableView:(UITableView*)tableView didEndEditingRowAtIndexPath:(NSIndexPath *)indexPath
{
    NSLog(@"didEndEditingRowAtIndexPath");
}
//移动行的过程中会多次调用此方法,返回值代表进行移动操作后回到的行,如果设置为当前行,则不论怎么移动都会回到当前行
- (NSIndexPath *)tableView:(UITableView *)tableView targetIndexPathForMoveFromRowAtIndexPath:(NSIndexPath *)sourceIndexPath toProposedIndexPath:(NSIndexPath *)proposedDestinationIndexPath
{
    return proposedDestinationIndexPath;
}
//设置内容缩进
- (NSInteger)tableView:(UITableView *)tableView indentationLevelForRowAtIndexPath:(NSIndexPath *)indexPath
{
    return indexPath.row*2+10;
}
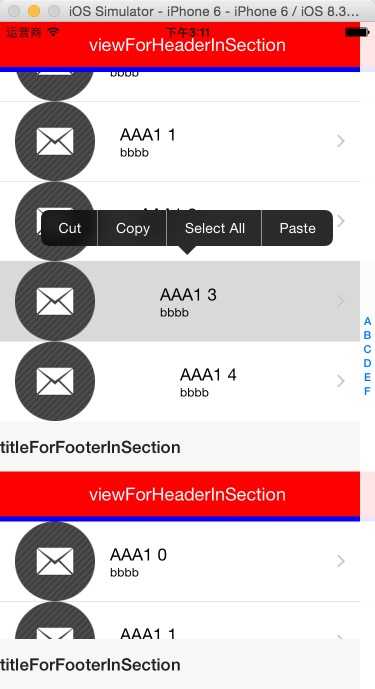
//是否在指定行显示菜单,返回值为YES时,长按显示菜单
- (BOOL)tableView:(UITableView *)tableView shouldShowMenuForRowAtIndexPath:(NSIndexPath *)indexPath
{
    return YES;
}
//弹出选择菜单时会调用此方法(复制、粘贴、全选、剪切)
- (BOOL)tableView:(UITableView *)tableView canPerformAction:(SEL)action forRowAtIndexPath:(NSIndexPath *)indexPath withSender:(id)sender
{
    NSLog(@"tableView canPerformAction forRowAtIndexPath withSender");
    return YES;
}
//选择菜单项完成之后调用此方法
- (void)tableView:(UITableView *)tableView performAction:(SEL)action forRowAtIndexPath:(NSIndexPath *)indexPath withSender:(id)sender
{
    NSLog(@"tableView performAction forRowAtIndexPath withSender %ld",indexPath.row);
}
@end


上面在设置tableView的表头和表尾时,若用同一个View则不能正常显示,这个还没明白为神马,如果有哪位大神看到此博客知道原因请留言,谢谢!!
标签:
原文地址:http://www.cnblogs.com/cuiyw/p/4522426.html